Dark Base Pro 900 Water Cooling Build (Updated: 01/12/2020 - Phase 4)

Associate
Joined
28 Sep 2007
Posts
163

[Updated to Phase 4]
See latest post here: Dark Base Pro 900 Water Cooling Build (Updated: 01/12/2020 - Phase 4)

Hi all!

So I've been itching to try my hand at a hard tube custom water cooling loop and decided to upgrade my PC at the same time for this momentous occasion!

Upon seeing iiNNeX's post and all the lovely watercooled cases in the gallery thread I figured that I too should show off my efforts and get some feedback!

So here we go! - Totally unofficial parts breakdown list a la iiNNeX inspiration:

Hardware:
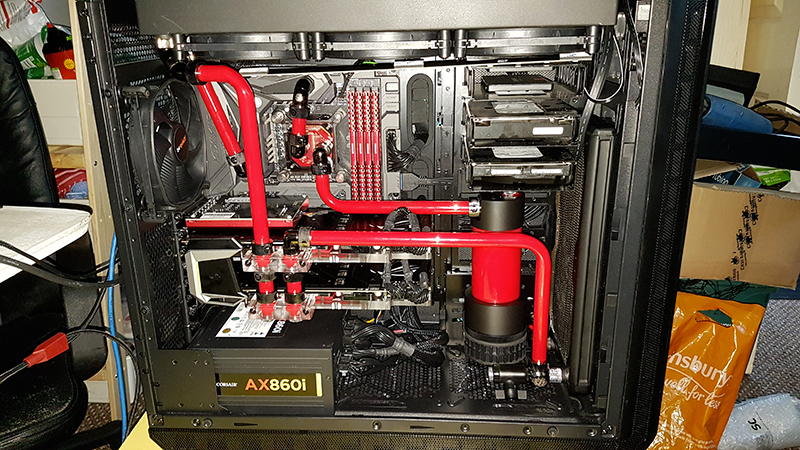
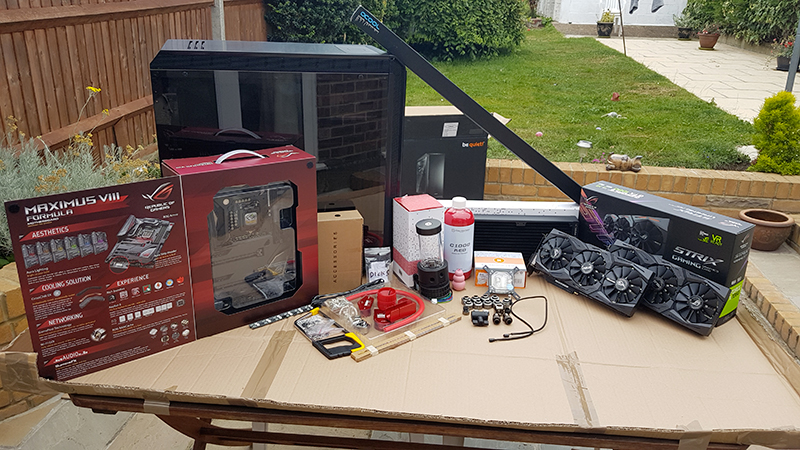
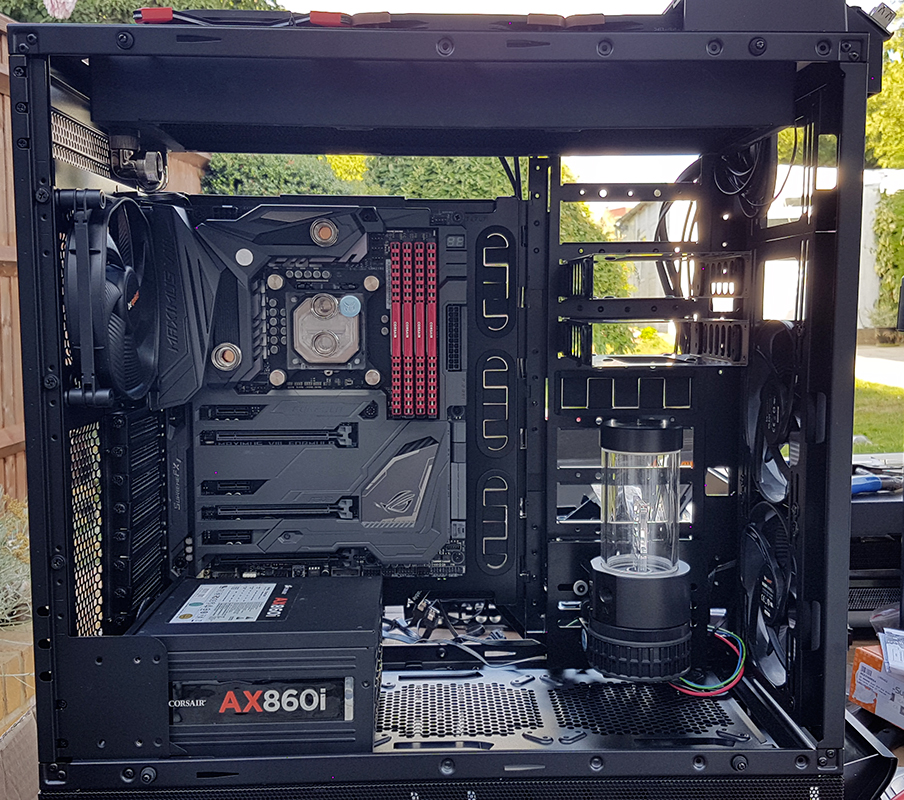
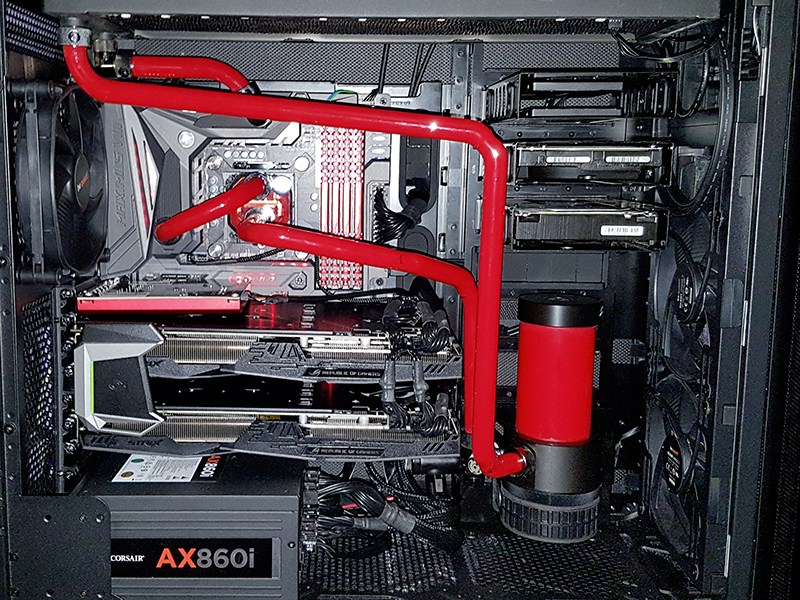
Be Quiet! Dark Base Pro 900 purchased
Intel i7 6700k processor purchased
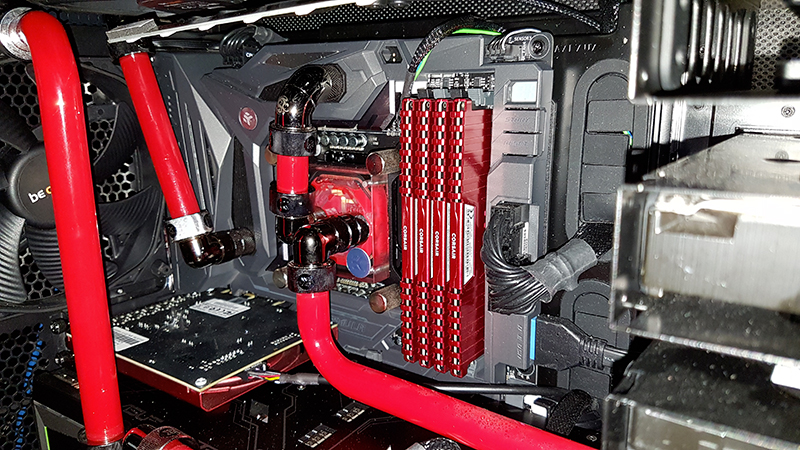
Asus Formula VIII Z170 RGB Motherboard purchased
Corsair Vengeance LPX 32GB kit (4x8GB) @ 3000mhz CAS-15 DDR4 memory purchased
Samsung 950 Pro 512GB M.2 NVME SSD purchased
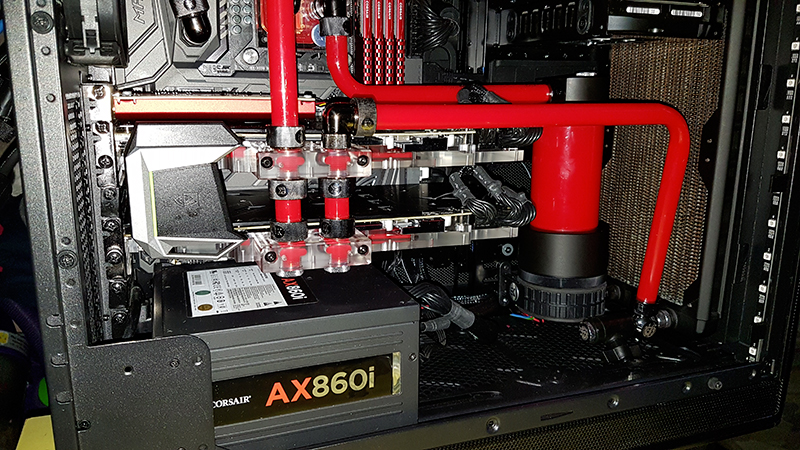
2x ASUS ROG STRIX GTX 1080 purchased

List of Water Cooling components chosen:
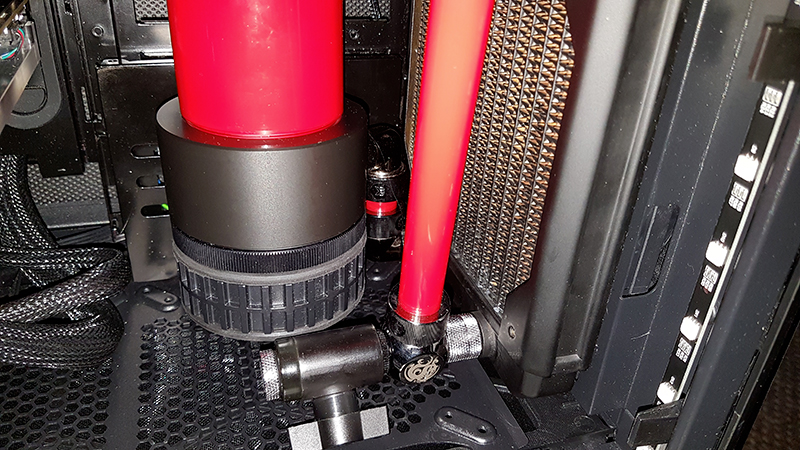
Pump/Res:
EK-XRES 140 Revo inc. D5 PWM pump (pump/res combo) purchased
EK Water Blocks EK-RES X3 - Internal Tube 12/16 - 40mm purchased
EK-RES X3 - Multiport TOP purchased (provides fill port access)

Blocks:
EK Water Blocks EK-Supremacy EVO - Acetal + Nickel CSQ purchased purchased
2x Bitspower Nvidia GTX 1080 ROG STRIX Acrylic (Clear) purchased
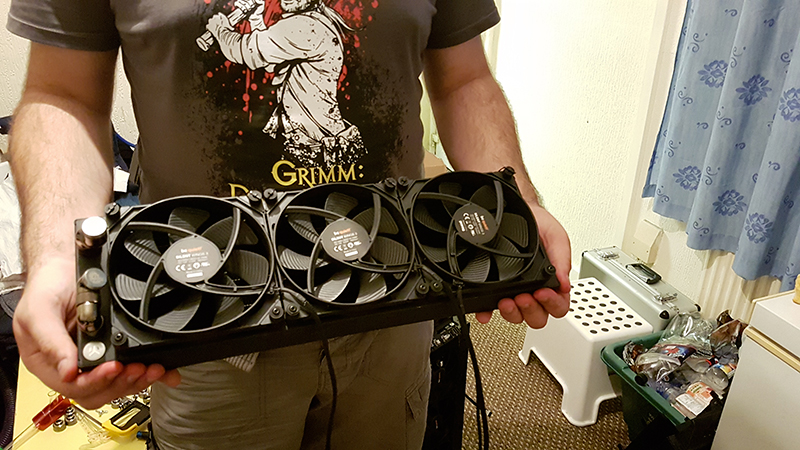
Radiators/Fans:
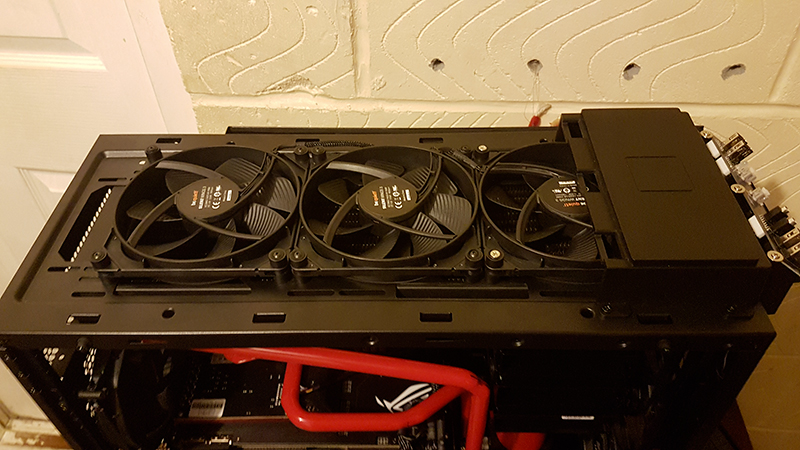
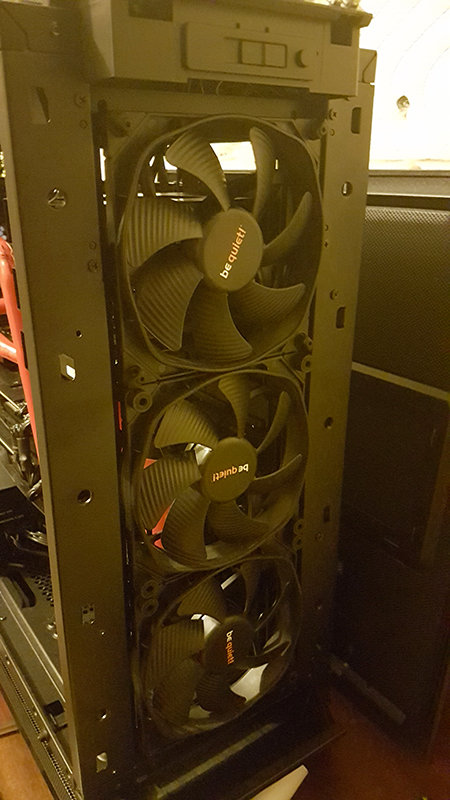
EK-CoolStream CE 420 (Triple) purchased
6x Be Quiet! Silent Wings 3 140mm PWM High Speed Fans (push/pull) purchased

HWLabs Black Ice Nemesis GTS 280 (Double) purchased
2x Be Quiet! Silent Wings 3 140mm PWM High Speed Fans (push)purchased

Fittings/Tubing:
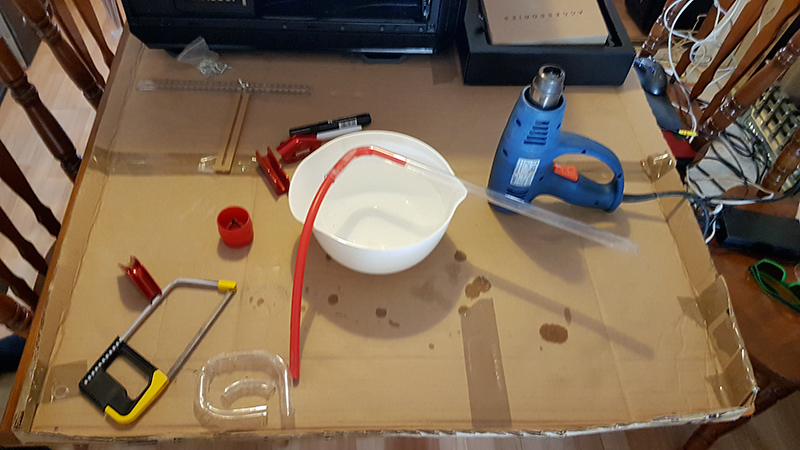
8x Alphacool Eisrohr 16/13mm PETG HardTube 80cm purchased
20x EK-HDC Fitting 16mm G1/4 - Black Nickel purchased
Other various 90/45/misc fittings from Bitspower in Black Sparkle purchased

Coolant:
Thermaltake C1000 RED Opaque Coolant purchased

Drainage system:
EK-AF Ball Valve (10mm) G1/4 purchased
Bitspower Q fitting to split off from main loop
Bitspower Stopper/Plug for Ball Valve end

So that's the kit I've sourced for my build! and yes it is a complete coincidence that I happen to have a lot of the same kit that iiNNeX is rocking, I built my loop a month before I saw any of these posts! :o

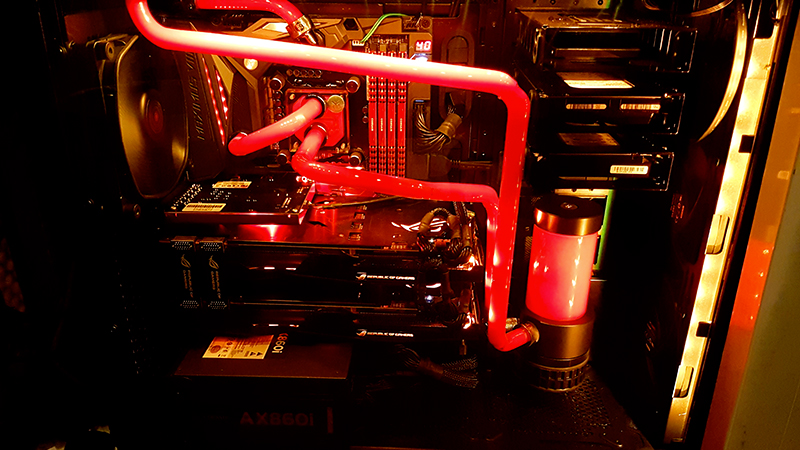
Please see the post below for some pictures of the build in it's current state. - all feedback is appreciated!
 
Last edited:
Associate
OP
Joined
28 Sep 2007
Posts
163
Parts list all splayed out ready to go ;D
drazek-pc-parts-list.jpg


Took us forever to figure out the best way to mount that Pump/Res combo:
drazek-pc-mounting-hardware.jpg


I must have ruined about 6 bends before finally getting my first perfect bend!
drazek-pc-bending-pipes.jpg


Here are all the lovely new silent fans:
drazek-pc-top-rad-fans.jpg


And here's the additional fan controller I installed to drive the radiator fans:
drazek-pc-front-rad-fans.jpg
drazek-pc-fan-controllers.jpg


Phase 1 complete! - I could have done better with the pipes, this was a massive learning experience, but I still love it!
drazek-cpu-custom-watercooling.jpg


Bonus Pic: it's all lit up! - unfortunately you can't see the lights all that great, but I opted for 'Orange' LEDs on the Dark Base Pro case as I found the orange made my red fluid light up quite nicely.
drazek-pc-lights.jpg


Those Benchmarks!!! :eek:
FireStrike-Benchmark.jpg


TimeSpy-Benchmark.jpg


You may have noticed that I don't have the GPUs watercooled yet in these images - that's because I decided to try only cooling the CPU at first as this was my first time doing a hard tube water cooling loop and the first time doing a custom water cooling loop in about 12 years! (so much has changed since then).

So the GPUs will be part of Phase 2: Return of the custom loop!
I'm just waiting for the final parts to arrive and then i'll get to adding the GPU blocks and front radiator to the system,.. and probably redo some (all?) of those tubes!

Lessons Learned during this project:

1. Always buy more tube and more fittings than you think you need - the amount of times I said to myself "argh! if I only had another 90 degree fitting!" ..
2. Bending PETG is harder than it looks; the biggest advise I can give is "Be Patient!" do not heat the tube on max temp really fast, you will cook and bubble it before you know, but at the same time do not try to force the bend if the tube is too cold, you'll just cause a crease/kink on the inside of the bend. - practice, practice, practice! (hence why you need tons of extra tube)
3. Don't use marker pen to 'mark' your bends on the tube ... it doesn't come off! (this was white board pen) - or at the very least, wipe off the marker BEFORE you start heating the pipe. *rolls eyes*
4. Don't forget to plan for a drainage system and a fill port (I forgot both... luckily I was able to get a ball valve on short notice, but it's not exactly where I would have preferred it to be... will fix in phase 2!)
 
Last edited:
Associate
Joined
17 Jul 2015
Posts
1,206
Really looking forward to this as I've just got this case and am thinking of doing a watercooled build in the future :)
 
Associate
Joined
13 Feb 2014
Posts
1,130
I like the colour!

I have the same MB as you, lovely isn't it :)

#I don't have the balls to do hardline (But then I take my pc to bits about every 7 days so be a nightmare!)
 
Associate
OP
Joined
28 Sep 2007
Posts
163
So how quiet is it? Can you hear the pump at all?

Hi Bone9 - it's as silent as the night sky... - as long as I keep the 'high speed' fans at 1000 rpm or lower, I can't hear it at all. dead silent under my desk.

even at max speed, 1600rpm fans, I can't hear the PC over my own mechanical keyboard...

The pump? silent at full speed.

I think part of it has to do with the really well padded case, this is a Be Quiet! case at the end of the day, and running 140mm 'silent' fans helps a hell of a lot too :)

I chose the radiators based on low fan RPM performance (optimised for 800 rpm), these rads don't require super high static pressure fans in order to perform their best.
 
Associate
Joined
17 Jul 2015
Posts
1,206
Hi Bone9 - it's as silent as the night sky... - as long as I keep the 'high speed' fans at 1000 rpm or lower, I can't hear it at all. dead silent under my desk.

even at max speed, 1600rpm fans, I can't hear the PC over my own mechanical keyboard...

The pump? silent at full speed.

I think part of it has to do with the really well padded case, this is a Be Quiet! case at the end of the day, and running 140mm 'silent' fans helps a hell of a lot too :)

I chose the radiators based on low fan RPM performance (optimised for 800 rpm), these rads don't require super high static pressure fans in order to perform their best.

Wow that sounds great! Would love to hear it, are you local to Suffolk at all?
 
Associate
OP
Joined
28 Sep 2007
Posts
163
Wow that sounds great! Would love to hear it, are you local to Suffolk at all?

Surrey, closer to Epsom.

I want your motherboard.

Those GPUs are screaming for water!

Haha, you're not wrong!! with this hot weather, those cards sometimes get as high as 80c! and I have to shove all my intake/exhaust fans to 100% to knock them back down to 65-70c

but I've litterally today just received all the extra parts necessary to watercool the GPUs :) I'll be running the Bitpower GPU water blocks because they are compatible with the stock ASUS back plates (which I love the look of!) which means I get to keep my yummy RGB LED effects ;D

Expect some picture updates in about 1+1/2 weeks time, i'll be heading to EGX first on Thursday and then doing the GPU upgrade over the weekend.
 
Associate
Joined
18 Sep 2016
Posts
6
Hi,

I'm busy doing my first ever build and I'm still at the stage of trying to work out what I want. I already have the same case. I bow to someone further down the path as I am currently drowning in the research stage :D

This thread helped.
 
Associate
OP
Joined
28 Sep 2007
Posts
163
Hi,

I'm busy doing my first ever build and I'm still at the stage of trying to work out what I want. I already have the same case. I bow to someone further down the path as I am currently drowning in the research stage :D

This thread helped.

Glad I could help uthikoloshe! :) - I'm still due to perform my second stage water cooling loop this weekend, so stay tuned for some updates!
 
Associate
Joined
1 Jun 2016
Posts
486
Location
Cambridge
Surrey, closer to Epsom.


Haha, you're not wrong!! with this hot weather, those cards sometimes get as high as 80c! and I have to shove all my intake/exhaust fans to 100% to knock them back down to 65-70c

but I've litterally today just received all the extra parts necessary to watercool the GPUs :) I'll be running the Bitpower GPU water blocks because they are compatible with the stock ASUS back plates (which I love the look of!) which means I get to keep my yummy RGB LED effects ;D

Expect some picture updates in about 1+1/2 weeks time, i'll be heading to EGX first on Thursday and then doing the GPU upgrade over the weekend.

Hanging in for picture updates of your water-cooled GPUs :)
 
Associate
OP
Joined
28 Sep 2007
Posts
163
Okay! - Phase 2 is complete,.. it's alive!!!

drazek-custom-watercooling.jpg

Adding the GPUs and redoing all the pipes took us well into the night... or morning... 6am to be exact! but I'm so happy with the new pipe configuration now, and my 90 bends were perfect!

drazek-pc-radiator.jpg

My top radiator now has fans on both sides in push/pull configuration, I've also orientated all my radiator fans to blow air in to the case, so i'll have very high positive pressure with a single exhaust fan in this configuration. (good thing)

drazek-pc-cpu-loop.jpg

I turned the CPU block back to a 'normal' orientation, because i found an Extreme Rigs review that showed better thermal performance in 'normal' instead of 'goofy' mounting.. also the pipes fit better and look nicer this way :)

drazek-pc-gpu-loop.jpg

2x Bitspower ASUS Strix GPU Water Blocks (notice that with these blocks I was able to keep the ASUS back plate AND fit the nvidia HB SLI bridge without issue... this is why I went Bitspower instead of EKWB)

drazek-pc-pump-connection.jpg

The Pump > Rad connection was so fiddly! and I had to make more modifications to my already modified pump mounting plate. - that's the shortest piece of hard tube I've ever had to fit!

In this 2nd phase build, I added the following:

Front Radiator 280 /w 2x 140mm fans.
GPU Blocks.
3x 140mm fans onto top radiator - this now makes 6 fans in push/pull config.
New multi-port Reservoir top.
A silver bullet style 'kill coil' into the intake port of the reservoir top.
Tons of new angled fittings to get it all to fit nicely!

You'll notice that the ball valve in the drain loop is open... this is intentional, as we found that the ball valve wasn't able to be tightened all the way due to it's position which caused a smal leak!! - so we had to turn the handle to allow a tiny bit more space to tighten the connection up, and we ensured the plug was nice and tight on the end... I will be adding a twisty spacer like the one seen between the junction and the radiator, which will allow me to tighten up the ball valve without having to twist it around and get stuck on the bottom of the case.

I am also planning to add 2x 90 degree angles to finish off the loop, one at the end of the ball valve to direct the flow towards the front of the case, making it easier to connect the drain pipe.. and one on top of the reservoir top again to redirect the positioning of the fill pipe connection.

Other than that, it's complete! ;D so what do you guys think?

Drazek.
 
Back
Top Bottom