My summer H440 hardline/mod project

Associate
Joined
6 May 2016
Posts
218
Hey guys I am very new to this forum but I've been building for a fair while. Got into water cooling just over two years ago and I've been trying to get more adventurous with my builds.

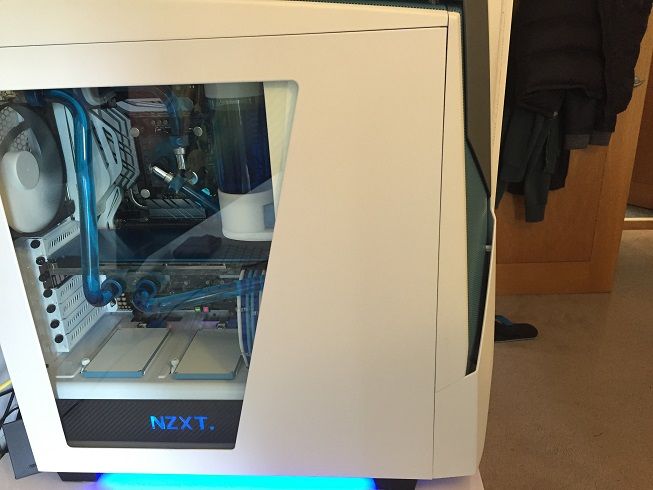
I will be building this in late june but I thought I would share what I have so far, get some ideas and feedback and hopefully build a beautiful system!

zmXKOrZ.jpg

O9rwHTS.jpg

HK2WJw5.jpg

The plans/ideas that I have so far:
  • A blue/black/white/silver theme which I hope won't be unbalanced, but from what I have put in the case so far it looks balanced.
  • I will be putting a 360mm rad in the front and a 360 rad in the top (one 30mm and one 45mm, front rad in pull and top rad pushing as exhaust)
  • I plan to remove the hdd rack and extend the window to show off my tube res/pump combo.
  • I am considering custom paining the radiators (and possibly the case) with similar accents as on the z170 deluxe motherboard, I am also going to paint the white NZXT logo blue.
  • Seeming as I haven't gotten any good pictures showing my plans for the loop I will talk you through it:
  • From the pump I will go to the front radiator, then to the gpu, a 90 to the top radiator and then another 90 from the top radiator to the cpu block, then back to the pump, I think this will be the cleanest way of going about this seeming as the radiators don't fit in any other orientation!

I have included a picture of an older cpu block that I have, just to get opinions on weather it would look nicer than the ek supremacy.

The gpu currently in the pictures is an r9 290 but I am torn between putting a water block on my fury x or waiting for vega in october and getting the best thing available at that time (From AMD or Nvidia)

Sorry for the lengthy description, thanks for viewing my project and hope you like it!
 
Associate
OP
Joined
6 May 2016
Posts
218
I like the ideas however I wouldnt be able to mount my pump/res like that, mine is 180mm. was hoping to add similar shapes as the asus motherboard instead on painting the accents of the case, It could be quite difficult though, I am planning to completely re-spray the side panel when I extend the window, I have got an enamel, acrylic coat and clear coat sorted so I think I will use that, I've seen plastidip done before and it doesn't seem very permanent. I definitely need to get myself a back-plate though!
 
Associate
Joined
11 Apr 2013
Posts
1,742
Location
Nr Salisbury
Associate
Joined
11 Apr 2013
Posts
1,742
Location
Nr Salisbury
Here's my res mounting btw

sTxSgA2lHWdh08t5p3gDsjRUm8ZwVsY0_NJilLPM-zdxhaMqCumUt75x_4zTACTn8Eh1-PRvVquPmuXYovg2vJnL6p592FYkNdlWem7KEZ3ePtynjwnoRF2CO6VT4_MCZYtEJrFFqg-MZLHF4DKu0Q0Qtp-rP4ysDFkKPSoiCvpQe_ubKurDUPzNbtR-QdTyFttH8hZ82wcCwu6myqvZa2Fcf8AESCruZXUlBegYPTEjW7p4bfTLmLW4T1U6wE6Hk9KOhyBtCG96Z6dMlJZe_aU_djRdtUBAII9-dOMaPGJBG0FYaBL21-_kwubkLlOgZBP-2CN6mEovEivXb4qG6fQ3q8b9hiHckJvTqbbvBku5QZpnIewzgkgeOPrQmKurY1blKZua4__HbEGnISzmOE6QXTyjP3pePDOzqDEeopm3x0ExH5pdy11zCqy_FhdYUqN5UkYcOLThUxfc9ecyQuSgFa4xjSmUoMsUaP45f9t7p0yIGKgZnVMSwk4f1VQGhMuqQoISAVuNzOfVWBI1z9OQsmzmSYVlrryeYT1AZzczNMyX1wI6t8BS0viZmNpivVyP-oY74TXvdK1Q4z697cO-neovs14=w717-h955-no
 
Associate
OP
Joined
6 May 2016
Posts
218
Good idea, I am pretty set on having mine mounted at the front though. It will probably become more clear when I progress with this build (will be another few weeks until I have the time)
 
Soldato
Joined
4 Dec 2015
Posts
3,221
Location
London
+1 for accents, makes it feel much more unique which is what I wanted. Not exactly the same case but an NZXT Noctis 450, originally the glossy white which I felt was cheap looking. I used Plastikote to paint it, highly recommend it as its a lot more readily available and cheaper than Plastidip.

Matt finish looks really nice, the original was just gloss white with a black grill:

Photo%2022-05-2016%2012%2018%2051_zpsgzho8ool.jpg

Photo%2022-05-2016%2012%2024%2046_zpsckiezli7.jpg


And finally here she is chilling on my desk.

File_000_zps2yul0yot.jpeg


Word of advice on the radiators, its a tight fit make no mistake so be sure to get some angled fittings - also assuming you are getting slim rads? The rear exhaust fan sits really close to my top rad fittings because although they 'fit' you cannot mount it with the fittings to the front with another 360mm there. Well, you can't in mine and I think the internals are almost identical.

FYI I built a small platform for my res so you could see it at the front, alternative is really mounting it on the rear of the drive bay or floor if you remove it.
 
Associate
OP
Joined
6 May 2016
Posts
218
That pc is really nice, surprisingly close to what I am looking to build mine like! Ive managed to get 2x35mm thick 360 rads in. The fans slightly overlap at the point where the radiators meet, so looks a little bit unbalanced, bit it fits! unfortunately I am going to have to sacrifice the rear fan because is is impossible to do my tubing otherwise(cleanly anyway).

I only managed to get my hands on three angled fittings (ocuk seem to be clearing monsoon stock and the fittings are 3x the price elsewhere) but I think I've got my tubing figured out.

As for the accents, I was thinking more custom graphics/ cutting a fan filter in the front of the case so it doesn't look like a domestic appliance anymore!

To give a bit of context, here is my res. I don't have any other way of mounting it other than using the plate on the back, given that the mounting holes are pretty useless I think my best option would be to manufacture some sort of bracket to convert it into a radiator mount out of some sheet of metal (or possibly strong plastic like ABS). The other option is to get a new res that comes with radiator mounting and put a pump top on my existing d5 (which will obviously be much more expensive)

pc6P5b8.jpg
 
Soldato
Joined
4 Dec 2015
Posts
3,221
Location
London
With the fans did you try putting them on top - not sure on the clearance of the 440 but my fans actually sit on top of the rad under the top casing.

You can get a lot of radiator mounts right now so I reckon that is a good bet to be honest, ones which have a platform are also around so be sure to have a good look.
 
Associate
OP
Joined
6 May 2016
Posts
218
There isn't enough space for that in the h440, could probably fit some in the front but they would be completely choked (I could make a cutout as I've seen in a couple of build logs)

Yeah I know a few but it just seems a waste to get rid of my existing combo when it works fine, I thought of a pretty good way to hide the gap behind the drive cages and mount my pump at the same time. Changed my mounting plan to using the existing screw holes on the drive sled area to make a mounting system, should look really clean! I will keep my eye out for good deals on reservoirs in the meantime just in case.
 
Associate
OP
Joined
6 May 2016
Posts
218
Uptade: nearly ready to start building!

A little update, I think I have everything to go ahead with the build, I should be able to start it on Saturdat 25th as I've got a fair bit of time off over the next few weeks. I have decided that I am going to re-spray the outside of the case satin black, and keep the inner frame white.

all of the parts that I plan to put in there (not all of the tubing, bought spare for some other projects that I am planning):
wSE2eBM.jpg

I am planning to keep the 290 in here until vega comes out, hopefully then I will have enough money to either get the best nvidia or amd card.

These are the paints that I went for, going all in on this paint job, may need to get myself some more primer though! (unfortunately couldn't get blue from hycote)
I5AkUAA.jpg

I plan on having blue tubing and white coolant inside, to make it pop!

ZDkDVL7.jpg
vELHAr4.jpg

For those curious I managed to fit an ax360 and an ex360. I plan to paint both satin black. There is barely any space and my loop may be difficult because the front rad is upside-down.

dl652GB.jpg

The remaining shopping list;
  • Acrylic sheet for the widow
  • A bimetal jigsaw blade
  • rivets/bots for mounting the window
  • sheet metal to rig up a res mount
  • A backplate for my gpu
 
Associate
OP
Joined
6 May 2016
Posts
218
Hey bud- what keyboard is that youre using
Like the build by the way

That confused me for a moment, the build you are looking at is another members. They posted pics for inspiration, I wouldn't have the gonads to post apple products on a forum like this!

Just in case you are actually curious I am using the corsair k70
 
Associate
OP
Joined
6 May 2016
Posts
218
UPDATE

This project has been on the backburner recently, but here is a quick update of a few things that I did yesterday, Will add all of the pictures to the OP aswell

Firstly I removed the hdd cover, just had to drill a few rivets and I think it looks much better.
r7F2rT5.jpg
NFBgSSn.jpg

I then masked up the side panel and marked it up with pencil, two of the sides slightly larger so it is going to be a rectangular window but looks close enough to square.

kB60cKK.jpg

I used dremel and a jigsaw to expand the window. And then a metal file to clean the edges (which took a while because my skills with the jigsaw were awful. Cutting over a carboard box was much cleaner then using a vice on a workbench.

XPeb0BM.jpg
xn0B2IF.jpg
5dYYFQE.jpg
MZPQo79.jpg
The corners took a while to get to an acceptable state!

Here is a picture of the pc partly assembled, with a few fittings to give an idea of the loop that I plan. The front radiator is the main problem as it will require quite a few bends.

pGAPqNL.jpg


Next I will be putting the loop together, however I would really like to get a larger reservoir as the current one looks a bit out of place and looks a bit too industrial for my liking.
 
Associate
OP
Joined
6 May 2016
Posts
218
Got the bends!

Somehow I managed to do all of my bends without throwing away any pieces of acrylic.

I am relatively happy with how the bends have come out, there is only one that I would consider replacing.

The bends are slightly out of place because I am yet to glue the acrylic collars to the ends.

I am planning to mount the res using a plate manufactured from the off-cuts from the window expansion (I hope that makes some sense!)

798Z9sp.jpg

6exQL4k.jpg

buiGgqt.jpg


For those curios about how I got around the bottom radiator problem, here is a closer look (excuse the cable mess)


gDAT2hd.jpg


I would quite like to add a bit more blue to the build, may add some blue to the cabling and paint some/all of the radiators blue.
 
Back
Top Bottom