

Soldato
OK, let me start by saying cheddar is not the best cheese to start with, it's just what i happen to be making next....
Anyway. The aim of this is to turn milk into solids then shape them to what we need.
Things needed.
4 litres of whole milk
Butter milk (as a starter culture) (large tesco?)
Rennet (online or some tescos)
Salt
Some boiled but cooled water.
A mould to press your cheese in, plus a tight fitting plunger. (online or home made. I've seen 2l cola bottles being used, chop of the top/bottom and use the tube.
A cheese cloth (online or a lint free teatowel if your realy cheap") )
)
Some weights (bucket of water, bricks, diving weights etc..)
A press of some kind. (home made leaver like mine or i've used the step ladders before. Lay them down and press near the join, hand the weight on te feet)
A large bowl.
For supplies try:-
http://www.ascott.biz/acatalog/Cheesemaking.html
http://www.cheesemaking.co.uk/cgi-bin/web_store.cgi?page=home.html&cart_id=
00.00
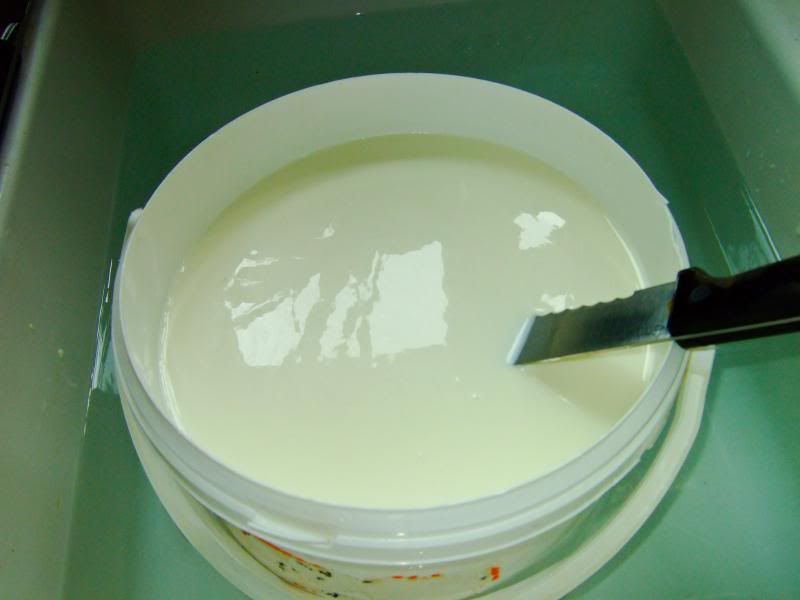
1. First you need to warm your milk. I normally do this using the kitchen sink as a warm water bath. You need to be aiming at 30-C. In between each step cover your milk/curds with a lid/cling film.
00.30
2. Add your starter, the butter milk. You need 4 level dessert spoons. Leave for 1 hour but keep an eye on the temperature. Butter milk is a bacteria soup, these bacteria consume the milk's lactose, producing lactic acid which makes the milk more acidic or sour and thus creating the best climate for the curd to form. The more acidic the milk becomes, the easier it is for the curd to expel the whey. They also play a key role in the aroma, texture, and flavour generated as the cheese is matured.
01.30
3. Add 24 drops of rennet to a 1/4 cup of boiled but cold water. Now stir this into your milk for 2 minutes. Leave to set for 45 minutes.
02.15
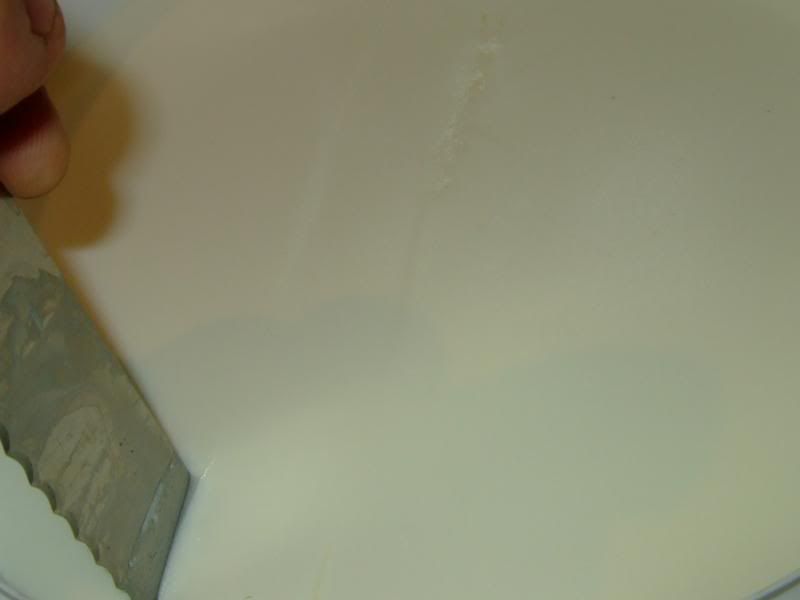
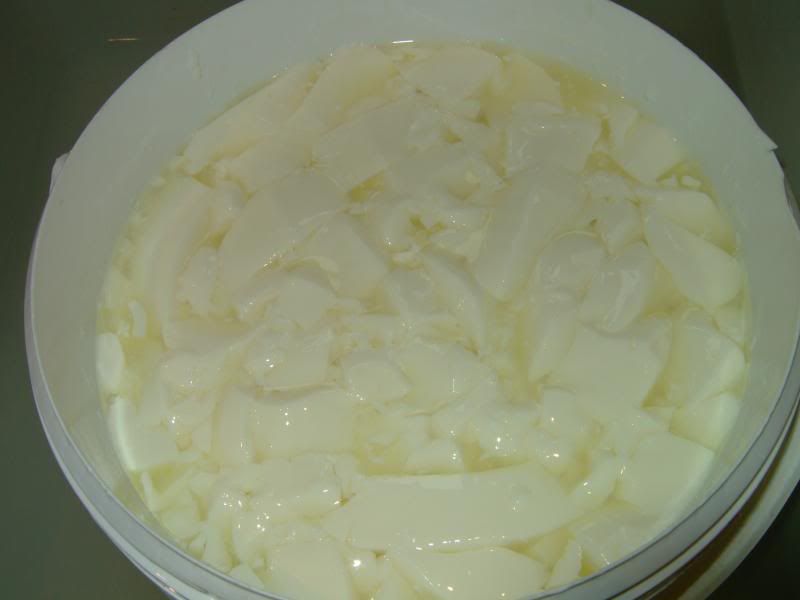
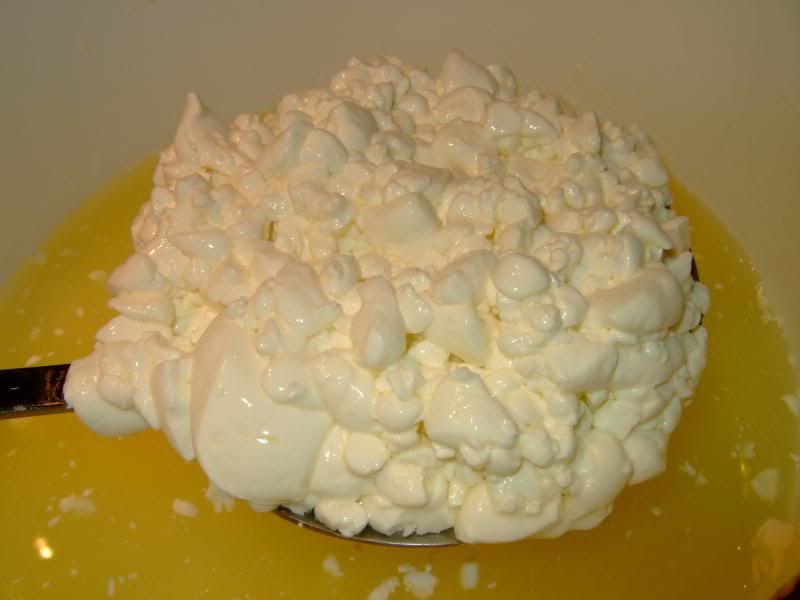
4. Hopefully your milk is now set. You should be able to cut the surface and get a clean knife/cut. If not leave 15mins more. Congrats, you've made curd!
02.15
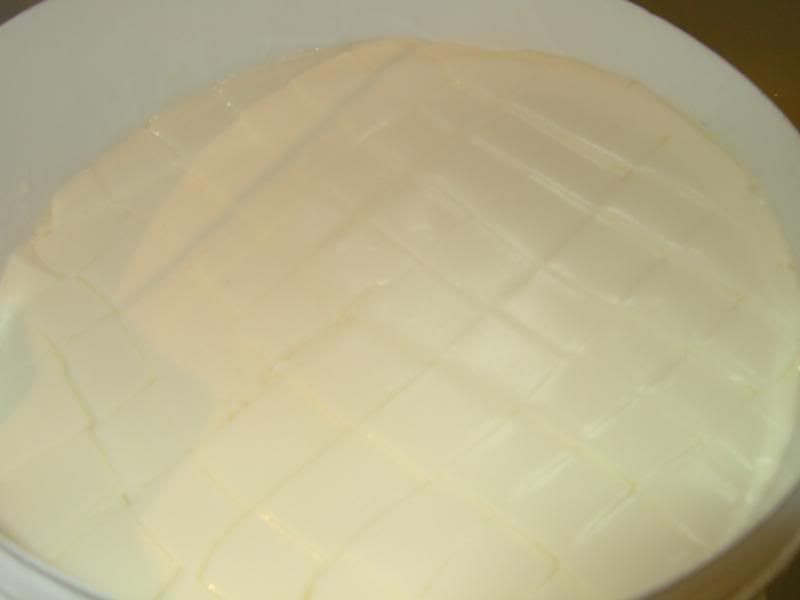
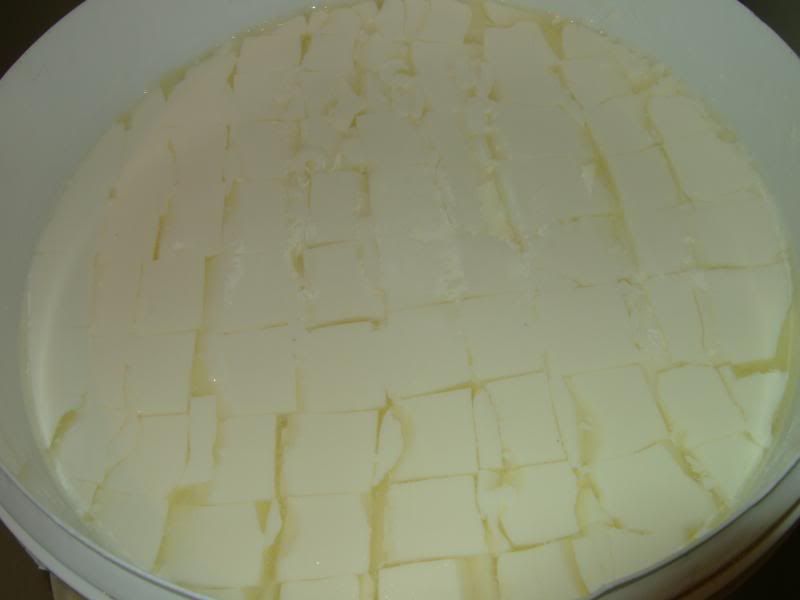
5. With a long enough knife to reach the bottom cut the curd like a grid 1/2 inch between the lines, this produces curd columns. Now angle the knife at 45 degrees and do it again along the same lines, your columns are now diamonds. Let these set for 15 mins.
02.30
6. Allow the curds to sit for 15 minutes to firm up. You will see whey forming between the cuts.
02.45
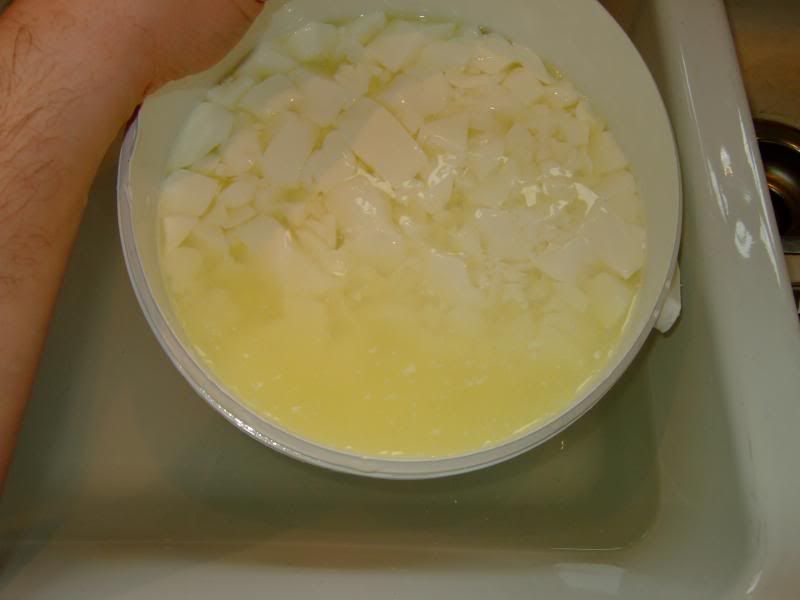
7. Slowly raise the temperature of the milk to 39C (not over!). It should take as long as 45 minutes to reach this temperature. During this time, gently stir the curds every few minutes so they don't mat together. This will make the curds shrink and expell whey.
03.30
8. 'Cook' the curds at 39C for another 45 minutes. During this time, gently stir the curds every few minutes so they don't mat together.
04.15
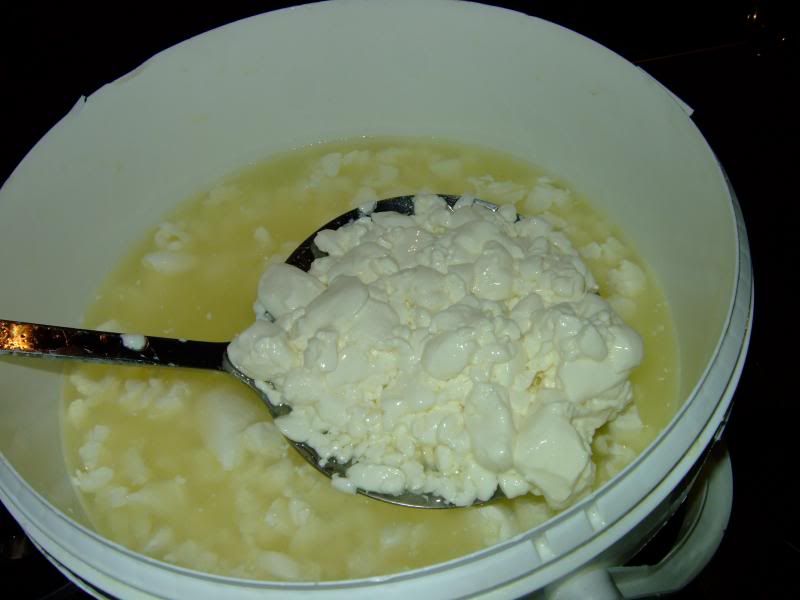
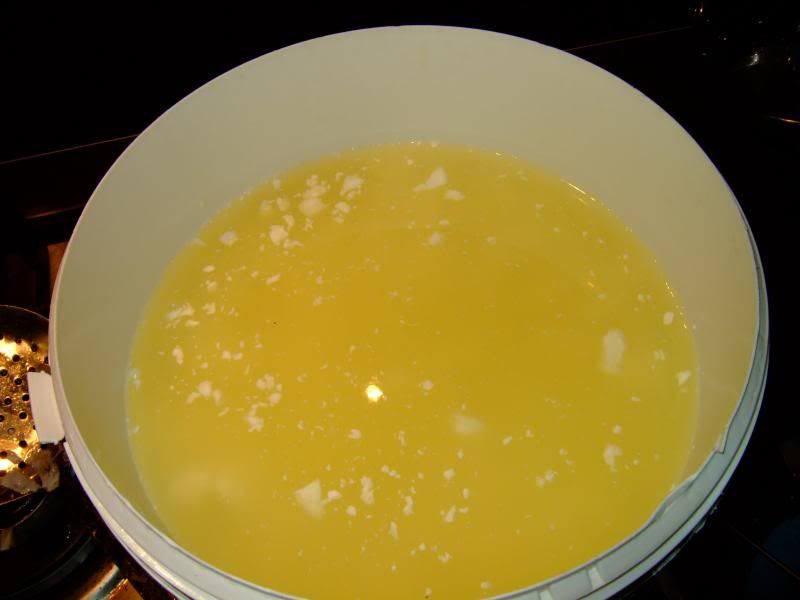
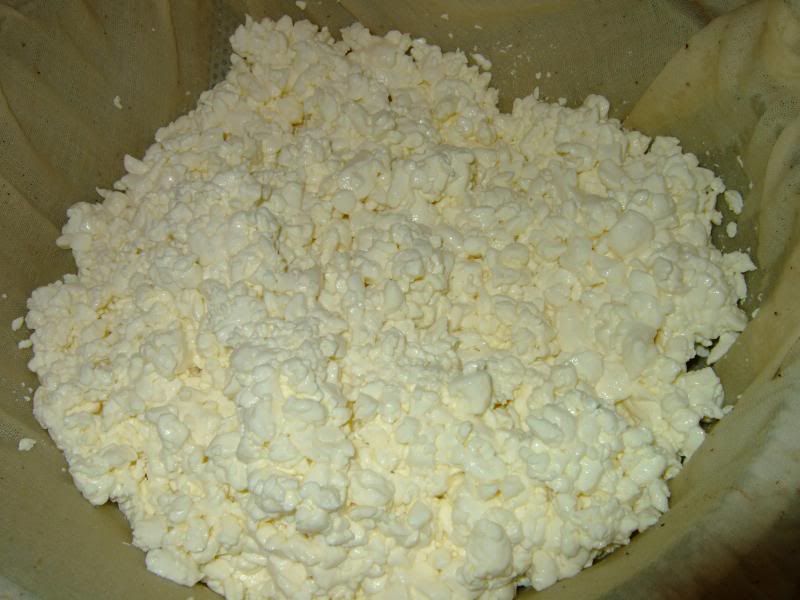
9. Drain the whey by pouring through a cheesecloth lined colander.
The following steps still need the curd to be at 38-39c. To do this i use the home oven, set it on 50c and use the grill pan as a drip tray. Be careful not to overheat the curd.
04.30
10. Lift the cheesecloth onto a board and roughly shape into a brick. let the brick set.
04.50
11.Cheddaring time! Remove the cloth and cut the curds into strips about 2cm wide, then 1/2 them. Cheddaring is the method used to expel more whey and get the pH to around 5.3. Like lego bricks place the curds in small piles 2 slices high so they look like a #. Tilt the tray and allow the whey to run off the piles.
05.00
12. Leave the piles in the warm for 15 minutes.
05.15
13. Flip the piles and build them up a layer by breaking down another pile.
05.30
14. Flip and build again. Continue this for a total of 2 full hours.
07.00
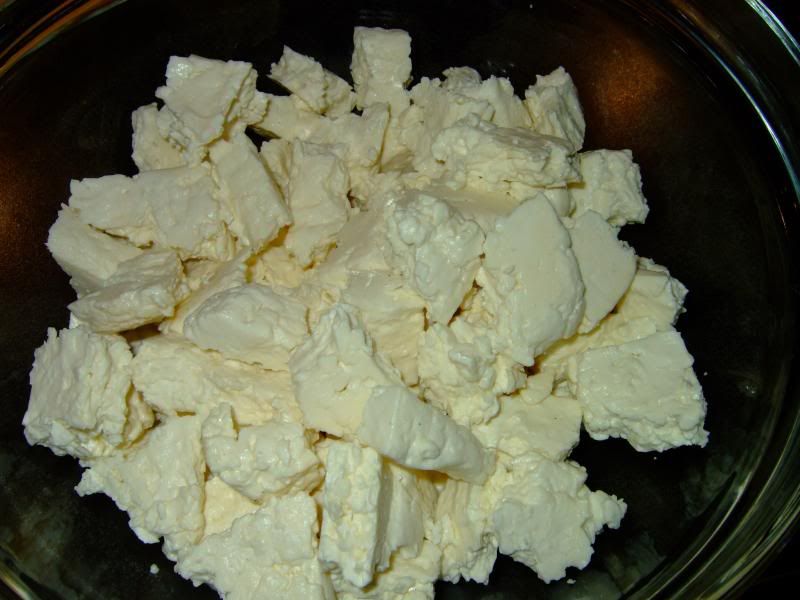
15. With the cheddaring complete break the curds into aprox 2cmx1cm blocks. The curds should feel like cooked chicken now.
07.10
16. Weigh the curds. You need to add 2% salt to curd weight. I had 600g curds so needed 12g salt. Salt is very important in cheese. It stops the acid production, expels more whey and preserves.
Stir in 1/2 the salt and coat the curds in it. Sit the curds for 10 minutes so soak it up.
07.20
17. Add the rest of the salt and stir in.
07.30
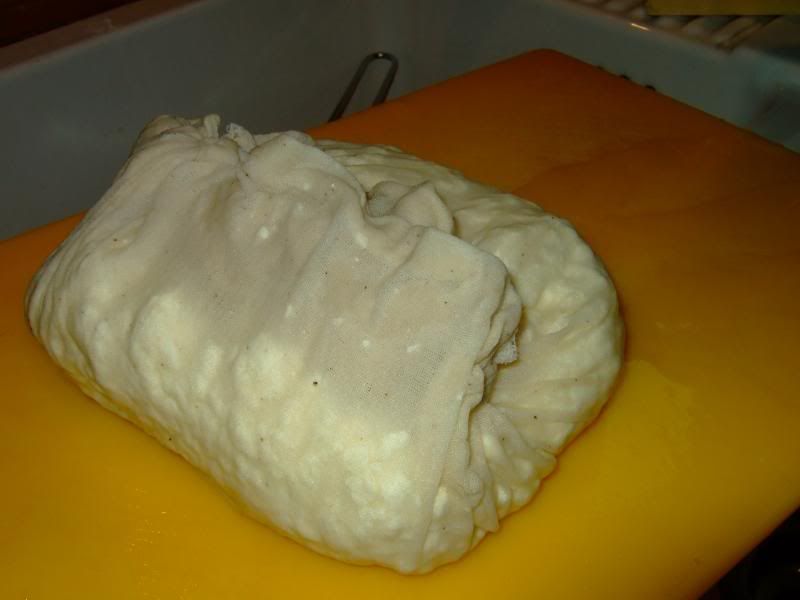
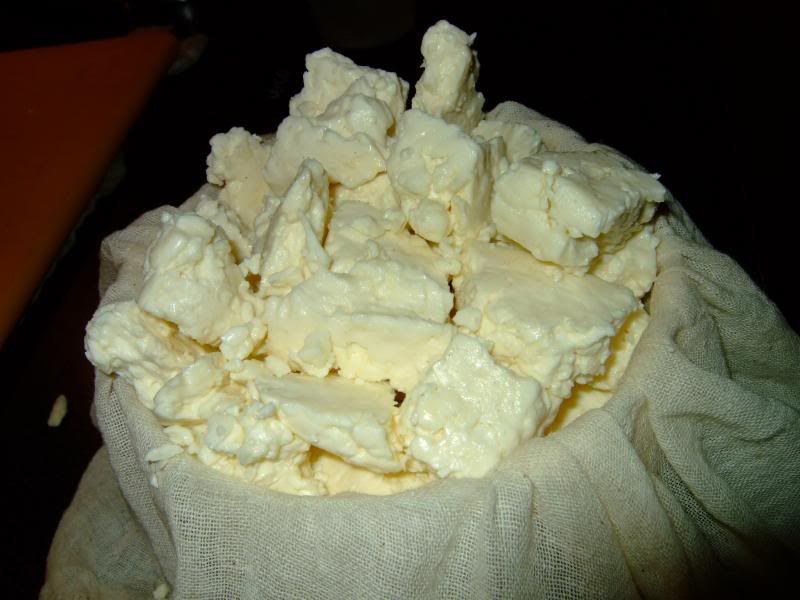
18. Line your mould with the cheese cloth and fill it with curds. place the plunger/follower on top and wrap te cheesecloth around the bundle.
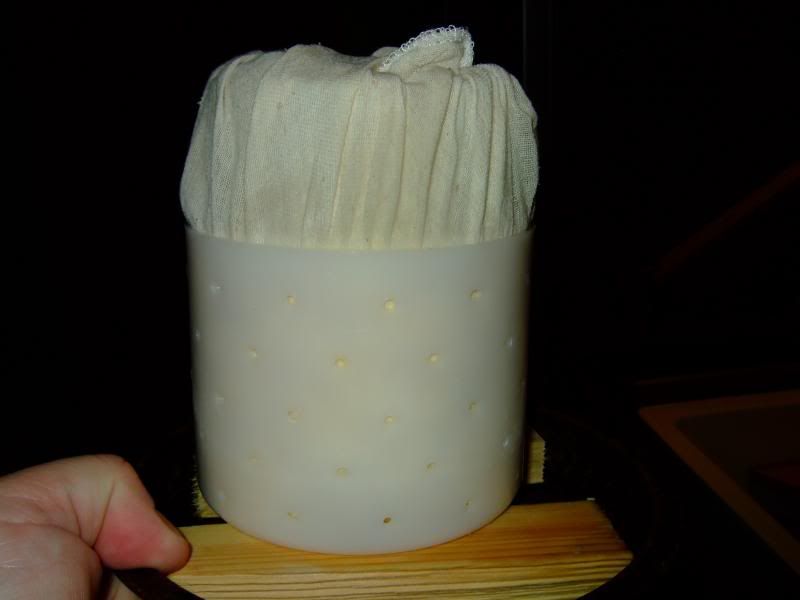
07.40
19. Press your curds lightly for 20 minutes. The curds will start to matt together.
08.00
20. Undress, flip and redress the cheese. Press at a higher pressure for 1 hour. The matting is more refined.
09.00
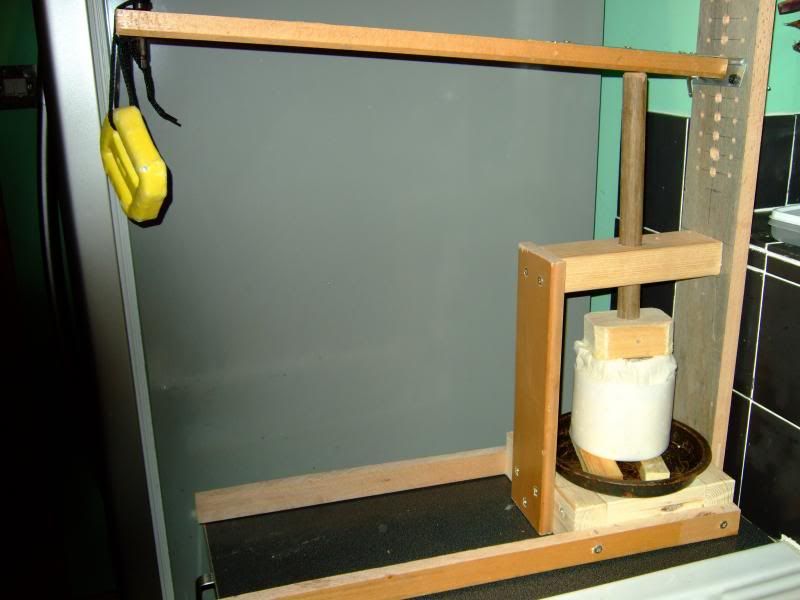
21. Flip and press at a higher pressure for 12 hours.
21.00
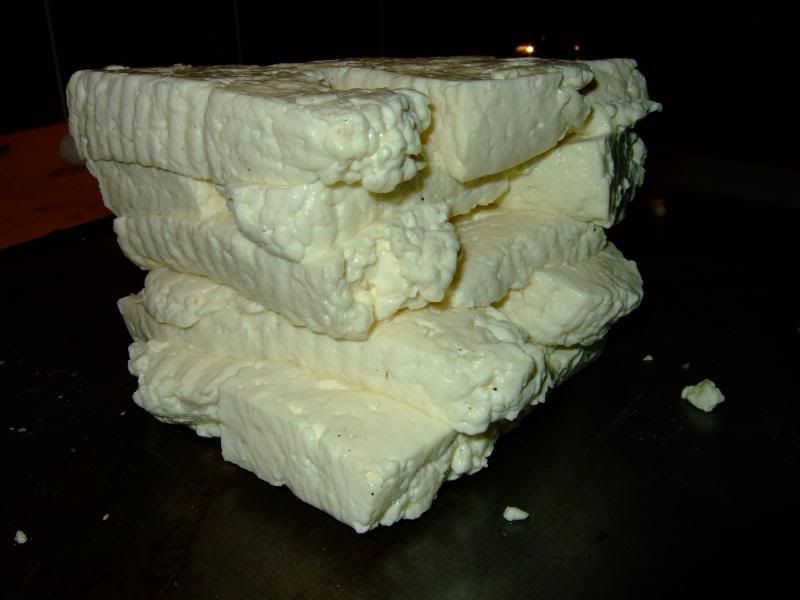
22. Flip and press at the highest pressure you dare for 24 hours. 8kg on mine 7.1 ration on the arm = 56kg on the cheese. The comercial guys press at twice that.

45.00
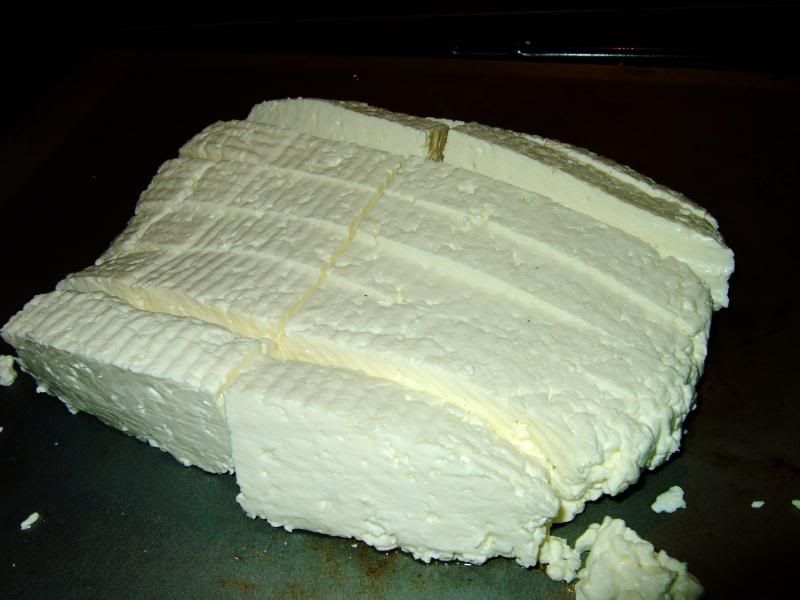
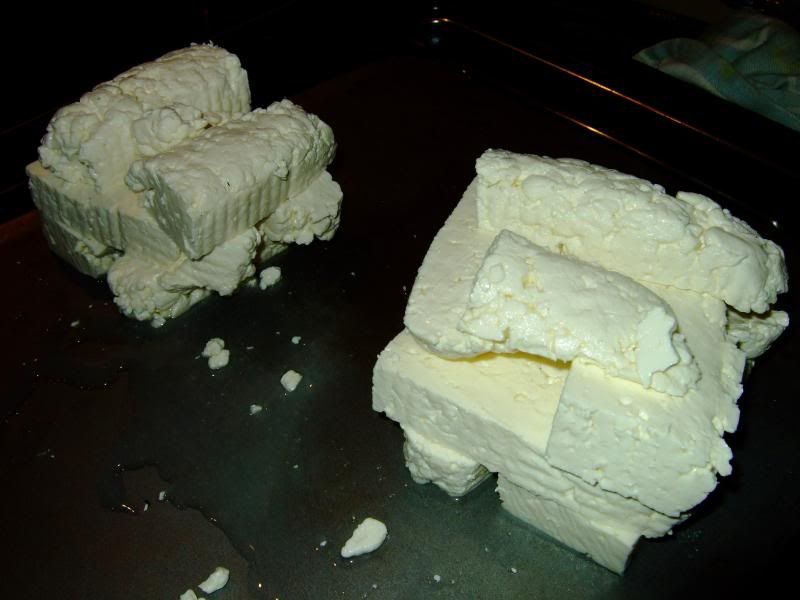
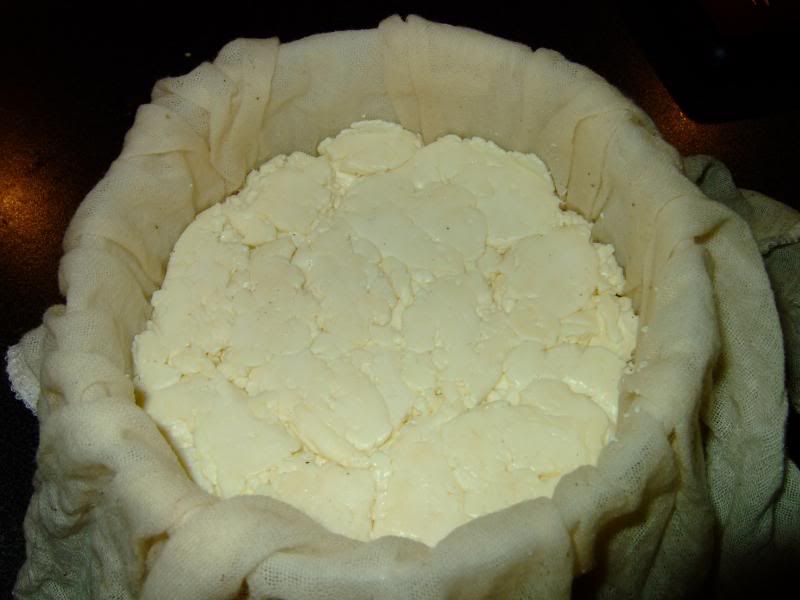
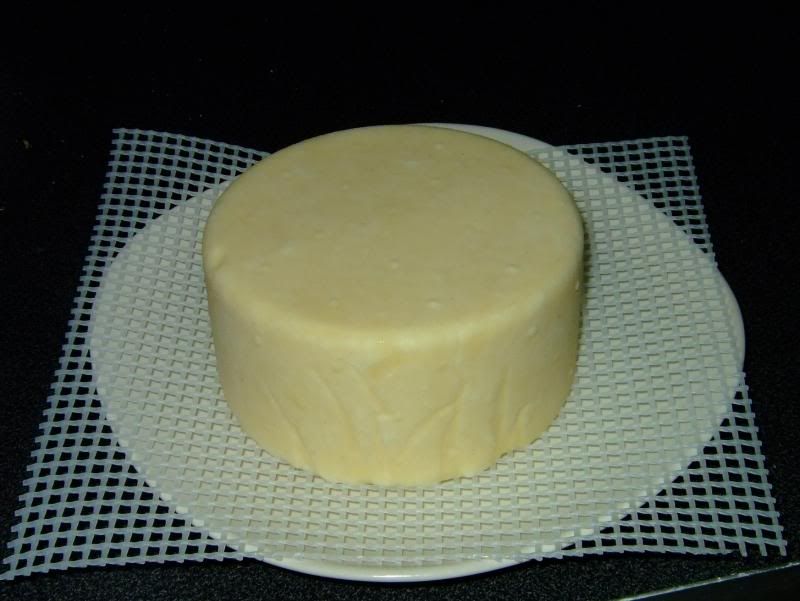
23. Unwrap your cheese. The surface should be smooth and all the curds should be matted into one block.
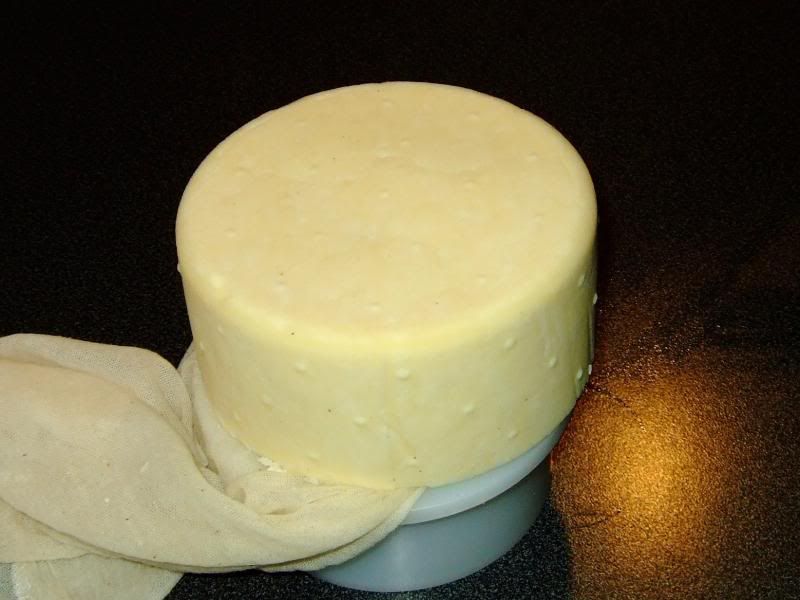
24. Air dry at room temp for 24 hours. (final weight 500g)
69.00
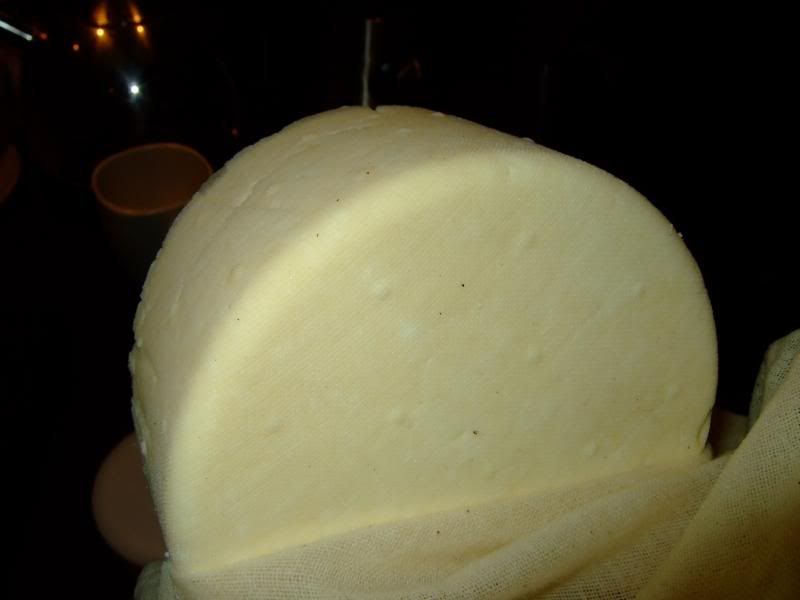
Rub your cheese with vinegar to kill any mould spores. I now give my cheeses 3 thin coats of paraffin wax. This stops dehydration but allows the cheese to breath.
Turn the cheese every day for a week. Every 2 days for a week after then every so often.
Leave in the fridge for 3-12 months.
Anyway. The aim of this is to turn milk into solids then shape them to what we need.
Things needed.
4 litres of whole milk
Butter milk (as a starter culture) (large tesco?)
Rennet (online or some tescos)
Salt
Some boiled but cooled water.
A mould to press your cheese in, plus a tight fitting plunger. (online or home made. I've seen 2l cola bottles being used, chop of the top/bottom and use the tube.
A cheese cloth (online or a lint free teatowel if your realy cheap
)Some weights (bucket of water, bricks, diving weights etc..)
A press of some kind. (home made leaver like mine or i've used the step ladders before. Lay them down and press near the join, hand the weight on te feet)
A large bowl.
For supplies try:-
http://www.ascott.biz/acatalog/Cheesemaking.html
http://www.cheesemaking.co.uk/cgi-bin/web_store.cgi?page=home.html&cart_id=
00.00
1. First you need to warm your milk. I normally do this using the kitchen sink as a warm water bath. You need to be aiming at 30-C. In between each step cover your milk/curds with a lid/cling film.

00.30
2. Add your starter, the butter milk. You need 4 level dessert spoons. Leave for 1 hour but keep an eye on the temperature. Butter milk is a bacteria soup, these bacteria consume the milk's lactose, producing lactic acid which makes the milk more acidic or sour and thus creating the best climate for the curd to form. The more acidic the milk becomes, the easier it is for the curd to expel the whey. They also play a key role in the aroma, texture, and flavour generated as the cheese is matured.
01.30
3. Add 24 drops of rennet to a 1/4 cup of boiled but cold water. Now stir this into your milk for 2 minutes. Leave to set for 45 minutes.
02.15
4. Hopefully your milk is now set. You should be able to cut the surface and get a clean knife/cut. If not leave 15mins more. Congrats, you've made curd!
02.15
5. With a long enough knife to reach the bottom cut the curd like a grid 1/2 inch between the lines, this produces curd columns. Now angle the knife at 45 degrees and do it again along the same lines, your columns are now diamonds. Let these set for 15 mins.


02.30
6. Allow the curds to sit for 15 minutes to firm up. You will see whey forming between the cuts.

02.45
7. Slowly raise the temperature of the milk to 39C (not over!). It should take as long as 45 minutes to reach this temperature. During this time, gently stir the curds every few minutes so they don't mat together. This will make the curds shrink and expell whey.


03.30
8. 'Cook' the curds at 39C for another 45 minutes. During this time, gently stir the curds every few minutes so they don't mat together.


04.15
9. Drain the whey by pouring through a cheesecloth lined colander.

The following steps still need the curd to be at 38-39c. To do this i use the home oven, set it on 50c and use the grill pan as a drip tray. Be careful not to overheat the curd.
04.30
10. Lift the cheesecloth onto a board and roughly shape into a brick. let the brick set.

04.50
11.Cheddaring time! Remove the cloth and cut the curds into strips about 2cm wide, then 1/2 them. Cheddaring is the method used to expel more whey and get the pH to around 5.3. Like lego bricks place the curds in small piles 2 slices high so they look like a #. Tilt the tray and allow the whey to run off the piles.

05.00
12. Leave the piles in the warm for 15 minutes.

05.15
13. Flip the piles and build them up a layer by breaking down another pile.

05.30
14. Flip and build again. Continue this for a total of 2 full hours.
07.00
15. With the cheddaring complete break the curds into aprox 2cmx1cm blocks. The curds should feel like cooked chicken now.

07.10
16. Weigh the curds. You need to add 2% salt to curd weight. I had 600g curds so needed 12g salt. Salt is very important in cheese. It stops the acid production, expels more whey and preserves.
Stir in 1/2 the salt and coat the curds in it. Sit the curds for 10 minutes so soak it up.
07.20
17. Add the rest of the salt and stir in.
07.30
18. Line your mould with the cheese cloth and fill it with curds. place the plunger/follower on top and wrap te cheesecloth around the bundle.


07.40
19. Press your curds lightly for 20 minutes. The curds will start to matt together.


08.00
20. Undress, flip and redress the cheese. Press at a higher pressure for 1 hour. The matting is more refined.

09.00
21. Flip and press at a higher pressure for 12 hours.
21.00
22. Flip and press at the highest pressure you dare for 24 hours. 8kg on mine 7.1 ration on the arm = 56kg on the cheese. The comercial guys press at twice that.

45.00
23. Unwrap your cheese. The surface should be smooth and all the curds should be matted into one block.

24. Air dry at room temp for 24 hours. (final weight 500g)

69.00
Rub your cheese with vinegar to kill any mould spores. I now give my cheeses 3 thin coats of paraffin wax. This stops dehydration but allows the cheese to breath.
Turn the cheese every day for a week. Every 2 days for a week after then every so often.
Leave in the fridge for 3-12 months.
Last edited:

")

