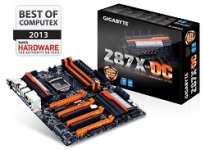
**Official Gigabyte Z87X-OC Discussion Thread**

Soldato
Joined
19 Dec 2003
Posts
7,213
Location
Grimsby, UK
rJm7jR7.jpg

Official Website >> http://uk.gigabyte.com/products/product-page.aspx?pid=4514

GIGABYTE UK Forum >> http://forum.giga-byte.co.uk/

GIGABYTE Tech Daily >> http://gigabytedaily.blogspot.co.uk/

Tweaktown Gigabyte Forum >> http://forums.tweaktown.com/gigabyte/

Latest Overclocking Programs, System Info, Benchmarking, & Stability Tools >> Click Here

Instruction Manual - Version 1002 >> Click Here

Compatable Ram List >> Click Here

Download Latest Drivers: Win7 64bit >> 22nd December 2013 - will normally be done around the end of each month.

Package Contents:

Utility
  • GIGABYTE EasyTune (Intel 8 series) B13.1030.1 *NEW* >> Click Here IMPORTANT: Please remove current / earlier version of EasyTune before installing this, otherwise Easytune will no longer function permenently!
  • GIGABYTE APP Center B13.1015.1 (Intel® Smart Response, Rapid Start, Smart Connect) *NEW* >> Click Here
  • GIGABYTE EZ Setup B13.0628.1 (Intel® Smart Response, Rapid Start, Smart Connect) >> Click Here
  • GIGABYTE OC Button Tool B13.0626.1 >> Click Here
  • GIGABYTE On/Off Charge (Apple iPad/iPhone) B13.1028.1 *NEW* >> Click Here
  • GIGABYTE Smart Recovery 2 B13.1007.1 *NEW* >> Click Here
  • GIGABYTE USB Blocker B13.0911.1 *NEW* >> Click Here
  • Intel Extreme Tuning Utility 4.1.0.122 >> Click Here
Drivers
  • Intel LAN Driver v18.5 >> Click Here
  • Intel ME Driver v9.5.15.1730 *NEW* >> Click Here
  • Intel PCH Driver v9.4.0.1027 *NEW* >> Click Here
  • Intel RST v12.8.0.1016 *NEW* >> Click Here
    Hot fix (Note) After installed IRST driver, please install Hot fix Click Here
  • Intel USB 3.0 Driver v2.5.0.19 >> Click Here
    * Please download & install Win8 USB patch for better compatibility.
  • Realtek HD Audio Driver R3.78 *NEW* >> Click Here

  • Intel VGA Driver v15.33.9.64.3355 *NEW* >> Click Here
BIOS Flashing via USB Flash Stick/Drive - A "How To ~ Qflash Guide" >> Click Here

Latest Official BIOS >> BIOS ID: F8 (Note) The USB driver must be updated in advanced.
  • [F8] Improve overclocking capability
  • [F7] Support New 4th Generation Intel Core Processors
  • [F6] Support PCB ver 1.0/1.1 / - Support Intel C2-stepping chipset
  • [F6] Improve PCIE-E compatibility
  • [F5] Improve SATA RAID performance
  • [F5] Enhance DDR performance
  • [F4] Adjust Windows mode screen
  • Release Date: 19th March 2014
WARNING:- DO NOT USE THE WINDOWS @BIOS!! METHOD TO UPDATE YOUR BIOS, HIGH RISK OF BIOS FAILIURE!

Latest Beta BIOS >> BIOS ID: F9c (Note) The USB driver must be updated in advanced.

Previous Beta BIOS >> BIOS ID: F7g

Latest LN2 Benching BIOS >> BIOS ID: X08

Previous LN2 Benching BIOS >> BIOS ID: X07
  • [X08] New feature "Extreme Speed"
  • [X07] New option “Memory Initial Parameter Set” for memory OC high speed frequency tuning.
  • [X07] Bios tweaking for PSC RAM as well as high speed MFR RAM.
  • [F9c] Enhanced Intel K-sku CPU performance
  • [F7g] Improve system compatibility
  • [F7f] Improve system compatibility
  • [F7e] Enhance system stability
  • [F7b] Improve system compatibility
  • [F7a] Improve system compatibility
  • [F5w] Intel C2-stepping chipset
  • [F5w] Improve SATA RAID
  • [F5w] Enhance DDR performance
  • [F5v] Improve memory performance
  • [F5s] Improve memory performance
  • [F5q] Improve SATA RAID performance
  • [F5q] Enhance DDR performance
  • [F5p] Improve SATA RAID performance
  • [F5p] Enhance DDR performance
  • [F5n] Improve SATA RAID performance
  • [F5n] Enhance DDR performance
  • [F5m] Improve system stability
  • [F5l] Improve system stability
  • [F5i] Improve system compatibility
  • [F5h] Improve system compatibility
  • Release Date: 10th July 2014
DISCLAIMER:
Gigabyte will not be held responsible or liable for any damage made with using a BETA BIOS.
Please proceed with discretion and do not attempt to use unless you know what you are doing!
Gigabyte Z87X-OC Forum Threads

The Gigabyte Z87/Haswell Overclocking(OC) Guide

Z87X-OC & Z87X-OC Force Owners/Discussion/Fan Club @ overclock.net

**Official** GIGABYTE Z87X-OC/OC Force Club @ Xtreme Systems

The GIGABYTE Z87X-OC Review with 4770K @ Xtreme Systems
 
Last edited:
Caporegime
Joined
17 Jan 2010
Posts
66,802
Location
weston-super-mare
There's a new X series BIOS out that is supposedly a strong clocker especially for sub zero.

http://www.overclock.net/t/1397684/...-owners-discussion-fan-club/630#post_20481084

here: https://www.facebook.com/teamauoc
http://www.mediafire.com/?byu5xiuom51mwa4

A couple notes i want to add:
To change RTLs different per channel(the board might auto do this correctly, but if it doesn't, then you will need to use fully manual mode, meaning youll have to set all timings the same per both channels(ouble work) So IMO save your profiles to USb drive as well as the profiles just so you don't have to redo it all the time. You will see two RTL and two IOL change things under manual mode, but those are just for each side of the single DIMM for that channel, so you need to set most everything same except the RTLs/IOLs per channel. (THis will be remedied to make it much easier to set both channel's RTLs/IOLs without having to set all timings twice)

DRAM OVP/OCP has been worked on, and also so has vDIMM capability even on air you can do over 2.0+v, SamOCX you got your 2.4v BIOS here.

This BIOS should be better with subzero(it has fully unlocked voltages).

tWR still isn't working perfect, however tWR is just part of another timings tWRPDEN, so to change tWR just set something in the BIOS like 10 for tWR, and then set your tWRPDEN to 11 or 12(i forget which I used) and you will get tWR of 10. (This will be fixed soon, but it isn't impossible to change tWR effectively, its actually quite easy) tWRPDEN=tWR +/- some things.

This BIOS enjoys training the memory on every boot, so from a cold boot or a hard reset expect a retrain of the memory, sometimes its best not to retrain so you might need to get a feel for it. (This will also be remedied in a future release)

Dinos and Cookie i am sure will post up how they got their top memory OCs very soon.

This is the First revision of the X series BIOS, second will only get better.
 
Associate
Joined
7 Mar 2013
Posts
62
Just brought this MoBo as part of an Overclockers bundle with 16GB Ram :)

Question, as its been a LONG time since I built up a PC, I was going to go with the ASUS P8Z68-V LX as I had one in a PC at work, I looked at the manual for it, and it said that the system could be sped up by installing a SSD drive?

I have one, 120GB, is this available on this MoBo?

Also, do I use the provided CD to install the drivers, or is that a NO now, and use links in the first post to get the utilities?

Can do anything with the BIOS as it voids the overclock warranty :(
 
Caporegime
Joined
11 Jul 2009
Posts
27,049
Location
BenefitStreetBirmingham
you can add in an ssd yes,then install windows on it

win7/8 will install all the drivers for you,just install the lan driver off the cd to access the internet,then download/install latest drivers from gigabyte website as they will be a lot newer than the ones on the bundled cd
 
Associate
Joined
7 Mar 2013
Posts
62
Ahh should have explained a little clear I think lol sorry noob alert

I have a 2TB drive rated at 6GB and was going to install Windows 7 on that, apparently the system boot up/speed can be increased by THEN adding a SSD to the system, this drive then has some space allocated to it to improve system performance?
 
Associate
Joined
19 Jul 2013
Posts
141
Just picked this board up after being quite impressed by the ud3h.

Is it safe to use the @BIOS utility to flash the bios on the OC?

I used it on the ud3h with no problem but I have read that people were having issues on the OC after using @BIOS.

Edit:
I went ahead and updated the bios to F5 with @BIOS.
its working fine for me on the OC board too.
 
Last edited:
Associate
Joined
3 Jul 2011
Posts
4
I have a Silver Arrow Extreme and I guess I won't be able to use the top most PCI-E slot on this board? Why on earth did they put the fastest slot right next to the CPU socket? This board is only for people with water cooling? :(
 
Caporegime
Joined
17 Jan 2010
Posts
66,802
Location
weston-super-mare
Just picked this board up after being quite impressed by the ud3h.

Is it safe to use the @bios utility to flash the bios on the OC?

I used it on the ud3h with no problem but I have read that people were having issues on the OC after using @bios.

Edit:
I went ahead and updated the bios to F5 with @BIOS.
its working fine for me on the OC board too.

You should use QFlash ideally, its the safest way.

In fact this is the correct way to update BIOS apparently,

http://www.overclock.net/t/1397684/...-owners-discussion-fan-club/640#post_20491193
Also you should always do a clear cmos and full power cycle after BIOS flash, infact the proper way to flash the BIOS is to flash it wait for the system to shut itself down, then don't let it start again, take out the battery clear the cmos, put the battery back in and put power back on and then load optimized defaults reboot and then do whatever. That is the proper BIOS flashing procedure to engage certain fail safe mechanisms like flashing ME firmware which seems to corrupt pretty easy on Z87. Newer BIOSes should auto reflash the ME firmware without you noticing every once in a while so you don't encounter odd issues like your OCes failing or stuff.
 
Soldato
Joined
29 Aug 2010
Posts
7,850
Location
Cornwall
I have a Silver Arrow Extreme and I guess I won't be able to use the top most PCI-E slot on this board? Why on earth did they put the fastest slot right next to the CPU socket? This board is only for people with water cooling? :(

The Asus Rampage IV Extreme (and I believe a lot of other X79 boards) did exactly the same thing. It is annoying.
 
Caporegime
Joined
17 Jan 2010
Posts
66,802
Location
weston-super-mare
TeamAU profiles for GIGABYTE Z87X-OC using X01 BIOS only.

PSC AIR, PSC LN2, Corsair Samsung ICs. Copy on USB stick and load profile and bios

http://www.mediafire.com/download/97j4s00emb6ra78/GigabyteZ87XOCX01biosTeamAU+testing+profiles.rar

https://www.facebook.com/teamauoc

Here are the testing notes also placed in the zip file

WARNING: Volts being suggested can be very high and could lead to hardware failure. We take no responsibility for hardware failure it may cause. These are the settings we normally test with and have not had any failures but it does not mean it is safe so use it at own risk!

I just want to say something before i get on with this information. Please use this as a guide. Don't assume it will work for you, it probably will but it might not and it would require some work on your part to troubleshoot and work out how to get the most out of your setup.


> Some CPUs/IMCs will need different voltage for VIOA and VIOD so this is something you need to work out on your own. Get to a frequency in OS that is close to the edge of stability and tune volts with GTL (Gigabyte Tweak Launcher) software. PSC ram generally likes little volts added so try VSA +0.05 first and bump as far as +0.3 on air. VIO i tend to go as high as +0.35 on air and it scales in some instances.

> You may need subzero on some CPUs to get the most out of RAM but in most insances you should be able to make the RAM out with CPU running on air or water. I tend to do most of my pretesting with CPU on Corsair H50 water cooler

> Use a high speed fan as volts are pretty high on ram and other settings

> Please note that I use an Advanced Timing setup so you have to adjust timings on BOTH channel A and B!!!

> Be mindful that RTL settings change with different RAM ratios (they tighten with lower ratios and loosen with higher) if you do not get the RTL perfect you will not be able to boot) The bios will normally pick the correct RTL values so i usually start with AUTO and then set specific values that are meant to work. The other think you need to be mindful that difference CAS latency will also set different RTLs (lower Cas sets tighter RTL). Channel A and B cannot have the same RTL set, channel B must always be +1. For example, with 26.00 ratio and PSC on CAS8 the correct RTL level should be 40/41. If you get CAS7 working, the correct RTL will be 38/39, CAS6 is 36/37 etc. Sometimes you will get a whacky RTL when bios auto tunes timings hence there is an option to set it and you should always set it in final benching.

> I normally have multiple profiles for some IC as you sometimes have to OC in stages to reach max clock. I also like having a reference point in case the rig gets unstable

> There are two key areas which will probably require most of the tweaking to get the most out of your ram, RTLs, IOLs and these tertiary timings (tRDRD_dr, tRDRD_dd, tWRWR_dr, tWRWR_dd). Use AUTO settings to tune if you start getting stuck and then start setting them and checking stability in windows

> Be patient with bios boot cycles. Don't clear cmos too fast or stop if it looks like it is in a boot loop. Sometimes bclock training can take a minute, just let the bios do it's thing and let you know where it's at. Sometimes you will get a fail OC and if you just go back into bios, save and exit it will actually boot up and be stable in windows. Something to keep in mind.

> PSC profiles I have are mainly based on some patriot kit i was testing. YOu may find your RAM needs full retuning but give these a go

*PSC Air Profile*
-frequency is high for some RAM so you can try backing off to a lower ratio or bclock.
-please note that IOL is set to 4 and some RAM won't be able to handle that.
-TRRSR(TRDRD) is set to 4 as some of the RAM i test with mostly is able to handle it. most sticks will require 5
-volts are pretty high and may be too high for some PSC or BBSE. Most ram has a specific range it likes. I have some PSCs that will not like more than 1.8vdimm on air and even on LN2. Be mindful of that
-VIO volts can impact on stability once you start increasing frequency on ram. Some combinations of hardware require AUTO settings, others need a slight bump to +0.05 but other configurations may need as high as +0.35. These two volts will also impact on efficiency of RAM and if you get the values wrong you could be passing frequency but be slow in benchmarks such as superpi.
-test difference VSA settings. I tend to always start with +0.23 but have found instances where RAM was more stable with less volts such as some PSC that likes +0.05-0.1 and others that need +0.3(like one of my BBSE sticks)

*PSC LN2 Profile*
-RAM testing subzero has a lot of complications. You must measure the temp properly first of all and what i normally do is insert a temp probe between RAM PCB and heatsink.
-Don't freeze RAM and then let it warm up and let ice melt or you are looking for trouble
-Insulate the board properly, do not use grease in RAM slots you will OC with. Normally i don't grease orange slots but some prefer to use black. I do use grease in black slots because moisture very quickly makes the rig unstable and you will see it manifest with general instability or rig just cutting out as if a power cord was pulled etc
- Memory will need to retrain when it gets subzero. Some ram will retrain at 0C and some at -40C. I tend to try and check the CB of RAM also once i do train as you will have memory that will not run very cold for best results. Corsair Dominators hate going past -32 to -35C while Vengeance sticks with samsung ICs will go to -48C without an issue or slowdowns. PSC generally tend to like full pot but not all sticks so something to check and slowly build up.

*Corsair Samsung ICs*
(like Dominator Platinum, some Vengeance ram also). It might also be ok on Gskill 2600 Samsung based ICs, possibly other vendors too.
So far this ram has all had a fairly low cold bug around -30 to -35 on Corsair Dominators and anotther 10C lower on Vengeance. yet to test GSkill. Not a great deal of scaling on cold but there is some with corsairs. You have to get your voltage right. Timings worked fine on both kits so they should be pretty similar.

Dinos22
 
Soldato
Joined
25 Jun 2013
Posts
5,046
Location
Warks
I've got this board now. Everything's up and running.

One issue - for the 12V CPU supply, my power connector has the larger socket type, but cannot be split. That means it won't fit into the usual eight pin socket, as the 4 pin one next to it blocks it. I've put the plug into the 4 pin one instead (so most of the plug hangs over). Is this a PSU thing, or normal?
 
Caporegime
Joined
17 Jan 2010
Posts
66,802
Location
weston-super-mare
I've got this board now. Everything's up and running.

One issue - for the 12V CPU supply, my power connector has the larger socket type, but cannot be split. That means it won't fit into the usual eight pin socket, as the 4 pin one next to it blocks it. I've put the plug into the 4 pin one instead (so most of the plug hangs over). Is this a PSU thing, or normal?

Must be a PSU thing, mine is like this,


IMG_3527_zps8f9fe7ec.jpg


I've never had to use the 4pin ATX connector.
 
Last edited:
Soldato
Joined
25 Jun 2013
Posts
5,046
Location
Warks
Mine's like that, except on the side it has an extra four pin socket that doesn't even have any wires going into it. I expected it'd detach, but it's one piece of plastic.

I'll check my PSU box to see if there's another cable I could use.
 
Back
Top Bottom