

Caporegime
YOUR BASKET
1 x XSPC RayStorm D5 RX360 WaterCooling Kit £289.68
1 x NZXT Switch 810 Big Tower Case - Gun Metal £159.95
1 x XSPC RX240 120mm Radiator - Black £65.98
1 x Scythe Kaze Server 5.25inch Black Fan Controller £42.89
1 x 34 Piece PC Tool Kit £19.98
2 x Mayhems Pastel - Raspberry Purple Coolant 1L £14.99 (£29.98)
1 x Aqua ComputerTwinConnect 2-Slot - SLI/Crossfire Bridge £14.99
2 x Scythe Gentle Typhoon 120mm 1450 RPM - 3 Pin £13.99 (£27.98)
1 x Akasa AK-TK-01 Cable Tidy Kit £5.99
1 x Aqua Computer Ball Valve Female Thread G 1/4 without Fittings £5.99
6 x EK-PSC Adapter Rotary 45° G1/4 Black Nickel £3.59 (£21.54)
6 x EK-PSC Adapter Rotary 90° G1/4 Black Nickel £3.59 (£21.54)
2 x XSPC 7/16" ID (16/11mm) High Flex Hose - Clear £2.99 (£5.98)
2 x XSPC G1/4" to 7/16" ID, 5/8" OD Compression Fitting (Chrome) £2.99 (£5.98)
Total : £738.62 (includes shipping : £16.85).


This is what I bought from OcUK to water cool my rig. I am waiting on 2 Aquacomputer aquagraFX for GTX 680 Lightning G1/4 water blocks to arrive so I can do the LTG's as well.
The current rig I have to go with this little lot is:
Asus Rampage IV formula
3930K SB-E
MSI Lightning 680 X 2
Antec TruePower 750 (soon to be changed for a 1200/1000.
Avexir 16GB quad channel DDR3 2133 ram
Asus VG278H 27" monitor X 3
Logitech G510 + G9 keyboard and mouse
Sennheiser 3DDD 7.1 gaming headset.
Pictures are rubbish sorry but I finaly got all my parts except the MSI Lightning 680 water blocks, which should be with me around the 15th.

All nice and new and keen to go in")

Removed the bottom HDD holder for preperation of the 240 rad.

All fans and rad fitted. I had to take all the fans off the rad because I was going to fit it all internaly but the rad + fans wouldn't fit under the 5.25 bays.

All pipes fitted and my finger tips were real sore. I have big hands, so I had to tighten everything up with my finger tips

Connected the pump to the PSU only whilst I filled the res up and repeated. I was surprised at how smooth this went. Took around 4 fills to get everything in and left it running for around 3 hours with periodic vigirous shakes of the switch case. No bubbles remain and the little tiny bubbles I kept turning the pump up and down (which seemed to help).


Time to start feeding all the bitfenix braided cables round and trying to keep on top of cable management.


I ran a test with only 1 GPU to make sure all was good (which it was thankfully)


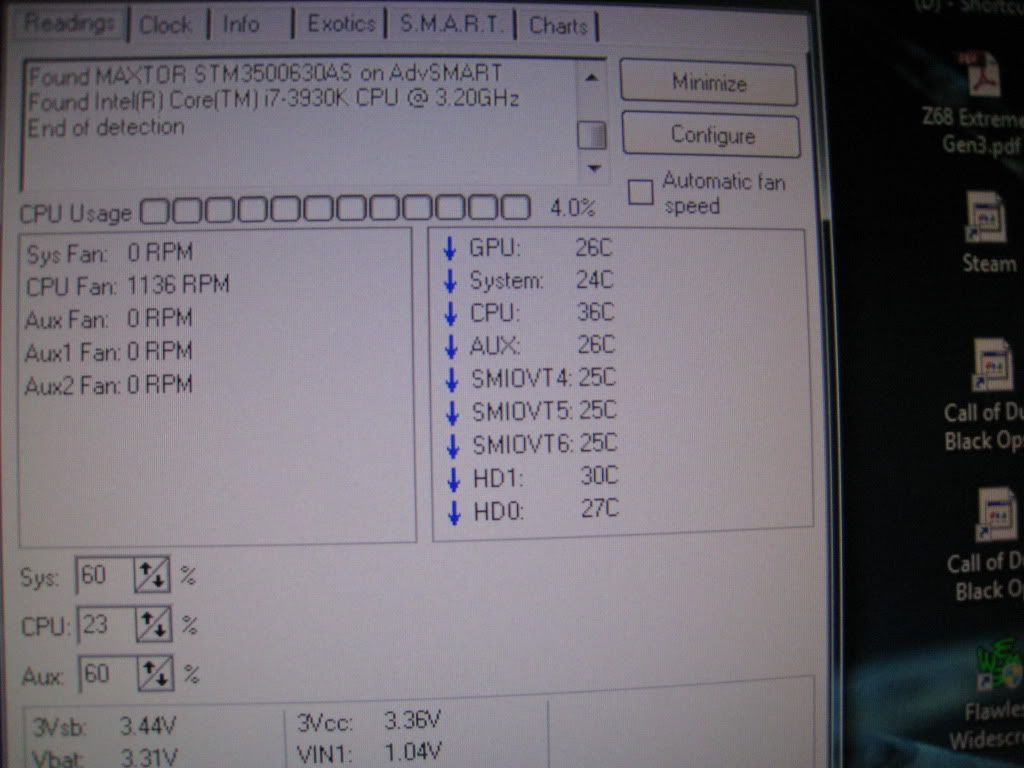
I monitored temps for 30 mins ish (got bored)


Very pleased with my first ever water cooling build and I am looking forward to when the LTG blocks arrive so I can get them under water also. I will be adding the 240 rad then also. I didn't feel it was worth adding yet
Sorry for the bad pics but I did enjoy building it
1 x XSPC RayStorm D5 RX360 WaterCooling Kit £289.68
1 x NZXT Switch 810 Big Tower Case - Gun Metal £159.95
1 x XSPC RX240 120mm Radiator - Black £65.98
1 x Scythe Kaze Server 5.25inch Black Fan Controller £42.89
1 x 34 Piece PC Tool Kit £19.98
2 x Mayhems Pastel - Raspberry Purple Coolant 1L £14.99 (£29.98)
1 x Aqua ComputerTwinConnect 2-Slot - SLI/Crossfire Bridge £14.99
2 x Scythe Gentle Typhoon 120mm 1450 RPM - 3 Pin £13.99 (£27.98)
1 x Akasa AK-TK-01 Cable Tidy Kit £5.99
1 x Aqua Computer Ball Valve Female Thread G 1/4 without Fittings £5.99
6 x EK-PSC Adapter Rotary 45° G1/4 Black Nickel £3.59 (£21.54)
6 x EK-PSC Adapter Rotary 90° G1/4 Black Nickel £3.59 (£21.54)
2 x XSPC 7/16" ID (16/11mm) High Flex Hose - Clear £2.99 (£5.98)
2 x XSPC G1/4" to 7/16" ID, 5/8" OD Compression Fitting (Chrome) £2.99 (£5.98)
Total : £738.62 (includes shipping : £16.85).
This is what I bought from OcUK to water cool my rig. I am waiting on 2 Aquacomputer aquagraFX for GTX 680 Lightning G1/4 water blocks to arrive so I can do the LTG's as well.
The current rig I have to go with this little lot is:
Asus Rampage IV formula
3930K SB-E
MSI Lightning 680 X 2
Antec TruePower 750 (soon to be changed for a 1200/1000.
Avexir 16GB quad channel DDR3 2133 ram
Asus VG278H 27" monitor X 3
Logitech G510 + G9 keyboard and mouse
Sennheiser 3DDD 7.1 gaming headset.
Pictures are rubbish sorry but I finaly got all my parts except the MSI Lightning 680 water blocks, which should be with me around the 15th.
All nice and new and keen to go in
Removed the bottom HDD holder for preperation of the 240 rad.
All fans and rad fitted. I had to take all the fans off the rad because I was going to fit it all internaly but the rad + fans wouldn't fit under the 5.25 bays.
All pipes fitted and my finger tips were real sore. I have big hands, so I had to tighten everything up with my finger tips
Connected the pump to the PSU only whilst I filled the res up and repeated. I was surprised at how smooth this went. Took around 4 fills to get everything in and left it running for around 3 hours with periodic vigirous shakes of the switch case. No bubbles remain and the little tiny bubbles I kept turning the pump up and down (which seemed to help).
Time to start feeding all the bitfenix braided cables round and trying to keep on top of cable management.
I ran a test with only 1 GPU to make sure all was good (which it was thankfully)
I monitored temps for 30 mins ish (got bored)
Very pleased with my first ever water cooling build and I am looking forward to when the LTG blocks arrive so I can get them under water also. I will be adding the 240 rad then also. I didn't feel it was worth adding yet
Sorry for the bad pics but I did enjoy building it
Last edited:


")