Project Micro Goliath

Associate
Joined
11 Sep 2014
Posts
212
Location
Suffolk, England
Welcome, to my second project build log! My first being project Molten Gold, in which I built my first ever custom loop with a black & gold colour scheme. With this new project, I plan to take things one step further & not only custom build the pc, but the case too!

I plan on using wood, glass & aluminium as my core materials for the case and I will make my own custom length sleeved cables for all possible components too. I'm yet to decide on a colour scheme for this build, but I'm thinking of a two tone theme. The wood I'll be using will be reclaimed from wooden pallets, just like I've done with my desk.

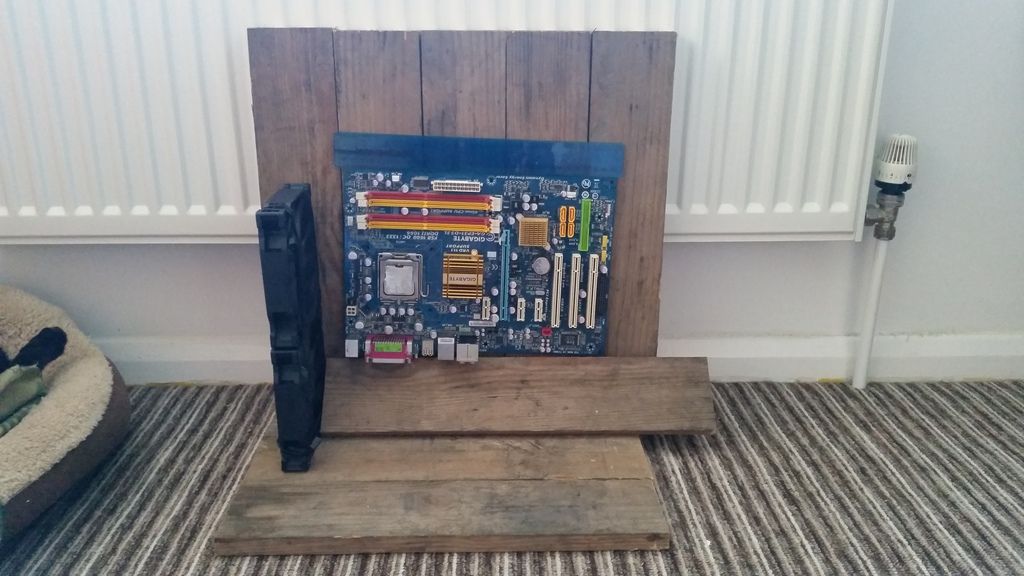
Below is the original design/layout I had in mind, before I got my hands on a pallet & spare parts for testing. After getting the pallet & cutting the wood to size etc, that layout wasn't possible & didn't look right, so it's been changed. Progress images & posts will be further into this log.
Micro%20Goliath%20PC%20Layout_zpsemvpejke.png


The components I plan to use for this build are listed below (this may change as the log progresses):

Mobo: Asus Z170-A Intel Z170 (Socket 1151) DDR4
CPU: Intel Core i7-6700K 4.0GHz (Skylake)
GPU: OcUK GeForce GTX 980Ti "Reference Design" OR OcUK GeForce GTX 980 "Reference Design" Depending on my budget
RAM: Kingston Fury Black 32GB (4x8GB) DDR4
Storage: Kingston HyperX 3K SSD 480GB
PSU: Corsair RM Series RM 850 '80+ Gold'
Fans: Corsair SP120's (possibly also AF120's/AF140's)
Radiator: XSPC EX240 Crossflow
CPU Block: Aqua Computer Cuplex Kryos XT .925 Silver Edition
GPU Block: EK-FC980 GTX - Acetal+Nickel
Tubing: Hardline (brand undecided)
Fittings: Monsoon Free Center Hardline 1/2 X 5/8 (16mm) 6 Pack - Green
Reservoir: RAI-R10 or RAI-R20 (Black)
Pump: XSPC D5 PWM + Bitspower D5 Mod Kit


This build is planned as a high end gaming machine in a small package, allowing me to travel with it with ease. This build was inspired by a game called Ark: Survival Evolved which is in Early Access on Steam right now. It's pretty demanding in terms of hardware, and my poor little system isn't up to the task of running the game at max settings. If I have chosen any parts which aren't suitable for the intended use, feel free to suggest replacements and explain why :) This log will be a long & steady one, so sit back & enjoy!
 
Last edited:
Associate
Joined
29 Dec 2014
Posts
2,333
Location
The "North"
Looking forward to seeing this build :). Just remember to make sure your case is sturdy as since you are using hardline tubing if the case moves too much in transit it could cause the acrylic tubing to crack at the fittings. It's rare but it's better to be safe and sure to avoid killing your hardware.
 
Associate
OP
Joined
11 Sep 2014
Posts
212
Location
Suffolk, England
Looking forward to seeing this build :). Just remember to make sure your case is sturdy as since you are using hardline tubing if the case moves too much in transit it could cause the acrylic tubing to crack at the fittings. It's rare but it's better to be safe and sure to avoid killing your hardware.

Yeah, don't worry it'll most likely be made from oak :) Either oak or use(good condition) pallet wood, which ever looks best & is sturdy enough. If I ever plan to move it outside of the house, I'll most likely take it apart & refill the loop once it's done moving. It'll be easy to take apart, in my mind at least aha.

Today I'm drawing up the placement plans on cardboard, can't do any test fits on old wood because I don't have any spare parts laying around :( But for Christmas, I should hopefully be getting the Monsoon hardline tube bending kit, some hardline & fittings :) So even with the old (current) hardware, I should be able to do a test fit & get it up & running. Then in time, replace the old hardware with the new.

Something I'm REALLY looking forward to doing & showing off, is the cable management idea I have in mind. Never seen it done before & it's going to be a sight to behold! Let's just say, I'll be taking cable routing holes to a whole new level! ;)
 
Associate
Joined
29 Dec 2014
Posts
2,333
Location
The "North"
Quick Question!

This build is going to be wood (from used pallets) and acrylic/glass. I've been told I'll need some metal in the build, is this true? If so, why do I need it? Will the components be safe if I don't use metal?
It's not my forte but I would assume the metal is to provide structural rigidity so the acrylic/glass don't get strained and crack. This could be due to woods natural nature to expand/shrink/bend/warp etc so the metal will provide a solid structure :)
 
Associate
OP
Joined
11 Sep 2014
Posts
212
Location
Suffolk, England
It's not my forte but I would assume the metal is to provide structural rigidity so the acrylic/glass don't get strained and crack. This could be due to woods natural nature to expand/shrink/bend/warp etc so the metal will provide a solid structure :)

Ah okay, thanks :) The wood I'll be using will be very strong, about an inch thick maybe more. The plan is to have grooves cut into the wood so that the glass/acrylic can slide into position. The concept is to have an upside down T shape wooden structure, then on one side (the near side) will be acrylic/glass going up from the base then across to the middle section of the inverted T (hopefully the acrylic/glass will be curved instead of a 90 degree angle). Then at the rear will be the 280 rad, exhausting hot air out the back, at the front will be two 140mm fans to blow cool, clean air across the gpu & mobo. The mobo will be rotated 90 degrees with the rear io ports pointing downwards. The gpu will be mounted flat to the wood on the right of the mobo using a pcie riser cable, again with the display ports facing downward. Reservoir will be horizontal above the mobo (or to the left, which ever looks best). PSU will be round the back, behind the 'mobo tray' along with the pump (which hopefully will be in a sound reducing chamber). The SSD (or SSD's) will be mounted along the base of the inverted T. That's what it looks like in my head, I hope it looks even half as good in anyone else's head aha!
 
Associate
Joined
29 Dec 2014
Posts
2,333
Location
The "North"
Ah okay, thanks :) The wood I'll be using will be very strong, about an inch thick maybe more. The plan is to have grooves cut into the wood so that the glass/acrylic can slide into position. The concept is to have an upside down T shape wooden structure, then on one side (the near side) will be acrylic/glass going up from the base then across to the middle section of the inverted T (hopefully the acrylic/glass will be curved instead of a 90 degree angle). Then at the rear will be the 280 rad, exhausting hot air out the back, at the front will be two 140mm fans to blow cool, clean air across the gpu & mobo. The mobo will be rotated 90 degrees with the rear io ports pointing downwards. The gpu will be mounted flat to the wood on the right of the mobo using a pcie riser cable, again with the display ports facing downward. Reservoir will be horizontal above the mobo (or to the left, which ever looks best). PSU will be round the back, behind the 'mobo tray' along with the pump (which hopefully will be in a sound reducing chamber). The SSD (or SSD's) will be mounted along the base of the inverted T. That's what it looks like in my head, I hope it looks even half as good in anyone else's head aha!
Sounds like a good plan, if I'm imagining it correctly it should look excellent. Like I say though, the metal may be necesary for the acrylic tubing to provide a decent structure so they don't strain and crack. Other than that though the plan seams well thought out. Good luck as I'm looking forward to seeing this build develop :)
 
Associate
OP
Joined
11 Sep 2014
Posts
212
Location
Suffolk, England
Sounds like a good plan, if I'm imagining it correctly it should look excellent. Like I say though, the metal may be necesary for the acrylic tubing to provide a decent structure so they don't strain and crack. Other than that though the plan seams well thought out. Good luck as I'm looking forward to seeing this build develop :)

Thank you :) If I do implement the metal, it'll be sandwiched in between the two layers of the mobo tray & possibly along the base. I want it to look as rustic as I can with the least amount of metal showing. I think my biggest problem is going to be getting the glass bent at a reasonable price at the angle/radius I want. After Christmas, watch this log speed up :)
 
Associate
Joined
29 Dec 2014
Posts
2,333
Location
The "North"
Thank you :) If I do implement the metal, it'll be sandwiched in between the two layers of the mobo tray & possibly along the base. I want it to look as rustic as I can with the least amount of metal showing. I think my biggest problem is going to be getting the glass bent at a reasonable price at the angle/radius I want. After Christmas, watch this log speed up :)
It's certainly worth waiting for to see this build log take form, as always though these ventures make a dent in the wallet :)
It's worth it though :)
 
Caporegime
Joined
5 Sep 2010
Posts
25,572
Hi,

Please ask a moderator to re-open this thread when you're ready to add pictures or sketches.


Your first post must include an outline of your plans, as well as pictures of the hardware or concept sketches of your ideas. Your progress posts should include answers to questions as well as pictures of any progress.

Thanks.

Edit 20/11

Re-opened for the OP to add photos.
 
Last edited:
Associate
OP
Joined
11 Sep 2014
Posts
212
Location
Suffolk, England
Got the pallet this week. So I've cut the slats up & trimmed them to equal sizes. Waiting until after Christmas until I can do a proper test fit of components. The layout has changed since the original design, so this is (roughly) how it'll look:
20151120_123531_zpsvynytwyl.jpg


The ruler marks roughly where the top (side) of the motherboard will be. The reservoir will either go horizontally above the motherboard, or round the back where the psu and pump will also be. This build is all about showing things off, so making both sides of the system interesting is what I'm aiming for.

If an SSD will fit on the slanted plinth below the motherboard, I will mount one or two there. The 280mm radiator will go at the back, behind the fans. Due to the length being a bit much, I've decided to mount the gpu directly to the motherboard rather than next to it with a riser cable.


So, that's where I stand at the moment. The next steps are: Sanding the edges & surfaces, screwing the wood together, motherboard mounting hole markers & lots of youtube videos on making my own custom cables!
 
Associate
Joined
29 Dec 2014
Posts
2,333
Location
The "North"
Nice to see an update. Now that I can see the material I'm sure this build will look excellent as the rustic wood actually looks pretty nice (Not sure why but I imagined warehouse pallets like those in Ikea :D)

Looking forward to seeing an update on the case construction and great work as always :)
 
Associate
OP
Joined
11 Sep 2014
Posts
212
Location
Suffolk, England
I had a quick skim on this but you need some metal as an earth, obviously the motherboard tray needs to be metal. Other than that, metal is just nice and strong so great for making cases.

Oh really? I would love it if the metal could be hidden somehow or as invisible as possible. Would it work if I attached a metal plate on the under side of the base? Or directly behind the motherboard & the same size as it, so I can't see it?
 
Back
Top Bottom