JayGee's Dark Base Pro 900 Water Cooled Build

Soldato
Joined
1 Dec 2015
Posts
18,514
could always do a route thats basic, clean and gets the job done, any spare tubes, get more playful. least you know you have a set of tubes ready for the rig that does the job !
 
Associate
OP
Joined
3 Jan 2018
Posts
205
Location
Cambridge
Probably will, but I’ll continue to theory craft in my head for a while longer yet as I’ve a few other tasks to complete before I get those runs done.
 
Associate
Joined
17 Jan 2018
Posts
5
Are you planning on putting fans in the bottom of the case? I'm putting together a system with this case and wondering if bottom fans will pull in to much dust as mine will sit on the floor.
 
Soldato
Joined
1 Dec 2015
Posts
18,514
Are you planning on putting fans in the bottom of the case? I'm putting together a system with this case and wondering if bottom fans will pull in to much dust as mine will sit on the floor.

If case has more possitive pressure , then only dust you'll get is on the filters which I believe the bottom has. With possitive pressure you get less build up of dust as air is being forced out of the case through any gaps due to higher pressure going into the case.
If you have more exhaust, the negative pressure and air is sucked through all unfiltered gaps in the case, which Al cases have a lot .
 
Associate
OP
Joined
3 Jan 2018
Posts
205
Location
Cambridge
Are you planning on putting fans in the bottom of the case? I'm putting together a system with this case and wondering if bottom fans will pull in to much dust as mine will sit on the floor.
Plan is to have a total of seven fans: three on each of two 420 rads and one exhaust fan to the rear. The fans on the front rad will pull air in and the fans on the top will exhaust.
 
Associate
OP
Joined
3 Jan 2018
Posts
205
Location
Cambridge
Having had a heavy week with work last week, and most of Saturday lost to family stuff, I was pleased to get some solid hours working on the build today - unfortunately it turned into a good-news/bad-news kind of day.

Good news: I completed all of the hardline.
Bad news: Leak testing showed up a couple of leaks.
Good news: No damage done and the drain port worked well to quickly drain off water in the loop.
Bad news: The leaks weren't resolved simply by tightening up fittings.

Ho hum, time to strip things back and redo a couple of the runs - which brings me on to the gotcha: because I was using the Monsoon hardline fittings, any run that I redo needs new lock collars (because they get bonded to the tube), and I've already used up the small number of spares that I had. New ones orderd but that means I won't be able to do much more now until next weekend.
 
Associate
OP
Joined
3 Jan 2018
Posts
205
Location
Cambridge
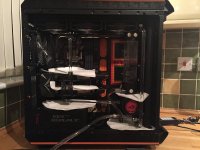
Last night I redid some of the runs, adding some additional 90deg fittings to reduce the number of bends and simplify things. Once done it was back to the kitchen sink for a second round of leak testing, this time all was good.

rXyfhX6.jpg

All being well I'll be able to hook up the stock cables this weekend for the first full system test with loop in operation, before starting on the custom cables.
 
Associate
OP
Joined
3 Jan 2018
Posts
205
Location
Cambridge
With apologies for a lack of photo's this is a short note on some of the challenges/progress over the weekend, with the aim of sharing some of the noob mistakes and things that I've learnt in the hope that it might inform/help others.

1/ At high revs the pump(s) had a very audible whine to them. Because I'd wired them up to be powered from a single molex rather than have each one powered separately I wasn't able to figure out if it was one or both, and with concerns that I had maybe let one run dry for a few seconds during filling I took both out of the loop and dissembled both looking for damage - nothing obvious. Still to do: test each in isolation to see (hear?) if I can figure out what the issue might be.

2/ Proprietary RGB gotcha. The blocks from Phantek have proprietary connectors - on the end of some (excessively) long cables. They come with additional (excessively) long cables that adapt to standard RGB headers. With the CPU block I was able to discretely route the cables to the back where I could then hook it up easily enough using the adapter cable. However for the GPU blocks I decided that the neatest solution was to cut down the cables and hardwire (solder) directly to the RGB header on the cards (on the basis that once attached I couldn't foresee needing to disconnect, and if I do need to split the card from the block I could still do that by disconnecting the other end of the cable). My mistake was to assume (in lieu of the connector labeling each colour) that it was only the connector that was proprietary and to solder the wires in the order of the ribbon cable. However once powered up it was obvious that the colour of the GPU blocks was not following the rest of the components. So, I dug out the adapter cable and pretty much immediately spotted that the ribbon cable had one of its strands crossed over, out of sequence to the standard RGB connector. Doh! So I also had to strip out both GPU's and resolder the RGB cables in the correct order (at the same time I did a better job at sleaving them). Still to do: confirm that they're now in synch with the rest of the RGB components (which I can only do once the pumps are back in and the loop is complete again).

3/ I've started the custom cabling which is going to be a mix of sleaving existing cables and making up some from scratch. The main take-aways at this stage:
a. It's not as daunting or as time consuming as I'd imagined it to be (this being my first foray into custom cables).
b. Getting the crimps right is something to practice (fortunately I'd over ordered pins) and is a test of eyesight as much as anything - I need to book an eyesight test because I really struggled to see things clearly enough with my current glasses!
c. Although I'd over ordered the sacrificial MDPC-X heat shrink, I hadn't anticipated quite how many attempts at getting the ends right would require more than one piece. On some attempts I used three individual pieces. On the basis that I've already used half of the quantity that I originally ordered and have only completed somewhere between one quarter and one third of the work I've already restocked.
d. For the first few pieces of sleaving I was taking care to melt the sleaving at both ends when I cut a piece. However using the MDPC-X sleaving the effect of that was for the sleaving to "blossom out" where it melted back. After a while I started to think that that might be contributing to why some pieces of heat shrink were tearing under heat (stretching against shape, extended edges before the sleaving itself melted back?). I then experimented with not melting the cut ends and I felt that it improved the success rate.
e. Be wary of "cheap" cable combs. It didn't take too many individual sleaved wires to be threading through the combs that I had before they disintegrated. I've now got some aluminium combs on order instead.

And in other, possibly less interesting, news (which really does need pictures to make sense of):
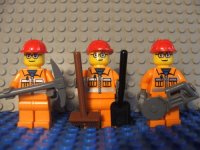
- I've added a bit more Lego to the case by way of trimming (hopefully finding the right balance this time - the attempt at a Lego shroud was waaaaaayyyy too much!)
- Going along with the growing Lego theme I've ordered some Lego minifigs "workmen" to add some additional "interest" to the build.
ufgGDys.jpg
 
Associate
OP
Joined
3 Jan 2018
Posts
205
Location
Cambridge
I thought that it would now be plain sailing but that isn't the case. I'm getting some random crashes, which on occaision leave the board in an unbootable state (Code 00). I say random because I've not found a way to reliably reproduce the issue and it doesn't appear to be linked to any kind of stress - i.e. it's not happening when the system is under load, either heavy power draw or temperature. For example it's crashed twice today after booting up for the first time and doing nothing more than web browsing. I had updated the BIOS yesterday to one that was only a few days old, so I've reverted to an older version but I'm still seeing the same issue. Next step is to start narrowing things down by swapping out stuff - starting with cables. :(
 
Soldato
Joined
1 Dec 2015
Posts
18,514
I thought that it would now be plain sailing but that isn't the case. I'm getting some random crashes, which on occaision leave the board in an unbootable state (Code 00). I say random because I've not found a way to reliably reproduce the issue and it doesn't appear to be linked to any kind of stress - i.e. it's not happening when the system is under load, either heavy power draw or temperature. For example it's crashed twice today after booting up for the first time and doing nothing more than web browsing. I had updated the BIOS yesterday to one that was only a few days old, so I've reverted to an older version but I'm still seeing the same issue. Next step is to start narrowing things down by swapping out stuff - starting with cables. :(

looking good! did the board work fine in air mode? questing you've tried running everything at 'Default' mode in bios just to see if crashes/boot kicks up a fuss?
 
Associate
OP
Joined
3 Jan 2018
Posts
205
Location
Cambridge
looking good! did the board work fine in air mode? questing you've tried running everything at 'Default' mode in bios just to see if crashes/boot kicks up a fuss?
Yes, no problems _apparent_ when running with air cooling, the caveat with that though is that I didn't do anything more than check that things were functional and didn't run the system for very long once it checked out. And the problem is very random - I had two crashes in the first 30 minutes of use today, and now it's ben running for two hours just fine. The only change for this period of stability is that I'm just running with one monitor, having taken out a small secondary monitor to use with another system - that said there were periods yesterday of some hours between crashes when I had both monitors connected, so I'll leave things running a while longer before I conclude that the issue is linked to that monitor.

WRT the BIOS settings I've not changed very much at all just yet, just some curves for the water pumps and fans.
 
Associate
OP
Joined
3 Jan 2018
Posts
205
Location
Cambridge
Nice build mate...what sort of temps are you getting for CPU ? Have you overclock it to 5GHZ yet ?
As noted above I've had some issues with random resets so, until I've resolved that, I'm not inclinded to add extra uncertainty by adding overclocks. That said I've not had a problem since removing a single small monitor from the equation and having had the system running non-stop for +10 hours during which time I've run benchmarks, played games, installed a bunch of stuff, watched YouTube and just generally messed around. It might be coincidence as I'm struggling to see why that monitor would cause such a problem, but it does seem really odd that with the monitor connected I was having regular crashes, but with it disconnected things are stable. It's not even as if it could be (sensibly) just the extra power draw as I've had crashes with the monitor connected but without the main monitor and a whole bunch of other peripherals too. No problem using that same monitor with any of my other machines either. Very odd. The irony of it is is that I usually use that monitor to keep an eye on system status with HWinfo, so without it I'm missing my usual view on temps etc. Anyways, the peak temp I've seen with the CPU (via the oled display) has been 60C during gaming (Far Cry Primal on Ultra).
 
Associate
OP
Joined
3 Jan 2018
Posts
205
Location
Cambridge
Update: Having had no crashes in over 12 hours of running the system I've re-introduced the second monitor that appeared to be the cause of the issues - and after a couple of hours I've still had no further crashes. :rolleyes:

Anyways that's given me time to run a few more benchmarks with the stock settings as a baseline ahead of overclocking, including running Prime95 blend for over 90mins which, with the fans and pumps running at ~50% and the front door on the case shut produced a maximum core temp of 65C (average core temp range: 51C - 53C). I was able to reduce that temperature by 6C in less than five minutes by opening the front door on the case and using the fan override selector to run the fans at max!

Other baseline benchmark results:
  • Cinebench R15: OpenGL 145.73fps, ref match 99.6%
  • Cinebench R15: CPU 1372cb
  • Cinebench R15: CPU(single core) 189cb (MP Ratio 7.25x)
  • Unigine: Valley 1.0 (DX11 / Ultra / 2560x1440 Fullscreen / 8xAA) 133.7fps, score 5592
  • Unigine: Heaven 4.0 (DX11 / Ultra / 2560x1440 Fullscreen / 8xAA / Extreme Tessellation) 173.6fps, score 4373
  • Unigine: Superposition 1.0 (4K optimized preset) score 9341
  • 3DMark: Time Spy 15922 (GPU 19723, CPU 7611)
  • 3DMark: Time Spy Extreme 7465 (GPU 9240, CPU 3575)
  • 3DMark: Firestrike 30275 (GPU 53316, Physics 19151, Combined 8984)
  • 3DMark: Firestrike Extreme 21403 (GPU 27368, Physics 18258, Combined 9008)
  • 3DMark: Firestrike Ultra 13019 (GPU 13921, Physics 18293, Combined 6789)
  • World of Tanks encore (Ultra / 2560x1440 fullscreen / TSSAA HQ) 27389
 
Associate
OP
Joined
3 Jan 2018
Posts
205
Location
Cambridge
This post is likely going to be the last for this project log as I don't envisage making any changes now for a while - that is unless there are questions/suggestions to respond to.

As a wrap up I thought I'd share the BIOS settings that have got me to a 5.1GHz OC on the 8700K and the DDR4 to 3.6GHz; the minor OC tweaks to the GPUs; and finally some benchmark results...

sDGgUjn.jpg
zwYG5AL.jpg
vNMbNjL.jpg
Yb97ZI5.jpg
4y9extz.jpg
REfl8DJ.jpg
CttWMZI.jpg
5qBoJ0M.png
n3Sblm6.png
SSW83A5.png
xH9FmF6.png
Note: Custom = same settings as the Extreme preset except screen size set to 2560x1440 (native resolution of my primary screen)
Owj3Pov.png
Z6fsX2S.png
Note: Custom = same settings as the Extreme preset except fullscreen and screen size set to 2560x1440 (native resolution of my primary screen)
VCDbl7a.png
6LaQqNq.png
ZKXNh90.png
pioOv7A.png
dSk9uRO.png
iCFNpL7.png
MbcrfoK.png
LtnQFwl.png
 
Associate
Joined
15 Nov 2018
Posts
1
Location
Washington, DC, USA
Hey JayGee, I just signed up for OCUK to reach out. I really like your build, and I've been working on a similar one for the past year. I was hoping to discuss it with you, hear how it's gone over the past few months, and see if I can get some advice.
 
Associate
OP
Joined
3 Jan 2018
Posts
205
Location
Cambridge
Hey JayGee, I just signed up for OCUK to reach out. I really like your build, and I've been working on a similar one for the past year. I was hoping to discuss it with you, hear how it's gone over the past few months, and see if I can get some advice.
Sure, hit me up.
 
Back
Top Bottom