Victorian renovation build log

Associate
OP
Joined
25 Sep 2016
Posts
885
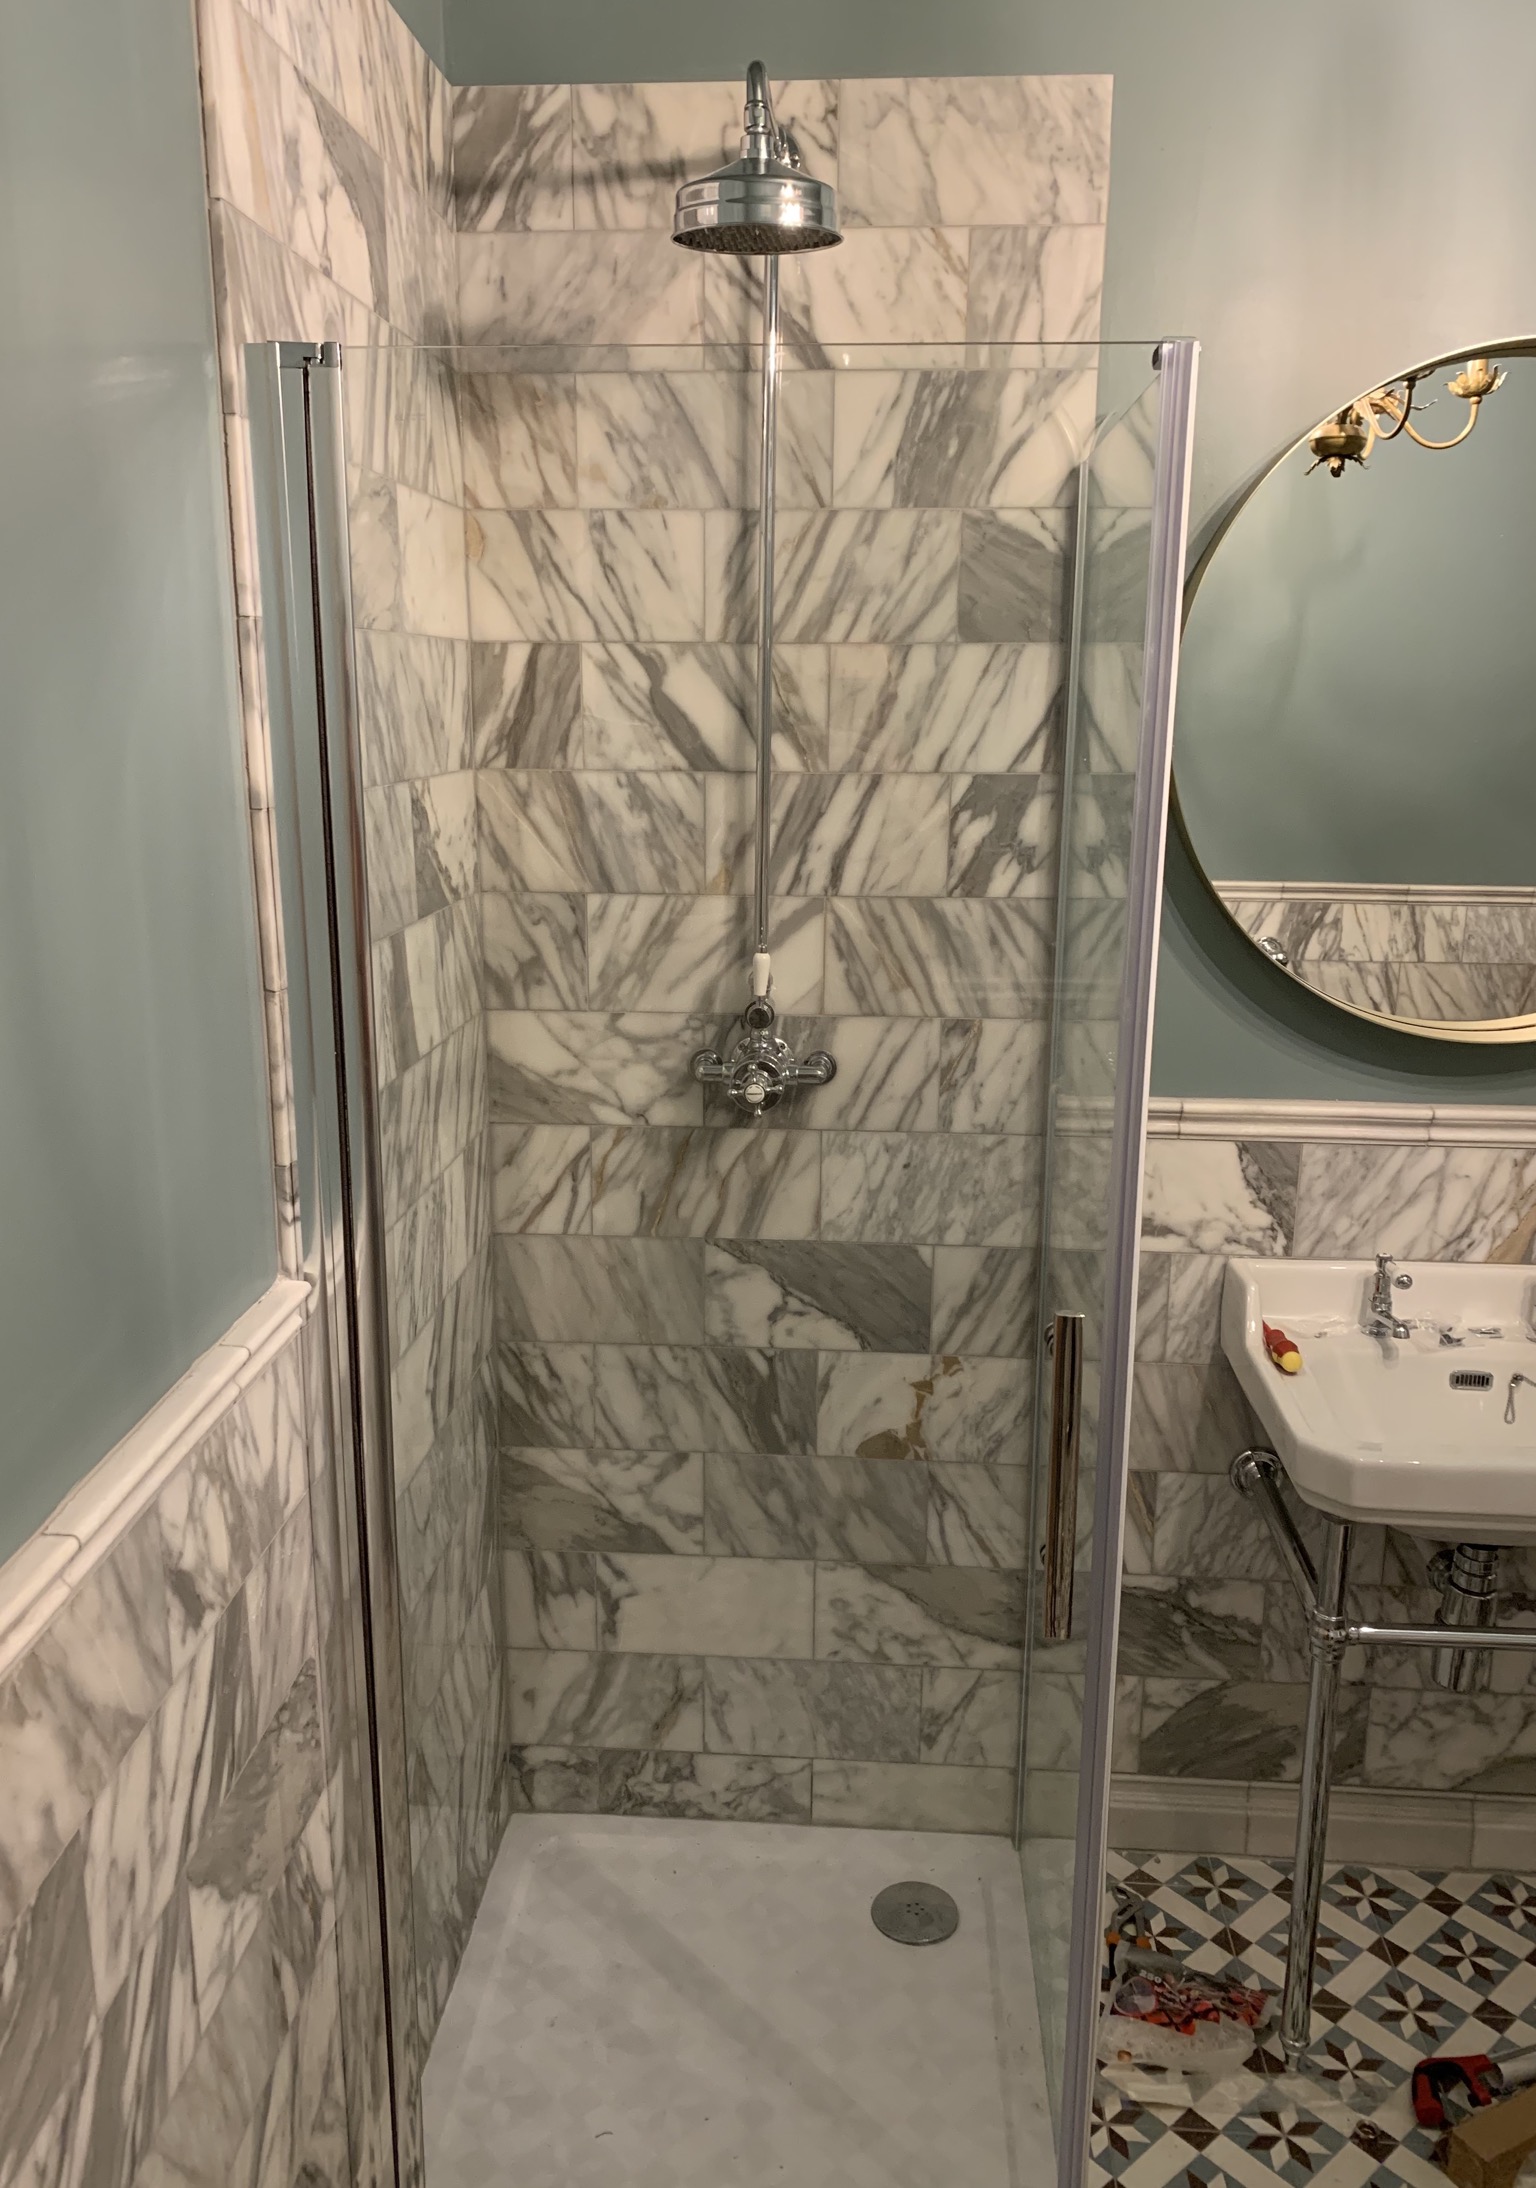
Is that a pattern on the tile or has a tiny piece of tile been cut to fill the gap?

Its a 3cm piece of the marble skirting mitred into the corner.

Everything in this house is actually much bigger than it appears on the pictures, the tiles are 30x15cm and the mirror is nearly a metre
 
Associate
OP
Joined
25 Sep 2016
Posts
885
F7A587CA8AA141CFA536.jpeg


Chimney pointed and cleaned

Anyone have and recommendations on brick sealers???

Next is strip the ceiling and then plaster!

Unfortunately I’ve been sent the wrong shower cubicle, but I’ve got painting to be getting on with!
 
Associate
OP
Joined
25 Sep 2016
Posts
885
Another baby has been born and really slowed me down :p

Managed to fit the taps and sink waste and the shower and frameless enclosure.

This was a cheapo eBay shower cubicle and I’m actually pretty impressed, decent fixings and magnetic seals on the door

8632FF24464742F8BFFB.jpeg


Also I’m now employing a friend of a friend as a labourer to help crack on with wall paper stripping, clearing, sanding and, well, labouring :D
 
Associate
OP
Joined
25 Sep 2016
Posts
885
had the bedroom plastered before Christmas
5ABAD49C560544FA99B7.jpeg


and mounted and plumbed in a radiator, room is toasty with 15mm PIR behind the plaster board

46BC8B89EC2D4EAEBBDA.jpeg


Ignore the mess I'm a very messy DIYer! I'm working my way through doing the skirting which is 9" victorian reproduction stuff.

And just to live up to the wifes expectations I've started excavating the basement before finishing the bedroom! I'll put some pics up at some point
 
Associate
Joined
14 Apr 2011
Posts
1,153
Location
Stafford
Have you capped the top of the chimney? might be an idea to put an air brick at the bottom of the chimney and ideally you dont want to seal it as the chimney will still need to breathe. You need to allow any moisture that finds it way into the chimney to escape. If you seal the bricks from the outside you might get issues with damp later.
 
Soldato
Joined
12 Jul 2005
Posts
3,916
Have you capped the top of the chimney? might be an idea to put an air brick at the bottom of the chimney and ideally you dont want to seal it as the chimney will still need to breathe. You need to allow any moisture that finds it way into the chimney to escape. If you seal the bricks from the outside you might get issues with damp later.

this!
 
Associate
OP
Joined
25 Sep 2016
Posts
885
The chimney breast pics are inside the room, bricks are being sealed on the inside purely to make them dust free and wipeable.

Chimney is actually 4 flues, 2 of which are in use - 1 for cooker extractor and 1 for an open fire
 
Associate
Joined
14 Apr 2011
Posts
1,153
Location
Stafford
The chimney breast pics are inside the room, bricks are being sealed on the inside purely to make them dust free and wipeable.

Chimney is actually 4 flues, 2 of which are in use - 1 for cooker extractor and 1 for an open fire

understood but talking from experience any unused chimney should always been vented top and bottom. You will get condensation building up inside the chimney as the warm flue gases condense on the cold brick on the way out of the chimney (normally at roof level) but does happen all the way up at least for the open fire. (less so if there is a liner) This water has to go somewhere which is normally out of the brickwork into the air which can only happen if you actually have air going into and out of the chimney, otherwise it will just get wetter and wetter as there is no air movement for the water to move into and eventually start penetrating to the outside of the chimney.

if this was me I would stick a decent sized (225x75mm) air brick just below the ceiling height of that room. This would ensure a gentle flow of slightly warmer air from the room up the chimney to help keep it dry, it would also provide the room with some extra ventilation which are often under-ventilated so would also help negate any mould and condensation issues.
 
Associate
OP
Joined
25 Sep 2016
Posts
885
Probably also fill the room with carbon monoxide and grease!

I’ll take my chances with a kitchen extractor and an open fire being ventilation enough
 
Associate
Joined
14 Apr 2011
Posts
1,153
Location
Stafford
Probably also fill the room with carbon monoxide and grease!

I’ll take my chances with a kitchen extractor and an open fire being ventilation enough

well that would only happen if your flues are compromised . I`m only trying to offer some friendly practiced advice is all, up to you if you want to take it or not. Love the changes you are making and the nods to trying to maintain some of the history of the property.
 
Last edited:
Soldato
Joined
1 Mar 2008
Posts
6,266
Location
Deep North
Surely the chimneys that are still in use are separate to the sealed up one in the bedroom?

Even if it's the same chimney breast running up through the house, all fires have their own individual chimney within the stack with chimney pot on the top of the chimney stack.
 
Associate
OP
Joined
25 Sep 2016
Posts
885
@Slade2 all advice appreciated! the central chimney has been the same for the past 6 years with no issues, and having seen some of the internal brick work, I wouldn't trust the flues not to leak into each other, not a risk I'll take when dealing with bedrooms. Plan is to get a flue liner down for both the open fire + kitchen extractor.

Either way, any issues and it will be very easy to add an air brick given it will remain exposed
 
Associate
OP
Joined
25 Sep 2016
Posts
885
While I mess around with skirting in my odd evenings off, a family friend has dug out the basement!
It was just tiles laid on earth, most of which were broken. Digging 30cm down for a new insulated slab.

FBEDB03E518140A9B64E.jpeg

6B0772A73A104AA7A09F.jpeg


Not 100% what to use the space for yet.
The corridor and under the stair will probably be a boot room as it has direct access to the garage, the room at the end I was thinking maybe a little workshop/hobby room for me
 
Associate
OP
Joined
25 Sep 2016
Posts
885
992D2492E4C7458AAF21.jpeg


The 'murder room' as its now known has been fully dug out, layered with hardcore and sand and DPM membrane put down. Membrane is full height on the left due to the soil level, wall on the right is the garage at the same level.

Tomorrow the floor insulation will go down ready for the screed next week.

While waiting for the screed the garage walls will be slurried and some drains put into retaining walls to help divert the water away.
 
Associate
OP
Joined
25 Sep 2016
Posts
885
Sorry photobucket seems to have died taking the early hosted pics with it and cubeupload seems to have been black listed by lots of web security so block the images.

Insulation down for the big (for me) pour next Monday. Got a quote for floor screed - £360 delivered dry onto the drive! Concrete suitable for indoor floor slabs mixed on arrival and barrowed in for me £140.

Now to work out what to do when it arrives :eek:

D53E8320F10944AABF65.jpeg
 
Soldato
Joined
19 Oct 2002
Posts
6,829
Location
Bath
I always use Imgbb.com for image hosting, it will auto give you the links for forums and the like.

Good work on the house is looking fantastic.
 
Back
Top Bottom