Am I doing something wrong? (air getting trapped in loop)

Soldato
Joined
27 Mar 2003
Posts
2,708
So I am trying to get to the bottom with a problem (question mark) with my current loop.

I am still relatively new to water cooling (almost 18 months) so have already done 2 loop replacements during that time (I like to make sure that I do a fluid and tube swap every 6 months)

So my current water cooling setup is:

EK-Velocity RGB Intel CPU Block (Nickel+Plexi)
EK-CoolStream SE 360 Slim Triple Rad with (3 EK-Vardar EVO 120 RGB Fans)
EK-XRES 140 Revo D5 Pump+ Res Combo
16/10 Soft Tubing + Compression fittings. (inc 2 90deg, 2 45deg fittings, 1 T-piece with drain port)

So I seem to have no problems in terms of leaks but it seems I am constantly getting air trapped in the system which seems to congregate at the return port/tube from the radiator to the pump/res.

I have tried setting the pump to minimum speed and it seems to make no difference I seem to constantly get air trapped over time so I am not sure where this is coming from as I said there is no leaks and all fittings are as tight as they can be. I am not sure if this normal with having the rad fitted at the top of the case or if it is a case of the pump is sucking air in from the fluid surface of the res (there is no vortex but you can see rippling on the surface of the fluid).

Currently I have been leaving a little air gap at the top of my res (not sure if that is causing the issue) so should I be filling the loop to the top of the res as well so it is flush to the cap?

Thanks in advance.

I would like to get to the bottom of this issue before my next replacement which is in the coming week. I've just ordered replacement fluid, thermal paste etc.
 
Soldato
Joined
11 Sep 2013
Posts
12,310
Tip the case.

Air goes up, and you're getting air stuck at the highest point, which is the top of the rad. The exit port is (I assume) on the underside, so beneath where the air runs to.
You have to tip the case so the exit port from your rad is as high as it can go. This will allow the air to escape.
Remember to keep the pump/res upright though, so unscrew it and turn it as you turn the case.
Another option, if you have a multi-port rad is to slightly open one of teh top ports to bleed the air out that way, but it can very easily spill.

Note that both methods require you to have the loop running as you do this...
 
Soldato
OP
Joined
27 Mar 2003
Posts
2,708
Tip the case.

Air goes up, and you're getting air stuck at the highest point, which is the top of the rad. The exit port is (I assume) on the underside, so beneath where the air runs to.
You have to tip the case so the exit port from your rad is as high as it can go. This will allow the air to escape.
Remember to keep the pump/res upright though, so unscrew it and turn it as you turn the case.
Another option, if you have a multi-port rad is to slightly open one of teh top ports to bleed the air out that way, but it can very easily spill.

Note that both methods require you to have the loop running as you do this...

That is what I have done several times but there is air still getting caught in the system. Once I think I have everything cleared out as in a solid stream coming from the rad to the res. a couple days later I see that little air gap growing larger and larger.
 
Soldato
Joined
11 Sep 2013
Posts
12,310
That is what I have done several times but there is air still getting caught in the system. Once I think I have everything cleared out as in a solid stream coming from the rad to the res. a couple days later I see that little air gap growing larger and larger.
Have you tipped the case so the exit ports on all the other components also bleed?
Might be worth repeating and switching the pump off and on, ideally while set to maximum, to help force as much air out as possible.
You will get microbubbles in the system that take a while to bleed out. That's just normal. Taking the top cap off the res every now and then, to alleviate the pressure, will help.

I'm more concerned that you have it getting stuck in the return pipe, though.
Do you have a photo of the loop, so we can see exactly how you have it set up, with all the fittings, etc?
 
Soldato
OP
Joined
27 Mar 2003
Posts
2,708
Here are some quick snaps for you

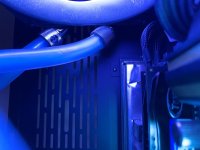
(Showing the air trap)
mRvIqbY.jpg


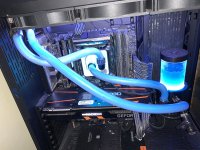
(Current Loop Setup) - omg how much dust :( good job I have an air duster arriving to sort that mess out :p
YEGHdPi.jpg

I have tipped the case on a regular basis and I tried to run the pump at min/max and then also got the air to move down the tube to the res and then switched of so it didn't get sucked back into the loop, creating all the micro bubbles.

I am wondering if I switched the rad round so that all the tubing is on the right hand side and then reducing the total loop length.
 
Soldato
Joined
11 Sep 2013
Posts
12,310
Well, that's a lot of unnecessary angled fittings, which probably isn't helping your flow rate... I've heard it said that one should never use an angled fitting on the Out port of the pump, as it can kill flow rate.
Is there any reason you chose to use all these angles, maybe space constraints?

Personally I'd ditch all the angles, except maybe the one on the return hose by the res.
I'd also put the CPU block on 90º anti-clockwise, so the Out port is on the top.

(Showing the air trap)
The case lighting makes the photo a little unclear - Are you meaning the little bubbles along the top of the hose, or is the entire bore empty, there?

I have tipped the case on a regular basis and I tried to run the pump at min/max and then also got the air to move down the tube to the res and then switched of so it didn't get sucked back into the loop, creating all the micro bubbles.
Pump on, set to max and unsecured so you can keep it upright.
Tip the case all the way to the right and hold it there for a good 30 seconds. Then, keeping it tipped, turn the pump off and let everything settle. Then turn it back on and hold it for about a minute. Repeat this several times.
You could also try squeezing the return hose, to build some back pressure. Squeeze it flat as you can, hold for several seconds, release. Repeat as necessary.
Finally, turn the case and res back upright and try a few more squeezes.

If at any point you hear/see any freed air moving through the loop, keep going until it stops.

I am wondering if I switched the rad round so that all the tubing is on the right hand side and then reducing the total loop length.
It can't hurt, but TBH I would first try swapping the ports on the rad. Having the front one as exit would be easier for tip-bleeding, as you can then tilt the case backward as well as to the right, and get that port as high as possible.

Also - Assuming it was new, did you flush the radiator through before installing it?
When did you last check/clean out the CPU block?
 
Soldato
Joined
18 Oct 2002
Posts
7,836
Location
Scun'orp
Is there anything stopping you flipping the rad round so the ports are at the front of the case? You will be able to get a much tidier loop that way with shorter overall length. The return line would go straight up in that case and be on the nearside port, so should be easier to bleed. I also wouldn't flip the block around unless EK say it can be fitted any old way, some cpu's need it in a certain orientation for optimum performance to align with the core, though to be fair it probably is quite a minor effect.
 
Soldato
Joined
29 Sep 2010
Posts
5,707
Whilst you're using a lot more angled fittings than you probably need, I doubt that is your problem or affecting flow rate all that much, especially in a cpu only loop.

Probably better off taking a photo of the lock when it's not powered on, without the lighting etc.

It might be better mounting the rad in the front as some have said, ports at the top would be easier to bleed but harder to drain, ports at the bottom harder to bleed but easier to drain.

Amount of fluid in the res won't impact your problem.
 
Soldato
Joined
11 Sep 2013
Posts
12,310
I also wouldn't flip the block around unless EK say it can be fitted any old way, some cpu's need it in a certain orientation for optimum performance to align with the core, though to be fair it probably is quite a minor effect.
EK blocks generally can be fitted that way, ie 'goofy' with the Out on top. if you so choose.
I mainly used mine goofy for the ease of bleeding, but in some cases it can also lower the temperatures by as much as 5ºC.
It's an option, at least, and you likely won't mess anything up by trying.

My current block is an Aquacomputer Kryos NEXT, which is goofy as standard, and while orientation made naff-all difference on a 4770K, the 5960X was about 4º lower.
 
Soldato
Joined
18 Oct 2002
Posts
7,836
Location
Scun'orp
Also, kudos to the OP for sticking with normal flexible tubing and resisting the urge to go hard-line, if this is your first loop :) There is nothing wrong with the old flexy tube. Also comes into its own if you run into bleeding problems and have to rejig things about to fix.
 
Soldato
OP
Joined
27 Mar 2003
Posts
2,708
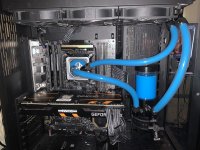
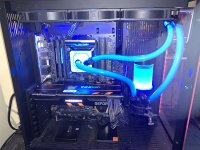
So i have spent the weekend and the first half of the week getting the system completely redone and hopefully you will agree the final product looks a lot better than before.

SLCux5Y.jpg

With lighting on

hz6eqIP.jpg

I had one large air lock in the rad after a day or so which refused to come out so I unbolted the res and then tipped the case 90 degrees (very carefully as ensuring not to tip the res over everything) on it's back and then air just came out. I haven't seen any other big bubbles in the loop or even trapped in the rad like that

This I think looks a lot cleaner now and have reduced my total tube footprint by probably 50%. I still see little improvements I can make from this in having the top and right tubes slightly shorter. but I didn't want to cut the tubing too short with this new config.

Thanks again everyone for the suggestions. It certainly gave me some food for thought.
 
Soldato
Joined
29 Sep 2010
Posts
5,707
Why do you have angled fittings on the rad still? Looks like they're not needed.

Not sure on the heat dissipation of the entire system as you've got 3 fans at intake through the roof and then from what I can see no other fans.

Glad the air lock is gone though.
 
Soldato
OP
Joined
27 Mar 2003
Posts
2,708
Why do you have angled fittings on the rad still? Looks like they're not needed.

Not sure on the heat dissipation of the entire system as you've got 3 fans at intake through the roof and then from what I can see no other fans.

Glad the air lock is gone though.


I found them easier to have on for fitting the tubing onto and allowing the flex tubing to bend a bit more naturally rather than trying to force it into some tight angles.

The fans at the top are set up to pull air through the rad rather than draw air in. I have tested them at full power and they pull a lot of air through (although they sound like a jet engine when at that level)

temps are fine usually. cpu at load rarely goes above 55c at full load with my 5820K @ 4ghz. and the gpu at full load usually sits at around 80C from looking at hw monitor.
 
Soldato
Joined
29 Sep 2010
Posts
5,707
I found them easier to have on for fitting the tubing onto and allowing the flex tubing to bend a bit more naturally rather than trying to force it into some tight angles.

The fans at the top are set up to pull air through the rad rather than draw air in. I have tested them at full power and they pull a lot of air through (although they sound like a jet engine when at that level)

temps are fine usually. cpu at load rarely goes above 55c at full load with my 5820K @ 4ghz. and the gpu at full load usually sits at around 80C from looking at hw monitor.
Thing is though the fans are pulling that hot air off the rad and dumping that into the case, the same as your gpu is doing and the fans for each are directly facing each other. 80 seems pretty hot for an aftermarket gpu temp though I can't tell what rtx/gtx it is :)
 
Soldato
OP
Joined
27 Mar 2003
Posts
2,708
The air is being pulled from inside the case, through the rad and out the other end, rather than coming from outside the case, going into the rad and then pulled into the machine. If I hold a piece of paper above it at full pelt then the paper floats for a second or two before it gets blown away.
(it was the one thing i ensured was happening when i initially set it up to prevent the middle becoming an oven)
I have 2080 RTX. that 80C is at full load (ie playing something like Destiny 2). usually it will sit in the mid 40's when doing nothing too gpu intensive.
 
Soldato
Joined
21 Dec 2019
Posts
6,520
Location
Planet Thanet
Looks like you improved it
But anyway for future reference
You don't need to replace coolant and tubing every 6 months
Hell my primo chill lrt tubing is 8 years old now and still good as new, though it's really solid stuff compared to the really soft bendy stuff nowadays
Angled fitting on rads is fine or you would have to bend the tubing too much
Use the port on top of the reservoir for bleeding air out just very slowly open it
Do that a few times you will actually hear air hiss out
Don't fill the res to the brim, like you have it is fine otherwise if you open the top port on the reservoir coolant not air comes out
 
Soldato
Joined
29 Sep 2010
Posts
5,707
The air is being pulled from inside the case, through the rad and out the other end, rather than coming from outside the case, going into the rad and then pulled into the machine. If I hold a piece of paper above it at full pelt then the paper floats for a second or two before it gets blown away.
(it was the one thing i ensured was happening when i initially set it up to prevent the middle becoming an oven)
I have 2080 RTX. that 80C is at full load (ie playing something like Destiny 2). usually it will sit in the mid 40's when doing nothing too gpu intensive.
Odd, unless you've changed the fans around? Can see the fan shrouds bit which is always at the side of the direction of air flow
 
Soldato
OP
Joined
27 Mar 2003
Posts
2,708
Odd, unless you've changed the fans around? Can see the fan shrouds bit which is always at the side of the direction of air flow


you were in fact correct. I did have the fans in the wrong orientation. I Thought when I had put everything back together again i had it pulling the air out. When i blasted the fans at full it was odd that it was sucking. So have literally just had the rad off and swapped the fans over.

Good catch. 1 internet cookie for you.
 
Soldato
OP
Joined
27 Mar 2003
Posts
2,708
Looks like you improved it
But anyway for future reference
You don't need to replace coolant and tubing every 6 months
Hell my primo chill lrt tubing is 8 years old now and still good as new, though it's really solid stuff compared to the really soft bendy stuff nowadays
Angled fitting on rads is fine or you would have to bend the tubing too much
Use the port on top of the reservoir for bleeding air out just very slowly open it
Do that a few times you will actually hear air hiss out
Don't fill the res to the brim, like you have it is fine otherwise if you open the top port on the reservoir coolant not air comes out

I know i don't need to replace it every 6 months but as I have my pc most of the time. as soon as I see the tubing looking a bit too cloudy/ streaky I know it is time to swap out. Plus this time when i did the swap out I had some gunk in the water block. So I just like to get it into a routine. Plus I like to change to the colour every so often
 
Soldato
Joined
29 Sep 2010
Posts
5,707
you were in fact correct. I did have the fans in the wrong orientation. I Thought when I had put everything back together again i had it pulling the air out. When i blasted the fans at full it was odd that it was sucking. So have literally just had the rad off and swapped the fans over.

Good catch. 1 internet cookie for you.
HTH :) might reduce your gpu load temp now too.
 
Back
Top Bottom