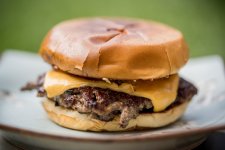
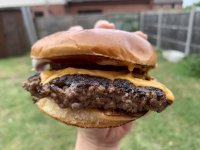
Caporegime
That looks immense. Major food envy here right now.
Had one, I think I threw it away because I found myself not liking the workflow of making the burger with it.
I don't even roll it into a ball these days since it gets press down in the pan. I divide a pack of mince into squares/rectangular shapes right there in the packet with a straight edge of the burger flipper thing. Lift one up into a hot carbon steel pan and using the same flipper squash it down until the right thickness that i want. If I want more leverage to push down, instead of stress on the handle I just grab a mug or use a wooden spoon.
Once flat season on one side. Flip once.
p.s. sprinkle some garlic powder with salt and pepper. It takes it up a notch.
Big or small.

It's a lightweight, gaming targeted mice. It does that really well. Especially for fps games.
And again there are IMO better lightweight gaming mice available with more features and less downsides. It certainly isnt the god of mice.
I don't use mine too often either. My usual tactic is to grab the mince, work it like a dough as described about, then grab a ball, chuck it in a hot pan and then use the above pressed pit to squash it down.
Kneading them like dough isn't good either. If you watch Gordon Ramsay, he handles them as little as humanly possible.
Not as uniform but i find it works a little better.
Had one, I think I threw it away because I found myself not liking the workflow of making the burger with it.
I don't even roll it into a ball these days since it gets press down in the pan. I divide a pack of mince into squares/rectangular shapes right there in the packet with a straight edge of the burger flipper thing. Lift one up into a hot carbon steel pan and using the same flipper squash it down until the right thickness that i want. If I want more leverage to push down, instead of stress on the handle I just grab a mug or use a wooden spoon. Don't use your hand, if you slip that's going to be one bad day.
Once flat season on one side. Flip once.
p.s. sprinkle some garlic powder with salt and pepper. It takes it up a notch.
Big or small.


Oh man, I'm hungry now. My process is similar, but I do make them into balls. I put them in between two small plates to squash them, then just chuck on a bit of salt and pepper combo before I put them in a hot pan.
Man I love burgers.
To finish it off and help the cheese melt, once flipped you put the cheese on and put a lid down for about 30 seconds.
https://www.amazon.co.uk/gp/product/B01N9NXZTY/ref=ppx_yo_dt_b_search_asin_title?ie=UTF8&psc=1
Ah see, i just stick the frying pan in the oven for a few minutes to melt the cheese, hadn't thought of just using a lid.
Although recently i've been putting the cheese onto the bread which gets toasted in the oven, so the cheese melts that way.
God i'm hungry.
 I am not sure i am being really lazy or what lol
I thought connected ovens were such a non-sense however I wish I could preheat mine remotely.See, that requires turning on and preheat the oven, this is much more streamlined
I tried the plate method, but just streamlined straight into the pan, there is less to wash up. I found making them into balls is kind of pointless because it is going to get squashed again. Plus it never really spread perfectly round anyway. I can always shape the edges once flattened into a more round shape if need be. Honestly, it's not necessary. The workflow of flatten (smash) in the pan is what i prefer.
I bought one of these, nice and wide for the whole patty.
https://www.amazon.co.uk/gp/product/B017LU1DD4/ref=ppx_yo_dt_b_search_asin_title?ie=UTF8&psc=1
To finish it off and help the cheese melt, once flipped you put the cheese on and put a lid down for about 30-45 seconds.
https://www.amazon.co.uk/gp/product/B01N9NXZTY/ref=ppx_yo_dt_b_search_asin_title?ie=UTF8&psc=1
I have one of those, but none of my pans are big enough for it to work very well unless I just cook one burger at a time.
I am tempted to get one of these.
https://www.amazon.co.uk/gp/product/B07Q7QMFSR/ref=ox_sc_saved_image_5?smid=A1QADIZC1R4U92&psc=1
A friend has one of those and its great for big cooks on camp fires or camping stoves - also works surprisingly well on the induction hob!
It's likely going to be a while before I get the chance to properly test it as the weather is not being agreeable for polishing. A few things I've noticed just quickly checking it out. It's actually made in Japan which is unusual. (not that it necessarily makes a difference) In free spin mode is very easy to stall unless at a very high speed setting. (which will chew the battery very quickly) This issue is well covered on the reviews on the PO6000C mains powered version. This may improve with use as it all seems pretty tight currently and probably needs some use to loosen up a bit. Forced rotation mode seems to be great. It's certainly on par with the festool which costs a lot more.Please let us know how you get on with it, quite tempted myself.


