Lifting very old floorboards

Soldato
Joined
2 May 2011
Posts
11,882
Location
Woking
I ask myself that about 50 times a day. But I don't think I've damaged it so much; I just think that I don't know what I'm doing. But I'm learning and I'm enjoying that part.

Also, the quote I got was for about seven thousand pounds.

I suspect I'll have it all done professionally if I ever get the works done to the place that I want to.

I suppose you have to **** it up quite a number of times before you get anywhere near £7k. From the video it looks like you're making progress anyway.
 
Soldato
Joined
18 Oct 2002
Posts
14,017
Location
Sandwich, Kent
The drum sander has not worked out;

Here is a video explaining why.

I am now in the market for a belt sander.
There are two Makita 9403's one is 110v and the other is 220v. Dumb question but in the UK does it matter which one I get?
There might be some at Lidl still. They were out a few weeks ago. But, damn - doing a whole floor with it will kill you. And it'll be awful.

Perhaps look into hiring an orbital floor sander if the one you've got currently isn't working for you.
 
Last edited:
Soldato
Joined
18 Oct 2002
Posts
14,017
Location
Sandwich, Kent
I'm not
From the look of my floors can we determine they are, indeed, pine?
I'm trying to find out how to finish them.

27mawpi.jpg

I want them to look like this:

U7mGecA.jpg
It's not going to look like that - that's fresh wood. Certainly not for any period of time at least.

With the different shades you're going to be bound to still have even with it all sanded / vs the new strips - I'd suggest going for a darker, perhaps richer colour.

Also, reading this might be beneficial.

https://www.houzz.com/discussions/1195423/help-wood-floor-varnish-disaster
 
Soldato
Joined
7 Feb 2004
Posts
8,114
Location
North East
You're never going to get it looking like perfectly even new floorboards. If yours are old as you say they won't be perfectly level and smooth, they'll have 100 years of knocks, wear, warping, drying and they won't have been perfect when laid. Especially if the building was a warehouse or whatever. If you want them to look like that, you're going to have to lay new flooring on top.

I'd suggest sanding them down as best you can so that they're back to bare wood so far as possible and applying some sort of stain or coloured finish.

I've not used their flooring products, but I found Osmo Oil really good on my interior wood.

https://osmouk.com/colour-your-floor/

Perhaps something light coloured would be enough to blend it all in?

I'd suggest getting samples before committing though! -

Edit - £1.49 a sample https://www.wood-finishes-direct.com/product/osmo-colour-foundation
 
Associate
Joined
5 Apr 2004
Posts
1,197
Out of interest what wasn't working with the belt sander? From memory you wrap around the sandpaper and screw in a retaining bar, whilst keeping it reasonably tight.
 
Soldato
Joined
23 Nov 2004
Posts
3,769
The belt sanders can be a bit of a handful the first time you use them. From your video it looks like you've gone against the grain/not with the flow of the boards. Is there a way on the underside to adjust the sandpaper so its not so abrasive.

I used one years ago for my parents and didn't find it too bae once I got going. Nails sticking slightly proud ripped the sand paper but it wasn't too bad. I only went with the grain/direction of the boards, then used a big handheld orbital sander for the edges. That was quite tricky to tame but worked well.

Keep going pal, don't give up.
 
Associate
OP
Joined
19 Aug 2019
Posts
257
The belt sanders can be a bit of a handful the first time you use them. From your video it looks like you've gone against the grain/not with the flow of the boards. Is there a way on the underside to adjust the sandpaper so its not so abrasive.

I used one years ago for my parents and didn't find it too bae once I got going. Nails sticking slightly proud ripped the sand paper but it wasn't too bad. I only went with the grain/direction of the boards, then used a big handheld orbital sander for the edges. That was quite tricky to tame but worked well.

Keep going pal, don't give up.

:) thanks!

God this is exhausting.

Here is an update.

Can any of you guys help me fit a kitchen?

https://www.dropbox.com/s/l3rxw7j8w0ier1d/IMG_6537.mp4?dl=0
 
Last edited:
Associate
Joined
5 Apr 2004
Posts
1,197
:D

Are you planning on filling the smaller gaps too? Would be a shame not to do it all.

Boards are coming up nice. Ide be careful with the PVA as whatever you choose to treat the wood with may not soak in the same way and it might stand out.

All I'd say with the kitchen is perhaps limit how many jobs you start otherwise you won't finish any of them.:)
 
Soldato
Joined
18 Oct 2002
Posts
14,017
Location
Sandwich, Kent
The black round thing is a clip to hold the trim onto the legs of the kitchen units. Kitchen looks fine - leave as is until you've got time and money to spare.

If I were you, I'd be looking to lay a real wood flooring over the top of the floorboards. All this sanding seems to be a bit of a waste of time. You'd be done in a few days.

https://www.diy.com/departments/goo...-wood-flooring-1-48m-set/3663602537380_BQ.prd
 
Soldato
Joined
18 Oct 2002
Posts
14,017
Location
Sandwich, Kent
Although keep in mind - real wood is a lot less forgiving and a lot harder to maintain than 'wood effect' laminate.

Much smaller scale, but. I re-used an old bit of worktop from our old house, and incorporated it into our new bathroom. To get it to come up nice I had to sand it down an awful lot - back to bare wood (not sure what you're doing with that PVA!) - plus some wood stain and varnish - it is possible to get old wood to look nice.

But on a whole house I'm not sure it's worth it when there's easier / better ways to achieve it.

WorktopVarnish.jpg
 
Associate
OP
Joined
19 Aug 2019
Posts
257
Oh god don't tell me it's a waste of time. Everything is covered in dust now and I feel committed. According to a "wood guy" the floor is slow grown Douglas fir which is "really really nice wood" though I don't know what that means. I'm hoping to get them looking nice. Tbh it's a bit of a learning curve for me and it's something to do. I feel that as long as I keep doing DIY projects I'll be able to pass the time until death.
 
Soldato
Joined
2 May 2011
Posts
11,882
Location
Woking
That is nice wood. It had probably grown for 100s of years, where what you buy in the shops is probably 20 years old or something. They longer it grows, the better it is I think (are we still talking about wood?).
 
Soldato
Joined
28 Dec 2017
Posts
8,451
Location
Beds
That is nice wood. It had probably grown for 100s of years, where what you buy in the shops is probably 20 years old or something. They longer it grows, the better it is I think (are we still talking about wood?).
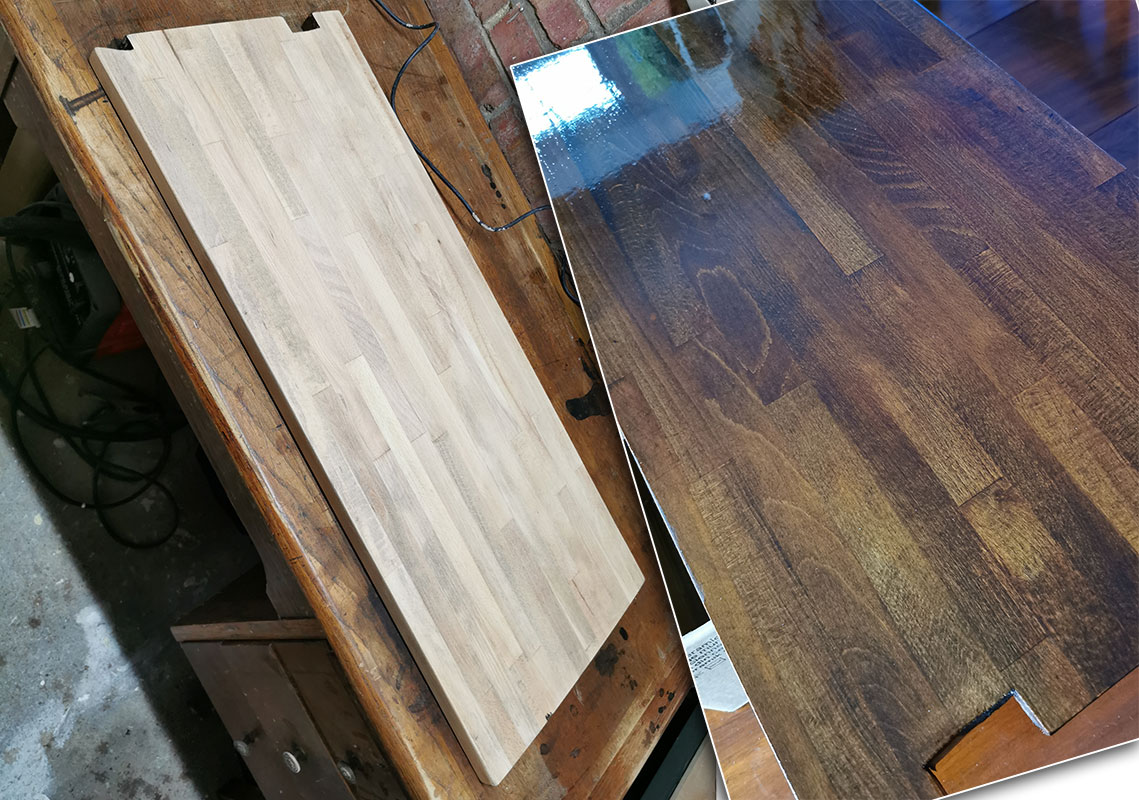
Slow growth as opposed to long, in a way. Length of growth is just a function of (how fast can it grow x how big do you need it) :p

Trees that grow slower typically have denser or harder timber as the same resources can go into a thinner layer of growth. Growth rings mark the seasons - they are darker denser wood which was formed in the winter when there's less sun and so, less resources. Therefore for any given size of timber, slower grown stuff will have more rings (which are the stronger part of the wood) and typically be denser too.

Especially true for pine as it grows so damn fast, the cheap stuff is mostly pale soft wood in-between scarce grain (winter growth) lines.

More stripes = betterer :)
 
Back
Top Bottom