My Guide: How to watercool a Lian Li PC7 or simular. (Completed at last)

Associate
Joined
18 Oct 2002
Posts
1,315
Location
Bristol
I guess you guys probably know me for my par advice and shocking gramma and spelling.

Heres my current case:

Overshot.jpg


But last week my friend bought a Coolermaster 201 from here and i was instantly jealous. I decided to buy an aluminium case. I looked at the Lian li PC 60 and was gonna purchase. Then i saw a PC 7 for 60 quid. Snapped it up while i could and it arrived shinning.

Here it is:
lianpc7new.jpg


A while back i kitted my self out with the "Innovatek kit 4" which is a great water cooling kit. I also bought the zalmans northbrige passive heat sink along with the innvatek GPU waterblock for geforce 4s. You can see where i have put the rad in the picture of my current case in the top 5.25 bay. Its flawed because the case air will be drawn through the rad. So the hotter the case the hotter the air being drawn through it.

I planned to use the lower front two fans on the PC 7 to bring in cool air. Sit the rad right infront of them and then have the 120mm fan on the rad @ 7vs pulling the cold air through the rad. This way no mater how hot components are getting cold air will always pass through the rad. My bedroom pretty cool most the time so external air isnt to much of an issue.

Here is what the case looks like side. (note the removable extra hdd bay is in)

case3.jpg
 
Last edited:
Associate
OP
Joined
18 Oct 2002
Posts
1,315
Location
Bristol
Time for the work.

Step 1: (Cutting out some stuff to make the innovarad fit in)

First i had to bend the fins that the innovarad comes with.They arnt the cooling fins, the ones that suposidly allow better mouting i just think they are stupid little things and are a waste of time.

Like most of you know the PC 7 comes with an extra mounting for hdd.

Goodbye to that and also to the guides that held it. Turned the case upside down in my garage. Used a drill to drill out the rivets and then the guides just fell out. I also flattened the pc speaker mounts.

case5.jpg


case6.jpg


case7.jpg


The innovatek rad will not fit in at the bottom on its side as it is two wide. A black ice will fit in there almost perfectly once the guides etc are removed. So time for the jig saw. Alu cuts like butter so it didnt take long.
 
Last edited:
Associate
OP
Joined
18 Oct 2002
Posts
1,315
Location
Bristol
Step two: (Remove the standard hdd bay and cut away the bottom bay making sure not to cut to far that the bay facial wont fit)

The Victim

case10.jpg


Once it was cut and back in the case it looks like this...

case11.jpg


Ok ok it wasnt the most even cut but it did the job as you will see.
 
Last edited:
Associate
OP
Joined
18 Oct 2002
Posts
1,315
Location
Bristol
Step Three is finally here: (Fitting the Zalmans Passive NB Heatsink)

Right this requires flash plugin. I do have pcitures of how i did this but i think this link shows it much better. Click here

Step Four: (Water cooling my leadtek ti4200 128 meg)

For this process i had to remove the big metal thing that leadtek supply their cards with. This is easily done by removing the three push pins sucuring it. Once removed the the back of the card looks like this.....

photo3.jpg


Notice how the ram is now uncovered. This aint BGA ram so the job of the old big leadtek metal thing had to be performed but how. Well by no other than tweakmaster. I bought some ram sinks for the ram and as you can see on the right i used thermal adhesive. As i used the thermal greese method and push pins to install the nb heatsink i had the thermal adhesive left over. Zalmans suply the heatsink for both methods, sticking it on, or mounting it via push pins.

Apply a small amount of thermal adhesive A to the the ram sinks and spread it out like shown in the Zalmans video thing. Then do the same to the ram with thermal adhesive B. Push the two together firmly and procced with the next one. Continue till the whole back of the card has heat sinks stuck on. Leave for about 10 mins then they will be rock solid........

photo4.jpg


Note: when using silver based thermal adhesive cover the tiny wires that go from the ram to the board to be sure that if the stuff does conduct it wont biff ur ram up.
 
Last edited:
Associate
OP
Joined
18 Oct 2002
Posts
1,315
Location
Bristol
Turn the card over and do the same again.....

photo2.jpg


Step Five and Six: (Mounting the GPU block to the card and attaching the tubing)

Apply thermal greeze to the GPU its self and spread thinly and evenly. Attach the tubing to the GPU block. I sent the warm water that comes out of CPU block straight to the graphics block then out of that block and back to the rad......

photo1.jpg
 
Associate
OP
Joined
18 Oct 2002
Posts
1,315
Location
Bristol
Procceed to put the push pins through the block mounts and then through the card. Attach the nuts to the pins and tighten them up finger tight. Then get a flat head screw driver and tighted until the block wont wiggle any more. Not to tight.........

Top
photo8.jpg


Bottom
photo6.jpg


Then i put the card back into the AGP slot.....

photo7.jpg
 
Associate
OP
Joined
18 Oct 2002
Posts
1,315
Location
Bristol
Step 6: (Filling the system)

This was the easy part. Make sure hold you rad and shake it at all different angles to get all the air out.

I put a 120mm ys-tech on both sides of the rad. I removed the 2 adda fans that sit at the front of the case. I runs these 2 ys-techs at 5 volts, using my diodebus from Nigel, which is almost silent.....

photo9.jpg


Step 7: (7 volting the adda fan in my PSU)

1: Open the PSU up after leaving it off for 12 hours
2: Cut the wires leading from the fan to the header on the board
3: I left the header attached and cover the wires from it in electrical tape. (Refering to an earlier comment that PSU might not work if fan header wasnt attached so i left it there)
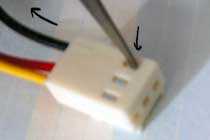
4: Got and old 3 pin fan and removed the things from inside the Header like this......

mb.detach.jpg
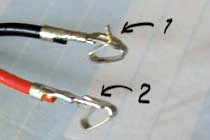
mb.pins.jpg


5: Cut these wires off the fan so i had two lenths of black and red wire with the metal things on the end shown in the second picture.
6: Strip the wire coating from the other end of your new wire and from the end of the fan thats in the psu.
7: Wind them together red to red black to black then sucre them in place with either one of those electrition things or tape.
8: You now should have a nice lenth of wire comming from the psu fan. Run this wire out through the psu in any method of your choise. I ran mine out through where all the normal psu wires come out.
9: Close up the PSU and fit it back in case
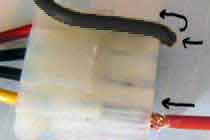
10: Find a spare molex and put the new wires into it like this.....
power.f.attach.jpg


11: Tape them in there so they wont come out. You may need to flatten the ends to make them fit intot he molex.

Now the fan is 7volted and you PSU will still turn on as you have left the old header still attached. Be sure to cover the bare wires with tape.

PHAT it works.

Oh yeh lastly be careful inside PSU read some guides about modding them to get a basic layout of what it looks like. AND DONT TOUCH THE ******* CAPICITORS.
 
Associate
OP
Joined
18 Oct 2002
Posts
1,315
Location
Bristol
Right then its all done. Re attach side pannels etc and switch pc back on.

Im sitting here almost in silence, all i can hear is just the hum of moving parts inside the machine. Right time for the temp.

Please bare in mind that these are innovatek bits using 3/8 tubing and the equipment cannot compete with the quality of Danger den etc. But the results are very impressive. Also take into account my rads fans are at 5volts and the innovatek rads are not as good as the bix etc.

My AMD Athlon Thunder Bird 1.3ghz is at 11.0x 136 = 1500mhz ish.

After 24 hours of prime the max temp was 50C. This was also a very hot summer day so i would like to re bench mark in the winter. I did this again on a cold day which was today and the max temp was 45C. No game will push it past 43C on a cold day.

My idle temp sitting here right now is 41C. When it gets colder in the late evening this can drop to about 38C

When running the rad fans at 7 volts my temps are 5C lower but that aint silence :)

Any comments are welcome.

Hey check out my new setup here.
 
Last edited:
Back
Top Bottom