• Competitor rules

    Please remember that any mention of competitors, hinting at competitors or offering to provide details of competitors will result in an account suspension. The full rules can be found under the 'Terms and Rules' link in the bottom right corner of your screen. Just don't mention competitors in any way, shape or form and you'll be OK.

Black debris in Gigabyte Aorus GTX 1080 Ti Waterforce WB Xtreme

Associate
Joined
18 Nov 2018
Posts
18
Hello.

I'm new here hoping to solve a problem I have somehow.
So recently I bought a Gigabyte Aorus GTX 1080ti Waterforce WB Xtreme Edition (quite a name!) used from a guy locally. It's fairly new, registered under a different account and has warranty till 2022. Irrelevant information but just to show how recent it is.
So the guy did not have accurate pictures of the card and when I got it it has black debris like stuff stuck on the block behind the window. I will provide a picture.
So I would really appreciate any suggestions on how to solve this. Is there any cleaning solution I can run through the loop or anything? Opening the block is out of the question since I read it's not possible without taking apart the glued front fascia. Plus I don't know if it would void the warranty (if I had any in the first place)
I have a relatively strong pump, xspc photon 170 res/pump combo but even at max for days, they won't budge. It's making me really sad that after so much time and a good chunk of money I finally added a GPU to my custom loop and this happens :(

Thank you
Phil

tjqjmz2.jpg
 
Associate
Joined
15 Aug 2018
Posts
1,133
I looks like bits of plastic, maybe from when connectors were screwed to the inlet or outlet of the block. If it bothers you that much then take the card apart. Unless there are stickers on the screws for warranty reasons I would just go for it. Water blocks tend to need a clean after running for a while. There's bound to be a video of how to do it on youtube
 
Last edited:
Soldato
Joined
24 Aug 2013
Posts
4,549
Location
Lincolnshire
Without stripping it down. Which should be possible and shouldn’t void any warranty. You could try running the flow backwards/reverse to try push the particles back out of the fins.

However you will be able to strip the block pretty easily. Won’t need to take the front off as they are just for the three bolts for the in/out ports. Just remove the usual backplate screws to remove the pcb then the screws to dismantle the block itself. Very easy to clean just with a soft toothbrush.
 
Last edited:
Associate
OP
Joined
18 Nov 2018
Posts
18
Without stripping it down. Which should be possible and shouldn’t void any warranty. You could try running the flow backwards/reverse to try push the particles back out of the fins.

However you will be able to strip the block pretty easily. Won’t need to take the front off as they are just for the three bolts for the in/out ports. Just remove the usual backplate screws to remove the pcb then the screws to dismantle the block itself. Very easy to clean just with a soft toothbrush.

Good idea! I will try to run the flow backwards on the card.
That Mayhems Blitz cleaning kit says it creates foam, would it be worth the try to dislodge it?

About taking apart the block, I searched about it and I read on another thread that it's not as easy as other blocks and you'd have to rip the glued on front.
 
Soldato
Joined
24 Aug 2013
Posts
4,549
Location
Lincolnshire
Good idea! I will try to run the flow backwards on the card.
That Mayhems Blitz cleaning kit says it creates foam, would it be worth the try to dislodge it?

About taking apart the block, I searched about it and I read on another thread that it's not as easy as other blocks and you'd have to rip the glued on front.

Failing that and if it’s bothering you that much then you could just leave the block as it is and grab a second hand ekwb block as the original backplate will still fit. Depending on the board Rev as there are two revisions on that Aorus pcb. As well as two blocks.

There should be a way to strip the block however. The in/out ports won’t need to come off just need to strip the block at which the screws will be under the main Aorus part where the fins are. Pcb shouldn’t need to come off either. That’s if it is possible however like you say as the screws are hidden and never owned one myself.
 
Associate
OP
Joined
18 Nov 2018
Posts
18
Failing that and if it’s bothering you that much then you could just leave the block as it is and grab a second hand ekwb block as the original backplate will still fit. Depending on the board Rev as there are two revisions on that Aorus pcb. As well as two blocks.

There should be a way to strip the block however. The in/out ports won’t need to come off just need to strip the block at which the screws will be under the main Aorus part where the fins are. Pcb shouldn’t need to come off either. That’s if it is possible however like you say as the screws are hidden and never owned one myself.

Oh man what a mess. I got this card specifically so I don't have to deal with installing custom blocks. I actually already had a 1080ti!

I will try the aforementioned and if I can find that blitz kit in a reasonably price I'll try that too.

I can't find any mention of anyone opening up this waterblock on the internet. Only a mention that you'd have to rip off the glued front fascia. Which would suck.
 
Soldato
Joined
28 Dec 2017
Posts
8,443
Location
Beds
Second hand water cooling kit should be cleaned out thoroughly! You really don't want to dislodge that crud and then have it float around your loop, inside your pump, settling wherever it wants to.

If you must run it to clean it, set up a filter: either use an inline filter or have the exit of the card empty into a bowl, and the inlet for the pump should be floating on the opposite side of the bowl near the surface of the liquid. This will let crud settle out of the flow.

Highly recommend at least trying to disassemble and clean the block. It'll improve the loop plus create a sense of ownership/peace of mind
 
Last edited:
Associate
OP
Joined
18 Nov 2018
Posts
18
Second hand water cooling kit should be cleaned out thoroughly! You really don't want to dislodge that crud and then have it flat around your loop, inside your pump, settling wherever it wants to.

If you must run it to clean it, set up a filter: either use an inline filter or have the exit of the card empty into a bowl, and the inlet for the pump should be floating on the opposite side of the bowl near the surface of the liquid. This will let crud settle out of the flow.

Highly recommend at least trying to disassemble and clean the block. It'll improve the loop plus create a sense of ownership/peace of mind

Thanks! I will get some deionized water tomorrow (can't find distilled for my life) and I will run the flow backwards with only the gpu on through a bowl like you suggested. I hope it works. If it doesn't then I'll have to try to open the block. I'm handy with that stuff but if they designed it to not open up I doubt I'll have an easy time.
 
Man of Honour
Joined
12 Jul 2005
Posts
20,517
Location
Aberlour, NE Scotland
A cheap solution you could try if you have access to a hosepipe and a couple of 1/2" barbs would be to connect the hosepipe to a barb on the outlet side of the block so you have reverse flow (you will need a bit of hose on the inlet side as well or you will be drenched) and turn the tap on. Hopefully mains water pressure in reverse flow should clear all of that junk out. Once done give it a couple of flushes with de-ionised water. That does look like black plastic inside so make me wonder if he had a pump destroy it's impeller or that he has stripped the thread on something.

If you have to strip the block you are quite right and will have to remove that stuck on front cover as the screws for dismantling the block are under it. Rather than do that I would be asking for a refund and just buy a block for the card you have.
 
Soldato
Joined
28 Dec 2017
Posts
8,443
Location
Beds
A cheap solution you could try if you have access to a hosepipe and a couple of 1/2" barbs would be to connect the hosepipe to a barb on the outlet side of the block so you have reverse flow (you will need a bit of hose on the inlet side as well or you will be drenched) and turn the tap on. Hopefully mains water pressure in reverse flow should clear all of that junk out. Once done give it a couple of flushes with de-ionised water. That does look like black plastic inside so make me wonder if he had a pump destroy it's impeller or that he has stripped the thread on something.

If you have to strip the block you are quite right and will have to remove that stuck on front cover as the screws for dismantling the block are under it. Rather than do that I would be asking for a refund and just buy a block for the card you have.
It's not advisable to apply mains pressure liquid to blocks. Radiators can handle the flow rate but the finer bits of blocks (seals and jet plates) can be damaged.
 
Soldato
Joined
22 Nov 2003
Posts
2,932
Location
Cardiff
That looks like gunk from a radiator - my guess is a new, un-flushed radiator was used in his loop.

Take the block a part and give it a good clean - all will be well :)
 
Associate
OP
Joined
18 Nov 2018
Posts
18
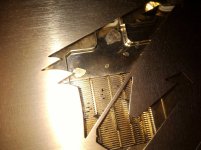
So nothing was cleaning it so I had to take it apart. This felt AWFUL. Worts day ever. Look at that. The silver part was aluminum, now it's never gonna straighten again. Those wrinkles will stay forever. Damn you gigabyte fir not letting us clean the block properly!

C7KPvF1r.jpg
 
Associate
OP
Joined
18 Nov 2018
Posts
18
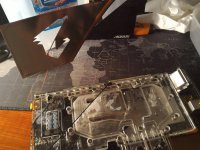
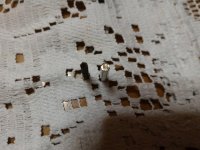
So good news. I found the right key. Opened it and cleaned it and it's fine now. Some scratches on the acrylic from the knife that I needed to put below the stickers in front but luckily all below the stickers and none on the transparent eagle part. The stuff inside was rubbery not metallic or paint chips.

Now the problem of putting back the stickers presents. The silver one as mentioned is aluminum and now has wrinkles that I must somehow eliminate. Ironing between two hot towels? Just a random thought. Also I'll clean the original glue and I must find another way to put it on. Maybe just some strips of double sided tape.

Thank you for giving me the confidence to open it up.
 
Associate
OP
Joined
18 Nov 2018
Posts
18
Hi!

I have the dame problem did you managed To get that sticker back on?

Not yet. The plastic part is fine but the aluminum part is still wrinkled. I tried ironing it between two sheets and nothing. I don't know how to straighten it. I'll try to find something that will put a ******** of pressure on it. I'll run it over with the car if I have to :mad:
Also I cannot get the glue off no matter what I try although that's not a big problem.

Also I has asked gigabyte for suggestions and they replied to me today since Sunday. They actually told me to RAM it lol. A little late for that. I don't have the receipt they asked anyway.
I replied by asking if they have spare parts to sell me just that aluminum front fascia.
 
Last edited:
Associate
Joined
21 Nov 2018
Posts
3
Alright let me know if you can get new one. Since I didnt open it yet can you share a picture where are the screws I got to remove? I'm thinking of just drilling small holes where they are since I may need to take it appart later.
 
Associate
OP
Joined
18 Nov 2018
Posts
18
Alright let me know if you can get new one. Since I didnt open it yet can you share a picture where are the screws I got to remove? I'm thinking of just drilling small holes where they are since I may need to take it appart later.

I highly doubt they're gonna let me have a new one, even if I pay for it. I will share a clear frontal picture of it for you later.
 
Associate
OP
Joined
18 Nov 2018
Posts
18
Alright let me know if you can get new one. Since I didnt open it yet can you share a picture where are the screws I got to remove? I'm thinking of just drilling small holes where they are since I may need to take it appart later.

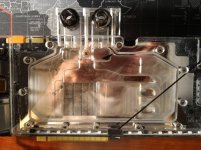
Here is the picture I promised. I hope it helps. I don't know if it'll look alright with holes. Let me try to fix mine first to find a way to restore it. I still haven't run it over with the car xD

OpLhRX0.jpg
 
Soldato
Joined
3 Jun 2012
Posts
10,823
To be honest, I think it's better without.

Get some Googone to remove any sticky residue. Run some coloured liquid and be happy
 
Back
Top Bottom