Dark Base Pro 900 Water Cooling Build (Updated: 01/12/2020 - Phase 4)

Associate
OP
Joined
28 Sep 2007
Posts
163
Looks great. What are your temps at max gaming?

Maximum Temps: 100% GPU load + 100% CPU load.

GPU 1 = 59c
GPU 2 = 52c
CPU = 70c

This is with overclocks, CPU @ 4.7ghz, GPU @ +200 core (2101mhz) +500 memory.

oh and I have a custom bios loaded into the GPUs which remove the TDP and voltage limit, allowing me to go beyond the 1.095v limit ... I think I max out at around 1.185v ? - suffice to say, the extra voltage produces a bit more heat, but keeps my overclocks more stable.
 
Last edited:
Associate
OP
Joined
28 Sep 2007
Posts
163
How much fluid did you use mate?

For the whole loop I think I used about 1.5 Litres of fluid, that's in the current 2 radiator setup... mind you i'm sure I lost a few drops to the carpet... my carpet's a little red now :|

Holy cow that Red is so .... red ! :)

Love what you have done m8, very nice !

And so is my carpet! - no, jokes aside (I cleaned most of the carpet but there are still red stains, need a carpet cleaner.) - the Red is really nice actually! I love the colour.. and with Orange LEDs it shines up really nice. Similarly Red and White LEDs make it shine up quite nice.

For an added weird effect! - Blue or Green LEDs make the red fluid go REALLY DARK, like eerily dark ... and the rest of the case is all lit up blue/green.

Thanks for the vote! I still have more tweaks to document! will put them up soon.

Do you get any pump vibration noise through the case mate?

hmm... no. - I have to go with no, as I have my pump running at 100% at all times and I can't hear the pump over the fans (which are set really quiet, can barely hear them under my table until they ramp up under heat.)

The only time I have heard the pump is when there was a blockage of fibre gunk stuck in my CPU block which was causing back pressure and turbulence in the loop, this was causing the pump to work harder than it should be and was making some noise, but that noise is what tipped me off that something wasn't quite right!!
 
Associate
OP
Joined
28 Sep 2007
Posts
163
Update: 05/12/2016

Here are a couple of pictures of some of the work I did over the weekend.

In summary:

I de-lidded the CPU and added some liquid metal pro onto the die, then re-sealed the heat spreader back onto the CPU. - big success! temperatures are now 10-20c lower than before.

drazek-pc-cpu-delid.jpg


I changed the top fans around so that they are now exhausts instead of intakes, I felt that the running them as intakes experiment was causing too much hot air to stay inside the case as I didn't have an adequate exhaust solution (only 1 fan.) - now I have 2x intake fans through the front rad, and 4x exhausts + PSU... which still isn't ideal, but this won't cause any watercooling performance issues.

drazek-pc-top-fan-switch.jpg


I also cleaned out my CPU block again noticed some gunk in the intake side of the block, and I flushed out my large radiator.
 
Associate
OP
Joined
28 Sep 2007
Posts
163
resevoir mounting

I am doing a very similar build and I am wondering how did u mount the resevoir and did u have to drill?:)
Hello! - I mounted the reservior using the 'water pump mounting plate' that came with the case... except I mounted the plate sideways onto the HDD caddy shelf by using some standard motherboard riser screws (the ones with a screw on one end and a screw hole on the other) and some motherboard screws, and a few washers... one washer on either side of the mounting plate.

It's not a perfect solution, but after some fiddling I managed to get the mounting plate to screw into the screw holes on the HDD caddy shelf on 2 holes. and it sits solid enough to hold the reservoir without bending or flexing so i'm happy with it! :)

The alternative would have been to mount the pump/res combo onto the back of the front radiator... however I couldn't find a pump>radiator mount that fits onto a 140mm fan mount!? I could only find 120mm versions... :/
 
Associate
OP
Joined
28 Sep 2007
Posts
163
Well hello you copy cat :p hehe Hows the system doing mate.

Haha, hello! - I was wondering how long it would be until you noticed my build. :p (and then for me to notice your post, sorry for the late reply.)

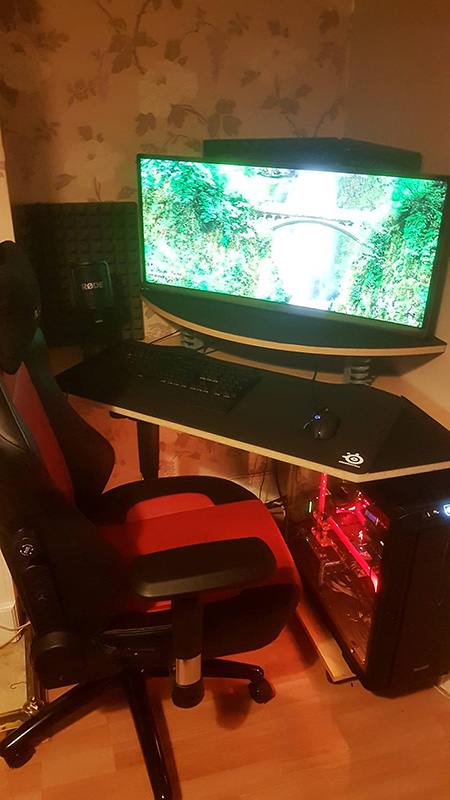
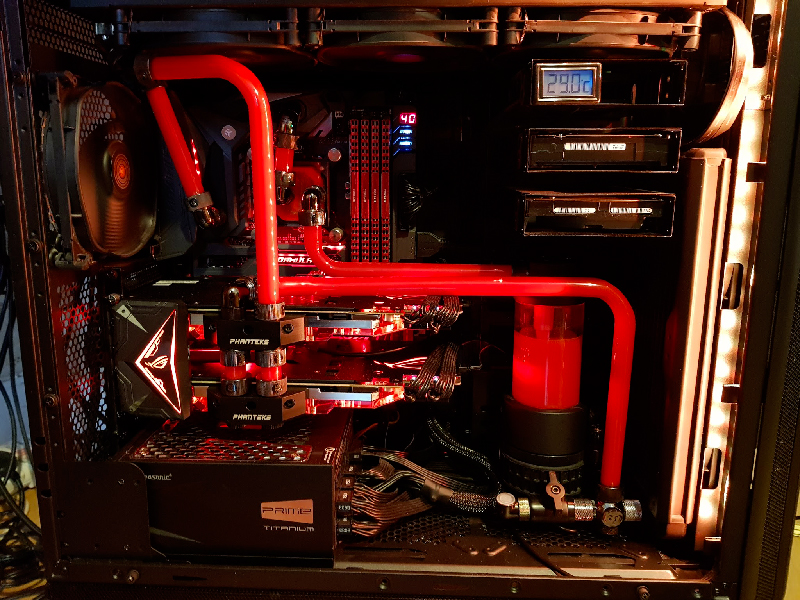
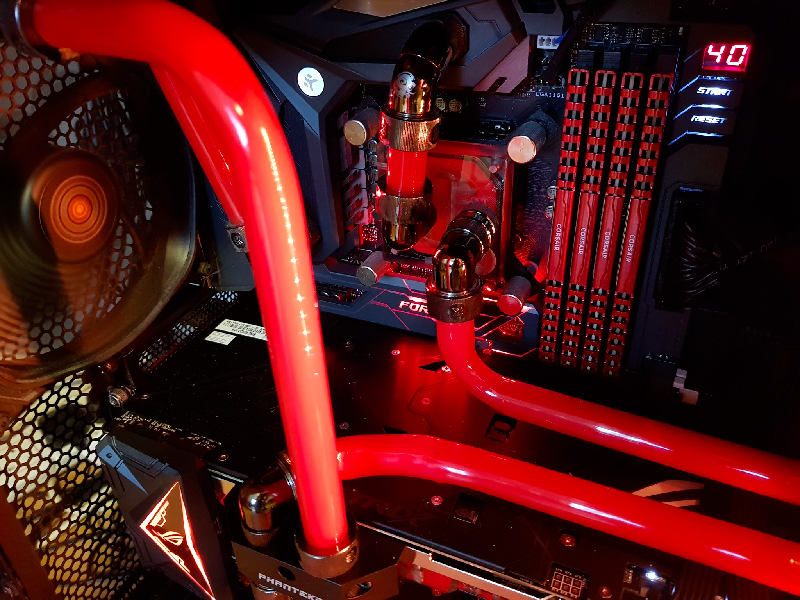
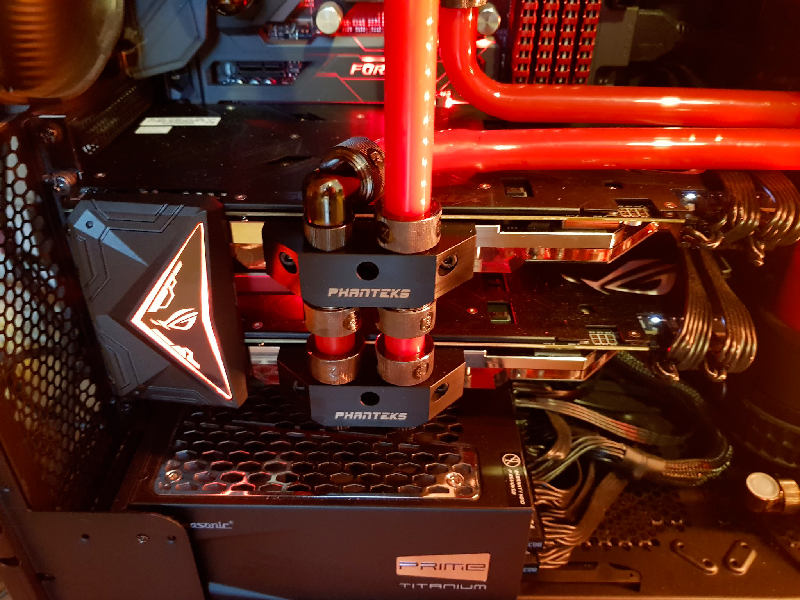
The system is doing brilliantly! - I've got it cranked up to the max, CPU overclocked to 4.7ghz (any higher and i gotta start using 1.4v+ which I'm not too comfortable with as a 24/7 gaming machine.)

The GPUs are overclocked to 2100mhz core and +500 on the memory. - and the whole system is running sweet, nice and cool :)

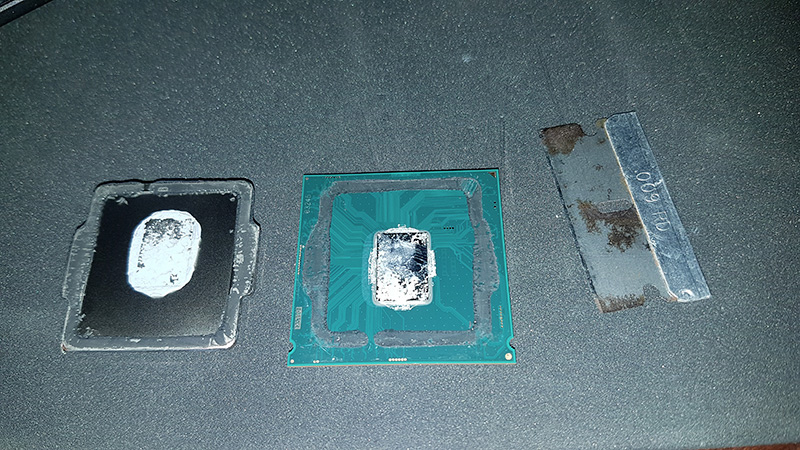
with the CPU delid also, none of the hardware seems to creep past 50c and the CPU spikes have been negated ;D I love it!

I most definitely took a lot of inspiration from your build, and you just happened to be building your machine at the same time I was preparing and researching to build my own, so your log helped me a lot, thanks!

I still need to get me a set of those custom sleeved PSU cables... but they're so expensive! - after spending almost £2k on my machine I find myself loath to spend that much on PSU cables... how odd.

I saw your link on ebay, did you manage to sell the machine in the end? - it's a shame to have to let something that awesome go :o
 
Last edited:
Associate
OP
Joined
28 Sep 2007
Posts
163
Hey all,

I thought i'd chime in with another update on my build, this one is a little less to do with the watercooling setup (though I am due to install a new wide beam LED strip this weekend.) and more to do with my setup as a whole!

So without further ado, voila:
drazek-pc-desk-setup.jpg


I customised my old corner desk, removed the legs and cut the surface to fit the corner better, then mounted it all to the wall! :)
My ASUS PG348Q is also on a monitor arm as I found the standard base lifted the screen way too high above my head and it felt weird gaming on it at that height, so with the new arm it sits a lot lower and is at the right height for me now :)
Oh and I cut up a desk mat to fit the top shelf nicely ;D
 
Associate
OP
Joined
28 Sep 2007
Posts
163
Hello all, me again!

I've gone an upgraded my graphics cards to 2x ASUS STRIX OC GTX 1080 Ti's in SLI. - My monster now has even MOAR POWAH!!!

Also used new Phanteks 1080Ti GPU WaterBlocks (I like these more than the EKWB ones because they allow to you re-use the ASUS back plates and the blocks are RGB)
+ ASUS HB Bridge

Here's some piccies: :)

drazek-phase3-custom-watercooling.jpg


drazek-phase3-cpu-custom-watercooling.jpg


drazek-phase3-gpu-custom-watercooling.jpg


I'm loving the new ASUS branded HB Bridge :) (mostly because it's RGB and not just nVidia Green!) - I also rate these Phanteks GPU blocks quite well, I've hooked them up in this configuration (left side intake) because that's how the water is meant to flow in order to hit the GPU Core first before the VRMs. (I've noticed a lot of watercoolers/youtubers too, tend to hook these one way blocks up the wrong way around! yes that includes EKWB's blocks... so many times do ppl hook them up the wrong way round.)
 
Last edited:
Associate
Joined
28 Dec 2017
Posts
1
Hi. Newbie here i wanna get into watercooling but need a lot more info from people who have actually build in the case. According to the manual You can fit max 420s in both the front and the top. I am thinking of top 420(undecided on thickness yet) and front 360(really would like a thick rad if possible). That config can work especially with a tall pump res combo and push pull for both rads right. I am guessing non of the drive cages can be used though. Therein lies my problem. i have an nvme ssd so thats one less space needed but i have 2 HDDs and will be adding at least 1 more in the future. I am kinda boned on that front right.
 
Associate
Joined
7 May 2004
Posts
1,951
Hi. Newbie here i wanna get into watercooling but need a lot more info from people who have actually build in the case. According to the manual You can fit max 420s in both the front and the top. I am thinking of top 420(undecided on thickness yet) and front 360(really would like a thick rad if possible). That config can work especially with a tall pump res combo and push pull for both rads right. I am guessing non of the drive cages can be used though. Therein lies my problem. i have an nvme ssd so thats one less space needed but i have 2 HDDs and will be adding at least 1 more in the future. I am kinda boned on that front right.


The only thing you can realistically do is have a smaller res combo and use 2 hard drive cages.

Also it's going to be very difficult to do push pull on the top as well as the front with 2 x 420 rads.
I couldn't do it with 2 360 rads.

It's a good case but I've decided to upgrade mine to a coolermaster 700p. That has better options for hiding cables, more options for mounting 2.5 inch ssds (I've got 2) and overall just seems like a much easier case to build what you want in
 
Associate
OP
Joined
28 Sep 2007
Posts
163
Hi. Newbie here i wanna get into watercooling but need a lot more info from people who have actually build in the case. According to the manual You can fit max 420s in both the front and the top. I am thinking of top 420(undecided on thickness yet) and front 360(really would like a thick rad if possible). That config can work especially with a tall pump res combo and push pull for both rads right. I am guessing non of the drive cages can be used though. Therein lies my problem. i have an nvme ssd so thats one less space needed but i have 2 HDDs and will be adding at least 1 more in the future. I am kinda boned on that front right.

Hi there, unfortunately in this case you cannot mount any HDD caddys with a front rad thicker than 45mm... 45mm is going to be very tight though!, I would recommend 40mm or less if you want HDD caddies.

Also this case will not fit 2x 420 rads, do you see the top rad in my picture? that's a 420 and it covers the area of the top most front fan... so you won't get a radiator to fit in there. - the best you can do is 1x 420 and 1x 280 which is what I have fitted currently. or you might get away with 2x 360 rads (3x 120 fans) but you'll have to measure it before you purchase on my recommendation ;p

Also something I don't quite like about this case, which is worth noting... the air vents at the top of the case are pretty much non-existant. those vents on the side of the top panel don't do enough to vent out the hot air and the solid piece top panel acts more of an insulator than a ventilator... I find my machine runs a lot cooler with the top panel taken off completely. - the same can be said for the front door, I tend to leave the door open all the time in order to let the air flow through better, if I keep the door closed, my PC can gain about 5-10 degrees during heavy gaming!
 
Associate
Joined
17 Jul 2015
Posts
1,206
Hi. Newbie here i wanna get into watercooling but need a lot more info from people who have actually build in the case. According to the manual You can fit max 420s in both the front and the top. I am thinking of top 420(undecided on thickness yet) and front 360(really would like a thick rad if possible). That config can work especially with a tall pump res combo and push pull for both rads right. I am guessing non of the drive cages can be used though. Therein lies my problem. i have an nvme ssd so thats one less space needed but i have 2 HDDs and will be adding at least 1 more in the future. I am kinda boned on that front right.
Hi mate see my build thread in my sig ;)
 
Back
Top Bottom