Need to shrink a photo down to keyring size

Man of Honour
Joined
12 Jul 2005
Posts
20,521
Location
Aberlour, NE Scotland
Ok, this is probably a easy one for the photography guru's but I have failed miserably so far. I need to shrink a photograph down to 2.5x3.5cm and another down to 5x3cm. The software that came with my Epson printer can't do it and the built in photo editor in Windows 10 doesn't seem to be able to do it unless I am looking at the wrong settings. Can anybody suggest a free and easy to use photo editor that will allow me to shrink these photo's please?

Many thanks in advance.
 
Soldato
Joined
29 Jul 2013
Posts
8,570
I think Microsoft word can do that.

Paste a jpg into a file, right click on it and it will let you change the size of the photo in cm's.

e: Just tested, worked a treat
 
Soldato
Joined
6 Jun 2008
Posts
11,618
Location
Finland
Even basic image editors like Irfanview and such could do it.
And then there are also quite a few mor complete free image editors below Gimp level complexity like like Photofiltre.
If aspect ratio is already correct you just select size in print settings.
 
Caporegime
Joined
20 Oct 2002
Posts
74,171
Location
Wish i was in a Ramen Shop Counter
You just need to adjust the pixels count, upload it to IMGUR and change the size.

Work out the print DPI you want, say 300dpi, multiply by size of physical print and that’s your total pixels count.

So 1 inch wide would be 300px and 2” would be 600.

Click save and then download the image.
 
Soldato
Joined
5 Dec 2006
Posts
15,370
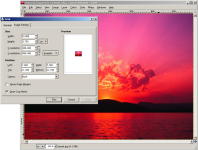
You don't need to shrink anything.

Just open image in GIMP.
Then go to File > Print.
Go to "Image Settings" tab.

mtOXatF.png


All you need to do is enter one figure, either the width or the height. It depends whether your image is too wide or too tall to fit within 5cm by 3cm.

In my example it is too wide, so I simply enter 5cm as the width, and the height automatically becomes 3.75cm, which is okay because we can trim the extra .75cm once it's printed.

Then you press print. Now your image is printed simply trim any blank paper.

Then using a ruler, simply trim 0.75cm extra from the sides and you have a perfect 5cm x 3cm print.
 
Soldato
Joined
5 Dec 2006
Posts
15,370
I meant the photo in my example is too tall, not too wide sorry. I'm not allowed to edit posts because it makes moderator's job harder.
 
Soldato
Joined
5 Dec 2006
Posts
15,370
Also I wanted to add that it's usually a good idea to include some "bleed".

Basically if you want your image 5cm wide, simply enter a slightly higher figure 5.01cm.

This means that when you trim your photo, the ink will go beyond the trim, so the ink goes right to the edge of the trim.

Better explanation here: https://en.wikipedia.org/wiki/Bleed_(printing)
 
Back
Top Bottom