Project: Somnolent High Ground (raised bed)

@SpellowHouse Thanks, that was certainly the intention :D I think I take after my dad in that he wouldn't use an inch screw when a 6" was a possibility.... except I'll use a dozen of them to make sure!

@pastymuncher Cheers, nice of you to say.

Got the last post in today and then the guard rail slotted in. A bit of blending (sandpaper mostly) between the posts and the horizontal timbers and then on to the ladder.
I cut the top down in situ; leant it at the right angle and used a Japanese saw run flush with the top of the timber as a guide. Couldn't think of a better way to do it as anything else would have meant disassembling the ladder to make compound cuts (it's something like 4° off vertical side to side and 20° front to back). Then I made a vertical cut on each so that a flat hits the timber and not a point. All this will make more sense when I post the pics....but my back is making it quite clear that moving would be bad and beer would be good!

Unpacked the new mini universal bender. Quickly found why they have a poor rep: the tolerances are looser than a politician's morals...so getting a straight bend is a challenge. Getting a bent bend of a specific angle is neigh impossible...so I ended up doing it vaguely in the right direction and then tweaking it with pliers while held in the vise. Bit of filing to get rid of the sharp corners, couple of holes (a modicum of swearing) and I've screwed it on the ladder. Needs to come off again and be sanded because it's black steel and where it was bent the mill scale is coming off so it leaves your hands black if you touch it. A job for another day though!
 
Back with pics :D

The last guard rail post. 10mm rod extending down 73mm into the timber (half way) and 190mm up into the post. Figured this would be something that might get pulled on coming up the ladder so it needs to be sturdy. The smaller one is 6mm and just prevents the post spinning. I had intended to glue the posts down as well....but the friction seems to be enough to be honest. The rails are friction-fit (both on width and length) too so they can be removed if necessary. I can always come back with some glue or brad nails if needs be.


Ladder cut to length


And hooks done.


And finally :D


Only thing to do on the bed now is paint it black like the ladder. Not quite such a rush on that one though. Wardrobe has to be moved, desk go in, network sockets moved to the diagonally opposite corner (because, obviously! :rolleyes: ) and pictures put up. Still work to do but this has definitely broken the back of it...and me!
I'll be back with more pics once it's black and for the desk. Once it looks like the 3D model, then it'll be done :D Oh, and corner trunking and USB extension is on order because his reading lamp is USB....because who doesn't have USB at hand for a reading lamp?! Just going to run it up as far as the corner nearest the ladder. It'd be easy to tuck under the mattress...but a pain every time the sheet needs to be changed. I can run the power up the trunking for the RGBW LED strip that's going under the bed too....because it clearly needs more 'cool factor' :D
 
Have you tried that stain on a scrap piece of wood yet.
Stain tends to work a lot better on hardwood than pine and those samples look like hardwood.

Well, I think I now know who's done this sort of thing before! We stained the desk and it didn't take particularly evenly or on a lot of the wood. I sanded it before applying the stain to take off anything that might be on it already but I didn't dare sand too far as it's only veneered. So how do you like the history of every cup that's ever been placed on the desk? None of these were visible before staining, they're just an artefact of differential absorption.


So we did as 964rs's had suggested a while ago and tested each type of wood. Clockwise from bottom left we have: Guard rail post, tanalised C24 (frame) untouched, guard rail, tanalised C24 that's been planed.


The guard rail is fine. The untouched C24 would only have been on the timbers against the walls so aren't going to be stained anyway. This is the one I thought wouldn't work as I figured it may not absorb where the green treatment has already been absorbed. Wrong, it works the best of all of them. Oddly when you plane it back (and leave it for a couple of weeks), it doesn't absorb as well. The darker bit is where the stain wasn't wiped off to see if leaving it on longer would help...it didn't. The guard rail is hopeless. As the palest of the woods, I thought it would take best...also wrong.


So we took the black Cuprinol Garden Shades we'd used recently and (after testing that it would go over the stained part) painted the desk to salvage it.


Looks a lot better but even a few days later it's not wet, but it definitely has a bit of tackiness to it. We'll see how much of a problem that is over time.

There were four network points put in this room when we moved in and rewired. Obviously these are as far away as possible from where we now need them :rolleyes: So up came the carpet and the floorboards and I've moved two of them from the corner under the bed to the corner under the desk. One I'd previously purloined to run the ceiling-mounted wifi so there's one left in the original location. A tape measure made an excellent pull tape in the void under the floorboards so I only had to remove one long one and two short bits. I didn't want to even try cutting a box into the wall - didn't have the spare sanity and didn't need the noise or mess - so I've surface mounted it instead. Did find that just to make life 'interesting' the orange had faded over the last decade and now looks rather mistakably like brown. No prizes...!


And so I believe these are now the final pictures of the completed project. No doubt I'll be proved wrong....even typing this I've just remembered that there's some 8mm thick adhesive-backed neoprene strip to line the underneath of the floating timbers. This is to reduce the future incidence of concussion that I may have acquired on a couple of occasions during the latter parts of the project.


Lighting is RGBW and will 'dance' to the music...if you must. He's just turned 12 so I figure it 'must' on occasion. :D
 
I was hoping i was going to be wrong about the stain when the ladder came out well.
At least you managed to sort it out a different way and get it looking great.
He is a very lucky boy.
No offence but I was hoping you were wrong too! :D
A panic application of paint wasn't in the plan but time pressure and readily at hand. It looked good on a test piece. We'll see on the tackiness; either it'll settle of I'll have to go over it with something to seal it or sand it back and try something else. Given it's a veneer glued to an MDF base, I think anything that needs to be absorbed is going to be out so it'll need to be a surface coating. Fingers crossed it'll just settle though!

Cheers all. It's been exhausting just tidying up, let alone doing it. Luckily it's the season for a break. Hope you all have a good one.
 
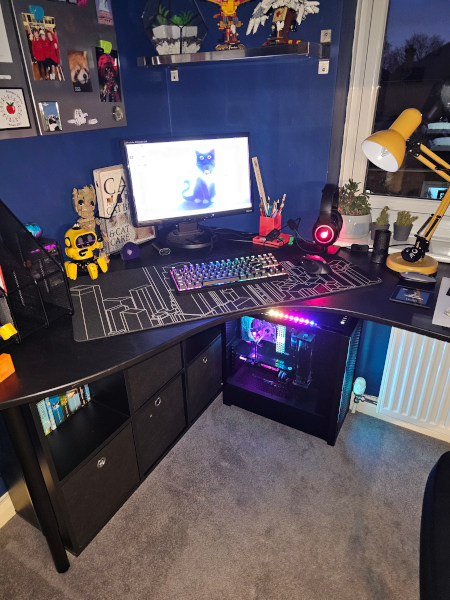
A final pic now that the PC has gone in. I promised some eventual PC-related content after all! This is, of course, the PC from Project: Self-Inflicted if you want better pics.
Only one monitor?! Yeah, for now. It may multiply if necessary in the future. The extra 6" of desk that I was required to cut off the left hand edge would have made that easier....but what do I know?! :rolleyes:

 
Back
Top Bottom