Mini ITX motherboard in a Shuttle G2 case??

Caporegime
Joined
9 Nov 2009
Posts
25,077
Location
Planet Earth
Has anyone here modified a Shuttle G2 case to take a mini-ITX motherboard. I know that it should fit fine but I am interested if anyone here has done this before!!

I have an old Shuttle SN41G2 which I would like to update.
 
Last edited:
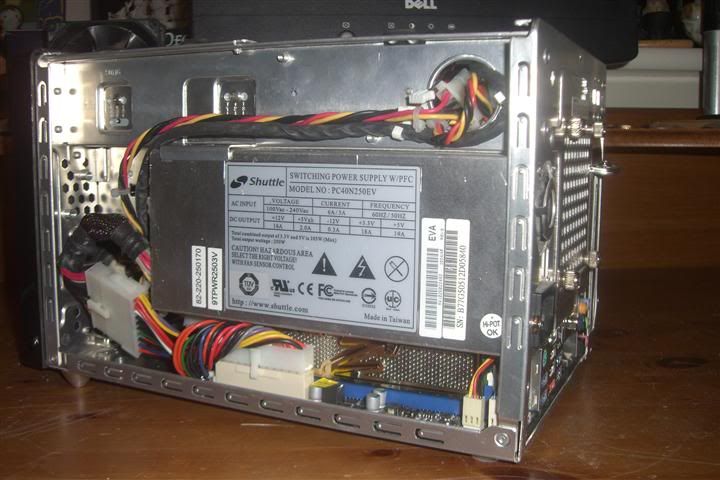
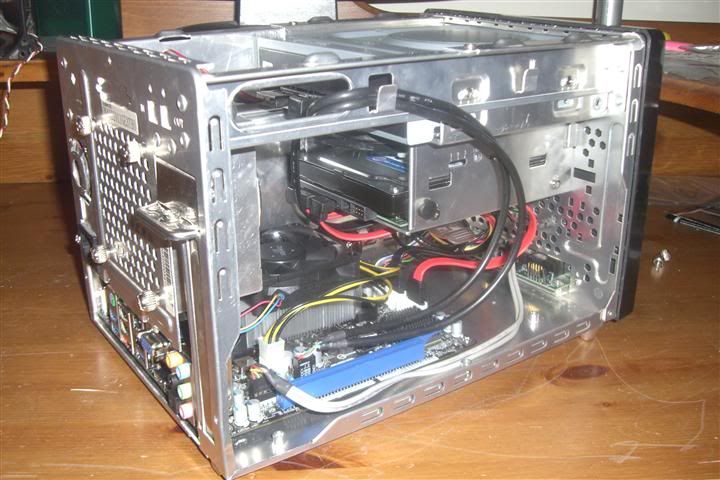
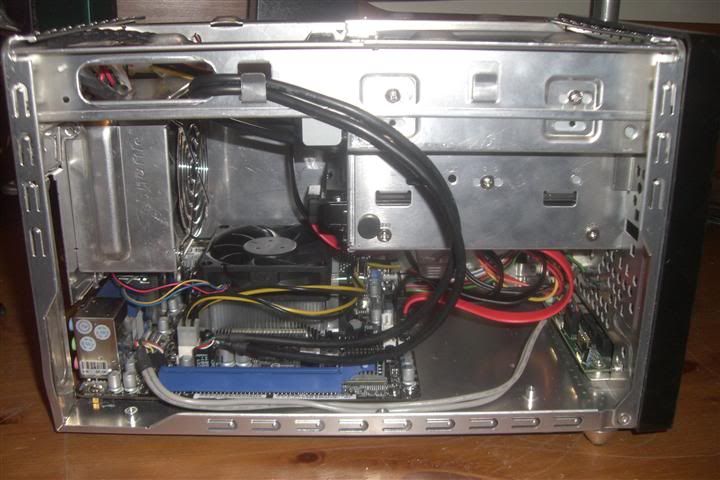
I did manage to fit a socket 775 motherboard into the case last year.


1.jpg


2.jpg


3.jpg


ATM,I am going to try and replace it with a socket 1155 motherboard.
 
ROFL && PMSL

I LOVE the idea of dumping a full sized PSU in there and saving monies but on a serious note the lower the power usage the more inefficient the PSU gets.

Thanks for posting - love it :D
 
Last edited:
ROFL && PMSL

I LOVE the idea of dumping a full sized PSU in there and saving monies but on a serious note the lower the power usage the more inefficient the PSU gets.

Thanks for posting - love it :D

Where is the fun in using a normal PSU?? I already have a pair of 1U PSUs to hand! :D

Anyway,the HX520W was lying around doing nothing for yonks. At least it has some use now! :D

On top of this the front of the case was looking rather lonely with all that free space. Not any more!:p

Not really bothered about power usage TBH. Even at 50% effiency the setup will hardly consume any power anyway even after I add an HD5670. Perhaps I need to find a way of shoe-horning in something a little bit more powerful! I may end up using less power! :p

Anyway,the PSU is the system exhaust and system inlet fan. It sucks cool air over all the components including the hard disk. I was surprised how quiet the system was.
 
Last edited:
Very nice. Think I'll give this a try too

Thanks!! The only issue is that with the case on the PSU does get a bit hot as the HX520W fans tends not to spin too high. I might end up modding the cover. OTH,I do like the look of the system without the case and it does run quite cool.

ps Is that a HDD cooler that you've got strapped to the back ?

Yep!! This build was done on the cheap so I used whatever I had lying around.

I used No More Nails to glue this cooler on:

http://images10.newegg.com/NeweggImage/productimage/35-233-002-03.jpg
 
Last edited:
Giving me ideas this thread i have an old Shuttle SN41G2 still working great after all these years but its to slow now only good for internet browsing never tried modding any pc so might be a good to practice on my old shuttle.
 
Far too much black tape used ... It costs money dude ! :D

I had it lying around!! :D

So let me get this straight ... intake from the back and trying to exhaust through the side ?

Yep,as the fan is positioned where the HX520W exhaust is located.The cover I am using is not the normal Shuttle one though - it is the PF16 which has the mesh sides.

This OcUK forum member has two 92MM fans at the back acting as the intake and a 120MM fan at the top as an exhaust:

http://forums.overclockers.co.uk/showpost.php?p=19862328&postcount=523

Temperatures seem OK. I might just add a 120MM fan at the top.

I got a shock when the HD5670 single slot reached 96C when gaming using the normal fan profile. Then I played the same game with the cover off and it hit 92C. It seems the heatsink was full of dust,so I gave it a good clean and it stays at 80C under load and around 40C to 45C at idle.
 
Last edited:
Anyway,a few days ago I was considering getting a new case so I could use the HD5850 and the Core i3 together. However,the cases I wanted were either too large or too expensive.

Then,I realised why not mod my current case some more??

I have added some pictures to show the new changes.

I replaced the Corsair HX520W with a Shuttle PC63J 500W PSU. The existing Corsair Vengeance DDR3 was replaced by a some Corsair Vengeance LP DDR3 and an 80MM fan was inserted as a system exhaust.

I had to cut some more of the case so I could insert the HD5850 1GB.

The 5.25" drive is only occupied by an SSD ATM. I am thinking of adding a card reader or VFD display. I will also need to get some shorter SATA cables too.

Mini-ITXreduxpicture1.jpg


Mini-ITXreduxpicture2-2.jpg


Mini-ITXreduxpicture3.jpg


Mini-ITXreduxpicture4.jpg


The new system is smaller than the Shuttle P2 chassis.

Mini-ITXreduxpicture5.jpg


It also smaller than the current H3 and H7 chassis too.
 
Last edited:
I'm glad you keep updating this thread, I am in the process of procurement for an SN41G2 refit. I've decide to keep it simple and go for a Llano system and use the integrated graphics (AsRock A75M-ITX and A4-3400), I'm going to try and use the existing PSU (it was upgraded to a 250W silent version some years back), I wont be fitting external fans just yet, relying on the stock cooler and plenty of space.

Knocking out the existing motherboard risers will be my challenge, I'd be interested how you done it, and also if you are using the existing riser for one of the corners for the ITX format ?

I have kept the existing risers and inserted a few for the mini-ITX motherboard. The existing risers have been covered in insulating tape.
You will need to get a low profile cooler not more than 6CM in height too. The Intel stock cooler is around 5CM in height. It might be worth looking at the Scythe Kozuti which is 4CM in height.However,the RAM needs to be standard height or low profile AFAIK.
 
Last edited:
After some deliberation I decided to use one of the existing risers, as I have no intention of using a separate graphics card I didn't worry about aligning with the existing slot holes. This also meant I only had to cut off one riser and install three.

I wanted to use as many of the original Shuttle components as possible, this included the original rear fan in its housing that would have contained the heatsink, I had to rotate it 90 deg to get the very short cable to reach the plug on the mobo.

The only issues were that one of the SATA power connectors had broken so I had to use a molex-SATA converter, and the internal USB connector for the front panel is just ever so short of the connector on the mobo.

I had to use extension cables for the 20/24 pin power and 4-pin power. The clearance over the memory was very tight, needed a bit of shuffling to get the PSU in place.

sn41g2refit01.jpg


The back panel is a bit exposed, I need to alter the IO shield to make it fit which will cover it up a bit.

sn41g2refit02.jpg


The original drive tray has a plastic clip underneath for keeping the cables tidy, intended for IDE ribbons, but works as well for flat SATA cables. The two black cables are from the card reader on the front. The nice aspect of the Shuttle was plenty of ways to tidy up cables by routing them over the frame and using the provided clips.

sn41g2refit03.jpg


Plenty of space at the moment (relative to a SFF), I may consider getting an upright cooler if it is the right orientation and can clear the back of the DVD.

There doesn't appear to be a cooling problem, but I'll need to stress it before confirming, the only issue is noise, the stock cooler is like a jet plane and the rear fan makes much more than normal, this might be due to it being overpowered, perhaps turning on the fan control may work. I have a spare large (120mm?) fan and may fit on the rear instead if I can find some rubber gromits which could improve internal space.

Right now I'm a bit stuck as my edition of Windows XP Pro is pre-SP1 and doesn't recognise drives of larger than 130Gb, so I'll have to create a slipstreamed CD to continue.
 
Back
Top Bottom