

I5-Maximus VI Hero

http://www.overclockers.co.uk/showproduct.php?prodid=MB-563-AS&groupid=701&catid=5&subcat=2574
Building a gaming system is often the most fun you can have and still have your clothes on. I got that opportunity the other day to put together a pretty good gaming system. My next door neighbour wanted a reasonable gaming system for his boy for Christmas and asked me to build it up. His budget was not extravagant and like all folks he wanted something that had some future proofing in the build.

The system needed to be Intel, and have some upgrade potential as games became more demanding or Ryan (his son) added monitor real estate to his gaming system. Currently he was gaming with a 27” 1080p panel which would not be too demanding on the video card of the new build.
I chose the i5-4670K processor, a 16GB kit of dual channel ram that was on special and an AMD 290X graphic card for the build. Toss in a Crucial M5 960GB SSD and a Seasonic X-Series 850w PSU to drive the entire system and you have the making of a very good gaming rig. The only thing missing was a motherboard.

Now deciding which motherboard to go for is not as easy to decide on as you would think. There are so many factors that come into play. First of all the motherboard no longer determines how high your CPU is going to overclock these days, that is up to the CPU as they will clock the same pretty much on all good boards. Plus most motherboards have multiple graphic capabilities, similar number of USB and SATA ports since again all this stuff is now controlled by the processor.

So why choose one board over another? Price plays a part in making up your mind of course, often cheap gets you just what you paid for cheap and nasty, top of the range expensive leaves you with an overpriced over featured gimmicky board that does not suite your needs. Somewhere between those two extremes lies the perfect gaming platform. And the clue to finding the right gaming board is suits your needs, I had to find a board that would match up to Ryan’s needs.
I decided on the ASUS Maximus VI Hero motherboard.
http://www.asus.com/Motherboards/MAXIMUS_VI_HERO/
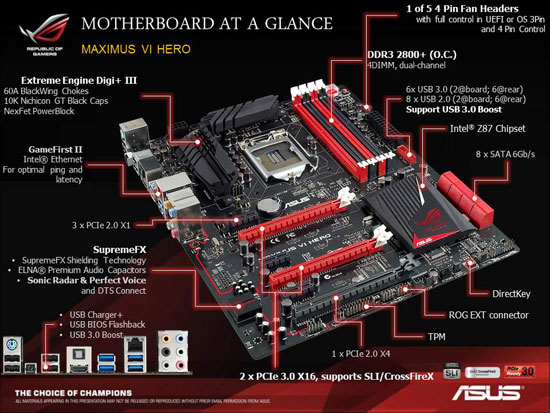
Basic Specification of the Maximus VI Hero
• Chipset Intel Z87
• CPU support LGA1150 compatible
• Memory support 4 slots: max 32GB DDR3 (2,400MHz)
• Expansion slots SLI and Crossfire support, Three 16x PCI-E 3.0 slots (One at x16, two at 8x and one 4x), two three 1x PCI-E
• Sound 10-channel HD audio via Realtek ALC898
• Networking Intel Gigabit Ethernet LAN, Bluetooth 2.1
• Ports 8 x SATA 6Gbps (six via Intel Z87, two via ASMedia ASM1061 controller) 6 x USB 3, 8 x USB 2, LAN, audio out, line in, mic, optical S/PDIF out, HDMI
• Dimensions (mm) 305 x 244 (ATX)
The board is a full sized ATX motherboard and will fit in most mid-sized cases and this chipset will work with all Sandy-bridge and Ivy-bridge CPU coolers so you do not have to worry about changing your cooler or compatibility if you are thinking of upgrading.

It is worth noting that the Hero does include the SSD Secure erase feature, something that I would like to have seen offered with all ASUS motherboards as more and more folks move over to SSD for their OS drive.
There are 8 USB ports on the back panel so pretty much every gaming device you want to use is covered. With 6 additional USB headers to be found on the board itself there is heaps of USB connectivity available especially as most cases now come with a USB header and cable as standard.

Good built in sound, plenty SATA connectivity and Gen3 PCIe lanes to match his graphic card. PCIe s Gen 3 provides a 2X faster transfer rate than Gen2. What that means is Gen 3 has twice the available bandwidth namely 32GB/s, basically going from PCIe Gen 2 to Gen 3 doubles the bandwidth available to the add-on cards installed, from 500MB/s per lane to 1GB/s per lane. So a Gen 3 PCI Express x16 slot is capable of offering 16GB/s (or 128Gbit/s) of bandwidth in each direction. Which is how we get to the 32GB/sec bi-directional bandwidth. This is standard with all boards that are Haswell compatible by the way.
Now the main reason I had for getting the Maximus VI Hero board is because of the ROG design and ROG bios.
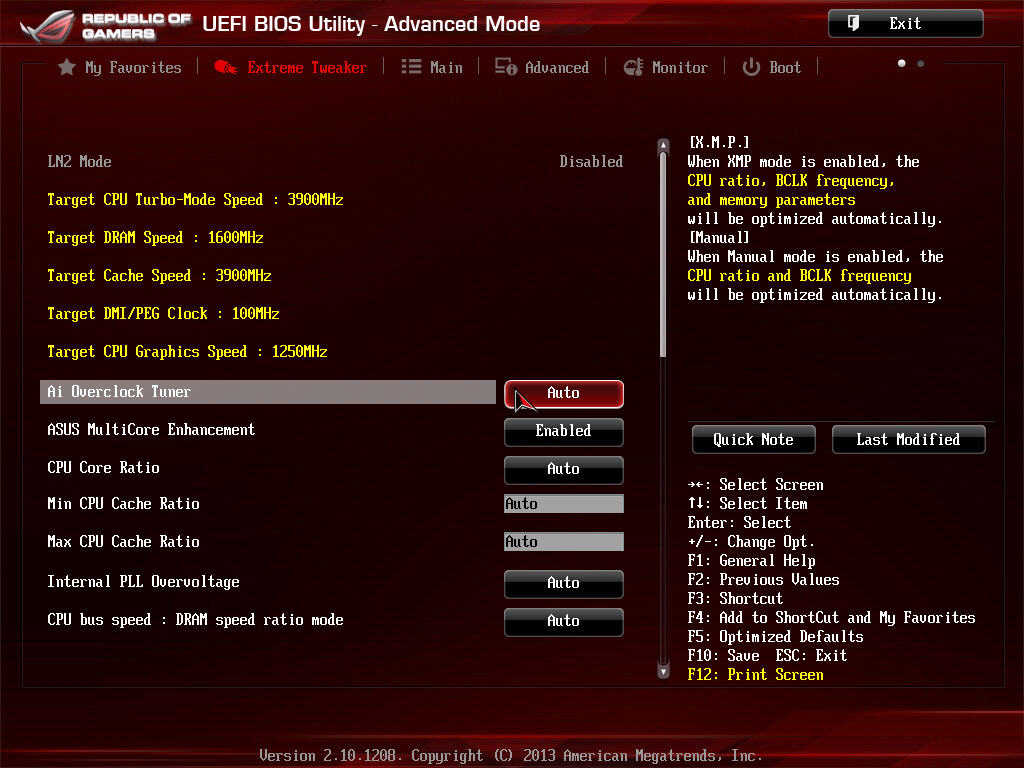
I bench with the Maximus VI Extreme, and the Rampage VI Extreme Black Edition boards currently, so I am well aware of how good this motherboards bios is. The format is simple and pretty self-explanatory. The BIOS engineering team have done a really good job of the bios, there are three or four settings that need to be changed for a solid overclock, and the rest can be left on auto in the main. Later on I will show you how I set up a modest overclock of 4.5GHz in the bios. The CPU sadly was a bit of a dog and needed heaps more voltage to clock higher and that resulted in way to much heat. But more on that later.
Another key reason was Ryan’s primary use of the system, gaming. So the board needed to reflect that requirement and the Hero certainly does.
Gaming specific features
• SupremeFX
• Sonic Radar
• Extreme Engine Digi+ III
• GameFirst II + Intel LAN
Those are from the Hero support page, I will show you a bit more about each of these features a little later.
BUNDLED SOFTWARE
It wouldn’t be a ROG motherboard if it didn’t come with a bunch of features oriented to give gamers an advantage and edge over our enemies on the virtual battlefield. With the Maximus VI Hero, it’s no different. Let’s take a look at the bundled software that comes with our motherboard.
AI Suite III
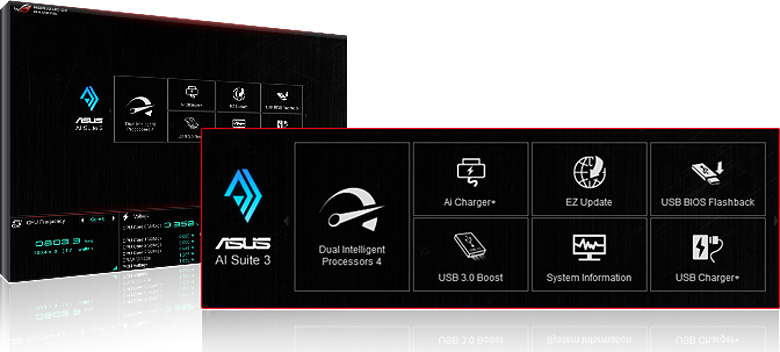
AI Suite III is a program that allows you to monitor and tweak every aspect of your system in real-time. No more fiddling in the BIOS for on the fly overclocking. Now those of your reading this article that visit the ROG forums will know I am not much of a fan of the older AI SuiteII software, and would regularly tell folks to remove it.

The AI SuiteIII software package is a quantum leap better and I now find myself actually telling folks to use it. Just like to clear one thing up here, 4 Way optimization is not available on any of the Maximus boards, the ROG Maximus range is aimed for uses with a little more knowledge and expertise than channel board owners, and who want to have more control over their overclock.
You can quite easily change the multi, BCLK and all the voltages in OS with ease.

There are two pages that I’d like to highlight: TPU and Fan Xpert 2.

The TPU tab is my favorite of all the available tabs. I have a set up a nice little overclock profile that I can click and load within seconds. Sometimes while playing demanding games you suddenly find yourself lacking in CPU power. No fear. Pause and minimize the game, open AI Suite III, load your overclock profile and BAM! Instant performance boost.
Fan Xpert 2
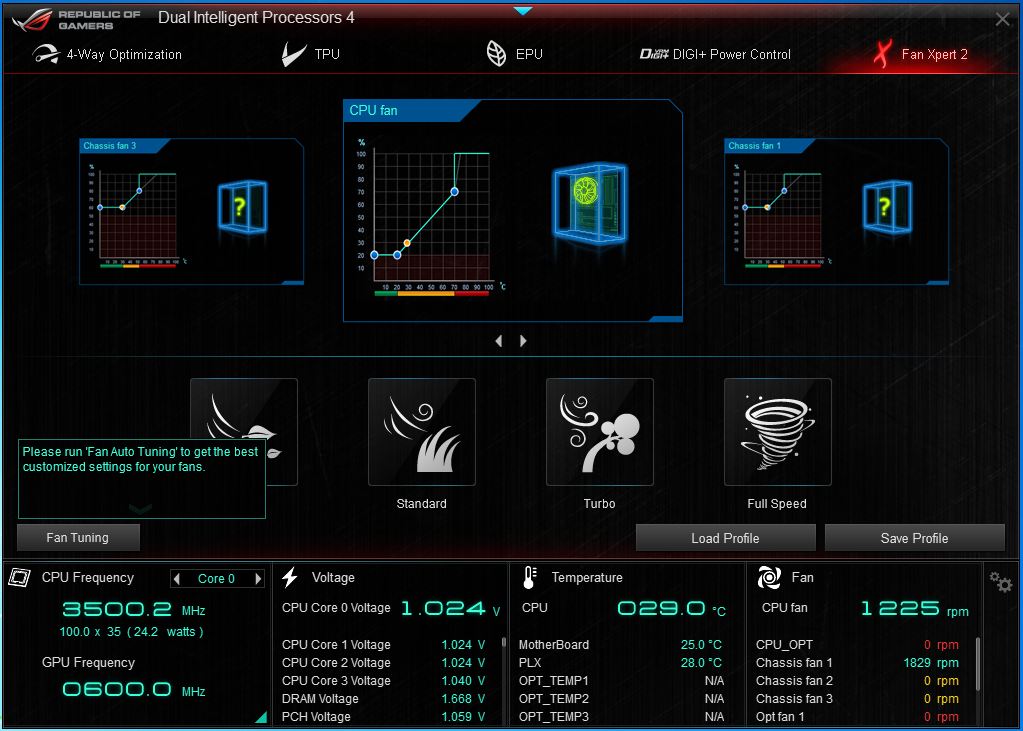
A very important tab is Fan Xpert 2 which is really neat because you have full control over all the fans inside your case. You can choose between different presets. For example, if a game is really taxing your system and you want to maintain an optimum airflow, changing the fans speed is as easy as clicking on a single button. Watching a movie and you want a whisper quite system load your silent profile and away you go.

There is also the facility to have dynamic control on your system and to switch between different fan profiles constantly, you can customize each fan’s behavior depending on temperature.
Specially for the gamers
Gamefirst II

The first change that you’d notice immediately after installing the ROG software on the DVD is the Gamefirst II meter on the bottom right of your screen. This little widget basically shows you a summary of all your network activity that’s going on in your system.

When you open the program itself, you’re presented with a lot of options to help you reduce latency to maximize your online gaming performance. There are different categories you can configure and prioritize.

Sonic Radar

Sonic radar is one of the more useful utility to give you an edge in gaming. What this basically does is display an on screen radar to show the direction that a certain noise is coming from.

There are a lot of noise presets to choose from. You can choose to monitor your enemy’s footsteps, gunshots or even explosions.

So depending on the game that you’re playing, you might find that certain presets work better than others.

You can configure this little radar to your liking. You can determine which position you want this to be placed on your screen, the shortcut to activate or deactivate it and the opacity of the overlay itself.
Putting all together and first boot
This is the finished build, on my test bench. I like to do all my clocking outside of the case and on a non-conductive surface. You can use your motherboard box as a test bench too. The reason for this is I want to make sure all my bits and pieces work before I do my build in the case and get my cable management neat and tidy.

The thought of finishing up a build only to find that I have some kind of hardware issue and need to strip the build to problem solve fills me with horror.
I also do my initial overclocking of the bios here on the test bench, before I install the OS. I use an older operating system while overclocking.
First thing I need to do is see if all the hardware works as it should.
CPU looking good in CPUz, and so is the memory and graphic card.
You can use any version of CPUz of course and there is a ROG themed version too. I make note of my voltage under load and reboot to bios.
I was aiming for 4.6GHz gaming stable but the CPU was just not up to the task, and nor was the cooling either.
If you have a good closed loop cooler like the H100i or even better a custom water cooling system you should be able to go quite a bit higher than I was able to safely.
Right moving on. The first thing I like to do is get my memory sorted out. Memory is the single most important aspect of a stable system these days. I like to use Memtest86+ ver 5.01 on a fat formatted USB drive to test my hardware.
Now two passes at first defaults, and then at the XMP profile is a reasonable indicator that your hardware is in working order. That does not mean your memory is guaranteed to be stable, just that your hardware is working with the XMP profile. The likelihood is that your memory is stable but more on that later.
So first thing is set XMP profile as your mode of overclock.

Now it is time to increase the multiplier. With Intel processors you can buy unlocked or K type processors. This does make the overclock process a lot easier as all you need to do is increase the multiplier and raise voltage as need to achieve your overclock. We are going to set 45 in bios.

Remember to sync all cores, set to enable.

Now we open the Digi+ sub menu, with the new UEFI bios navigation can be with either the keyboard or a mouse. I am still quite old school so I am most comfortable with the keyboard and tend to use that all the time.

We are going to change the LLC, it is the first entry all the others we can leave on auto. I like to set level 4 or 5, if I was going to be overclocking for benchmarking or some folding I might be tempted to set LLC higher but for a gaming system medium is just about the perfect setting.
Load Level Correction is a feature designed to level out the vDroop that Intel include as part of each CPU. I like to have some vDroop present in my builds as that prevents any nasty spikes when under load that could potentially harm my processor.

Back to the main menu and navigate down to the Voltage section.
I am going to be using the offset mode to provide the current to the processor. I select offset as the mode, and I want a positive offset. You can also select negative if you wish to lower your voltages but in this instance I need more voltage to overclock my CPU so I go with the +.

0.030 is the value I enter.

I do quickly go down to look at the voltage set for my memory and my sticks require 1.65v for the XMP profile so all is good.

F10 to save and reboot. Enter to make it happen. We are now ready to boot into OS and see if the system is stable or not.
Stability is different things to different folks. Each person must work out what stability means for them. A bencher considers their system stable if they pass the benchmark and are able to take a screenshot. A financial house that uses system to model the markets will have a very different idea of what stability means, and of course they will not even consider overclocking their systems at all. Ryan is a gamer. So he needs his system to run without BSOD or any freezing during all his gaming.

Here is what I did for Ryan and his gaming machine. First of all I ran a stress test to see how the cooler managed under load. I like the ROG RealBench ver 2 that Nodens over at ROG forums is developing. Real world stuff and reflects what we actually use our system for.
I did not want his system throttling due to temperature. A stress test is a very good tool to use as it loads your CPU to an extreme level. This load will generate heat in a big way. Some folks like to run Prime, others use AIDA64 and so on. Each one has their own favourite and that is just fine as all do a good job of producing heat.

As you can see the cooler was able to cope. I only ran the stress test for 20 minutes as that was sufficient for me to see the cooler was up to the task.
Now I can hear the howls of the stress test brigade, the guys who stress test for 12 or more hours. Yeah guys I know I have heard it all before and I respect what you guys do. But I do not go that route.
Now I open up a couple of browsers, and at least 50 tabs in each browser. I open a game windowed and let it loop by itself. A media player running some 1080p video on a second screen and finally I open Prime and run the application.
Now I put the system to sleep. Yes you read that correctly, I put the system to sleep and leave it for a couple of hours. If the system wakes from sleep with no errors or problems then the system memory is stable and the system is ready for the final stage of stability testing.

Playing games. Remember this system is a gaming set up, and the proof of any stability is in the playing of the games. Here Ryan came in and played three or four hours of his most stressful games FSX is one of his favourites and I know that puts huge strain on any system. We did not use BF4 as it was just released and initially so buggy that it was not worth the effort.

I needed to bump up the voltage a few times during this process but finally got the system sorted at 4.5GHz at 1.360 vCore and the memory running happily at 2200MHz. In bios I save an OC profile of the stable overclock before resetting to defaults in preparation for the OS install.
Quick tip, do not install your OS with additional hard drives fitted. Once you OS is done and the chipset drivers installed power down and fit the additional storage drives. Try to keep all your hard drives on the Intel native chipset too. I tend to disable the third party storage devices.
The Hero motherboard is a real solid piece of kit, rich in features and my number one pick as a gaming platform. Overclocking the system the way I did it, allows Ryan and his new Hero gaming system to have his processor ramp up the full 4.5GHz when under load and then dial down to 800MHz with next to no voltage when not needed, browsing the web or writing his university assignments on a world processor does not require an overclocked system after all.

http://www.overclockers.co.uk/showproduct.php?prodid=MB-563-AS&groupid=701&catid=5&subcat=2574
Building a gaming system is often the most fun you can have and still have your clothes on. I got that opportunity the other day to put together a pretty good gaming system. My next door neighbour wanted a reasonable gaming system for his boy for Christmas and asked me to build it up. His budget was not extravagant and like all folks he wanted something that had some future proofing in the build.
The system needed to be Intel, and have some upgrade potential as games became more demanding or Ryan (his son) added monitor real estate to his gaming system. Currently he was gaming with a 27” 1080p panel which would not be too demanding on the video card of the new build.
I chose the i5-4670K processor, a 16GB kit of dual channel ram that was on special and an AMD 290X graphic card for the build. Toss in a Crucial M5 960GB SSD and a Seasonic X-Series 850w PSU to drive the entire system and you have the making of a very good gaming rig. The only thing missing was a motherboard.
Now deciding which motherboard to go for is not as easy to decide on as you would think. There are so many factors that come into play. First of all the motherboard no longer determines how high your CPU is going to overclock these days, that is up to the CPU as they will clock the same pretty much on all good boards. Plus most motherboards have multiple graphic capabilities, similar number of USB and SATA ports since again all this stuff is now controlled by the processor.
So why choose one board over another? Price plays a part in making up your mind of course, often cheap gets you just what you paid for cheap and nasty, top of the range expensive leaves you with an overpriced over featured gimmicky board that does not suite your needs. Somewhere between those two extremes lies the perfect gaming platform. And the clue to finding the right gaming board is suits your needs, I had to find a board that would match up to Ryan’s needs.
I decided on the ASUS Maximus VI Hero motherboard.
http://www.asus.com/Motherboards/MAXIMUS_VI_HERO/
Basic Specification of the Maximus VI Hero
• Chipset Intel Z87
• CPU support LGA1150 compatible
• Memory support 4 slots: max 32GB DDR3 (2,400MHz)
• Expansion slots SLI and Crossfire support, Three 16x PCI-E 3.0 slots (One at x16, two at 8x and one 4x), two three 1x PCI-E
• Sound 10-channel HD audio via Realtek ALC898
• Networking Intel Gigabit Ethernet LAN, Bluetooth 2.1
• Ports 8 x SATA 6Gbps (six via Intel Z87, two via ASMedia ASM1061 controller) 6 x USB 3, 8 x USB 2, LAN, audio out, line in, mic, optical S/PDIF out, HDMI
• Dimensions (mm) 305 x 244 (ATX)
The board is a full sized ATX motherboard and will fit in most mid-sized cases and this chipset will work with all Sandy-bridge and Ivy-bridge CPU coolers so you do not have to worry about changing your cooler or compatibility if you are thinking of upgrading.
It is worth noting that the Hero does include the SSD Secure erase feature, something that I would like to have seen offered with all ASUS motherboards as more and more folks move over to SSD for their OS drive.
There are 8 USB ports on the back panel so pretty much every gaming device you want to use is covered. With 6 additional USB headers to be found on the board itself there is heaps of USB connectivity available especially as most cases now come with a USB header and cable as standard.
Good built in sound, plenty SATA connectivity and Gen3 PCIe lanes to match his graphic card. PCIe s Gen 3 provides a 2X faster transfer rate than Gen2. What that means is Gen 3 has twice the available bandwidth namely 32GB/s, basically going from PCIe Gen 2 to Gen 3 doubles the bandwidth available to the add-on cards installed, from 500MB/s per lane to 1GB/s per lane. So a Gen 3 PCI Express x16 slot is capable of offering 16GB/s (or 128Gbit/s) of bandwidth in each direction. Which is how we get to the 32GB/sec bi-directional bandwidth. This is standard with all boards that are Haswell compatible by the way.
Now the main reason I had for getting the Maximus VI Hero board is because of the ROG design and ROG bios.
I bench with the Maximus VI Extreme, and the Rampage VI Extreme Black Edition boards currently, so I am well aware of how good this motherboards bios is. The format is simple and pretty self-explanatory. The BIOS engineering team have done a really good job of the bios, there are three or four settings that need to be changed for a solid overclock, and the rest can be left on auto in the main. Later on I will show you how I set up a modest overclock of 4.5GHz in the bios. The CPU sadly was a bit of a dog and needed heaps more voltage to clock higher and that resulted in way to much heat. But more on that later.
Another key reason was Ryan’s primary use of the system, gaming. So the board needed to reflect that requirement and the Hero certainly does.
Gaming specific features
• SupremeFX
• Sonic Radar
• Extreme Engine Digi+ III
• GameFirst II + Intel LAN
Those are from the Hero support page, I will show you a bit more about each of these features a little later.
BUNDLED SOFTWARE
It wouldn’t be a ROG motherboard if it didn’t come with a bunch of features oriented to give gamers an advantage and edge over our enemies on the virtual battlefield. With the Maximus VI Hero, it’s no different. Let’s take a look at the bundled software that comes with our motherboard.
AI Suite III
AI Suite III is a program that allows you to monitor and tweak every aspect of your system in real-time. No more fiddling in the BIOS for on the fly overclocking. Now those of your reading this article that visit the ROG forums will know I am not much of a fan of the older AI SuiteII software, and would regularly tell folks to remove it.
The AI SuiteIII software package is a quantum leap better and I now find myself actually telling folks to use it. Just like to clear one thing up here, 4 Way optimization is not available on any of the Maximus boards, the ROG Maximus range is aimed for uses with a little more knowledge and expertise than channel board owners, and who want to have more control over their overclock.
You can quite easily change the multi, BCLK and all the voltages in OS with ease.
There are two pages that I’d like to highlight: TPU and Fan Xpert 2.
The TPU tab is my favorite of all the available tabs. I have a set up a nice little overclock profile that I can click and load within seconds. Sometimes while playing demanding games you suddenly find yourself lacking in CPU power. No fear. Pause and minimize the game, open AI Suite III, load your overclock profile and BAM! Instant performance boost.
Fan Xpert 2
A very important tab is Fan Xpert 2 which is really neat because you have full control over all the fans inside your case. You can choose between different presets. For example, if a game is really taxing your system and you want to maintain an optimum airflow, changing the fans speed is as easy as clicking on a single button. Watching a movie and you want a whisper quite system load your silent profile and away you go.
There is also the facility to have dynamic control on your system and to switch between different fan profiles constantly, you can customize each fan’s behavior depending on temperature.
Specially for the gamers
Gamefirst II
The first change that you’d notice immediately after installing the ROG software on the DVD is the Gamefirst II meter on the bottom right of your screen. This little widget basically shows you a summary of all your network activity that’s going on in your system.
When you open the program itself, you’re presented with a lot of options to help you reduce latency to maximize your online gaming performance. There are different categories you can configure and prioritize.
Sonic Radar
Sonic radar is one of the more useful utility to give you an edge in gaming. What this basically does is display an on screen radar to show the direction that a certain noise is coming from.
There are a lot of noise presets to choose from. You can choose to monitor your enemy’s footsteps, gunshots or even explosions.
So depending on the game that you’re playing, you might find that certain presets work better than others.
You can configure this little radar to your liking. You can determine which position you want this to be placed on your screen, the shortcut to activate or deactivate it and the opacity of the overlay itself.
Putting all together and first boot
This is the finished build, on my test bench. I like to do all my clocking outside of the case and on a non-conductive surface. You can use your motherboard box as a test bench too. The reason for this is I want to make sure all my bits and pieces work before I do my build in the case and get my cable management neat and tidy.
The thought of finishing up a build only to find that I have some kind of hardware issue and need to strip the build to problem solve fills me with horror.
I also do my initial overclocking of the bios here on the test bench, before I install the OS. I use an older operating system while overclocking.
First thing I need to do is see if all the hardware works as it should.
CPU looking good in CPUz, and so is the memory and graphic card.
You can use any version of CPUz of course and there is a ROG themed version too. I make note of my voltage under load and reboot to bios.
I was aiming for 4.6GHz gaming stable but the CPU was just not up to the task, and nor was the cooling either.
If you have a good closed loop cooler like the H100i or even better a custom water cooling system you should be able to go quite a bit higher than I was able to safely.
Right moving on. The first thing I like to do is get my memory sorted out. Memory is the single most important aspect of a stable system these days. I like to use Memtest86+ ver 5.01 on a fat formatted USB drive to test my hardware.
Now two passes at first defaults, and then at the XMP profile is a reasonable indicator that your hardware is in working order. That does not mean your memory is guaranteed to be stable, just that your hardware is working with the XMP profile. The likelihood is that your memory is stable but more on that later.
So first thing is set XMP profile as your mode of overclock.
Now it is time to increase the multiplier. With Intel processors you can buy unlocked or K type processors. This does make the overclock process a lot easier as all you need to do is increase the multiplier and raise voltage as need to achieve your overclock. We are going to set 45 in bios.
Remember to sync all cores, set to enable.
Now we open the Digi+ sub menu, with the new UEFI bios navigation can be with either the keyboard or a mouse. I am still quite old school so I am most comfortable with the keyboard and tend to use that all the time.
We are going to change the LLC, it is the first entry all the others we can leave on auto. I like to set level 4 or 5, if I was going to be overclocking for benchmarking or some folding I might be tempted to set LLC higher but for a gaming system medium is just about the perfect setting.
Load Level Correction is a feature designed to level out the vDroop that Intel include as part of each CPU. I like to have some vDroop present in my builds as that prevents any nasty spikes when under load that could potentially harm my processor.
Back to the main menu and navigate down to the Voltage section.
I am going to be using the offset mode to provide the current to the processor. I select offset as the mode, and I want a positive offset. You can also select negative if you wish to lower your voltages but in this instance I need more voltage to overclock my CPU so I go with the +.
0.030 is the value I enter.
I do quickly go down to look at the voltage set for my memory and my sticks require 1.65v for the XMP profile so all is good.
F10 to save and reboot. Enter to make it happen. We are now ready to boot into OS and see if the system is stable or not.
Stability is different things to different folks. Each person must work out what stability means for them. A bencher considers their system stable if they pass the benchmark and are able to take a screenshot. A financial house that uses system to model the markets will have a very different idea of what stability means, and of course they will not even consider overclocking their systems at all. Ryan is a gamer. So he needs his system to run without BSOD or any freezing during all his gaming.
Here is what I did for Ryan and his gaming machine. First of all I ran a stress test to see how the cooler managed under load. I like the ROG RealBench ver 2 that Nodens over at ROG forums is developing. Real world stuff and reflects what we actually use our system for.
I did not want his system throttling due to temperature. A stress test is a very good tool to use as it loads your CPU to an extreme level. This load will generate heat in a big way. Some folks like to run Prime, others use AIDA64 and so on. Each one has their own favourite and that is just fine as all do a good job of producing heat.
As you can see the cooler was able to cope. I only ran the stress test for 20 minutes as that was sufficient for me to see the cooler was up to the task.
Now I can hear the howls of the stress test brigade, the guys who stress test for 12 or more hours. Yeah guys I know I have heard it all before and I respect what you guys do. But I do not go that route.
Now I open up a couple of browsers, and at least 50 tabs in each browser. I open a game windowed and let it loop by itself. A media player running some 1080p video on a second screen and finally I open Prime and run the application.
Now I put the system to sleep. Yes you read that correctly, I put the system to sleep and leave it for a couple of hours. If the system wakes from sleep with no errors or problems then the system memory is stable and the system is ready for the final stage of stability testing.
Playing games. Remember this system is a gaming set up, and the proof of any stability is in the playing of the games. Here Ryan came in and played three or four hours of his most stressful games FSX is one of his favourites and I know that puts huge strain on any system. We did not use BF4 as it was just released and initially so buggy that it was not worth the effort.
I needed to bump up the voltage a few times during this process but finally got the system sorted at 4.5GHz at 1.360 vCore and the memory running happily at 2200MHz. In bios I save an OC profile of the stable overclock before resetting to defaults in preparation for the OS install.
Quick tip, do not install your OS with additional hard drives fitted. Once you OS is done and the chipset drivers installed power down and fit the additional storage drives. Try to keep all your hard drives on the Intel native chipset too. I tend to disable the third party storage devices.
The Hero motherboard is a real solid piece of kit, rich in features and my number one pick as a gaming platform. Overclocking the system the way I did it, allows Ryan and his new Hero gaming system to have his processor ramp up the full 4.5GHz when under load and then dial down to 800MHz with next to no voltage when not needed, browsing the web or writing his university assignments on a world processor does not require an overclocked system after all.
")