

Soldato
I have some watercooling kit, that I'm going to be using for a build at some point in the future, that needs testing to make sure it's sound. No particular reason that it shouldn't be but I'd rather know now rather than plan to use it and be surprised. The pump specifically is a bit suspect - might just need a new O-ring.
So, these things exist why am I making one? Well, I have Aqua Computer's Dr Drop leak tester....but it leaks slightly and intermittently. This tends to render it fairly useless as a leak tester! To be fair, all the other stuff I've had from Aqua Computer has been great and any problems I've had they've resolved so I'm not having a go at them for bringing what was, at the time, a fairly revolutionary tool to market. The main issue is that the gauge is naff. It breaks the first time the tubing pushes the unit off the table onto a soft surface. The tyre valves are prone to leaking too - maybe even the gauge itself, it's difficult to tell. EK do one and I looked at that too. It's better as it has a ball valve to back up the tyre valve but it looks like the gauge could be just as naff. Now to be fair, I'm basing that solely off a review I read on another site and I've not seen the thing in the flesh....but I don't want to drop 30-odd quid on buying myself the same problem.
So, some online purchasing later and we have:

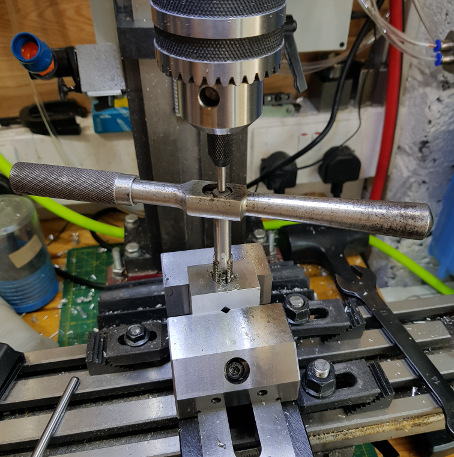
Faced the sides of the aluminium block with a fly cutter on the mill. The brass 'stick' is an air nozzle to blow the chips clear - one of the new toys I got a compressor for.

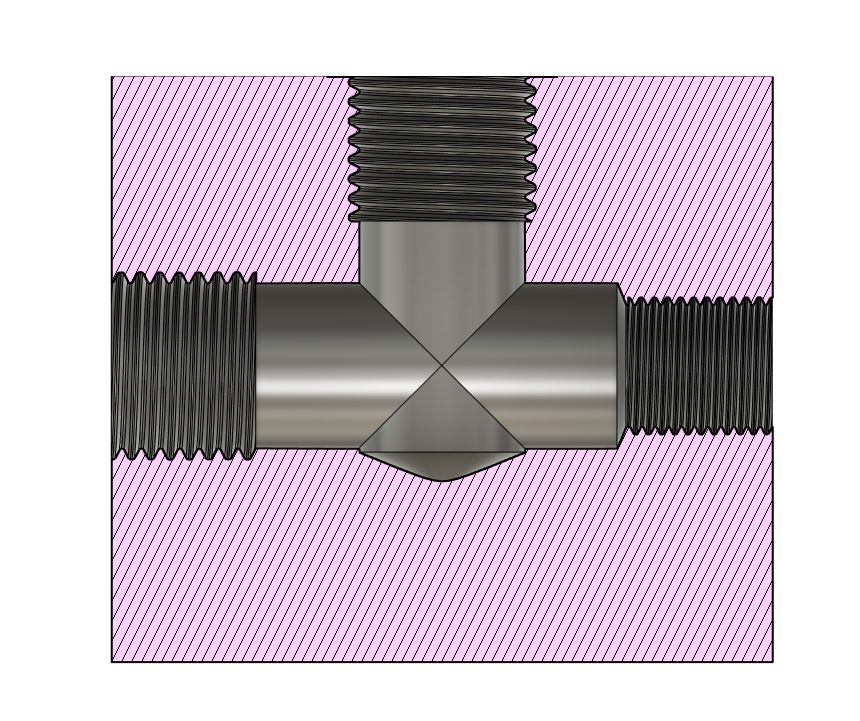
Drilled 11.8mm and tapped G1/4" (BSPP to be specific) for the gauge and a watercooling fitting. I had the drill and tap from when I was playing about tapping extra holes in a res ages back - has come in useful for pneumatics since. The last hole was drilled 8.8mm and tapped 1/8" BSPP
Internally it looks like this:
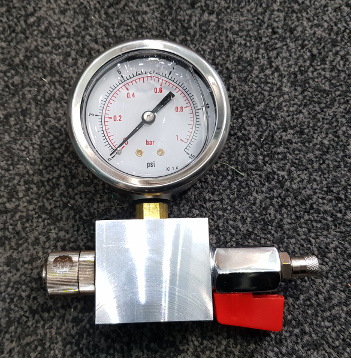
And assembled:
Had to put an M10 washer between the ball valve and the block so that there was enough clearance to turn the tap. The Loctite will take care of the seal on the threads so the faces don't need to be tight against each other.
Just need to wait for the Loctite to cure (24 hours) and I can test it. This particular flavour of Loctite is a thread sealant (good for something like 10,000psi so 15psi should be a walk in the park!) and replaces need for PTFE tape. It's also a thread locker so to a certain extent you can screw a gauge in until it faces the right direction and not have to bottom it out.....that said, I did just chamfer the hole until it bottomed out straight.
*Why glycerin-filled? Well - in my head at least - it should help with reducing stiction. When there's a slow leak on a cheap gauge the needle won't actually move until you flick the gauge. I'm hoping this should negate the need for that....although it being a nicer made gauge in the first place should help too. It's worth noting though that the liquid is only held in by a bung at the top - it survived the post without leaking though so hopefully it shouldn't be a problem.
So, these things exist why am I making one? Well, I have Aqua Computer's Dr Drop leak tester....but it leaks slightly and intermittently. This tends to render it fairly useless as a leak tester! To be fair, all the other stuff I've had from Aqua Computer has been great and any problems I've had they've resolved so I'm not having a go at them for bringing what was, at the time, a fairly revolutionary tool to market. The main issue is that the gauge is naff. It breaks the first time the tubing pushes the unit off the table onto a soft surface. The tyre valves are prone to leaking too - maybe even the gauge itself, it's difficult to tell. EK do one and I looked at that too. It's better as it has a ball valve to back up the tyre valve but it looks like the gauge could be just as naff. Now to be fair, I'm basing that solely off a review I read on another site and I've not seen the thing in the flesh....but I don't want to drop 30-odd quid on buying myself the same problem.
So, some online purchasing later and we have:
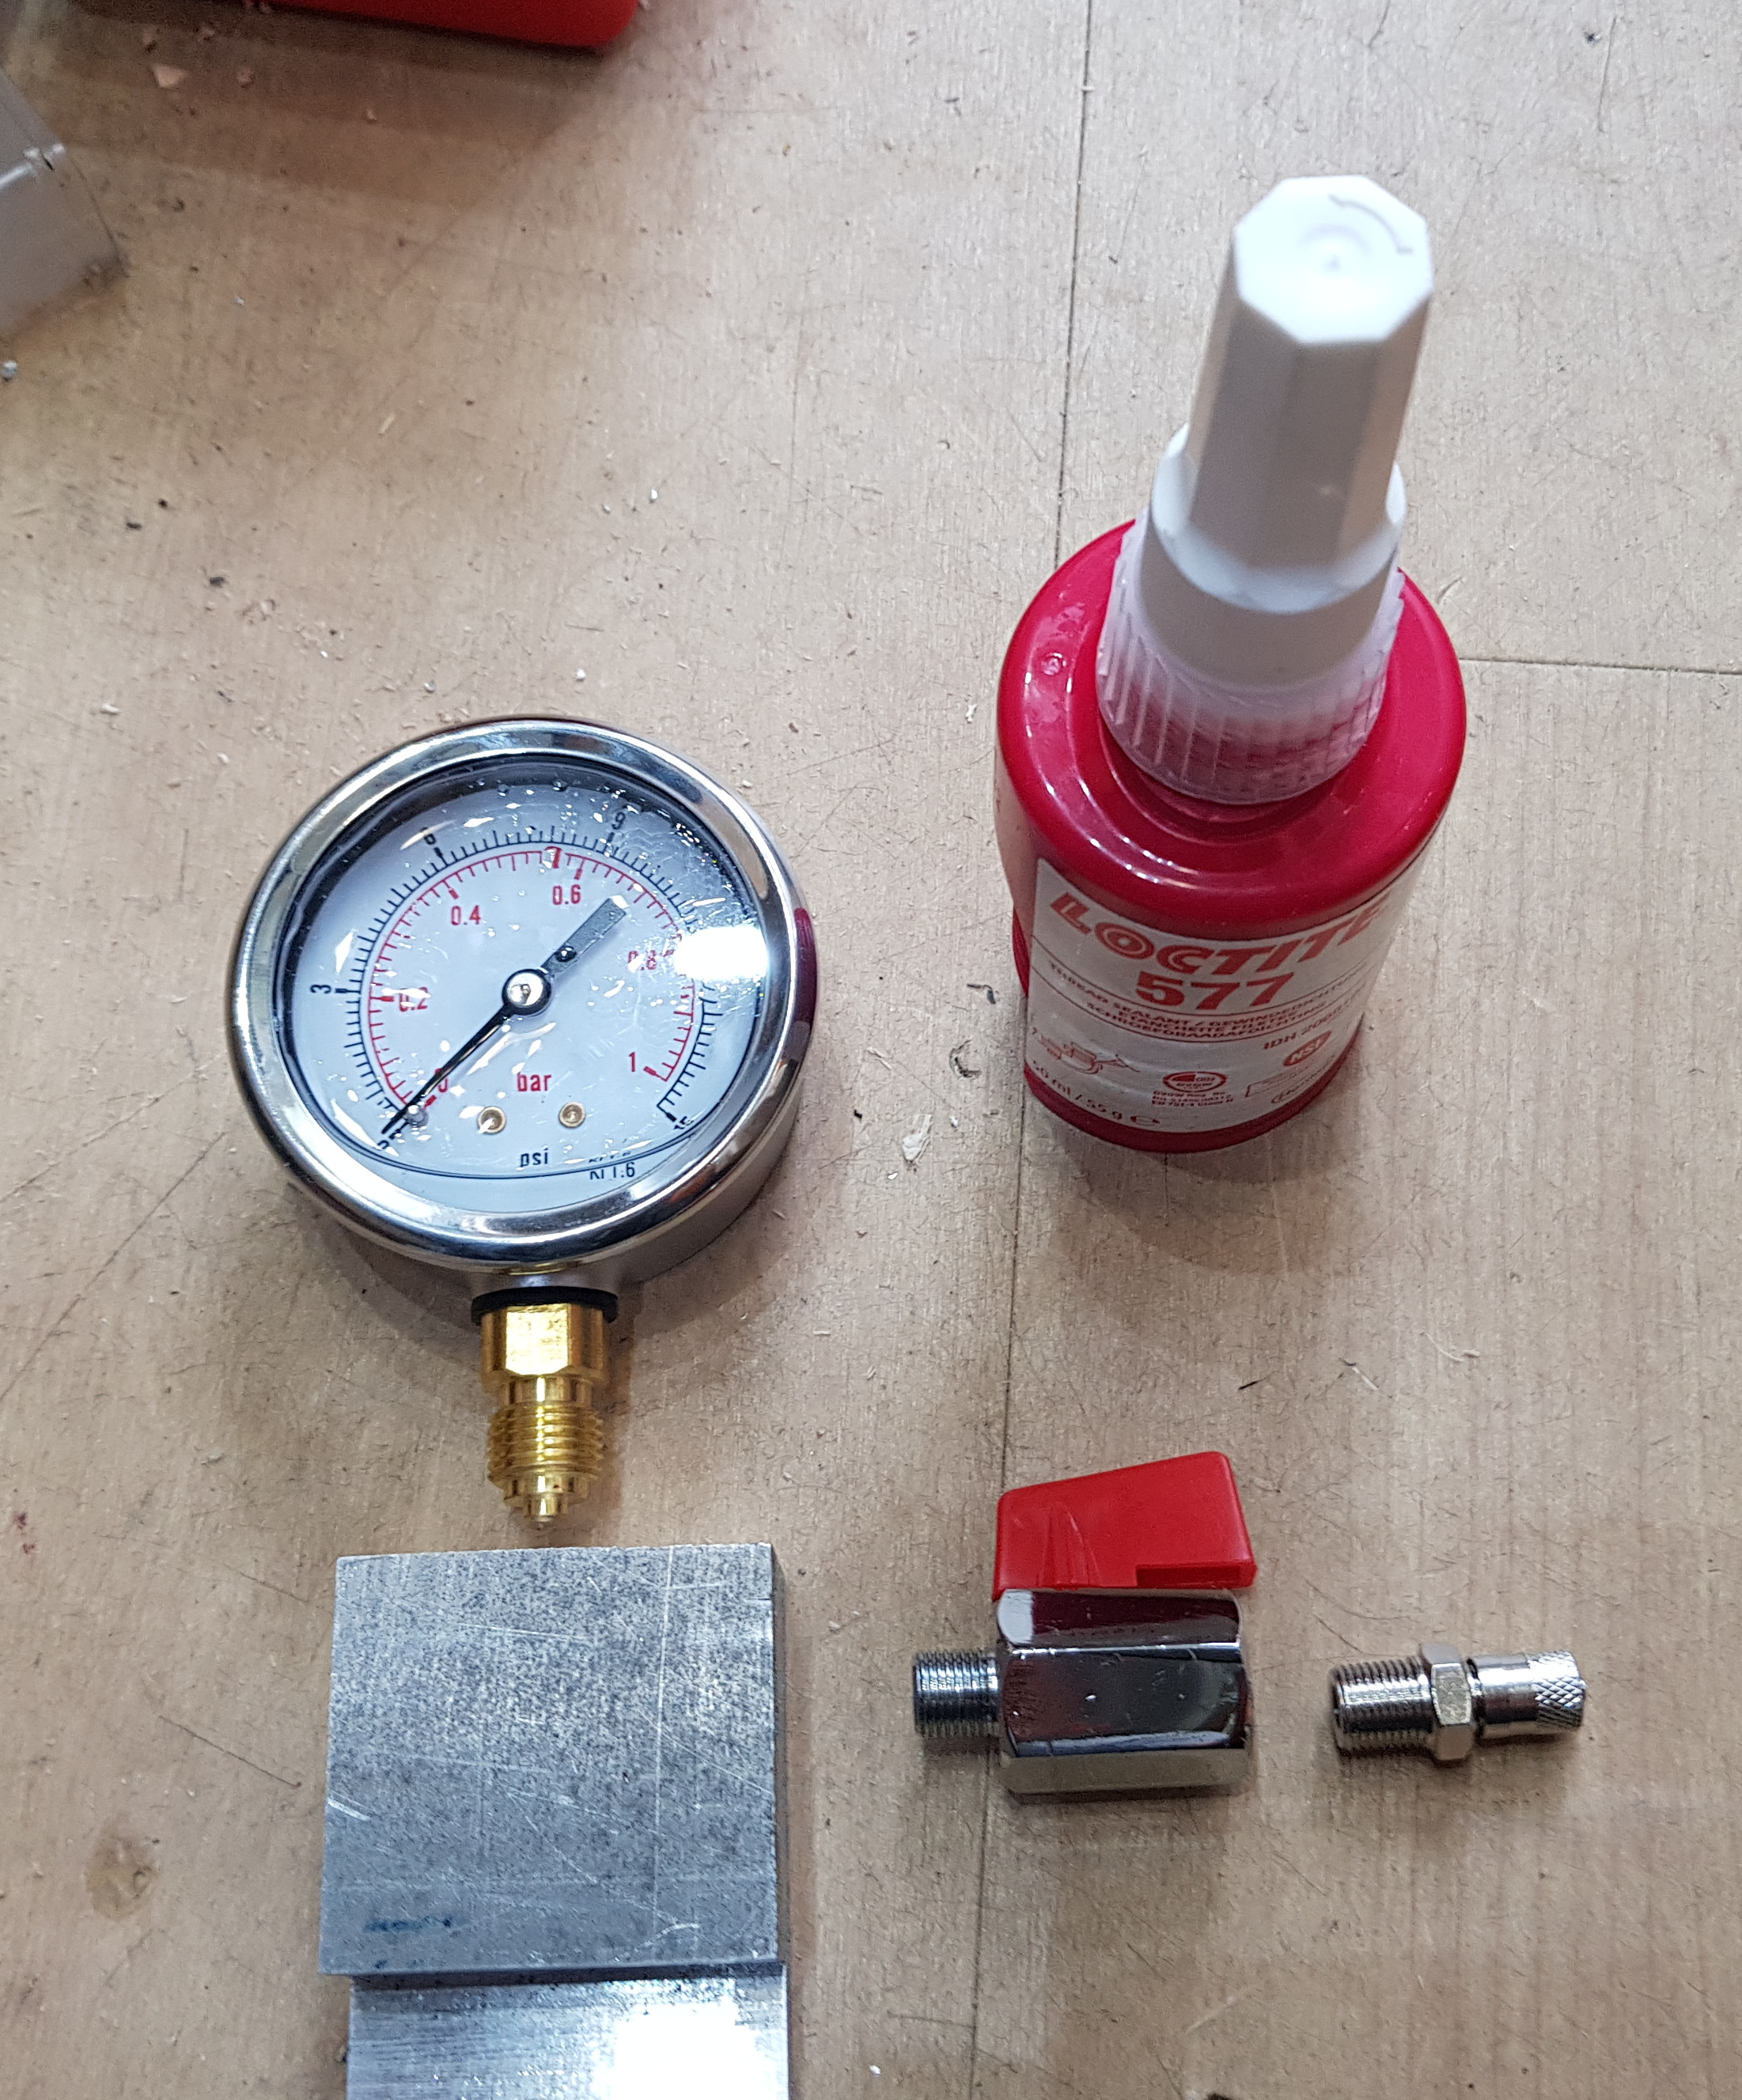
- 1-bar glycerin-filled* gauge (£10.50)
- 1/8" BSP ball-valve (£3.50)
- 1/8" BSP Schrader valve (£4)
- Loctite 577 (£20 a bottle but "free" as I'd already invested for compressor fittings)
- Chunk of aluminium I already had ("free")
Faced the sides of the aluminium block with a fly cutter on the mill. The brass 'stick' is an air nozzle to blow the chips clear - one of the new toys I got a compressor for.
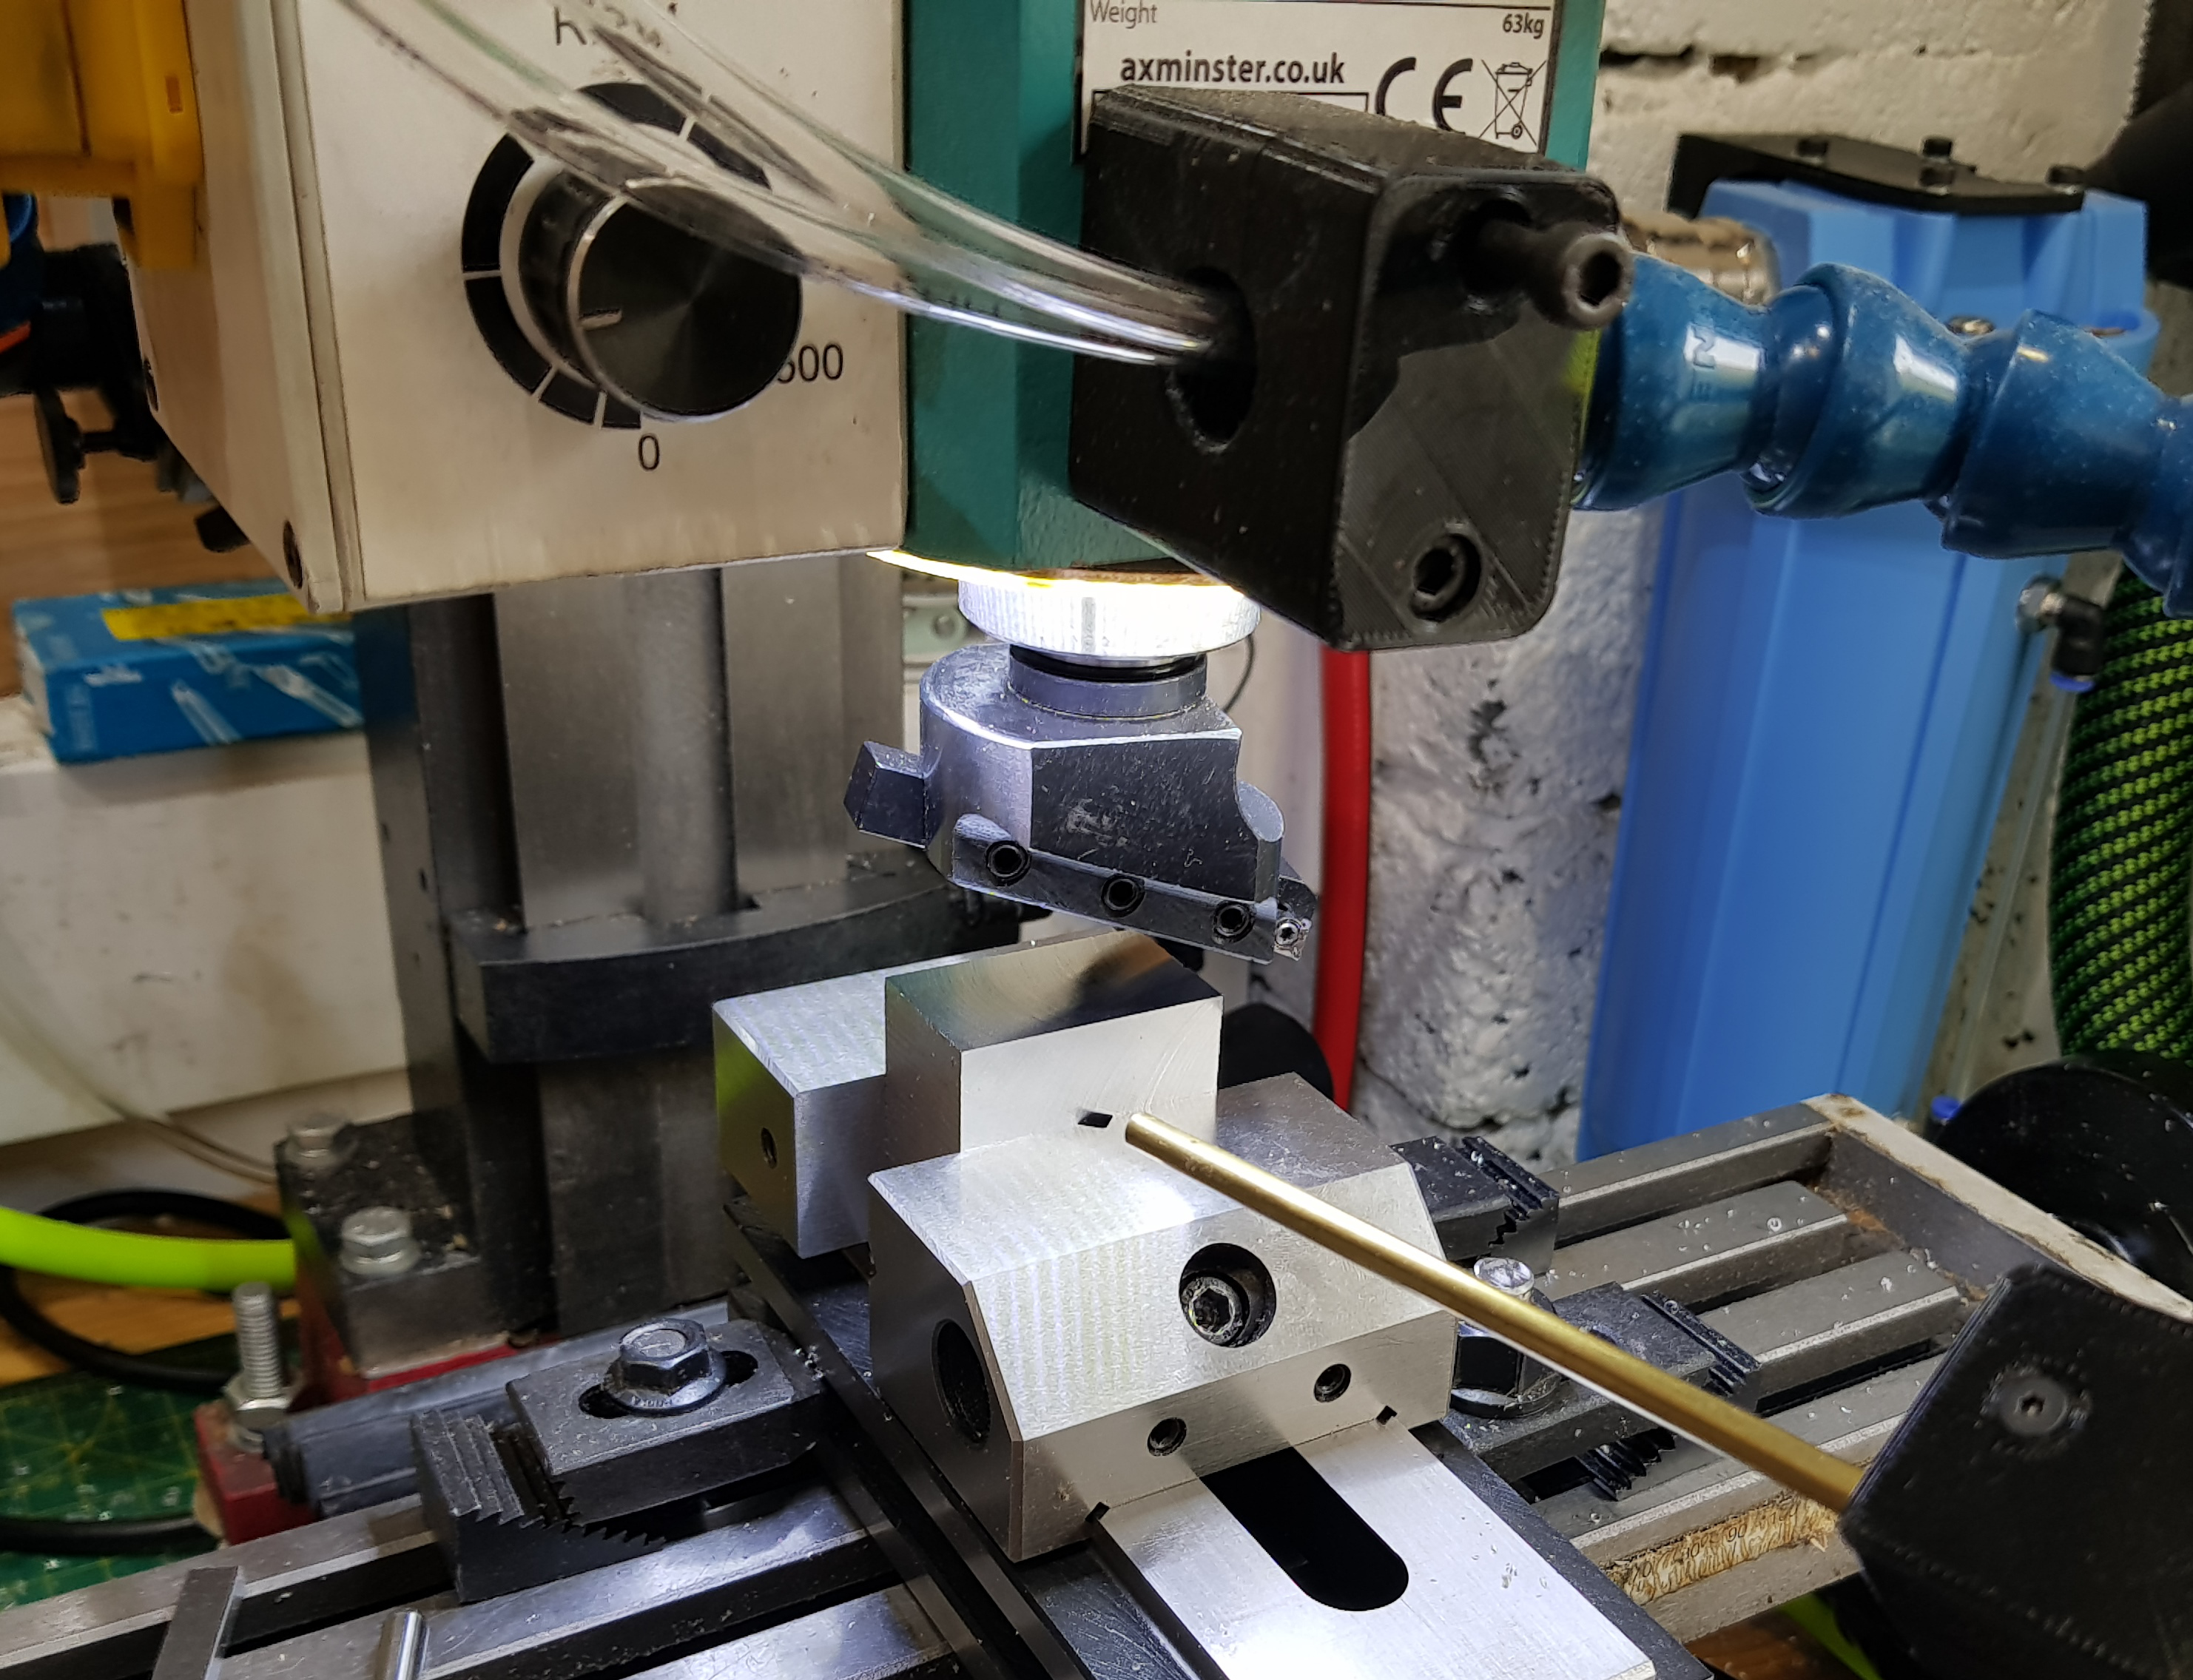
Drilled 11.8mm and tapped G1/4" (BSPP to be specific) for the gauge and a watercooling fitting. I had the drill and tap from when I was playing about tapping extra holes in a res ages back - has come in useful for pneumatics since. The last hole was drilled 8.8mm and tapped 1/8" BSPP

Internally it looks like this:
And assembled:
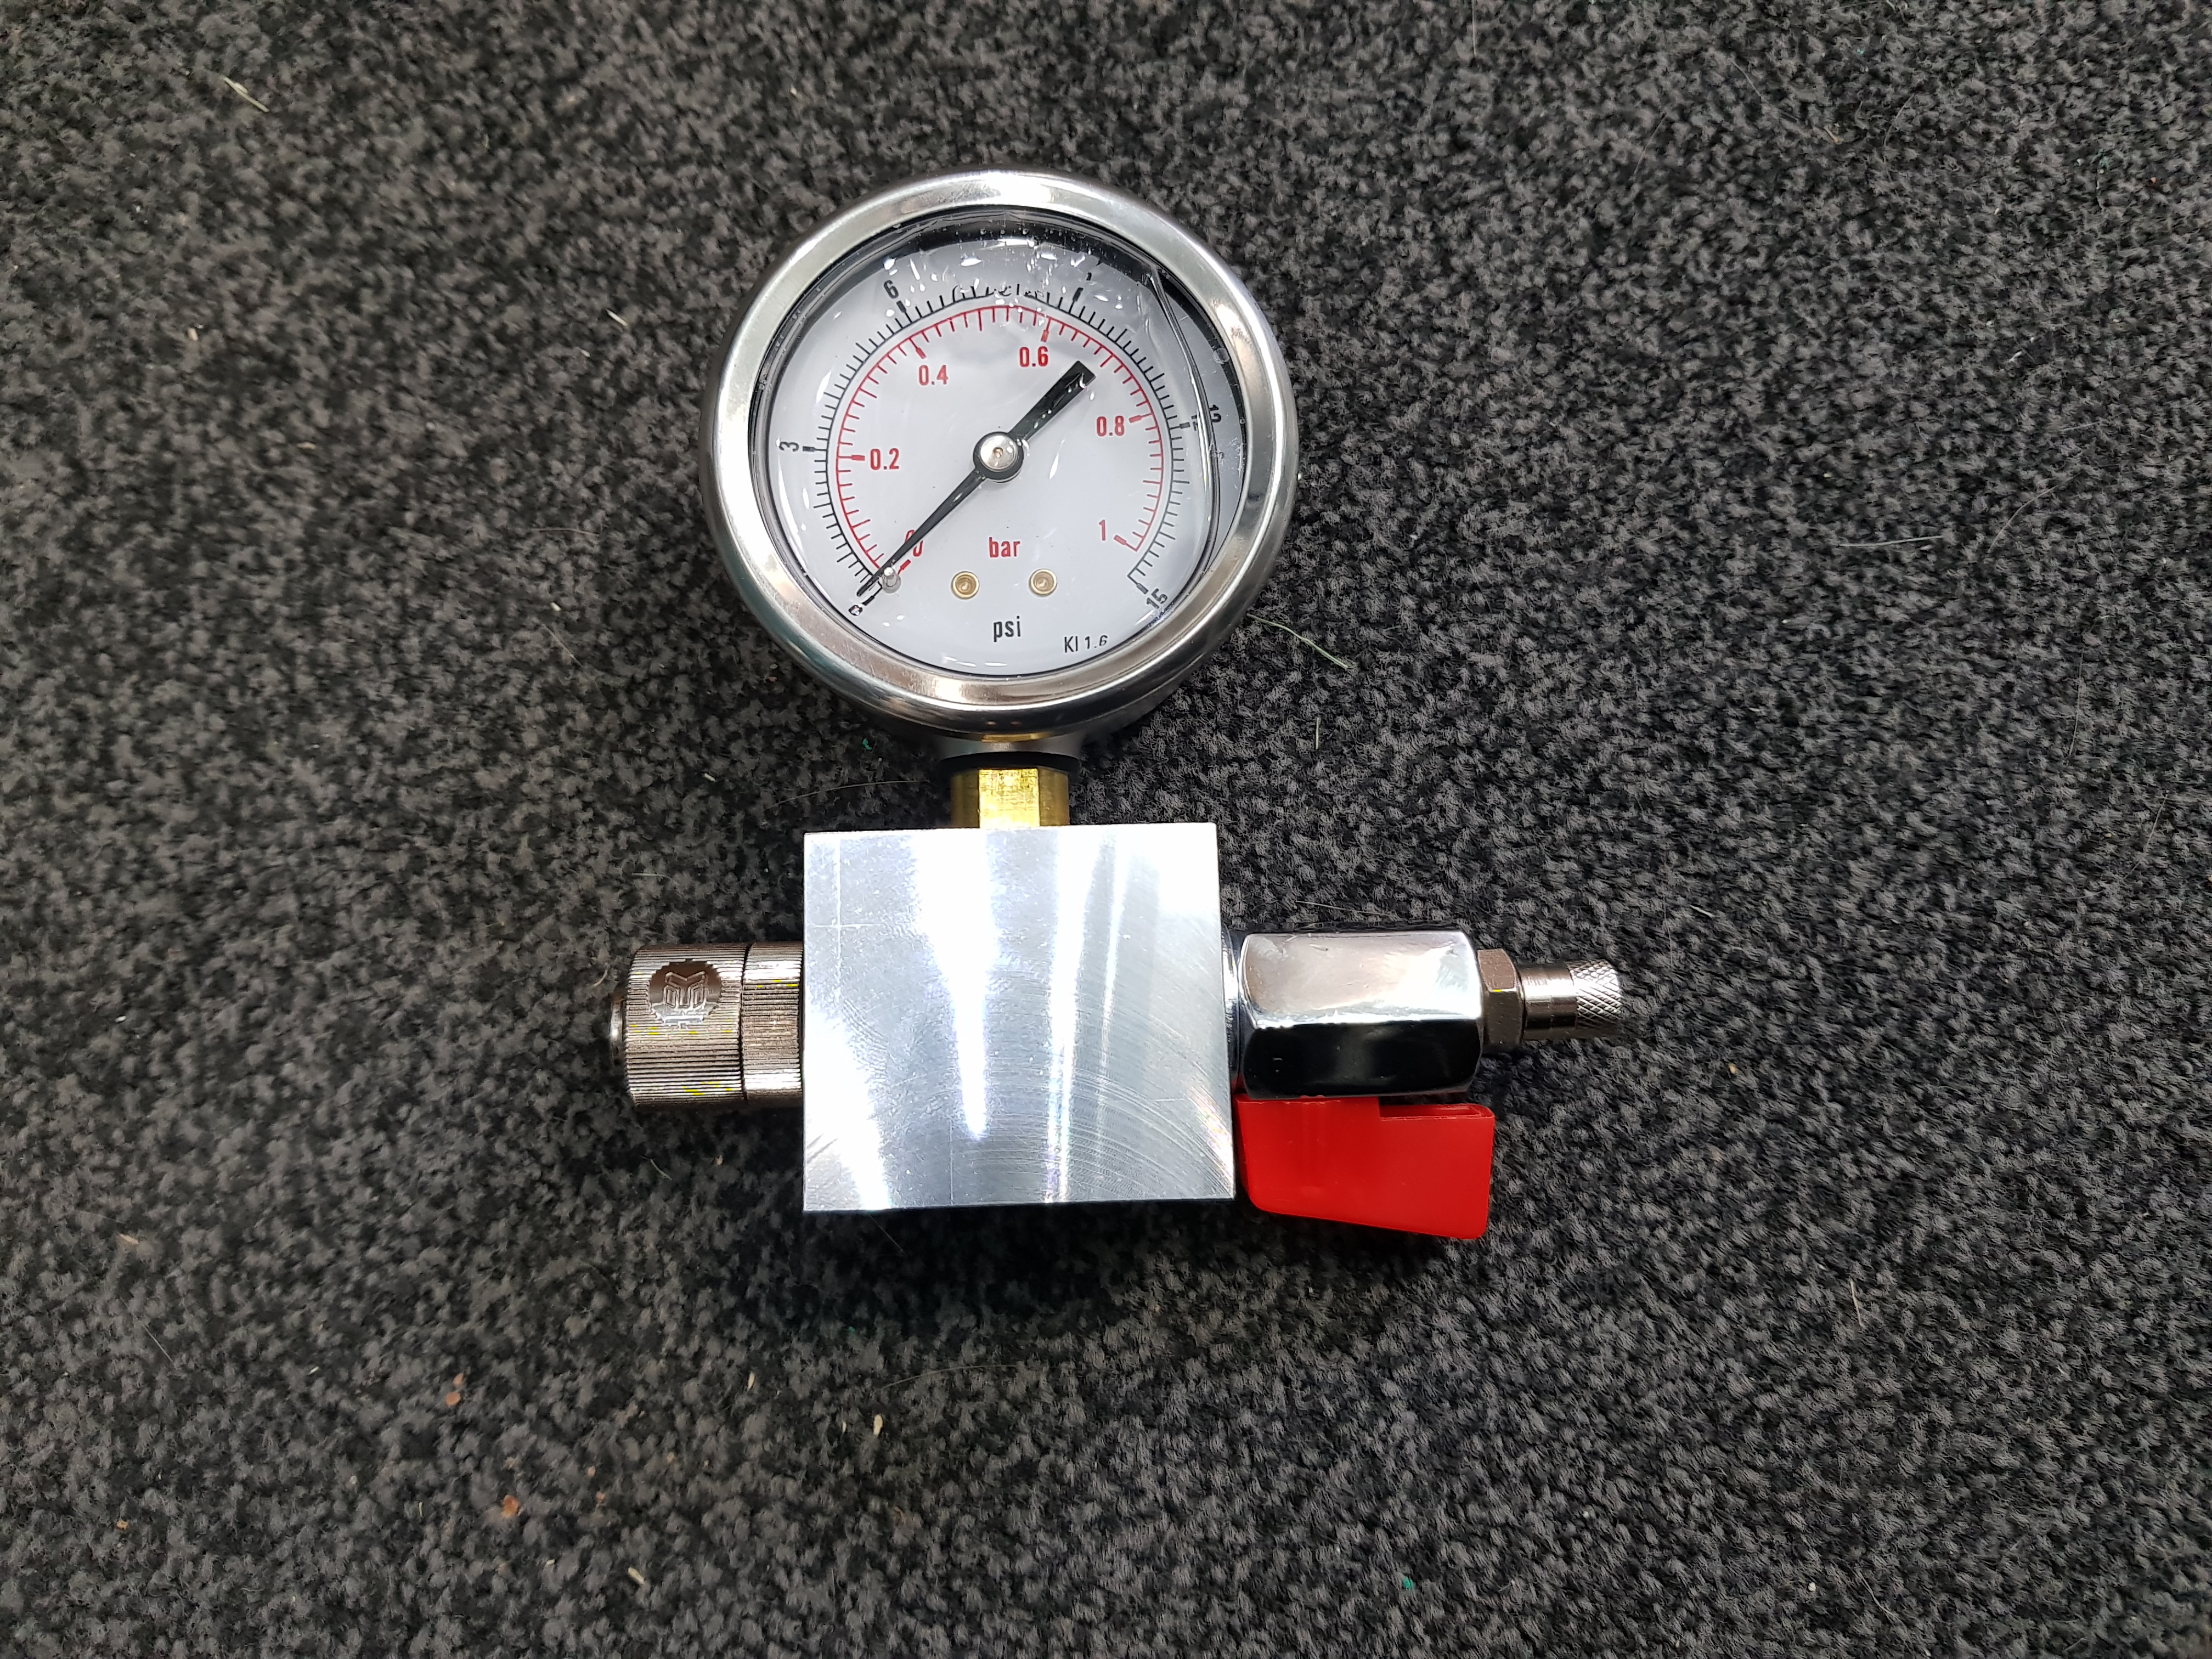
Had to put an M10 washer between the ball valve and the block so that there was enough clearance to turn the tap. The Loctite will take care of the seal on the threads so the faces don't need to be tight against each other.
Just need to wait for the Loctite to cure (24 hours) and I can test it. This particular flavour of Loctite is a thread sealant (good for something like 10,000psi so 15psi should be a walk in the park!) and replaces need for PTFE tape. It's also a thread locker so to a certain extent you can screw a gauge in until it faces the right direction and not have to bottom it out.....that said, I did just chamfer the hole until it bottomed out straight.
*Why glycerin-filled? Well - in my head at least - it should help with reducing stiction. When there's a slow leak on a cheap gauge the needle won't actually move until you flick the gauge. I'm hoping this should negate the need for that....although it being a nicer made gauge in the first place should help too. It's worth noting though that the liquid is only held in by a bung at the top - it survived the post without leaking though so hopefully it shouldn't be a problem.
")
 Downside is that apparently it's prone to corrode if I leave it in the garden ;D