Airfix beginner looking for tips and tricks

Soldato
Joined
24 Nov 2006
Posts
5,008
My Dad got me an Airfix battleship for my birthday years ago and I've always been too afraid of doing a bad job to actually get round to having a go building it. I can't remember what model kit it is but when I dig it out of storage I'll update. I've decided that I will start building some kits for practice before having a go and I've decided that I will get a couple of the starter sets first then hopefully build up skills - I am especially nervous about doing a good job painting the model.

I appreciate that there are a myriad of model kit resources and videos available but I'm looking for more anecdotal tips and tricks from our members about how I can go from someone who hasn't built an airfix kit in 18 years and wasn't very good back then to being able to do a decent job at it.

Please can you let me know what's worked for you, what tools I should pick up (I have a craft knife and that's about it) and anything I should do/read/watch to get going?
 
Haven't built a plastic kit in many years but used to do it a fair bit, so here are a few tips:-

Some model paints have different characteristics to others. Personally I liked Humbrol enamels for brush painting as the longer drying time meant it didn't start drying on the brush before the job was complete when painting a large area. This can be a problem with acrylics such as Tamiya paints where you get dried flakes of paint ending up in the job if you don't clean the brush with thinners periodically. For spraying with an airbrush or aerosols Tamiya acrylics work really well and the fast drying time means you can apply a second coat sooner. The only model paints I never really got on with were Revell, they seemed to have a larger particle size which hid a lot of the surface detail and left more visible brush strokes.

Use the proper thinners for the paint, don't cheap out with white spirit etc.

Clean all the plastic parts before you begin construction. I used to put some water and washing up liquid in a bowl and gently clean all the parts on their sprues before beginning. This removes all the release agent used for extracting the parts from the moulds from the plastic. This stuff is designed to stop anything sticking so you need to be shot of it if you want your paint to stick. Later once you are ready to paint an area (after gluing some parts, masking etc.) Clean the area again with some tissue dipped in white spirit. This removes any skin oil etc. left from handling.

I'd recommend Tamiya masking tape as it has just the right amount of "stick", is slightly flexible, doesn't leave a residue behind and gives a nice sharp line to the paint. It also comes in lots of different widths, 6 or 10mm would probably be best for hull waterlines. Don't skimp and use DIY stuff, it is utter crap for modelling.

A pair of tweezers would be handy for a battleship; lots of fiddly, AA guns, davits, lifeboats etc.

I preferred a liquid brush on glue but you need to watch this doesn't dissolve the surface detail if you are heavy handed with it. The semi-liquid type with a thin metal tube (i.e. Revell Professional) is easier to use. I'd avoid the old "toothpaste tube" gel glues as they can be messy.

Some model filler might be useful, particularly if this is an older kit made using moulds that are now past their best. Model filler tends to be much finer grained than DIY stuff so again don't cheap out on this. I found Revell Plasto to be a good product. You'll need something to sand this back too; wet and dry paper or there are specialist sanding sticks made too. I'd suggest 500 to 1000 grit either way.

Thanks for this - very detailed! I'd heard about cleaning the parts beforehand but not the second clean, that will be good. Also thanks for the tips on the paint/thinners, tape and filler, they will all be useful and I will keep them in mind.

Just started down the scale model hobby myself, built a 1/72 Spitfire over the holidays and somehow have since amassed a further 8 models...

https://www.youtube.com/watch?v=pr4UjXjCFQs&list=PL69dyGBiwEEcuZjLPIo-s1L6pA0jraiYJ&index=9 - this youtube channel helped!

Main thing I learn was, go slow and get sub-assemblies built and painted before you add to your model of you're never going to get it painted once it's in.

I have also bought slightly larger models as 1/72 aircraft a bit small for my fingers.

Cheers Josh, will watch some of the videos see what I can learn. 1/72 is the scale I'll start with but yeah could be a bit fiddly!
 
Thanks @andy o - you're actually likely to be local to me.

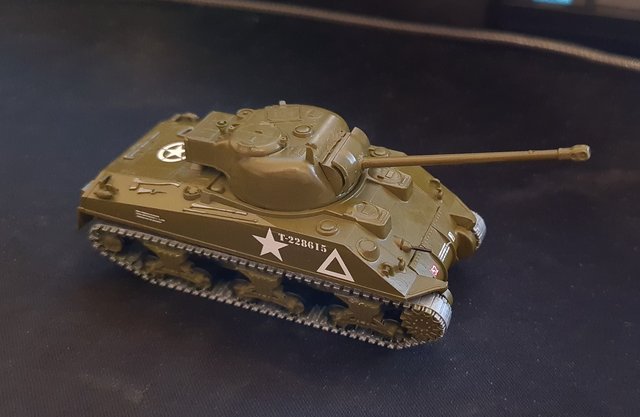
I've just ordered my first starter kit along with a few tools and a cutting mat. Ordered the Airfix Sherman Firefly starter kit, only to get a feel for how to put it together and start painting so will see how I get on.
 
It took me a while to get through and I made a lot of mistakes for a starter kit, including one structural piece glued a few mm wrong at the back as I didn't read the instructions right but I finally finished my first model:

20240424-044949.jpg


Issues:
I didn't sand/file the sprue gate enough on the barrel which is really obvious in the photo although less so in person.
One of the joins inside the turret didn't hold with the glue on one side and because it did on the other but offset then I couldn't glue it correctly so I had to fill a gap on the turret just above the plate at the bottom of the barrel. If I did this again I'd clamp or hold the part longer inside until it set properly. The filling isn't great - it again looks worse in the photo than in person but I basically used the wrong grade wet and dry to sand it and couldn't be bothered doing it again after painting.
I glued the rear part that the body sits on too high so it's too high at the back and doesn't quite sit correctly, doesn't look bad from this angle but not great at the back.
Brush painted the lacquer and I'm not that happy as the finish is a bit too uneven, I'll consider spray can for next one as I don't want to invest in an airbrush yet.

Overall I really enjoyed making it (until I realised I put the rear part on wrong which was a bit demoralising) and I found the painting to be relaxing. I know it's a small starter kit and some of the guys here do very impressive modelling but for essentially starting out I'm happy. I'm also happy that I made the mistakes and will watch for similar problems in future models. Now to choose the next one!
 
Back
Top Bottom