Airlock? / Cannot fill water through fill pipe.

Soldato
Joined
12 Jun 2012
Posts
3,918
Location
West Yorkshire
Hi guys,

I'm looking for a bit of advice on my loop setup, more the fill port. When i try to fill the machine with it on, the coolent doesn't travel into the system. Only when i power cycle the machine, the pump stops and the water than goes into the res. Do i need to move the fill feed? Just incase there is too much flow traveling through the fitting?

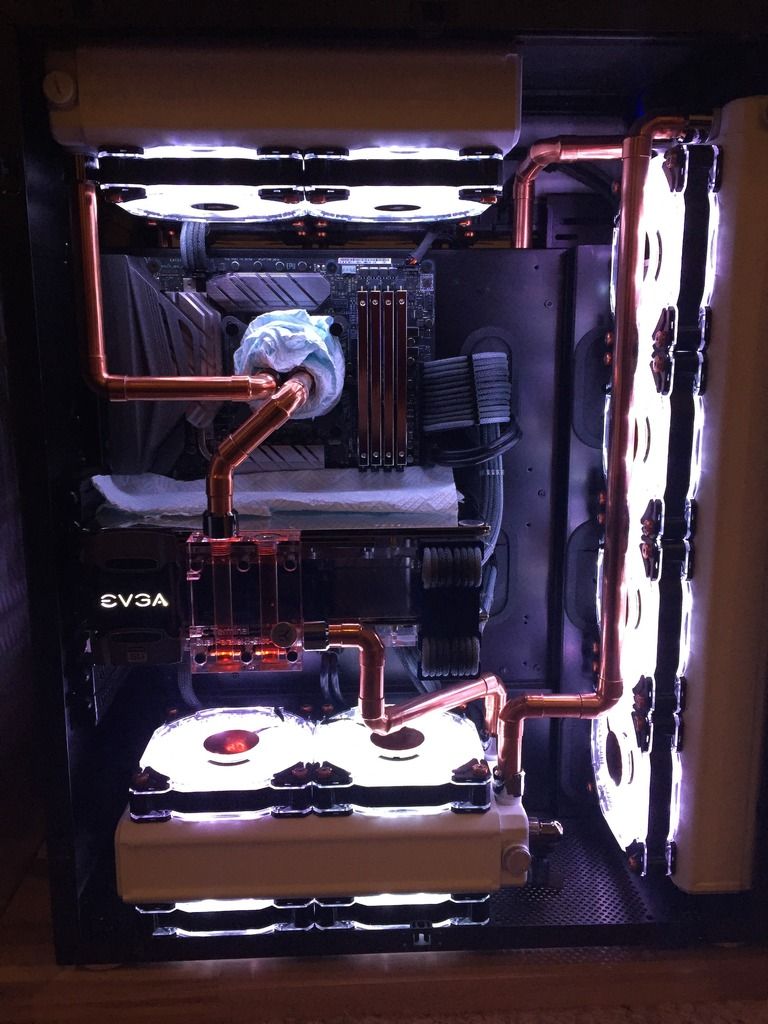
I've taken a photo for you. So when its on, the coolent just hangs in the feed. Turn the PC off and the water will be sucked down. You would think this is because there is too much coolent in the system, although it does this even empty.

72SARU8.jpg


Any pointers would be great.

Thanks.
 
The way I fill mine is to fill the res then switch the pump on. Just before the res empties turn the pump off again and repeat until the system is full. The big difference though is that my res is the highest point in the loop so I don't know if this way will work for you.
 
You need to get air in there. It's really a very ineffective way to fill a loop, and you'd be best to remove that tubing altogether, unscrew the top of the res and just fill it as you go using the power cycle with the PSU (I trust just the pump is powered). That WILL work.
 
I think you need to rethink this loop, the drain valve is also causing a bit of a problem - really the ball valve should be off the T and then just pop the tube in only when you want to drain.

All those chained connectors and that soft tube are a bit of a mess... back flow is probably the issue there also but I think you need to sort out a much more clear and logical flow without all that stuff in the way.
 
The way you have it there the whole thing is essentially acting as a good old fashioned T line which have always been a ball ache to fill and bleed. If this is the XRES DDC pump/res combo then you should really be using one of the two inlet ports on the pump base as the return rather than the single top port. Maybe turn the rad upside down so you can feed into the bottom of the pump, and keep the top port as a fill line only. Either than or run a line from the rad as is down to the bottom pump inlet port.

How you have it at the moment will eventually fill and bleed, it will just take ages. Infact, unless you still trying to bleed air out of the rads, it looks pretty OK as is according to that photo. However, if you are still trying to bleed then using one of the proper pump inlets instead and it will make it much easier. It's probably at this point you'll wish you hadn't gone hardline.
 
The top of his res is also the return by the looks of it so he can't unscrew it to fill.

Ah yes, so it is, missed that. Well, as above, this should really be rethought, but leaving as is won't prevent you from filing... but it is going to take an age and a half, maybe two ages.

Sucks, but welcome to watercooling. ;)
 
As mentioned above you'd be better off using one of the inlets on the pump for the return rather than the top of the res.

Looking at the picture I think the easiest way would be to remove the collection of 90 degree fittings and the fill tube and run another line of tube down to the inlet on the front of the pump. You'll need to rework the pipework by the pump outlet as well though unfortunately.

Bit of advice for the next time you do a build, before using the lovely but expensive pastel coolant try filling and running the loop first with distilled to make sure you're happy with how it looks and works. I've found from experience that every time I do a loop in a new case no matter how much thought I give it at the time that I always come up with better ideas for how to do it once it's up and running. Draining and redoing parts of the loop is much cheaper when you're only chucking out a bit of distilled water.
 
What coolant is that ? Looks great :)

:D That quick picture doesn't do it justice. When its hitting the UV strip, it really does look well.

I think you need to rethink this loop, the drain valve is also causing a bit of a problem - really the ball valve should be off the T and then just pop the tube in only when you want to drain.

All those chained connectors and that soft tube are a bit of a mess... back flow is probably the issue there also but I think you need to sort out a much more clear and logical flow without all that stuff in the way.

I 100% agree on redesigning. This is my first loop so i'm constantly learning, albeit making my wallet cry. The only reason the ball valve isn't on the T is because of room. Without the 90 degree there the ball valve won't fit in the case. I have to wiggle it under the pipe to put it in the case! I will say however it drains brilliantly.

The way you have it there the whole thing is essentially acting as a good old fashioned T line which have always been a ball ache to fill and bleed. If this is the XRES DDC pump/res combo then you should really be using one of the two inlet ports on the pump base as the return rather than the single top port. Maybe turn the rad upside down so you can feed into the bottom of the pump, and keep the top port as a fill line only. Either than or run a line from the rad as is down to the bottom pump inlet port.

How you have it at the moment will eventually fill and bleed, it will just take ages. Infact, unless you still trying to bleed air out of the rads, it looks pretty OK as is according to that photo. However, if you are still trying to bleed then using one of the proper pump inlets instead and it will make it much easier. It's probably at this point you'll wish you hadn't gone hardline.

How have i never thought about turning the rad upside down!?! My god the amount of time i have wasted trying to line up the tubing etc at the top. Since my MoBo is being RMA'd i will spend some time this weekend on turning that upside down and buy some new tubing to have it fill at the bottom of the pump instead. This way, like you said i can just unscrew the top as i have normally done :) .

Bit of advice for the next time you do a build, before using the lovely but expensive pastel coolant try filling and running the loop first with distilled to make sure you're happy with how it looks and works. I've found from experience that every time I do a loop in a new case no matter how much thought I give it at the time that I always come up with better ideas for how to do it once it's up and running. Draining and redoing parts of the loop is much cheaper when you're only chucking out a bit of distilled water.

I will for sure be doing this, this time around. Thanks for the advice.

So all summed up :

  • Turn rads upside down
  • Add the refeed to the base of the res
  • Change the drain? - Where would you guys put it? I cant put it direct under the 4 way because it wont fit (horizontal pipe is too low).
Thanks guys.
 
The drain just needs to be somewhere that can be a low point... I say can be, because don't forget you can just turn the case on its side to drain.

In my build I've got the ball valve connected to the rotary 90 off a rad. Basically it's brilliant because you can rotate it in and hide, then when you need to drain just turn it to face out and attach your tube before opening the valve. So similar to you but the tube is only attached to drain making it much cleaner plumbing.

If you're shifting the pump unit to plumb in the radiator upside down then you could add a T splitter to the port and simply have it off there. It seems like it would fit where it is though if you keep the 90 before the valve and just ditch the tube...
 
I thought (I could be wrong and apologise if the case) reservoirs intended for top return/flow had a tube running into the bottom of reservoir (assume yours hasn't), as others have said you need to create an air bubble in reservoir (same principle as bubble top water cylinder) for expansion otherwise your rad the highest point will have air in it always. Even if you did manage to get all the air out, what will you use for expansion?
 
The drain just needs to be somewhere that can be a low point... I say can be, because don't forget you can just turn the case on its side to drain.

In my build I've got the ball valve connected to the rotary 90 off a rad. Basically it's brilliant because you can rotate it in and hide, then when you need to drain just turn it to face out and attach your tube before opening the valve. So similar to you but the tube is only attached to drain making it much cleaner plumbing.

If you're shifting the pump unit to plumb in the radiator upside down then you could add a T splitter to the port and simply have it off there. It seems like it would fit where it is though if you keep the 90 before the valve and just ditch the tube...

Any chance of a pic of this?
I've boo boo'd my drain on my loop (using a Y splitter just before my rad, one side goes to the GPU the other to a QDC for draining). However draining my loop yesterday, discovered that it doesn't drain too well!
 
Only ones i've got uploaded, bottom rad to the right of it - thats an EK valve on a 90 rotary. To drain I just turn to the front and attach a fitting/tube and job done. I did used to have it on a T splitter inline off the pump.

Bit unique though as i've got multiport rads:
IMG_2510_zps1w8b8wc2.jpg
 
Nice tidy soldering there! They just normal 5/8 compressions? Thought about doing mine in copper a little while ago but thought the pipe OD was a bit on the small side.

16mm copper with those new Monsoon Evos, the solder is in face copper bonding agent - a very good idea if I do say so my self ;)
 
Never heard of it before, you learn something new everyday. Will have to bear that in mind for future if this petg doesn't work out (I also have those EV2 fittings on order-so will give me options for the future), thanks.

Not much use of it is why, it's generally slated by plumbers but for this purpose it's really quite strong. Have a read of my build log and you'll see it all - it's called project Smurf. FYI on the EV2s, the key it comes with to tighten the compression is crap, bends very easily and if it slips off you will scratch your tube... be careful as you go :)
 
Back
Top Bottom