Crack in Roof/Ceiling Joist

Soldato
Joined
9 Mar 2010
Posts
2,841
Morning lads,

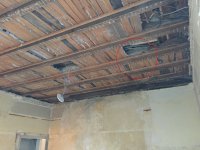
Took down the ceiling in one of the rooms we're away to decorate because 1) 100 year old wallpaper with various layers or paint beneath isn't fun to take off and 2) there was movement in the plaster that I thought was from it being detached from the lath behind it.

4 hours later and I'm left with a nice clear ceiling for plastering, BUT I've found a crack in a joist.

https://imgur.com/a/PK9MK (overview and closeups)

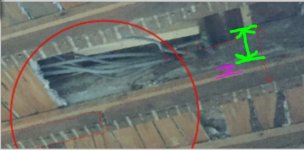
I've tried to highlight the width of the joist, the size of the notches near the crack and the size of the "sliver" that' cracked along the beam in this image:
t47D2uO.jpg

Because the lath was attached to the bottom of the joist (and that long sliver of wood has cracked off the joist) that's what was causing the movement.

What's the best way to tackle this? Just a massive bracing/sister piece?

Americans seem to sister joists with ply, construction adhesive and nails. Brits seem to favor larger joists that get bolted on.
 
Soldato
Joined
17 Jun 2007
Posts
9,320
What above it? If its a room and you can't realistically remove and replace I would sister with the thickest timber you can get on both sides.

But I would replace, as I have done in several places in my 100 yr old house.
 
Soldato
Joined
17 Jun 2007
Posts
9,320
Actually looking at the last pic in the set. Are you sure its structural?

It looks like you have another much bigger joist above it.

Can you take that batten off
 
Soldato
OP
Joined
9 Mar 2010
Posts
2,841
There’s a room above it.

Installing a whole new joist seems like overkill but I suppose ultimately that would be the best solution.

I take it I’m just best lifting the floor above to make sure I can detach the floorboards and going from above is going to be easier than installing from below?

Oh yeah, and I thought the same - it’s definitely the joist. Those batons are nailed on the side and it effectively looks like the nails created the weak point where it has cracked.
 
Soldato
Joined
17 Jun 2007
Posts
9,320
That pic still looks funny.

Looks like youve taken off the old Lath 'n plaster. Which has exposed the joists. But then it looks like youve got battens nailed to the joists with more floorboards. What are these floorboards doing? are they nailed to the battens. Looks like youve got two sets of floorboards
 
Soldato
OP
Joined
9 Mar 2010
Posts
2,841
Sorry, gotcha.

Yes, lath and plaster removed from the ceiling.

The next layer is bits of wood, resting on those batons between the joists, that hold the rubble/ash sound dampening material between the ceiling and the floor above.

Above that is the floorboards of the room above.
 
Soldato
Joined
17 Jun 2007
Posts
9,320
Is the joist. a big one.. From the bottom (where the lath was nailed) to the top where your actual floorboards are... It kinda looks like 2 pieces like 2 joists one on top of the other.

Its a big split for it to stop at the batten
 
Soldato
Joined
17 Jan 2006
Posts
4,267
I think he's saying the fusia bit is a baton that's nailed to the side of the joist, and that the part he's marked with the red arrow is the full height of the joist
 
Soldato
OP
Joined
9 Mar 2010
Posts
2,841
Yeah, red line is full height of the joist - what you’ve marked in pink is the baton nailed onto the side of the joist.

Sorry, in hindsight I can see how the picture might be ambiguous.

I really need to cut the baton off to have a good look at what’s going on behind it (i.e. how the crack ends). I realise removing it likely has no structural bearing but Christ - it doesn’t half fill me with fear! :D
 
Soldato
OP
Joined
9 Mar 2010
Posts
2,841
Sorry just in and it's too dark to get decent photos (as you can tell there's no lights in the room at the mo! :)

Will need to do some investigating tomorrow!
 
Soldato
Joined
28 Nov 2002
Posts
11,233
Location
Cumbria
Easiest way to do this is to saw out some of this planks retaining the insulation and install a sister joist either side of the crack


clamp the sister joists to the damaged joist equal about the crack then drill through in a few places either side with a 12mm auger

Remove the sister joists and put 12mm coach bolts through all the holes in one of them, now put a serrated washer on each bolt on the mating side of the joist and a load of decent wood glue, install onto broken joist, put a serrated washer on the opposite side of the broken joist , glue, install the other sister joist, square washer, nut , tighten bolts


You could also use steel plates to fix it in a similar fashion
 
Back
Top Bottom