[Finished] HAF Pipe 480 (original from 2014)

Associate
Joined
21 Oct 2014
Posts
26
Location
The Netherlands
At the moment of posting this build log from my casemod that I did last year, I already started the build log about the 2015 update, this buildog is just to show you what I did last year, if you want to see the update you weill have to look in the new build log called "HAF Pipe 480 (2015)"

Everything is an exact copy of what I posted last year in the other forums, I had no time to also post it on this forum back then so since I do have the time now, you can enjoy it here too :)

The final result is this, I've made it a spoiler since some like to read the thread before viewing the result :)
16590225752_7543a13f3f_c.jpg

From this point everything is back in 2014!!!
Recently I started buying the parts for a Custom watercooling loop to be fitted in my Coolermaster HAF X case

At this moment I have:
EKWB Supremacy Nickel/Plexi (Polished)
Mayhems X1 Blood Red Coolant
2x Aquatube reservoir (Not sure yet if I will use them in this loop)
HardwareLabs Black Ice Sr-1 480mm radiator (which should fit nicely in a HAF X)

In this Buildlog I will show what I'm doing to my HAF X case to fit the 480mm Black Ice Sr-1 Radiator (normally it only supports 120 or 240mm rads without modding) also I will do my best to keep as much of the outside looks the same


I started by measuring the room between the front and back of the HAF X's frame which was about 519mm, the front and back panels are both 1mm thick so I have room for a 517mm radiator (which is perfect because the HWL Black Ice Sr-1 is exactly 517mm in length)

I ordered the radiator :D
13852530975_6376ab21dd_c.jpg


This shows how an HAF X frame looks from above before modding (not my picture)
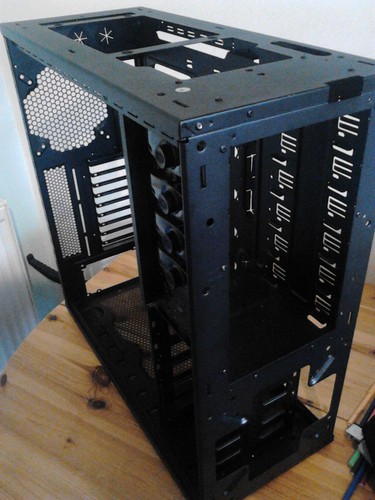
8751321766_6166cea119.jpg


Before I started cutting I wanted to know if I could keep my Front I/O, sadly the answer was no (kind of expected it) :( so I removed it (need to think about what I will do with it)
13852555063_1573e7691f_c.jpg


Even the plastic fins at the back had to go
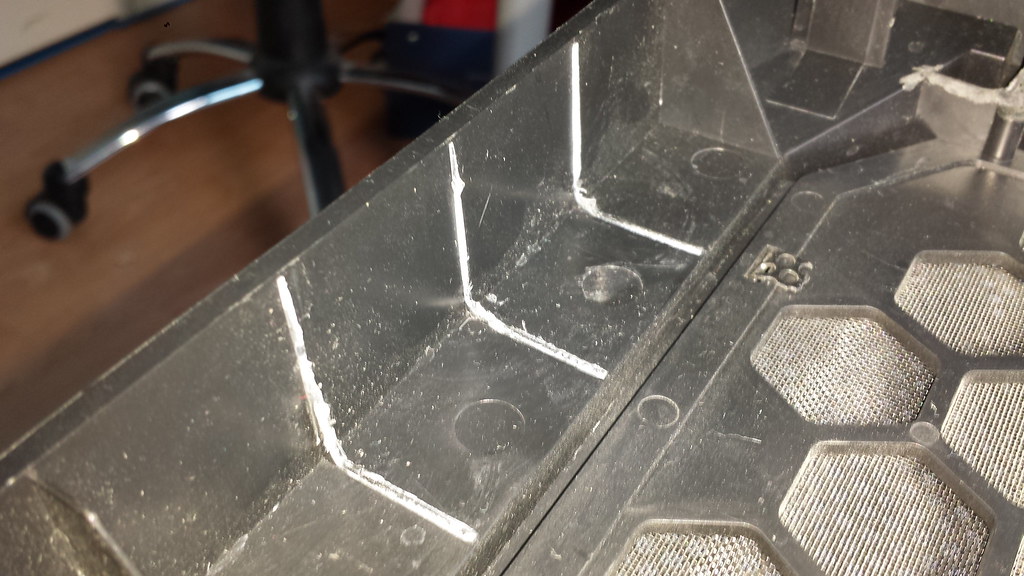
13852556503_c2d0b4eebb_b.jpg


First cuts are made, cut out the two radiator brackets and immediately cut out a section at the back too
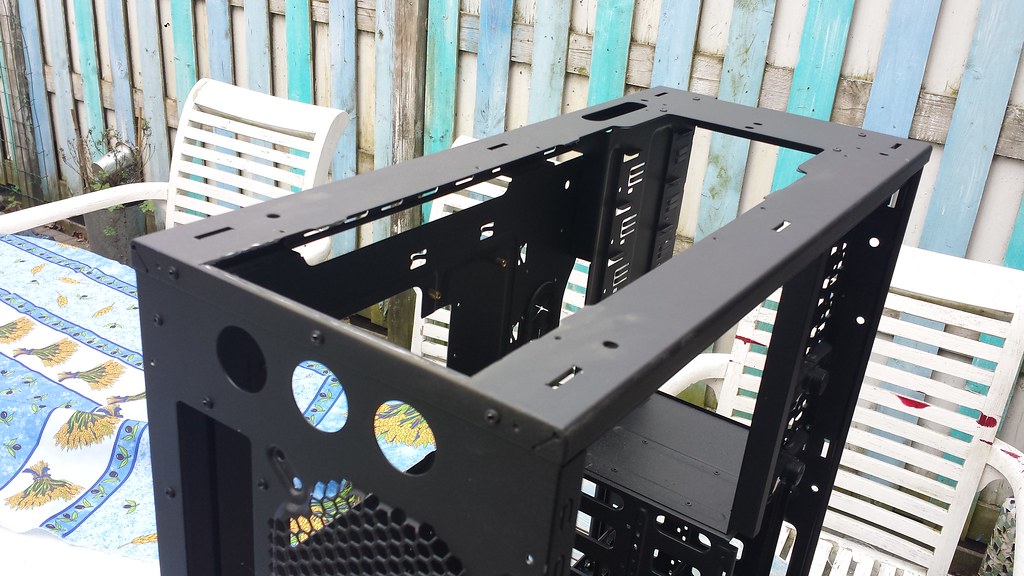
13852553293_bcbbb596a0_b.jpg


Also made a start with cutting out the front
13852519915_08c777e6da_c.jpg


Lets start with smoothing the rough edges on these cuts
13852517245_a583ecf9b9_c.jpg


As I said it should fit ;)
13852894614_113e22b809_c.jpg


Also making surte the front and back are perfectly smooth so I don't scratch my radiator (...too much)
13852546933_3aa430be80_c.jpg

13852546323_15dccf8b4f_c.jpg


THE universal modding tool :D
13852888684_da3a24aafa_c.jpg


Well time to see if it fits and yeah it's a perfect example of "If it fits, it sits" measurements where spot on :cooldude:
13852887684_ef681b3c96_c.jpg


Cutting away the fins was not enough so a quick freestyle cut was needed to get it to fit at the back
13852837255_a4d339c2a0_c.jpg


Shot of the empty front I/O (at this moment I got an idea what I'll do with it) and the radiator's in and out
13852886714_7a2b26b88b_c.jpg


Now I need to make some brackets to keep the radiator 18mm higher than the old mounts (I need the maximum height to get the motherboard clear) higher than that would mean I also needed to get rid of my Power, Reset and Fan LED switches

I'm going to use the old 240 mount brackets to make some new ones :)
13852507585_688f043c7b_c.jpg


Cut the brackets in half, scraped the paint of the bending points (and some metal) to make them bendable by hand

The result :D
13852502715_efa1f58bf8_c.jpg


Putted the brackets on the Radiator to see if they are bend well enough to get the 18mm rise, this is how it will hang in there :)
13852497425_f2bc44df92_c.jpg


Looks good from above
13852528663_f5fd744689_c.jpg


The clip in which the power, reset and fan LED switches are mounted rests exactly on top of the radiator so it's a perfect fit :D
13852494855_e800c1ed35_c.jpg


By now it's time to get the drill and drill the holes which will be used to fasten the brackets, sadly my little brother broke the drill a few weeks before I started this so I need to get a new drill
 
Last edited:
It's time for a new update

I got a new drill to drill the mounting holes for the brackets
13852526033_3643366ba4_c.jpg


Everything is here for assembly :D
13852491375_c7d808b9ff_c.jpg


Bolted everything down and tightened it as much as possible to make the brackets somewhat Semi-Permanent so I can easily mount a different 480mm radiator if I wanted to
13853373933_1420b27941_c.jpg


Still need to get the other ends of the brackets a little shorter and grind the to the same round shape as the other end
13852489105_4f77cbd961_c.jpg


As I said I wanted to change as little as possible to the looks so I even bolted them upside down so only the nice bolt head would be visible (if you look very good)
13852520223_96175871ff_c.jpg


Ordering the fans pretty soon, will use this nice 8-Way PWM Splitter from Swiftech to control them with the onboard Fan Xpert 2 software on my VI Formula board :) saves me a fan controller
13852902904_b5922b2e15_c.jpg


So three days went by and I got the fans in :)

4x Corsair SP120 High Pressure PWM edition fans :D
13852487635_abf9f6d8d0_c.jpg


I need to say Corsair does make some nice fans, I need to get rid of those blue rings and put on the red ones
13852471675_ab8b3dbbe7_c.jpg


Changed the rings and mounted the fans on the radiator
13852456935_db813591d4_c.jpg


Mounted the radiator to the brackets, it seems like I still have some room to get the 8 and 4 pin CPU power cables in there when the board is installed :)
13852444395_ef3a567961_c.jpg

13852441195_c64d384beb_c.jpg


Now I needed to find a place for the 8-Way PWM Splitter, found a perfect spot on the backside of the motherboard tray which has room for the headers and no cables crossing that spot :D
13852477473_c5f428decd_c.jpg


Now I need to drill some holes, clean everything including the radiator, bolt everything back on there and wire everything etc.

Till next time (which will be soon I guess)
 
I forgot to throw the last two updates on this forum but here they are this is PART 1!!

Got some nice stuff in

GPU Block for the ASUS GTX780 DCII OC
13921763809_2657122fdc_c.jpg


Pump Top for the MCP655
14108809144_3a06a81f7a_c.jpg


The Pump itself (Laing / Swiftech D5-MCP655)
13921760087_ca7198e62d_c.jpg


The third Aquatube that I own Love these reservoirs
13921779089_9cba81681b_c.jpg


The supernice looking backplate for the GTX780 DCII OC
13921814638_b855beeb43_c.jpg

14105340802_2a4456ac84_c.jpg


Three stop fittings, one for the reservoir and two for the GPU SINGLE link I'll get in soon
14108435815_01a9917995_c.jpg


Got two fittings to see how they look, the rest will be ordered with the remaining parts, I honeslty love these (just needs a black or red O ring to match the build (at least for the visible ones)
14108828734_78201e33b1_c.jpg


The Phobya 20 LED's MODboard/station
14128465193_b131542fb9_c.jpg


Two 5mm LED plugs for the reservoir
13921753619_26982dbe01_c.jpg


Some extra EK badges because I damaged the one on the CPU block
14108403835_e873d0f252_c.jpg


So that was the unboxing lets get to the stuff where I work on them...POLISHING ALL THE BLOCKS!!!

Pump top before
14105358442_3b077da364_c.jpg


Pump without the default bracket and top
13921783867_9614010c6e_c.jpg


How it looks on the pump before polishing
13921802169_97e8f71d2c_c.jpg


Polishing time!!!

How it looked like after polishing and mounted to the pump (little preview of the GPU block on the right)
14108397605_94e81f5b6f_c.jpg


The GPU plexy before
13921841400_3cc3a6eaf7_c.jpg


After polishing it twice I finally got it totally clear (the little bit of fog is some polish residue that I cleaned of afterwards)
14105239401_22dd9635ff_c.jpg


Now the whole family in one picture
13921839809_e9a40af027_c.jpg


Now it's time to also mount the GPU Block to the GTX780

Normal
13938641899_105e05d5c1_c.jpg


Cooler came off nice (too much paste ASUS)
13938631797_ee99e862a0_c.jpg


Nice and clean
13938666900_4fc6b976cf_c.jpg


Adding the Thermal pads
14145362393_951afab41d_c.jpg


Mounted the block and the backplate
13938639279_1575830aa5_c.jpg

13938687478_2bb94d54df_c.jpg


Also here is the CPU Block which I did a month or so ago

Before
13996102981_c5a12fa05c_c.jpg

13976175316_7045f7ea66_c.jpg


After
13976175286_97a5431215_c.jpg

14019279863_0b4db5944b_c.jpg


With the Mayhems X1 Blood Red coolant which I'm going to use
13996082222_466cfd9670_c.jpg


Next order is already placed, in the meanwhile I need to make some brackets for the Pump and the Reservoir, how about some acrylic
 
It has been a long time since the last update, been really busy and never had the time to update the forum

BUT HERE IT IS!!!! A FREAKISHLY BIG UPDATE!!!

Putting the block on there with the Direct Die cooling kit from EKWB
14419296823_c8279dcac3_c.jpg


Had an idea how to mount the reservoir in the HDD Cage
14212549830_f489e2328d_c.jpg


One tube done
14397779022_335cdb137d_c.jpg


When I noticed that I would need a lot more tubing than I had anticipated I got a nice deal with E22 (Nate George) and my good friend Fred, they sent me this
14212548500_b5b7a4fa92_c.jpg


Got several meters of tubing and a bending cord, in return I will make a 3D model for one of Fred's his upcoming mods
14212548110_36fddaf637_c.jpg


Also the last fittings, a 1L fill bottle and some Bitfenix sleeved cables arrived, FINALLY!!!!
14399139555_10c5f1a1a9_c.jpg


The cables (didn't have time to sleeve them myself this time)
14212686937_b5efc30060_c.jpg


The new fittings with 2x Fillport fitting, 2x mini male to male G1/4 connections, 2x 90* degree G1/4 fitting, 1x 90 degree enhance fitting, 1x 500mm extension for the actual filling port and I bought a nice logo badge from Bitspower not sure what to do with it yet xD
14212684787_dce0048e29_c.jpg


Tried to collect all the fittings together for a nice group photo, sadly I forgot about 4 of them
14212684357_4f93119e59_c.jpg


Drilled two big holes at the top of the HDD cage and fitted the reservoir by mounting it hanging on two fillports with two male to male fittings never seen this before and I thought it looked pretty sick
14212681067_893f052734_c.jpg

14395772481_3e97091c22_c.jpg


The PSU cover/midplate will not be here anytime soon and I wanted to use my rig so I made a quick decision to mount the pump on the floor temporary (with a thich piece of rubber in between the block and floor)
14397730772_d7e1933429_c.jpg


The hardest tube of the complete rig went right at the first try xD looks good
14419285403_43080fef54_c.jpg


It's a perfect fit, just need to put a plastic sheet between it to keep it from scratching when I need to take it out (which still happened a few days after xD)
14376002756_a564f6773b_c.jpg


I also have to wait for the LED's but still wanted to see the effect on the pump top so I got a little RGB led and it looked pretty cool (will be two 5mm white LED's)
14399131305_71da7a16de_c.jpg


I assembled the hardware again and I finally got all the tubes right
14419284023_f1b24086b7_c.jpg

14212470729_d099678677_c.jpg


I did change some things after making these photo's, I did change the tube on the top of the reservoir from the back to the front for 10x easier air bleeding
14212469869_43552005ca_c.jpg


Filled it up with Mayhems Pure H2O to clean the tubes a bit, used the rig for a couple of days seems like the temps where way too high on the CPU so I knew I had not used enough of Liquid Ultra (I was out of the stuff) I will apply some Arctic Silver 5 when I change the liquid

It looks awesome but it will look even better with the X1 Blood Red coolant from Mayhems
14212536870_8d78644c81_c.jpg

14212499550_d15f69de54_c.jpg

14399128165_17c60d6cf4_c.jpg

14399127645_9b34b88749_c.jpg


At this point it should be clean so it was time to take it apart, clean all the tubes, change the Liquid Ultra to AS5, put all the tubes back and fill it up with Blood...Red coolant
*These photo's are made right after filling it so the liquid still has a lot of air in it and isn't clear yet
14212465119_ab378f00c0_c.jpg

14375997296_439717bdd8_c.jpg

14212466449_1b35394572_c.jpg

14212672577_8e2718c3b9_c.jpg

14398019504_3341ce977c_c.jpg

14212496728_2b59535796_c.jpg


Still need to remove the clear piece of plastic that I putted on this little round window, the scratches will be gone then
14395754611_42d9c935e9_c.jpg


Bleeding out the air in the radiator by tilting it back 45 degrees xD
14212454459_48ca7f6d71_c.jpg


Some Semi-Proffesional photo's of the result after bleeding out the air
14397728192_59b5597513_c.jpg

14212430379_85bb189f7d_c.jpg

14399086795_3893691b95_c.jpg

14212633227_11f89b4553_c.jpg

14375983426_e49fdc4c97_c.jpg

14397979104_0ea8cf6c96_c.jpg

14212515050_640fc97938_c.jpg

14212486158_4ffe76e7c6_c.jpg

14397742592_351279212d_c.jpg

14375950286_6a3b9787b7_c.jpg

14212443359_11ebbc5e6c_c.jpg

14212455078_64ef484227_c.jpg

14212649247_4271374a15_c.jpg


I've started editing these pics a little bit and these are the result of that
14212517260_2bc37276b5_c.jpg

14212659877_60f4b7da72_c.jpg

14419228903_4d9a15fee7_c.jpg

14212500680_bed13513fc_c.jpg


Hope you guys and gals like it

This is it, for the update please check out the other build log HAF Pipe 480 (2015)
 
Thank you all for the nice comments

Polishing is a hassle but totally worth it, got some new blocks to polish for my update/upgrade, the EK SLI link and the block for the second card, I can feel my arms and hands hurt already :')
 
Yeah it comes with a PSU cover (isn't good enough for me), I wanted to get a metal custom cover made last year but the company that would sponsor and make it backed out.
Still got the design for the cover so maybe I'll have it made for the upgrade in the next couple of weeks
 
Back
Top Bottom