Getting so tempted. How is This done ?

Associate
Joined
31 Jan 2011
Posts
2,313
Location
Hampshire
im getting so so tempted to water cool my pc just to be a tart tbh. However couple of questions if i may.

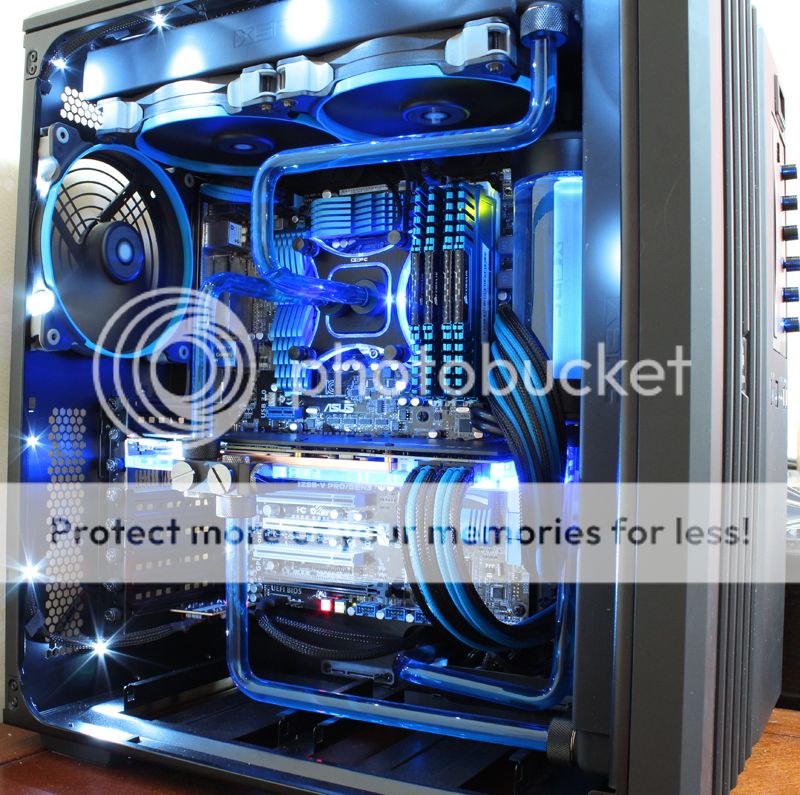
Thinking of a Carbide 540 case, so everything will need to fit into this. I have a Gigabyte GTX 970 G1 can i get a gpu block to fit this ?

Secondly how have people done this with the pipes ? is this rigid ? bent by the uder or ordered like such ?
IMG_0161_zps1f55d7d2.jpg~original
 
That's a lovely build. Are you going to copy it but in a 540?

It looks like the gpu is a reference board so any fullcover 970 block will do.
 
Not copy it exactly but fairly closely. Im always game for a challenge and am fairly practical person. Im sure the most difficult part is going to be heating the pipe to the right point for bending without deforming and getting the bend in the right place.
I really dont like the look of the flexible tubing compared to this so if im going to do it i will do it this way. I have no issue taking my time and often told i have the patience of a saint with things like this.

Thats good that the g1 uses a reference board as i would want a waterblock on that too. The pipe is cheap enough i will probably just buy 3 times what i need as if its not perfect its going in thr bin lol.
 
Watercooling is easy once you get the hang, but extremely time consuming and fiddly. For your first time, I would probably recommend normal tubing then in 6 months etc when you have the hang of it try acrylic.

Or just jump right in, just don't expect it to be easy.

I'm on custom loop number two now, I will probably try acrylic next.
 
I've just done my first WC build in a 540, nice easy case to work with, no idea how the person in your picture has managed to fit a photon res in the front tho; mine wouldn't and had to go in the back! :/
 
1. buy double the amount of acrylic tubes you think you may need
2. make sure you don't mind your rig offline for 2 weeks trying to get all the parts together.
3. when bending the pipes i'd say tolerance wise you have 2mm max to play with so be prepared to make a few "template pipes" and then make a proper pipe afterwards.
4. bolt everything in the exact position it will be in the end of your build then suss out best routes etc.

fingers crossed i'll be filling mine this weekend but if i have any leaks the whole lot will be ripped out and i will go back to barbed fittings :)
 
Well i think im gunna give it a whirl. 2mm play thats quite a tight tolerance. Still should be fun. Im not the type to loose patience more the type never to be beaten. Looks like quite a bit of fun fiddling about getting it to fit.
 
Acrylic is not as difficult as people seem to make out. Just measure accurately, take your time and order a couple of lengths spare. It's fun to do and looks great. Worth the effort in my opinion.
 
It does look a lot tidier, is it me or is the price of the tubing taking the p/££, The extruded tube costs pence to manufacturer (i have a number of tube manufacturers as customers) some one some where is taking the jolly on it.
 
Yeah it is expensive for what it is, but in the grand scheme of things 20 quid on some tubing is nothing when you're building up a custom water loop.

I'd not used acrylic until my last build so my knowledge is pretty limited, but I used the primochill revolver fittings, and the primochill acrylic tubing and haven't had any problems at all. No leaks, and it was easy enough to bend and shape how I wanted.

I would recommend getting the monsoon kit if you're going to do a lot of bends, it made my life so much easier and comes with everything you need except for a uk power adapter for the heat gun.

I'd recommend anyone to try it if you enjoy fiddling with computer builds. I did mine in two evenings after work and I really enjoyed it, and much prefer it to any of my previous water cooled builds.

If you're interested I can chuck up a couple of pics of the way I marked out, and the finished build.
 
I put some in the watercooling thread or whatever it is when I built it the other month. But here's the monsoon kit as I used it. Just screwed the mandrels down to the mdf base once I had marked out the centre line for the pipe route. Heat the tube up gently and bend it round the mandrels and let it cool. I found a YouTube guide on using the monsoon kit and found it very useful. Worth a watch.


I went a bit over board on the layout, it's not the most efficient route but it's the look I wanted and I was just having a play around with it.


Didn't take many pics while I was doing it. But there's a couple that came out ok. Just don't rush and it's pretty easy. Don't over heat the pipe or it will blister. Found that out the hard way after doing the fourth and final bend on a single pipe, only to chuck it in the bin.

Good luck, and get some pics up when you're done!
 
Last edited:
well after buying all my 13mm acrylic fittings tubes / bending jigs / saws / glue / rulers / reamers / heatgun / uv light etc etc etc. (approx £200 odd )

looked amazing until i filled it with water, then the leaks came.

so i ripped the fittings out and went back to good old vinyl tubes, taken me on and off about 3 weeks to do ( mainly waiting on stockists )

imo the fittings i used have too much of a small tolerance ( 1mm out when mating to a fitting face or out by 1-2 degrees on the flat ) the rubber washer the monsoon fittings pull up against have about 0.5mm of compression then bottom out.

i learnt allot over the three weeks, but i thought it was time to draw the line and start having fun again.

i'm not knocking monoons products i'm just stating the fact if your considering acrylic make sure your do you homework.

i think if i had about another spare couple of weeks and remade most of the pipes to higher tolerances it would be fine but i'd allways be looking inside to check for leaks.

so if your considering acrylic tubes remember you have to be mega precise or it will fail ( with monsoon anyway ), i wish there were more concise instructions on the assembly .
 
Last edited:
I put some in the watercooling thread or whatever it is when I built it the other month. But here's the monsoon kit as I used it. Just screwed the mandrels down to the mdf base once I had marked out the centre line for the pipe route. Heat the tube up gently and bend it round the mandrels and let it cool. I found a YouTube guide on using the monsoon kit and found it very useful. Worth a watch.


I went a bit over board on the layout, it's not the most efficient route but it's the look I wanted and I was just having a play around with it.


Didn't take many pics while I was doing it. But there's a couple that came out ok. Just don't rush and it's pretty easy. Don't over heat the pipe or it will blister. Found that out the hard way after doing the fourth and final bend on a single pipe, only to chuck it in the bin.

Good luck, and get some pics up when you're done!


That looks EPIC !
 
Regarding tolerances, it comes down to what type of fitting you are going to be using, if it is the basic push the tube in type, then I'd say, even 1mm off can be too much to trust. The 2 piece fittings can be a bit more forgiving as they use a compression way of holding the tube.

Have you looked at the Bitspower range ? they do all the angles needed, with dual ends, to have solid tube, but with all the corners being in metal, a bit of an odd way of explaining I no, but it makes sense to me. It can be expensive, but I think it looks super sexy. I'm saving at the moment, for about 3 - £400 worth. http://www.overclockers.co.uk/showproduct.php?prodid=WC-499-BP&groupid=962&catid=2589&subcat=2593
 
Back
Top Bottom