Gigabyte GA-Z68XP-UD4 Review.
Today I will be looking at the Gigabyte GA-Z68XP-UD4 motherboard for the Intel Pentium, i3, i5 and i7 range of CPU’s based on the socket 1155 platform; it is based on the Intel Z68 chipset and features everything the P67 chipset has to offer but additionally it includes,
• SSD Caching (Smart Response Technology)
• Quick Sync
• Lucid Virtu
So let’s have a quick rundown on what these three features do,
SSD Caching.
This enables the use of a small sized SSD to cache and thus rapidly access commonly used files from a normal mechanical hard drive that already has an operating system/software installed and running from. The maximum size of SSD space you can use for this is 64GB so if you have larger than this you will have to partition the drive.
Quick Sync.
Intels range of Sandybridge CPU’s all feature an integrated graphics core, this can be used by supporting programs to accelerate the encoding times of converting media formats/exporting videos from a video editor.
Lucid Virtu.
This software allows the motherboard to switch between the integrated graphics core and a discrete graphics card, this is useful if you want power saving from not needing to use a discrete graphics card for more simple tasks or want to use the different features of the integrated graphics core as they may differ from a graphics card.
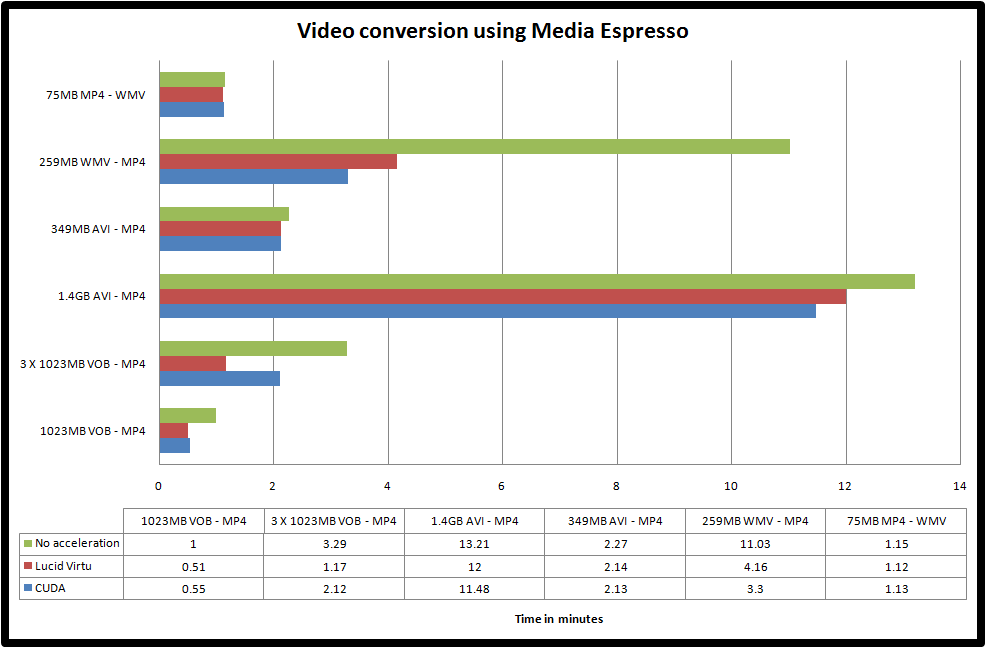
I have done some tests with various file types using different types of hardware acceleration, Lucid Virtu, Nvidia CUDA and no acceleration with a program that supports either type of acceleration. The results are below.
Product home page - http://www.gigabyte.com/products/product-page.aspx?pid=3910#ov
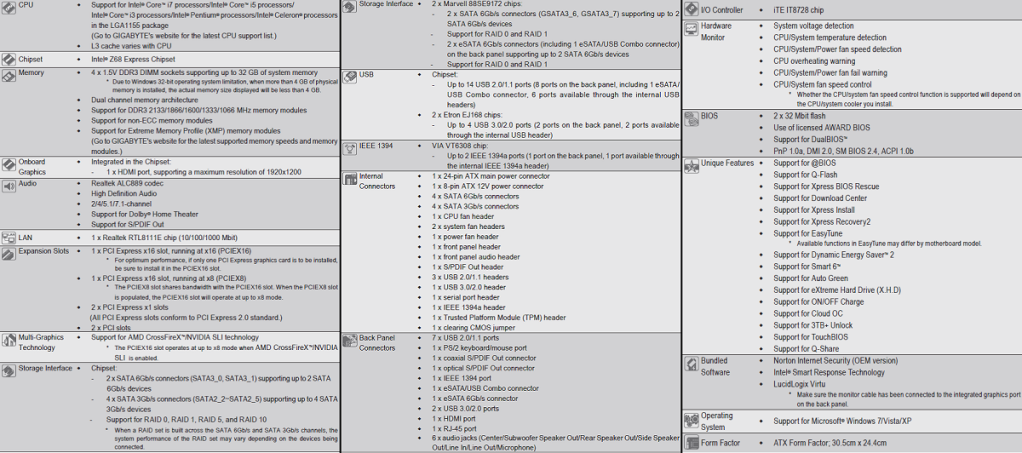
Motherboard Specifications.
Packaging and Accessories.
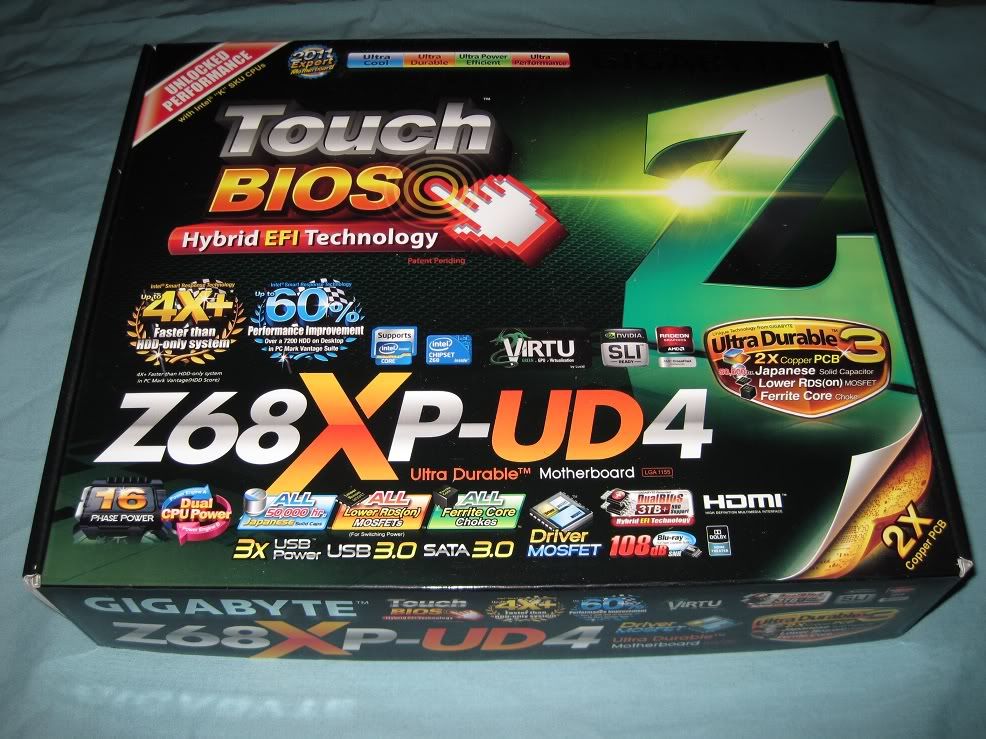
The motherboard comes in a standard sized cardboard box.
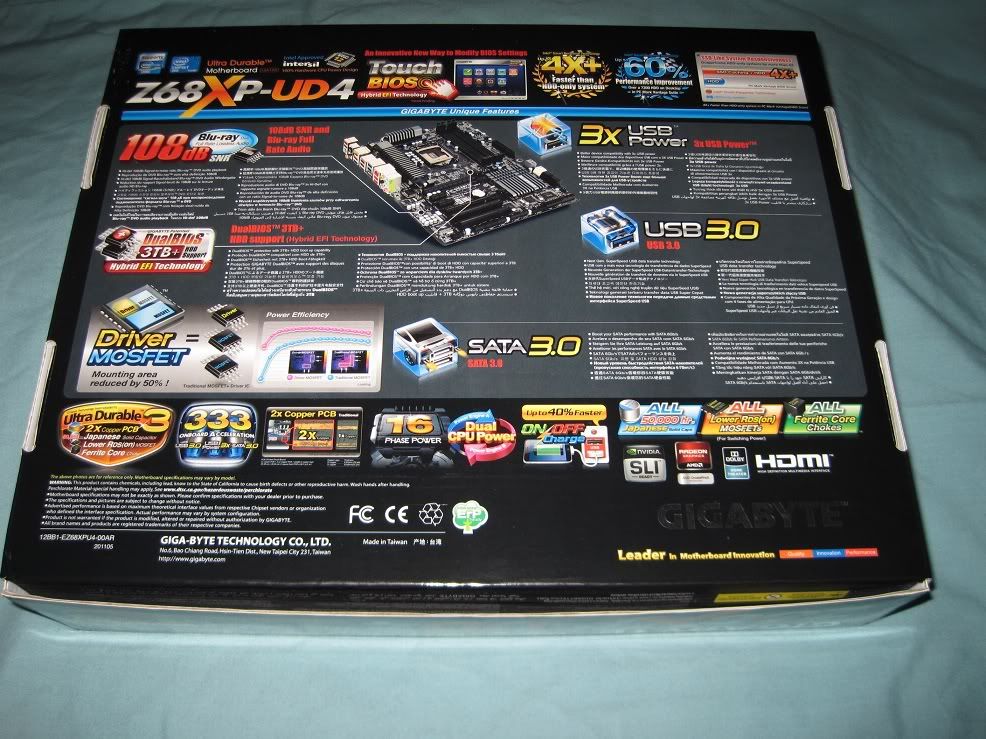
The rear features an image of the board and a rundown on some of the more interesting features of the board.
Let’s open it up and see what’s included.
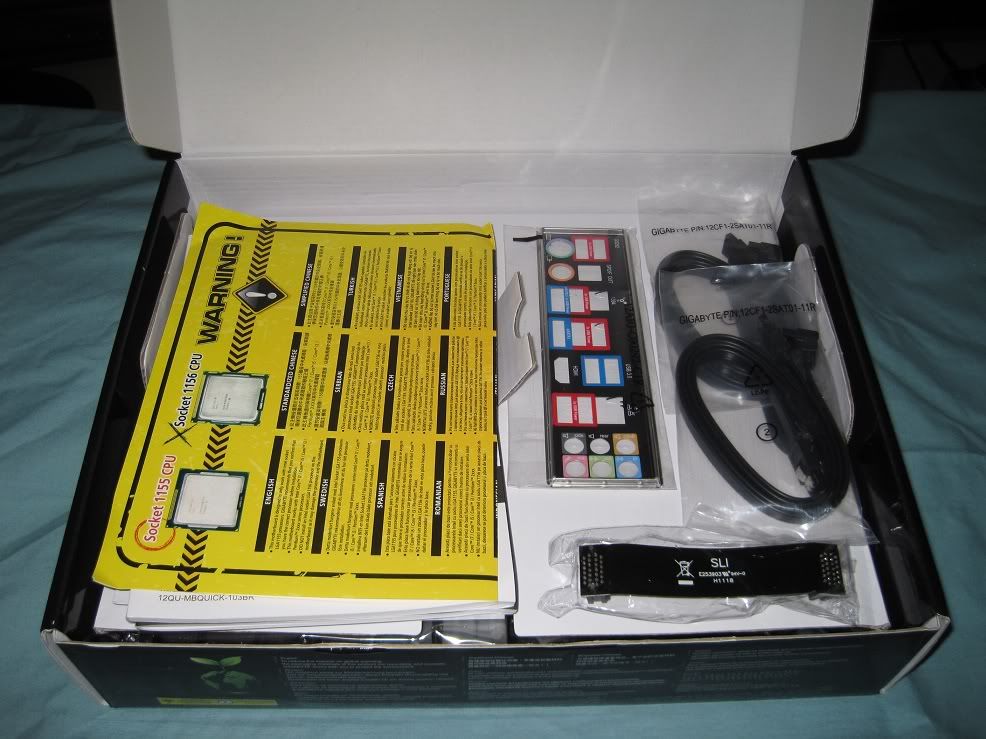
Accessories included are,
User and installation booklets.
Driver and software CD.
2 X case badges.
4 X Black SATA cables, two with 90degree heads.
1X I/O shield plate.
1 X SLI bridge.
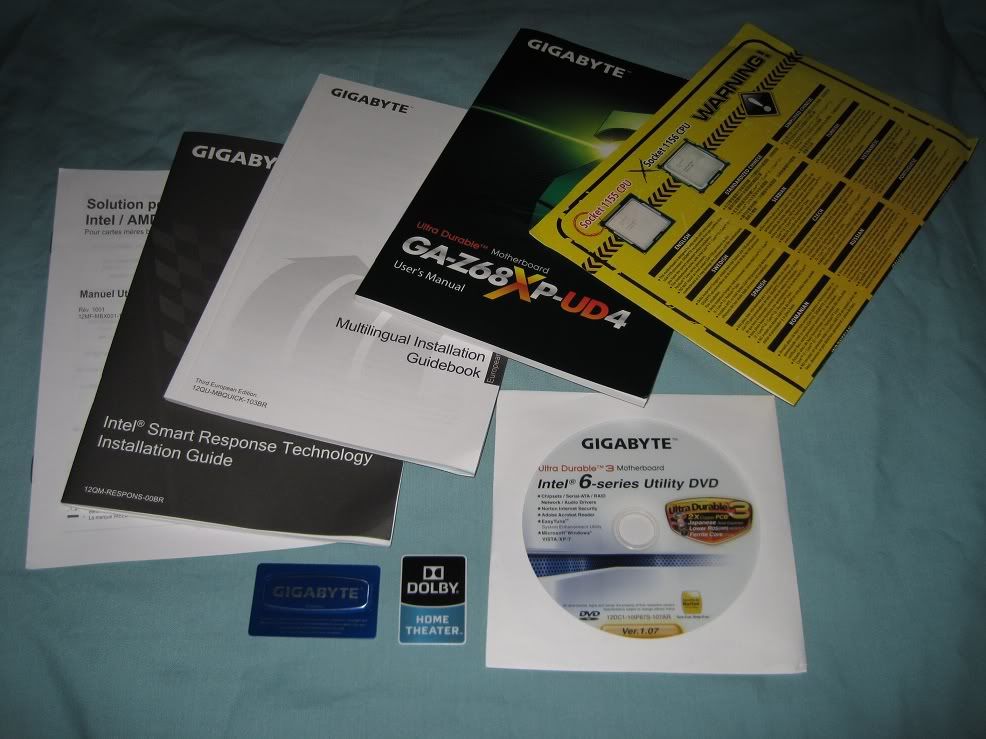
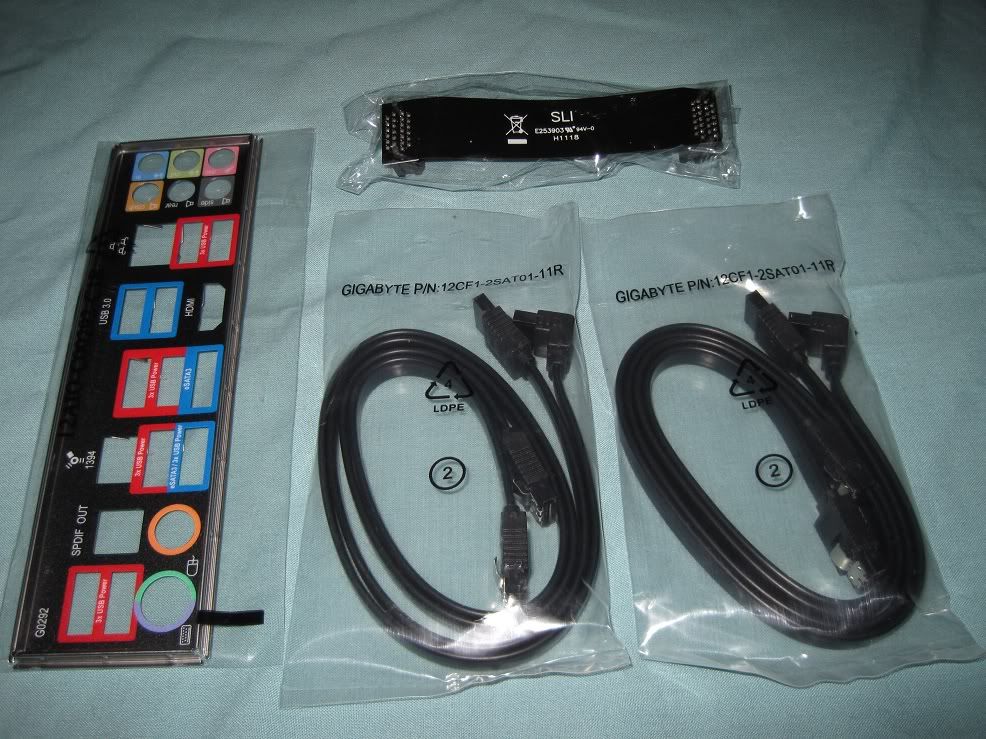
Motherboard photos.
As you can see it’s all Black and Grey in appearance which does look very good when combined with other matching parts. Another thing I noticed when handling this board for the first time was just how heavy it is, it really does feel and look like a sturdy well built product.
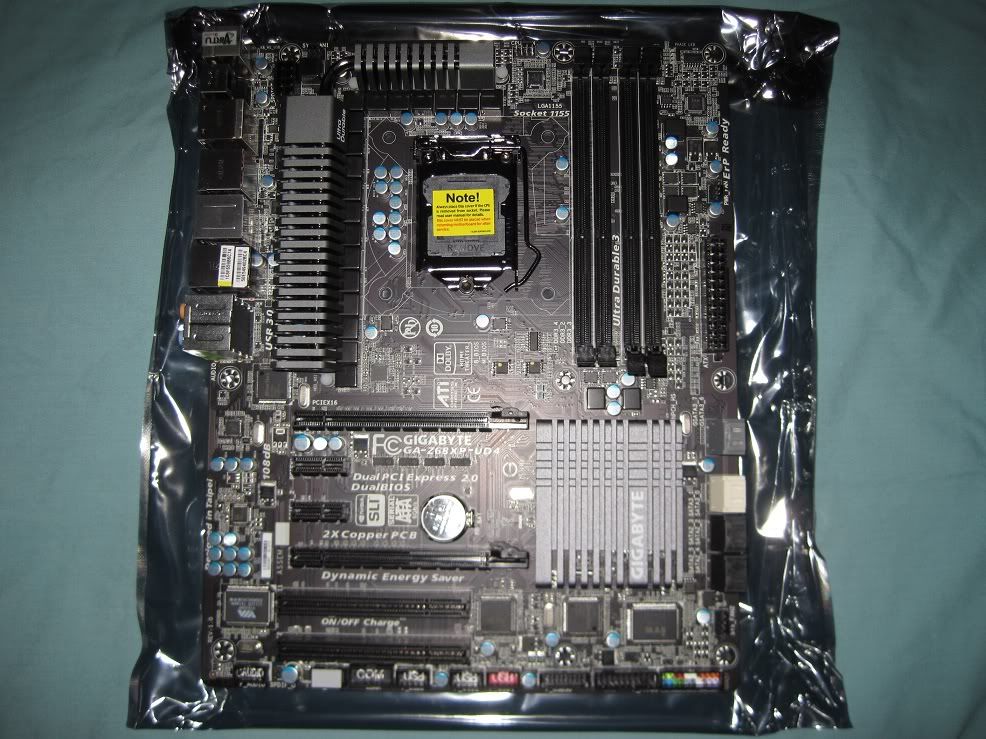
The CPU socket area and the VRM heatsinks, under these heatsinks you can see the nickel finish on the ferrite chokes for the 16 phase power VRM. Having more phases creates a smoother more stable voltage and is meant to reduce temperatures by spreading the load.
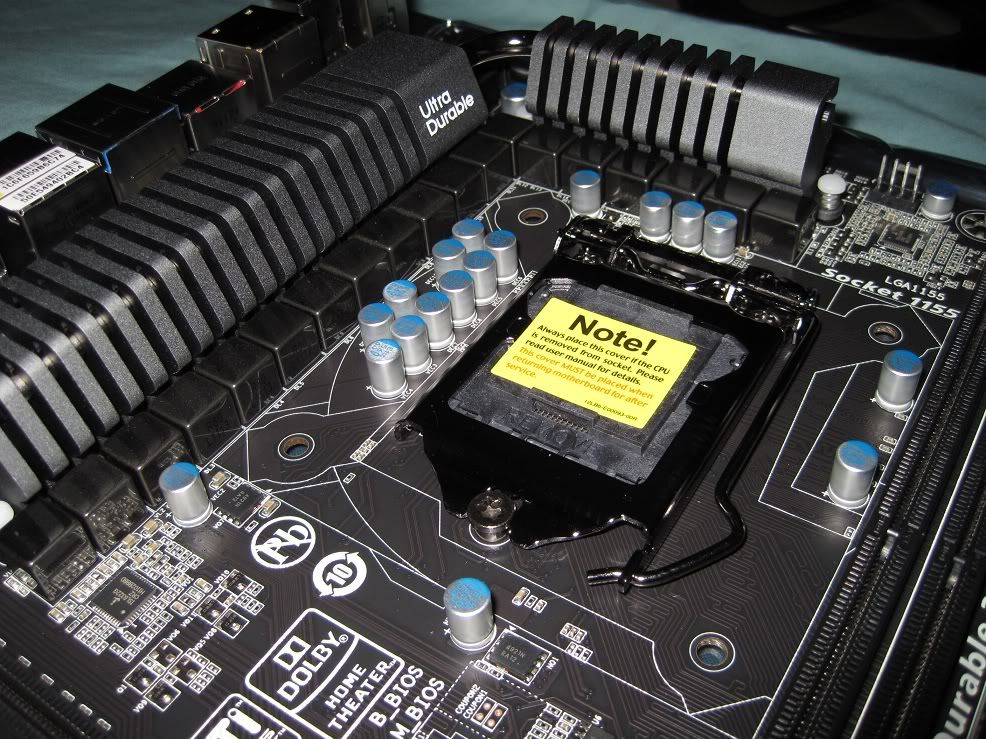
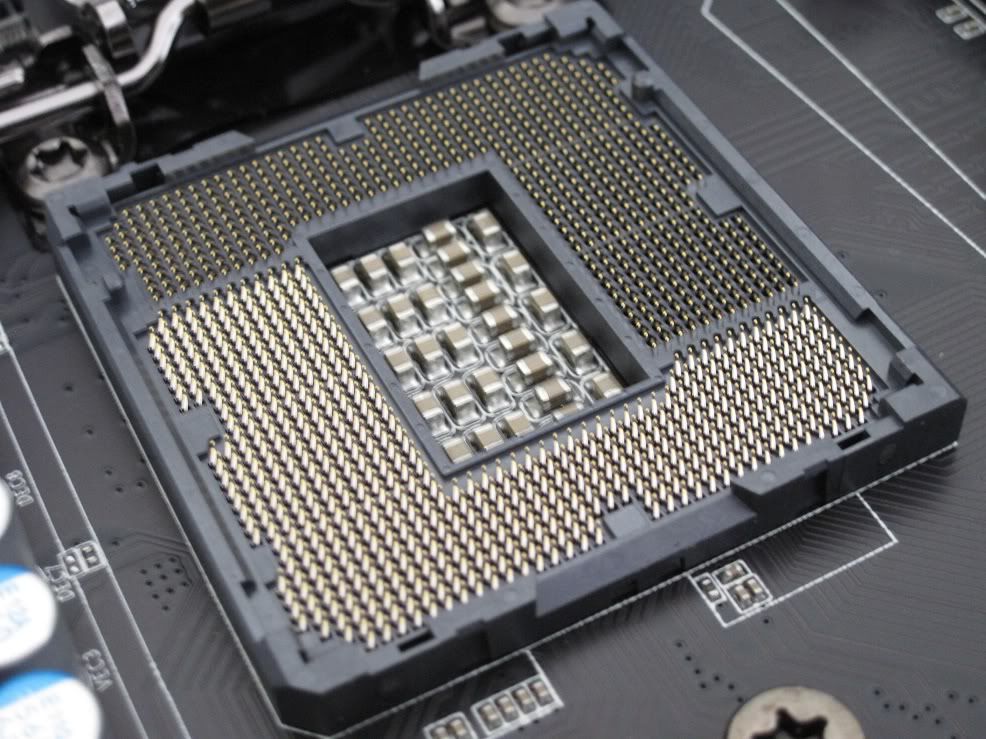
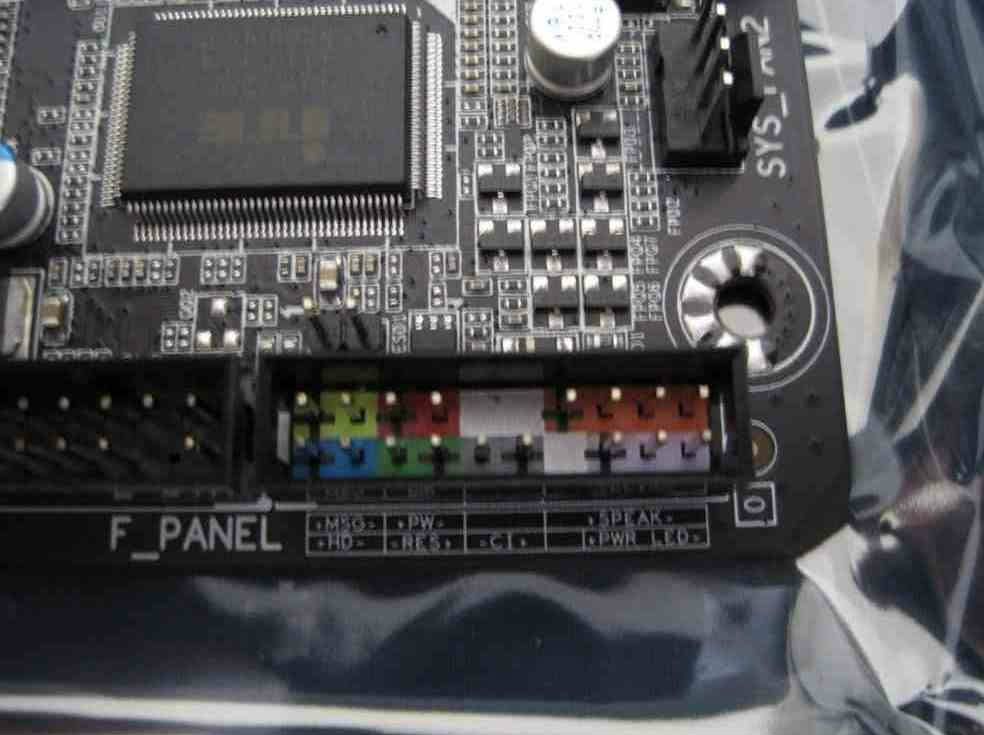
The case switch and LED connectors are colour coded to make it easier to see where to connect the little headers. The only way to improve this would be with the quick connect blocks as used by MSI.
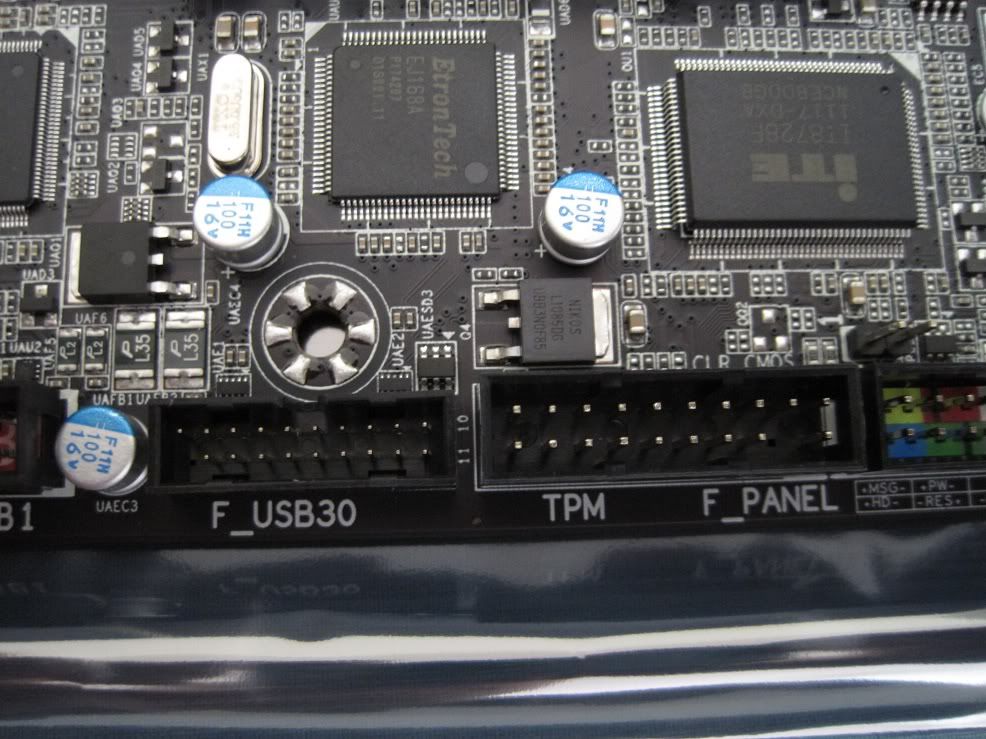
This is the internal USB3.0/2.0 and Trusted Platform Module header; above and to the right of this you can see the clear CMOS pins.
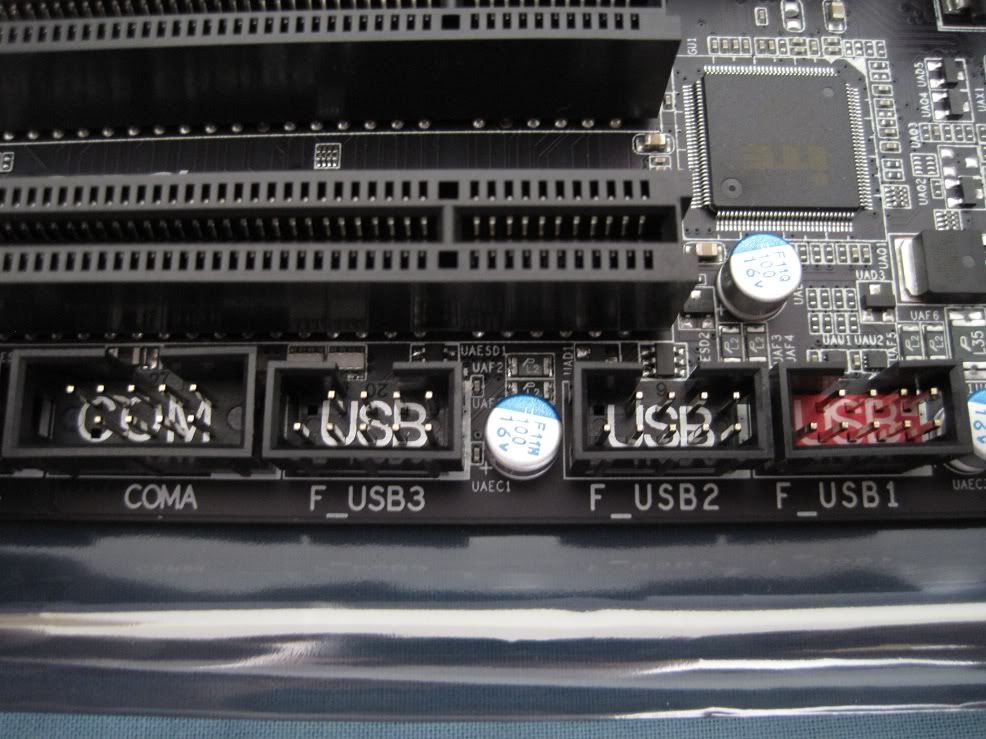
This board features an additional 3 X USB2.0 headers, the USB2.0 header with the Red background is for charging devices. Next to these is a serial port header.
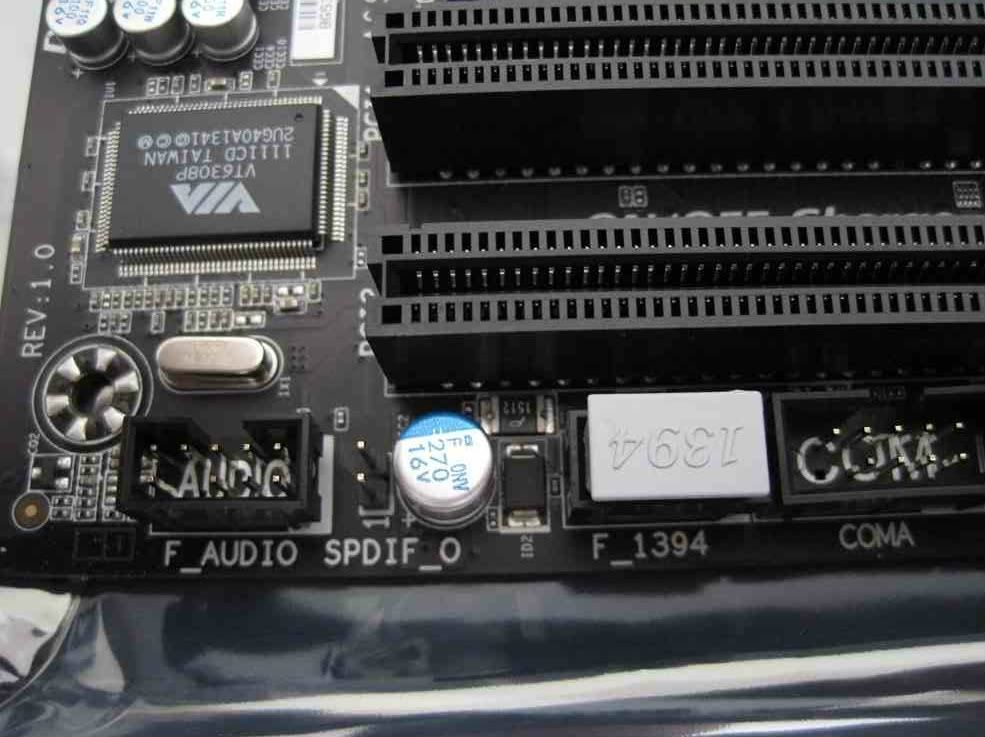
And lastly is an internal Fire wire, front audio header and a digital audio interconnect.
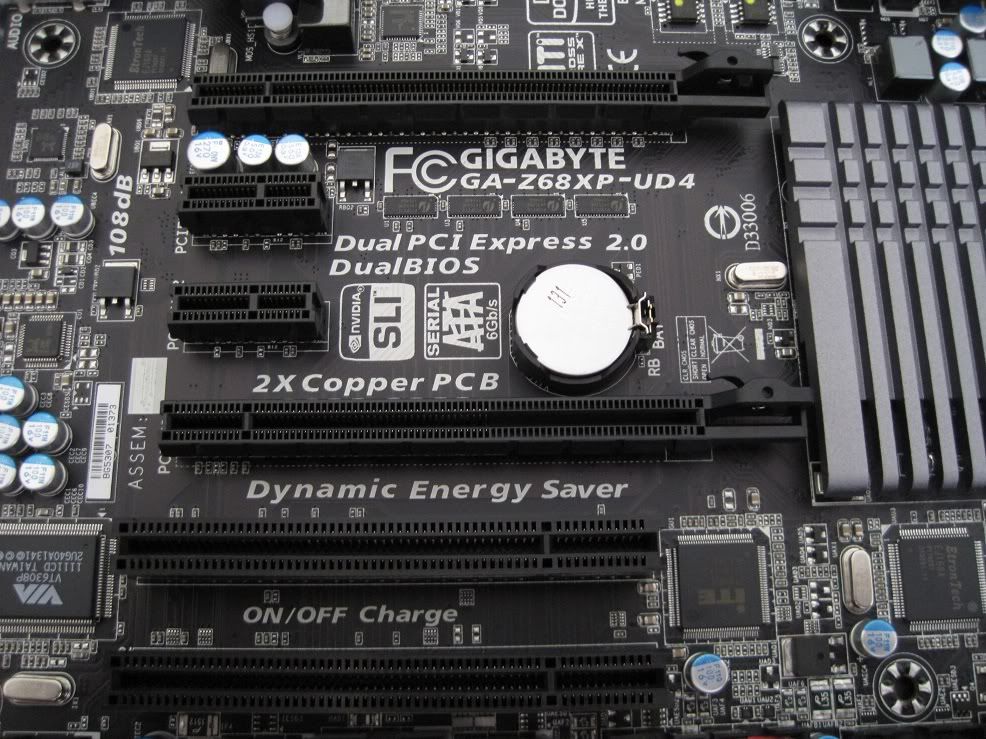
Next are the PCI-E and PCI slots,
1X PCI Express x16 slot
2 X PCI Express x1 slots
1 X PCI Express X16 slot that runs at a maximum of x8, this shares bandwidth with the top x16 PCI Express slot, so when this x8 slot is filled with a second graphics card in SLI/Crossfire mode, then the top x16 slot runs at x8 also, so both graphic cards get an equal 8X/8X bandwidth, many of the cheaper boards don’t do this and can only manage a 16X/4X bandwidth.
2 X PCI slots
Here we have the rear panel connectors, Left to Right we have,
2XUSB2.0 and a PS/2, Digital and Coaxial audio outputs, Fire wire, single USB2.0 and a eSATA/USB2.0 combo, 2XUSB2.0 and eSATA 6Gb/s, 2XUSB3.0 and a HDMI port(with a plastic protector), Ethernet and 2XUSB2.0, finally we have the six 3.5mm audio jacks for the motherboards 7.1 channel audio chip (Center, Subwoofer out, Rear speaker out, Side speaker out, Line in, Line out, Microphone).
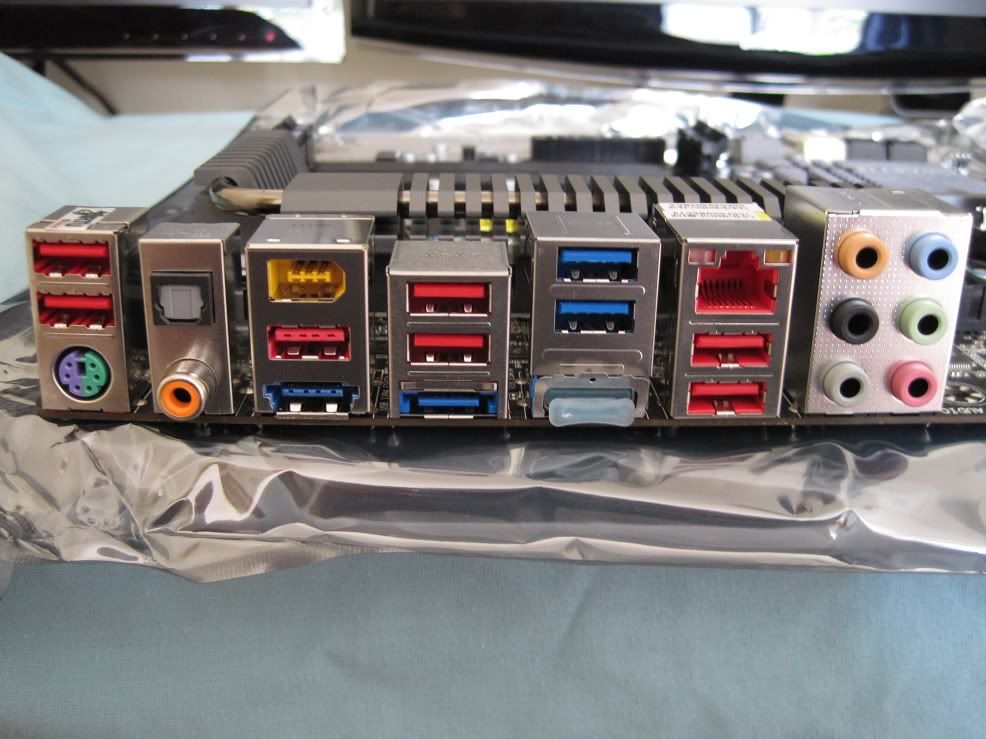
Now the only fault I can find here is the lack of DVI and D-SUB ports as found on other Z68 motherboards, the fact there is also no adapter supplied encase you only have a DVI etc on the monitor is slightly disappointing.
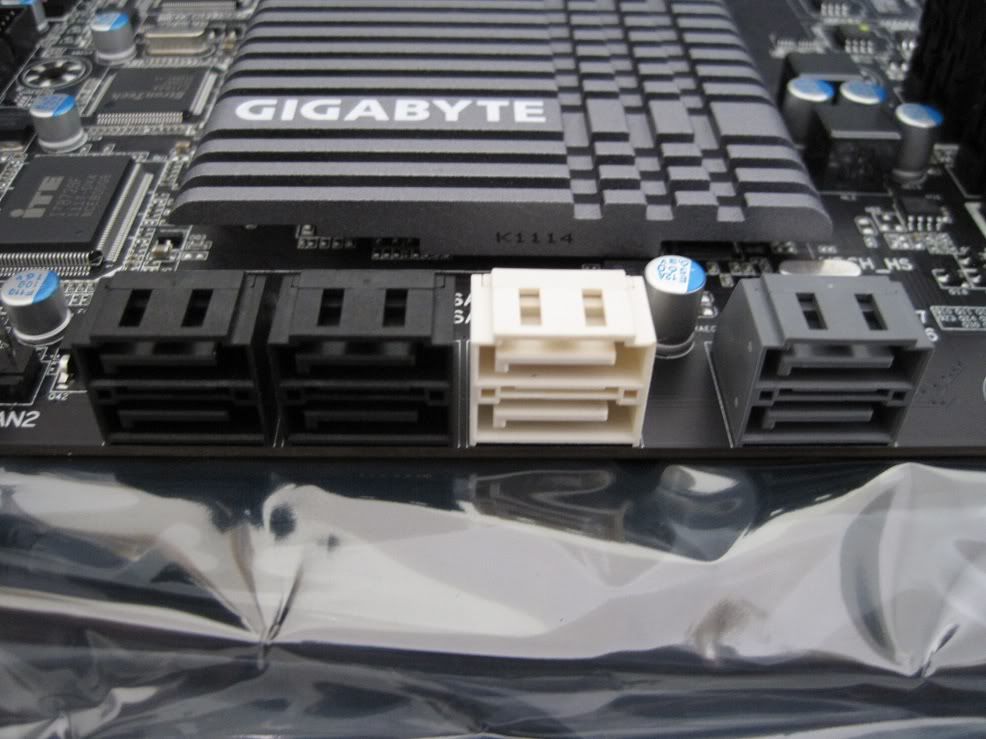
Now for the internal SATA ports, Left to Right,
4XSATA 3Gb/s, 2XSATA 6Gb/s from the Intel controller and 2XSATA 6Gb/s from the Marvell controller.
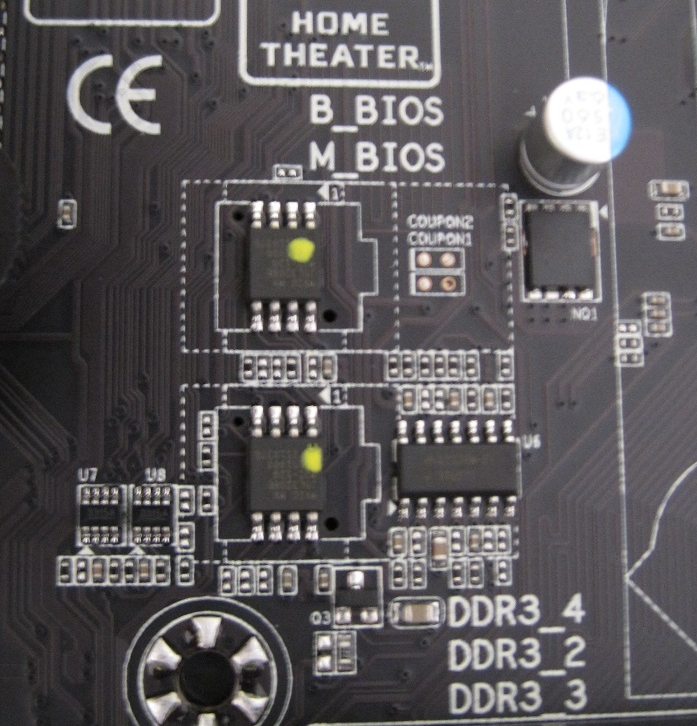
Finally here are the two BIOS chips that make up the DualBIOS feature, one is a backup that cannot be flashed, so if you experience a power failure or other issue during a BIOS flash then the second chip will take over at restart and will restore the data in the failed chip, this can be a life saver and I have used this feature before with great effect on a old Socket A Gigabyte board that while during a BIOS flash experienced a problem, it was a quick and painless recovery as I remember it.
A great feature that all motherboards from all manufacturers should have as standard in my opinion.
RAM and aftermarket heatsink fitment.
I feel the RAM slots are a bit too close to the socket on this board when compared to a Asrock Z68 Extreme4, I could not mount my Titan Fenrir like I can with the Asrock with it blowing from south to north. Below you will see the only way I could mount this heatsink without blocking the second slot from the socket, if I fitted it with the fan blowing east to west then the fan blocked both slots, if I mounted it with the fan blowing south to north then both slots were also blocked, with it mounted as below only the slot closest to the socket was obstructed by the Fenrir mounting mechanism. Another 5mm or so and I could have mounted the Fenrir blowing south to north and still got a RAM stick in the second slot.


BIOS and Touch BIOS.
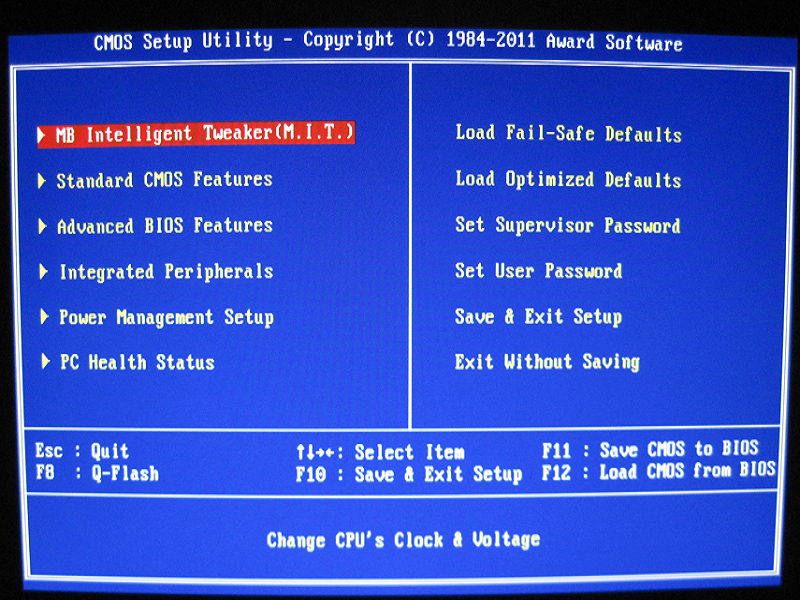
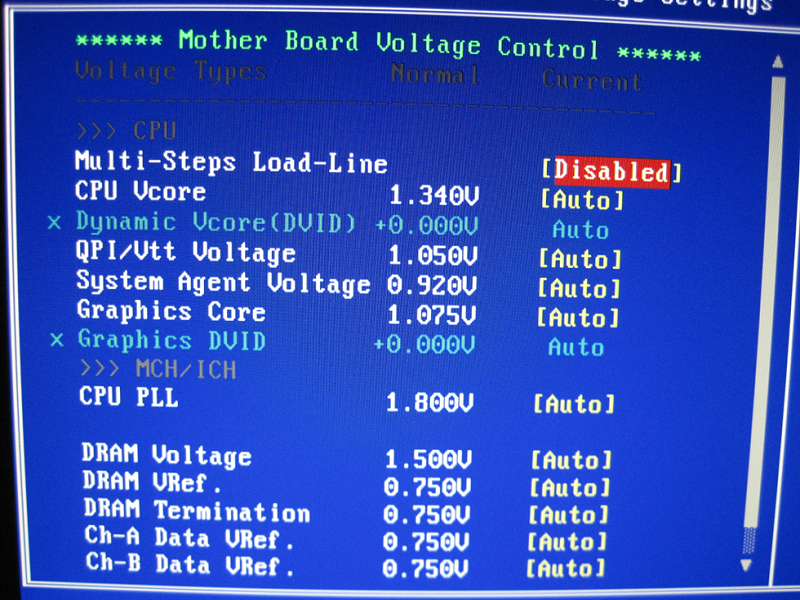
This motherboard doesn’t feature a UEFI style click BIOS that all the other manufacturers have employed, instead it uses the familiar AWARD BIOS that many people should be familiar with, even though it doesn’t feature the new style interface of a UEFI, this BIOS isn’t missing anything and all the frequency and voltage control and tweaking you could want are all present and correct.
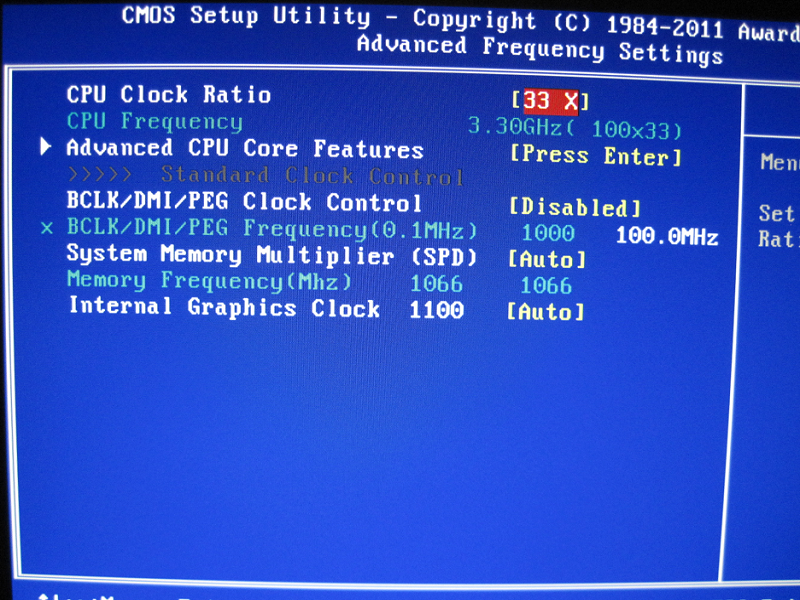
Here is a quick look at some of the more interesting BIOS pages with default frequency and voltage settings.

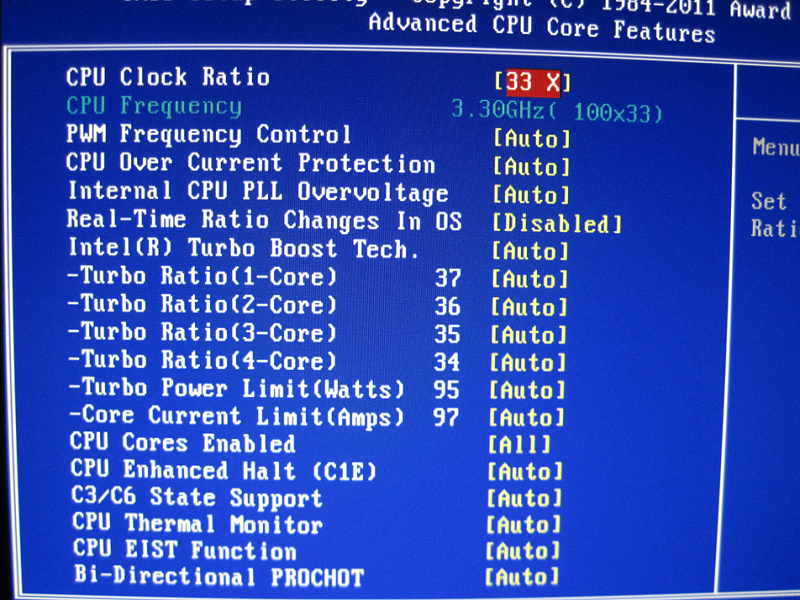

Fortunately Gigabyte have also included a piece of software called Touch BIOS, this is a windows based utility that offers all the same control of the normal BIOS but with a fancy user interface control.


Included software and utilities.
Norton Internet security.
Trend micro PC-Chillin.
Kaspersky Internet Security 2011
Acrobat Reader.
AIWI Game 64bit (this allows you to use an iphone/ipod touch as a wireless keyboard/touchpad)
WinZip
TouchBIOS
3TB+ Unlock
Dynamic Energy Saver™ 2
Smart 6™
Auto Green
EasyTune6
Face-Wizard (customise the boot-up screen)
Cloud OC (web based overclock)
Q-Share
On/Off Charge
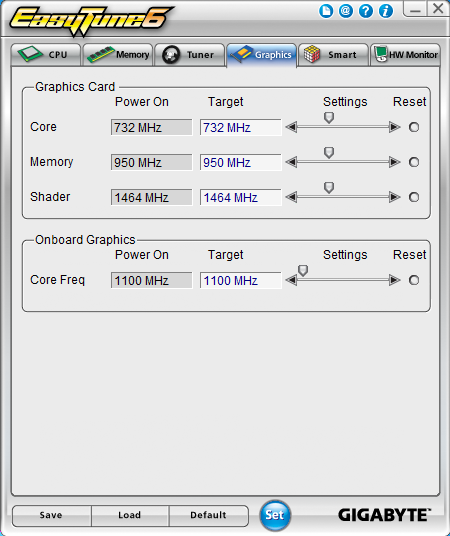
I will just give a quick explanation of EasyTune6, This is a Windows based overclocking utility that allows you full control of frequencies, CPU ratios and voltages, you can even overclock a discrete graphics card or the Sandybridge built in graphics core. There is smart fan control that allows you to easily control the CPU fan profile so it can ramp up as temps increase as you want it to. There is also a set of three “Quick Boost” overclock options so if your lazy or too scared to scared to fiddle with any of the BIOS settings manually, then you can pick from one of three predetermined settings.
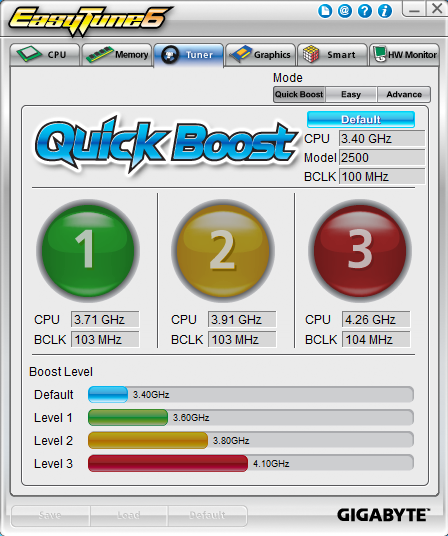
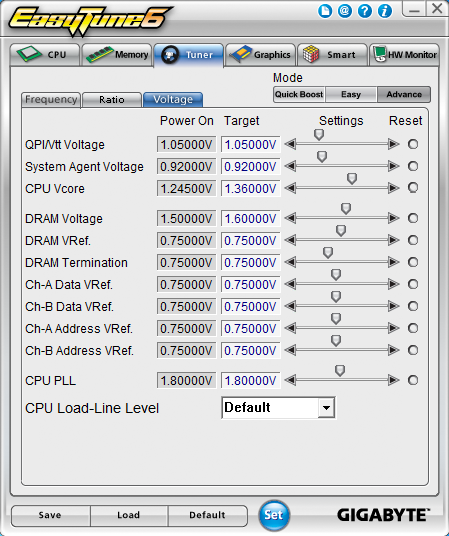
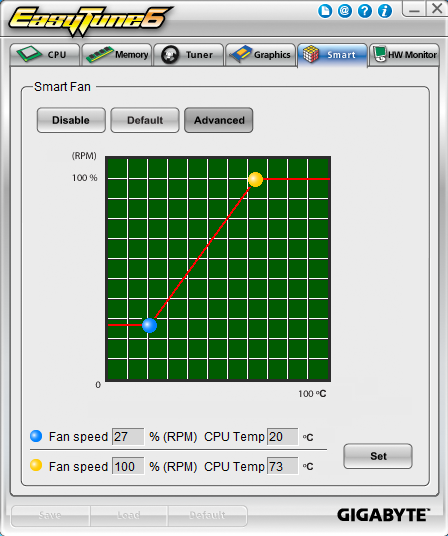
I have tried the “Quick Boost” option and while the first two speeds were perfectly stable under Prime95 and Intel Burntest, the last speed wasn’t, with Burntest reporting the system to be unstable and Prime95 stopping the workers in one or more threads. When the system did crash and restart from being unstable it recovered perfectly and restored the last known good settings, this is impeccable behaviour and saves havingto use the CLR_CMOS jumper and I was very impressed by this. So some kudos points to Gigabyte.
Overclocking.
Instead of using one of the easy options in the Easytune6 software to overclock my CPU, I did it manually by entering the BIOS at start-up and doing nothing more than setting the CPU ratio to 45X and upping the Vcore a bit, this proved to be perfectly stable with Prime95 and Burntest. Being a bit braver with my own personal CPU I decided to go just that bit higher, 4.7GHz and then 4.8GHz was all I was prepared to do and this required more Vcore again and a touch more PLL voltage. I also manually set the DRAM voltage and timings to what is written on the memory sticks instead of letting the board decide what was best for them. Again it passed Burntest multiple times and Prime95 for as long as I could be bothered to wait for.
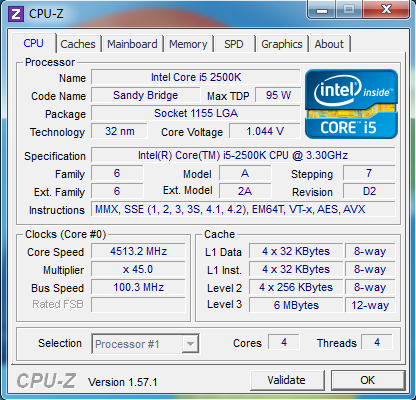
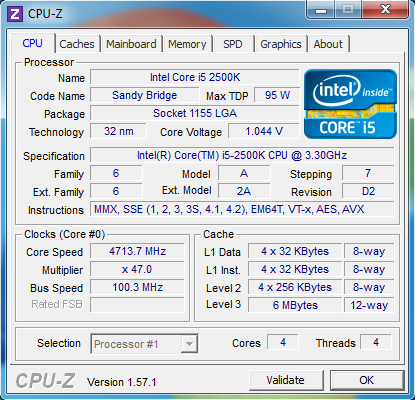
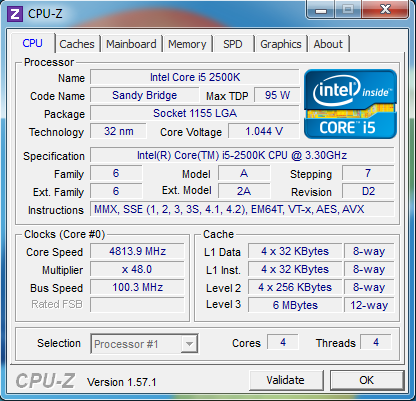
Another thing to note is the motherboards Serial VID works perfectly, by just altering the clock ratio and re-entering the BIOS, the Vcore is automatically adjusted to suit, so at stock 33X its 1.245V, but by setting the CPU ratio to 45X and then saving and exiting the BIOS, going back in shows the Vcore to now be 1.340V.


Comparison vs Asrock Z68 extreme4 at stock speeds.
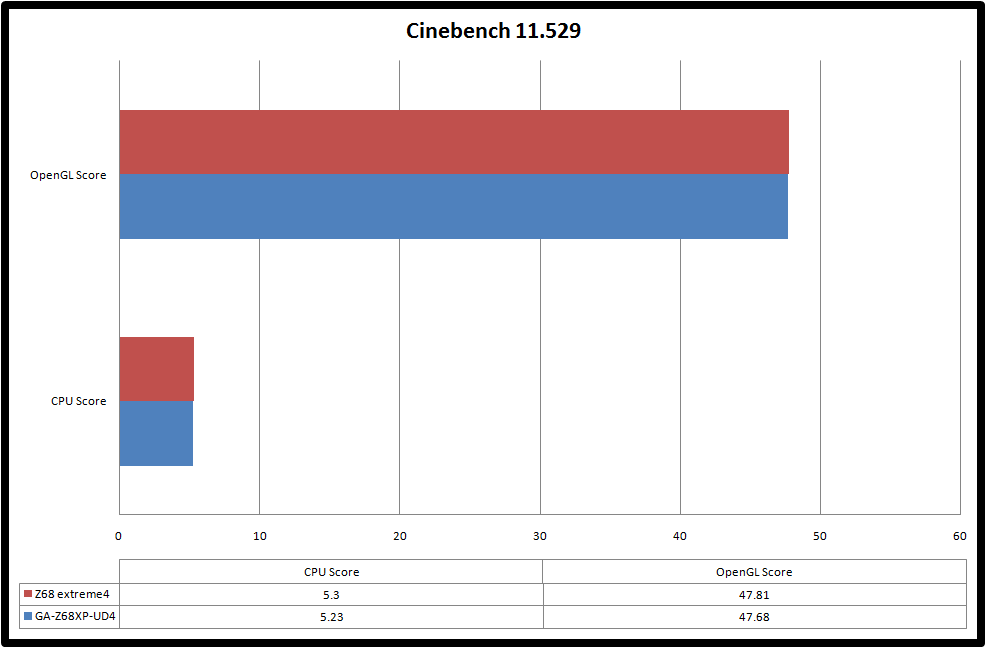
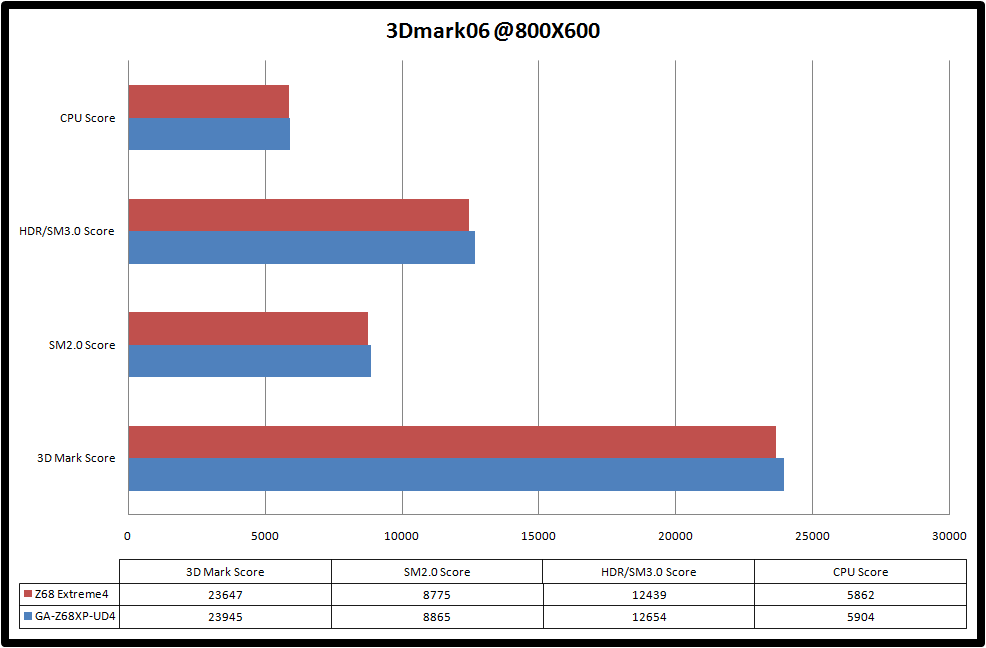
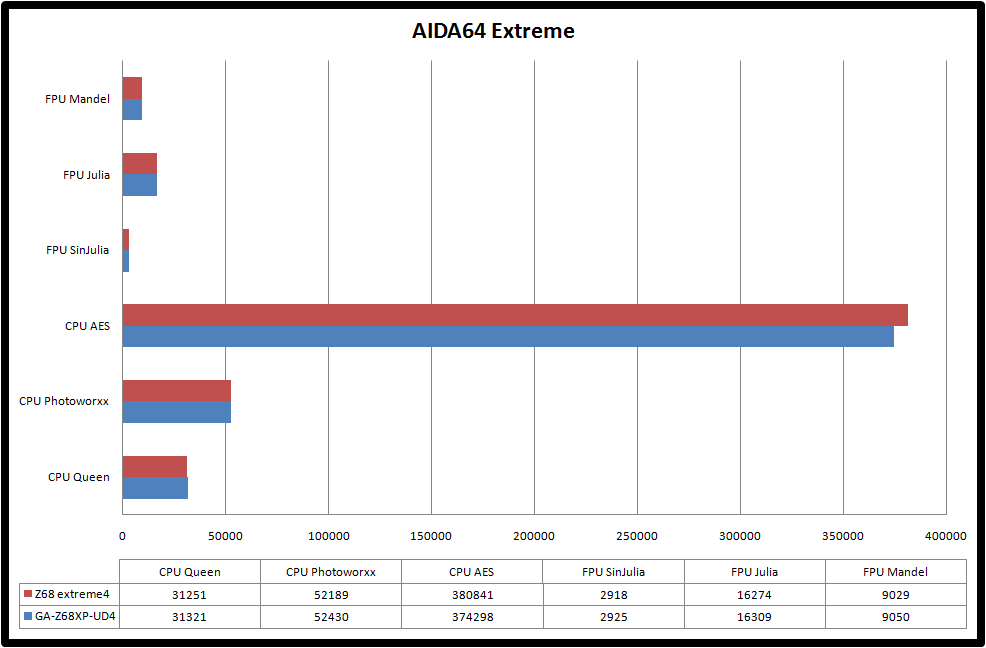
I manually set the CPU at 3.3 GHz and disabled Turboboost for these test on both platforms, with the RAM at 1333mhz and 9-9-9-27 timings. The rest of the test equipment is,
• 2 X 2GB Corsair Dominator 1600Mhz RAM.
• Intel i5 2500K.
• Palit GTX570 at stock speeds.
• Crucial C300 64GB SSD.
• Titan Fenrir V2 heatsink.
• Antec new truepower 650W PSU.
• Windows 7 64bit Ultimate.
• Nvidia 280.26
Both motherboards have the latest BIOS from the manufacturer website and the latest drivers were also used from the actual chipset manufacturer websites.
All test were repeated three times and then the median score used, any decimal places on the AIDA64 tests were just wiped off.
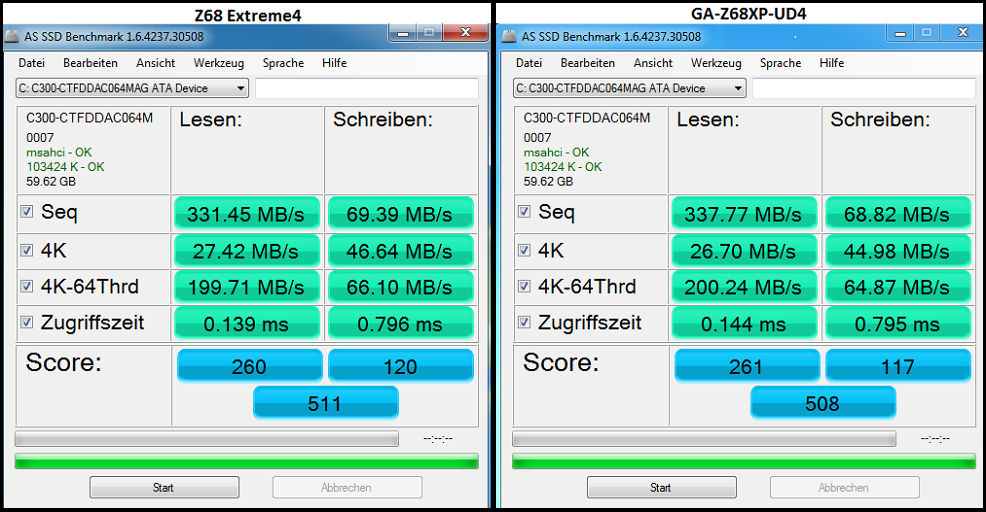
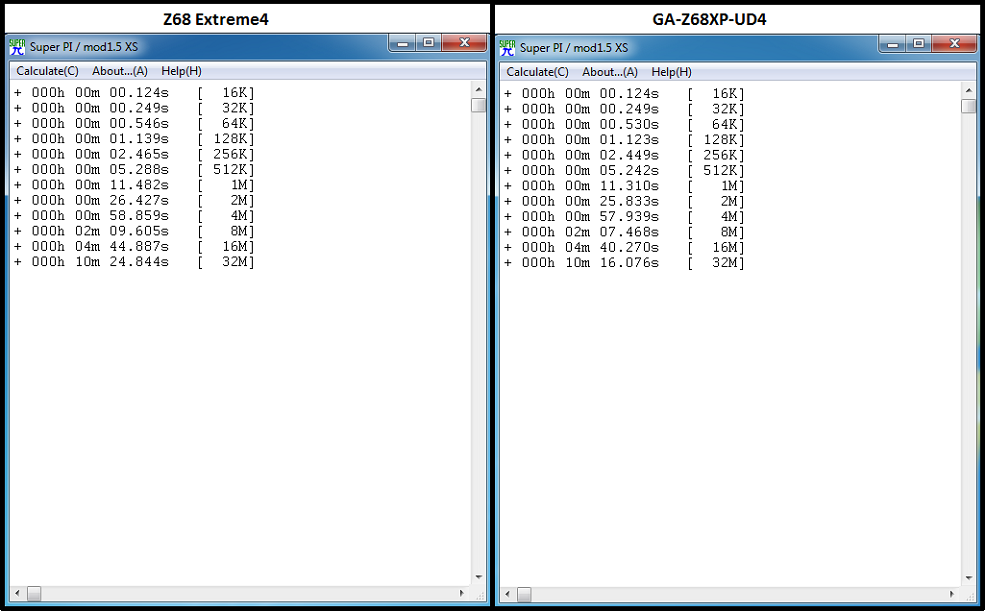
Stock vs 4.5 GHz comparison.
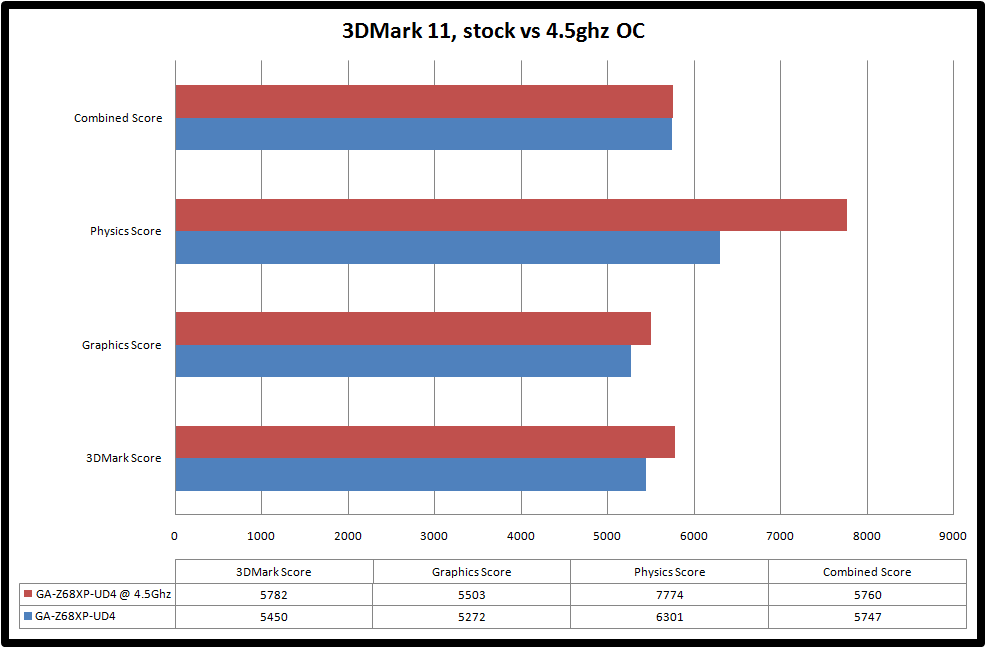
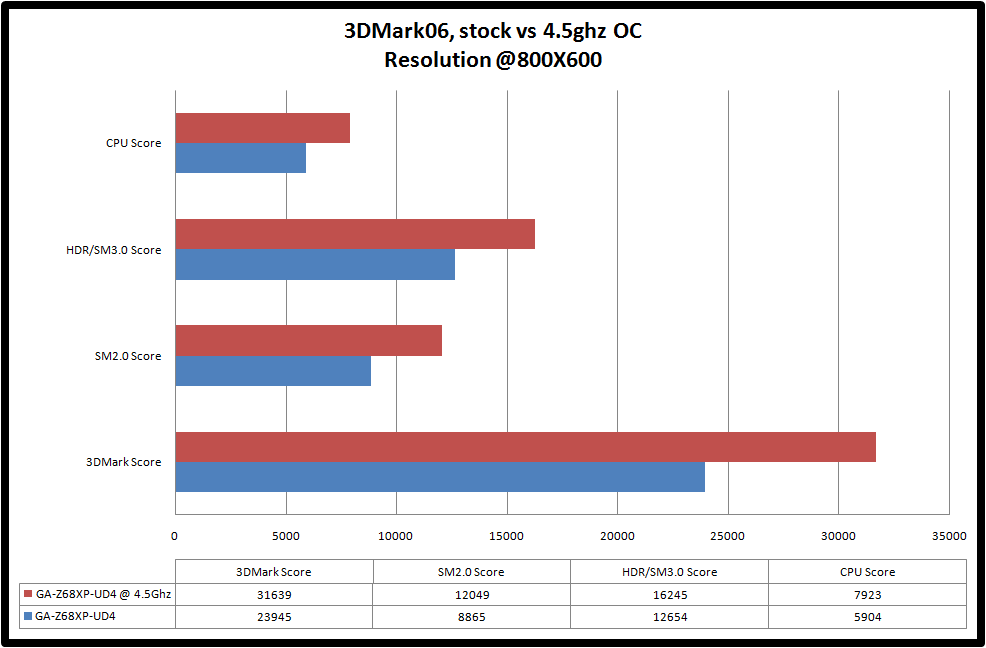
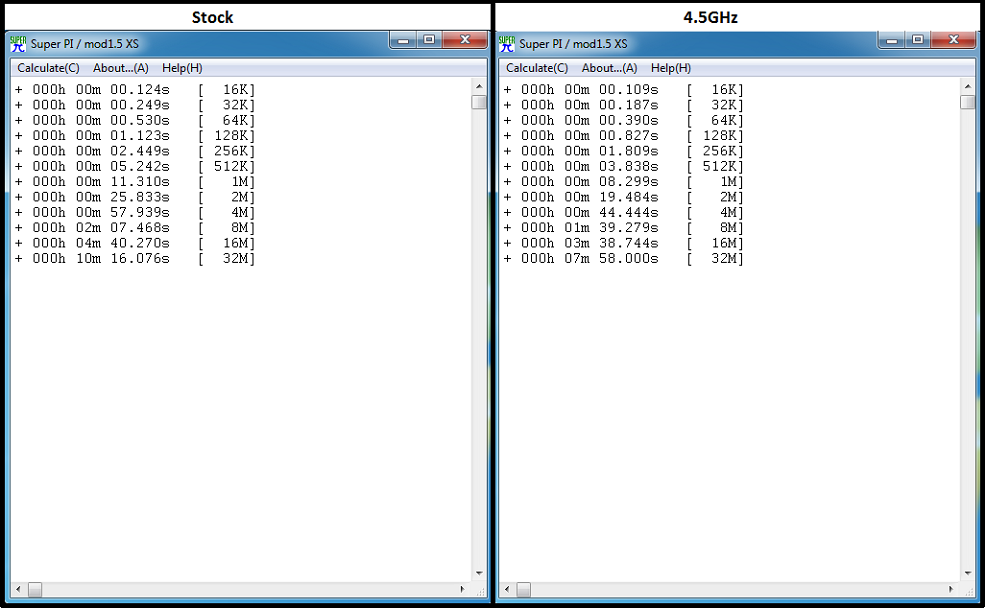
These results are of the Gigabyte board with the CPU at stock speeds and at 4.5Ghz just by altering the CPU multiplier to 45X, the RAM speed and timings are the same as stock.
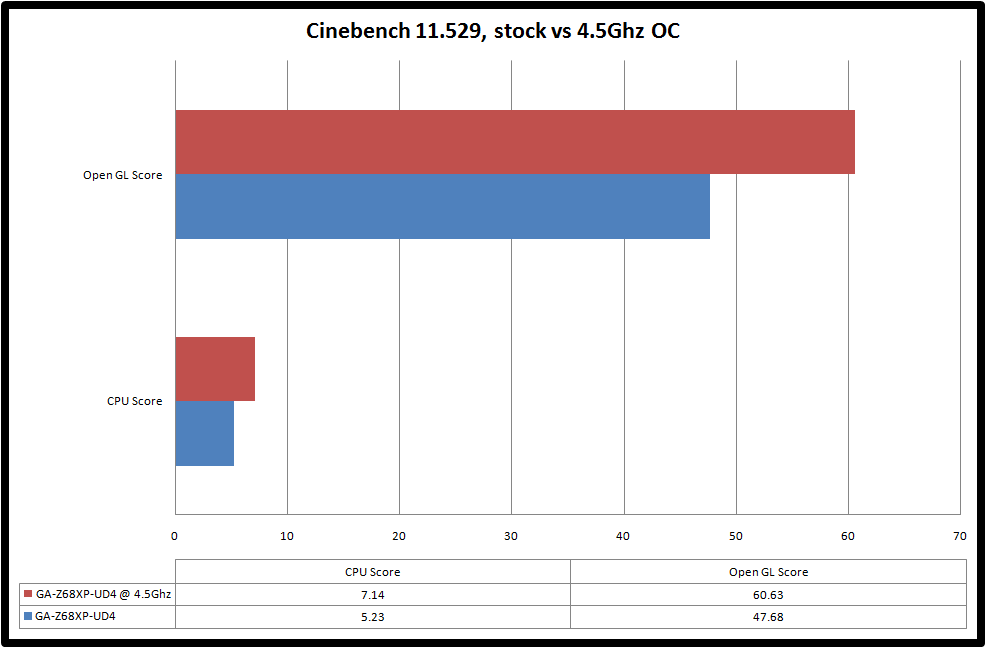
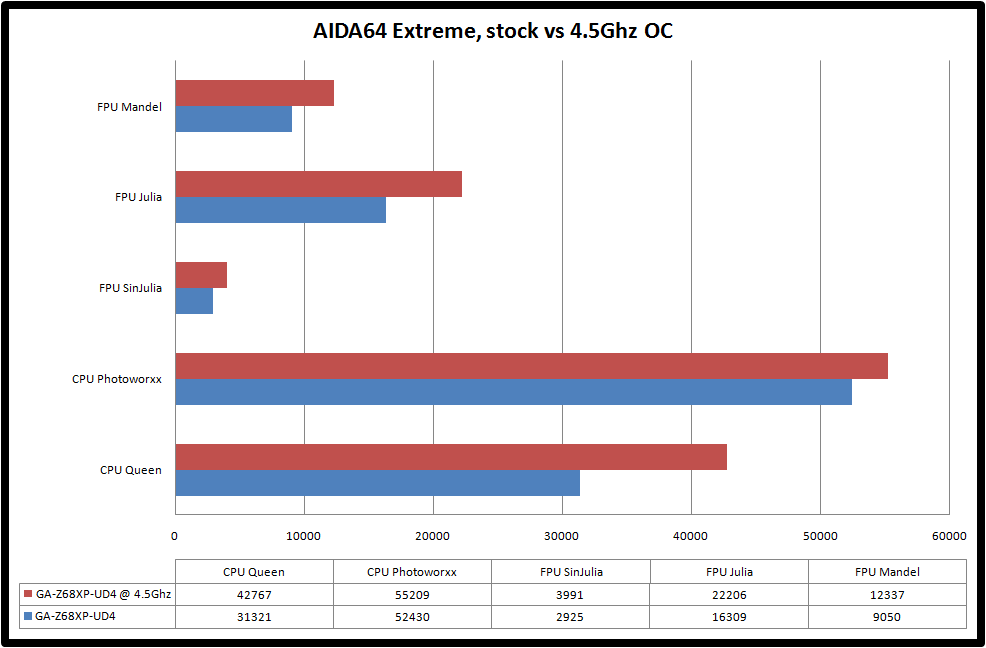
Summary.
What a good board this is, apart from the fantastic restart and recovery when overclocking became unstable, actually getting to the 4.5GHz that everyone seems to want as standard from these “K” chips was extremely easy and trust me, I’m no overclocking expert, I am sure with more knowledge or daring then getting up to 5GHz won’t be an issue. While the main BIOS screen won’t win any prizes for style compared to a UEFI, the BIOS does everything you could want and more. The build quality is very nice and as mentioned in the review the sheer weight of this board compared to handling my Asrock Z68 Extreme4 really is noticeable (perhaps that’s helped by the 2oz of cooper used in the PCB?) and the colour choices used in the design of this goes well with anything.
Feature wise it’s all there (apart from the lack of DVI and D-SUB display outputs) with a large number of internal and external USB2.0 ports, a great onboard sound chip with Blu-Ray audio decoding as standard, it does symmetrical (8X/8X) SLI/Crossfire so you get the best experience over motherboards that do this asymmetrically at an uneven 16X/4X and with the latest BIOS from Gigabyte it has Intel Ivybridge support ready and waiting.
The 3 year warranty also shows the faith Gigabyte have put into their product and not having to send an item to say the Netherlands or some other random part of the world which can cost a lot of money in shipping costs is also a big plus point. The service and repair centre for Gigabyte is in the UK.
Pros.
Well built and looks good.
High quality components used.
16 Phase VRM for the CPU.
Dual BIOS.
Good performance at stock.
Easy overclocking.
Perfect BIOS recovery to the last good working settings.
3 year warranty.
UK based service and repair centre.
Cons.
RAM slots too close to the socket for my large heatsink.
No DVI and D-SUB connector for the onboard display outputs or an adapter to convert the HDMI connector.
No UEFI
Today I will be looking at the Gigabyte GA-Z68XP-UD4 motherboard for the Intel Pentium, i3, i5 and i7 range of CPU’s based on the socket 1155 platform; it is based on the Intel Z68 chipset and features everything the P67 chipset has to offer but additionally it includes,
• SSD Caching (Smart Response Technology)
• Quick Sync
• Lucid Virtu
So let’s have a quick rundown on what these three features do,
SSD Caching.
This enables the use of a small sized SSD to cache and thus rapidly access commonly used files from a normal mechanical hard drive that already has an operating system/software installed and running from. The maximum size of SSD space you can use for this is 64GB so if you have larger than this you will have to partition the drive.
Quick Sync.
Intels range of Sandybridge CPU’s all feature an integrated graphics core, this can be used by supporting programs to accelerate the encoding times of converting media formats/exporting videos from a video editor.
Lucid Virtu.
This software allows the motherboard to switch between the integrated graphics core and a discrete graphics card, this is useful if you want power saving from not needing to use a discrete graphics card for more simple tasks or want to use the different features of the integrated graphics core as they may differ from a graphics card.
I have done some tests with various file types using different types of hardware acceleration, Lucid Virtu, Nvidia CUDA and no acceleration with a program that supports either type of acceleration. The results are below.

Product home page - http://www.gigabyte.com/products/product-page.aspx?pid=3910#ov
Motherboard Specifications.

Packaging and Accessories.
The motherboard comes in a standard sized cardboard box.

The rear features an image of the board and a rundown on some of the more interesting features of the board.

Let’s open it up and see what’s included.

Accessories included are,
User and installation booklets.
Driver and software CD.
2 X case badges.
4 X Black SATA cables, two with 90degree heads.
1X I/O shield plate.
1 X SLI bridge.


Motherboard photos.
As you can see it’s all Black and Grey in appearance which does look very good when combined with other matching parts. Another thing I noticed when handling this board for the first time was just how heavy it is, it really does feel and look like a sturdy well built product.

The CPU socket area and the VRM heatsinks, under these heatsinks you can see the nickel finish on the ferrite chokes for the 16 phase power VRM. Having more phases creates a smoother more stable voltage and is meant to reduce temperatures by spreading the load.


The case switch and LED connectors are colour coded to make it easier to see where to connect the little headers. The only way to improve this would be with the quick connect blocks as used by MSI.

This is the internal USB3.0/2.0 and Trusted Platform Module header; above and to the right of this you can see the clear CMOS pins.

This board features an additional 3 X USB2.0 headers, the USB2.0 header with the Red background is for charging devices. Next to these is a serial port header.

And lastly is an internal Fire wire, front audio header and a digital audio interconnect.

Next are the PCI-E and PCI slots,
1X PCI Express x16 slot
2 X PCI Express x1 slots
1 X PCI Express X16 slot that runs at a maximum of x8, this shares bandwidth with the top x16 PCI Express slot, so when this x8 slot is filled with a second graphics card in SLI/Crossfire mode, then the top x16 slot runs at x8 also, so both graphic cards get an equal 8X/8X bandwidth, many of the cheaper boards don’t do this and can only manage a 16X/4X bandwidth.
2 X PCI slots

Here we have the rear panel connectors, Left to Right we have,
2XUSB2.0 and a PS/2, Digital and Coaxial audio outputs, Fire wire, single USB2.0 and a eSATA/USB2.0 combo, 2XUSB2.0 and eSATA 6Gb/s, 2XUSB3.0 and a HDMI port(with a plastic protector), Ethernet and 2XUSB2.0, finally we have the six 3.5mm audio jacks for the motherboards 7.1 channel audio chip (Center, Subwoofer out, Rear speaker out, Side speaker out, Line in, Line out, Microphone).

Now the only fault I can find here is the lack of DVI and D-SUB ports as found on other Z68 motherboards, the fact there is also no adapter supplied encase you only have a DVI etc on the monitor is slightly disappointing.
Now for the internal SATA ports, Left to Right,
4XSATA 3Gb/s, 2XSATA 6Gb/s from the Intel controller and 2XSATA 6Gb/s from the Marvell controller.

Finally here are the two BIOS chips that make up the DualBIOS feature, one is a backup that cannot be flashed, so if you experience a power failure or other issue during a BIOS flash then the second chip will take over at restart and will restore the data in the failed chip, this can be a life saver and I have used this feature before with great effect on a old Socket A Gigabyte board that while during a BIOS flash experienced a problem, it was a quick and painless recovery as I remember it.
A great feature that all motherboards from all manufacturers should have as standard in my opinion.

RAM and aftermarket heatsink fitment.
I feel the RAM slots are a bit too close to the socket on this board when compared to a Asrock Z68 Extreme4, I could not mount my Titan Fenrir like I can with the Asrock with it blowing from south to north. Below you will see the only way I could mount this heatsink without blocking the second slot from the socket, if I fitted it with the fan blowing east to west then the fan blocked both slots, if I mounted it with the fan blowing south to north then both slots were also blocked, with it mounted as below only the slot closest to the socket was obstructed by the Fenrir mounting mechanism. Another 5mm or so and I could have mounted the Fenrir blowing south to north and still got a RAM stick in the second slot.


BIOS and Touch BIOS.
This motherboard doesn’t feature a UEFI style click BIOS that all the other manufacturers have employed, instead it uses the familiar AWARD BIOS that many people should be familiar with, even though it doesn’t feature the new style interface of a UEFI, this BIOS isn’t missing anything and all the frequency and voltage control and tweaking you could want are all present and correct.
Here is a quick look at some of the more interesting BIOS pages with default frequency and voltage settings.


Fortunately Gigabyte have also included a piece of software called Touch BIOS, this is a windows based utility that offers all the same control of the normal BIOS but with a fancy user interface control.


Included software and utilities.
Norton Internet security.
Trend micro PC-Chillin.
Kaspersky Internet Security 2011
Acrobat Reader.
AIWI Game 64bit (this allows you to use an iphone/ipod touch as a wireless keyboard/touchpad)
WinZip
TouchBIOS
3TB+ Unlock
Dynamic Energy Saver™ 2
Smart 6™
Auto Green
EasyTune6
Face-Wizard (customise the boot-up screen)
Cloud OC (web based overclock)
Q-Share
On/Off Charge
I will just give a quick explanation of EasyTune6, This is a Windows based overclocking utility that allows you full control of frequencies, CPU ratios and voltages, you can even overclock a discrete graphics card or the Sandybridge built in graphics core. There is smart fan control that allows you to easily control the CPU fan profile so it can ramp up as temps increase as you want it to. There is also a set of three “Quick Boost” overclock options so if your lazy or too scared to scared to fiddle with any of the BIOS settings manually, then you can pick from one of three predetermined settings.


I have tried the “Quick Boost” option and while the first two speeds were perfectly stable under Prime95 and Intel Burntest, the last speed wasn’t, with Burntest reporting the system to be unstable and Prime95 stopping the workers in one or more threads. When the system did crash and restart from being unstable it recovered perfectly and restored the last known good settings, this is impeccable behaviour and saves havingto use the CLR_CMOS jumper and I was very impressed by this. So some kudos points to Gigabyte.
Overclocking.
Instead of using one of the easy options in the Easytune6 software to overclock my CPU, I did it manually by entering the BIOS at start-up and doing nothing more than setting the CPU ratio to 45X and upping the Vcore a bit, this proved to be perfectly stable with Prime95 and Burntest. Being a bit braver with my own personal CPU I decided to go just that bit higher, 4.7GHz and then 4.8GHz was all I was prepared to do and this required more Vcore again and a touch more PLL voltage. I also manually set the DRAM voltage and timings to what is written on the memory sticks instead of letting the board decide what was best for them. Again it passed Burntest multiple times and Prime95 for as long as I could be bothered to wait for.


Another thing to note is the motherboards Serial VID works perfectly, by just altering the clock ratio and re-entering the BIOS, the Vcore is automatically adjusted to suit, so at stock 33X its 1.245V, but by setting the CPU ratio to 45X and then saving and exiting the BIOS, going back in shows the Vcore to now be 1.340V.


Comparison vs Asrock Z68 extreme4 at stock speeds.
I manually set the CPU at 3.3 GHz and disabled Turboboost for these test on both platforms, with the RAM at 1333mhz and 9-9-9-27 timings. The rest of the test equipment is,
• 2 X 2GB Corsair Dominator 1600Mhz RAM.
• Intel i5 2500K.
• Palit GTX570 at stock speeds.
• Crucial C300 64GB SSD.
• Titan Fenrir V2 heatsink.
• Antec new truepower 650W PSU.
• Windows 7 64bit Ultimate.
• Nvidia 280.26
Both motherboards have the latest BIOS from the manufacturer website and the latest drivers were also used from the actual chipset manufacturer websites.
All test were repeated three times and then the median score used, any decimal places on the AIDA64 tests were just wiped off.


Stock vs 4.5 GHz comparison.
These results are of the Gigabyte board with the CPU at stock speeds and at 4.5Ghz just by altering the CPU multiplier to 45X, the RAM speed and timings are the same as stock.


Summary.
What a good board this is, apart from the fantastic restart and recovery when overclocking became unstable, actually getting to the 4.5GHz that everyone seems to want as standard from these “K” chips was extremely easy and trust me, I’m no overclocking expert, I am sure with more knowledge or daring then getting up to 5GHz won’t be an issue. While the main BIOS screen won’t win any prizes for style compared to a UEFI, the BIOS does everything you could want and more. The build quality is very nice and as mentioned in the review the sheer weight of this board compared to handling my Asrock Z68 Extreme4 really is noticeable (perhaps that’s helped by the 2oz of cooper used in the PCB?) and the colour choices used in the design of this goes well with anything.
Feature wise it’s all there (apart from the lack of DVI and D-SUB display outputs) with a large number of internal and external USB2.0 ports, a great onboard sound chip with Blu-Ray audio decoding as standard, it does symmetrical (8X/8X) SLI/Crossfire so you get the best experience over motherboards that do this asymmetrically at an uneven 16X/4X and with the latest BIOS from Gigabyte it has Intel Ivybridge support ready and waiting.
The 3 year warranty also shows the faith Gigabyte have put into their product and not having to send an item to say the Netherlands or some other random part of the world which can cost a lot of money in shipping costs is also a big plus point. The service and repair centre for Gigabyte is in the UK.
Pros.
Well built and looks good.
High quality components used.
16 Phase VRM for the CPU.
Dual BIOS.
Good performance at stock.
Easy overclocking.
Perfect BIOS recovery to the last good working settings.
3 year warranty.
UK based service and repair centre.
Cons.
RAM slots too close to the socket for my large heatsink.
No DVI and D-SUB connector for the onboard display outputs or an adapter to convert the HDMI connector.
No UEFI
Last edited:


 when I saw the settings for that.