Associate
- Joined
- 4 Jun 2003
- Posts
- 974
- Location
- space
So tonight I made a chain oiler for the Transalp. It cost me £11.30 including 1L of heavy transmission oil (80w90 is ideal for chains)

here is a quick guide i knocked up to make one
!!! Disclamer !!!
This is a home brewed idea from my head so if you done like it dont do it, the last thing i want is someone hurting themselves because of one of my ideas, But if you are not a fool you should be able to build this it works very well on my xl600v Transalp or Tranny as most know it
Right now i got the don't sue my ass part out of the way we shall begin !!!
Parts & were bought
Poundland
one alloy anodised water bottle £1
A bag of cable ties £1
B&Q
Two micro Irragation valves 5mm £3
5mm hollow tubing of some description 30cm (I got damaged brass tube reduced for a 80p
3m of clear tubing again 5mm I/d (so it fits sungly over the brass tube). £3
local garage
Some 80w90 weight transmission oil £2.50
O.k really should have taken some build pictures but here is a run through. (i will build another one and take some pictures tomorrow)
Instructions
1. Take a 5 mm drill bit and drill a hole through the screw off lid of water bottle (i drilled through the handle too to give it extra support).
2. Cut about 8 cm of the brass hollow tubing and insert it into the hole you drilled ( it should be pretty snug so no glue will me needed to get a good seal if not use some glue). leave about 4 cm sticking clear on which to squeeze over the clear tubing.
3. Cut two strips of clear tubing about 7cm long
4. Squeeze the first 7 cm piece of tubing onto the end of the brass tube that is sticking out of the bottle top it should go on 3cm
5. Then fit your first valve (direction doesnt matter)
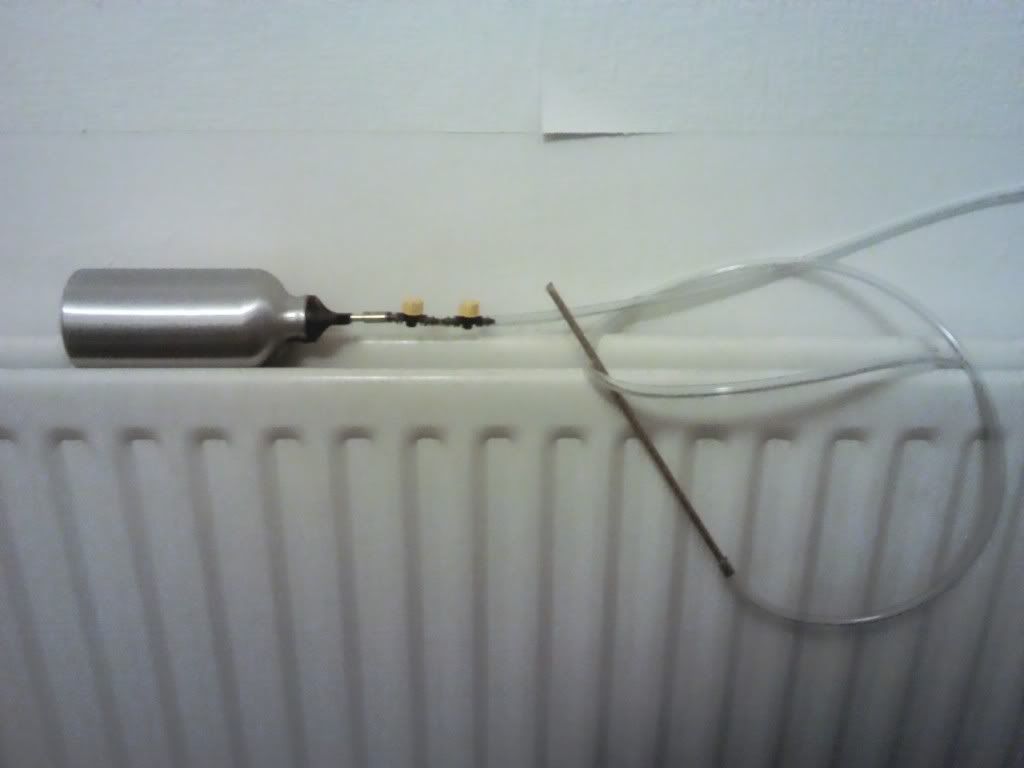
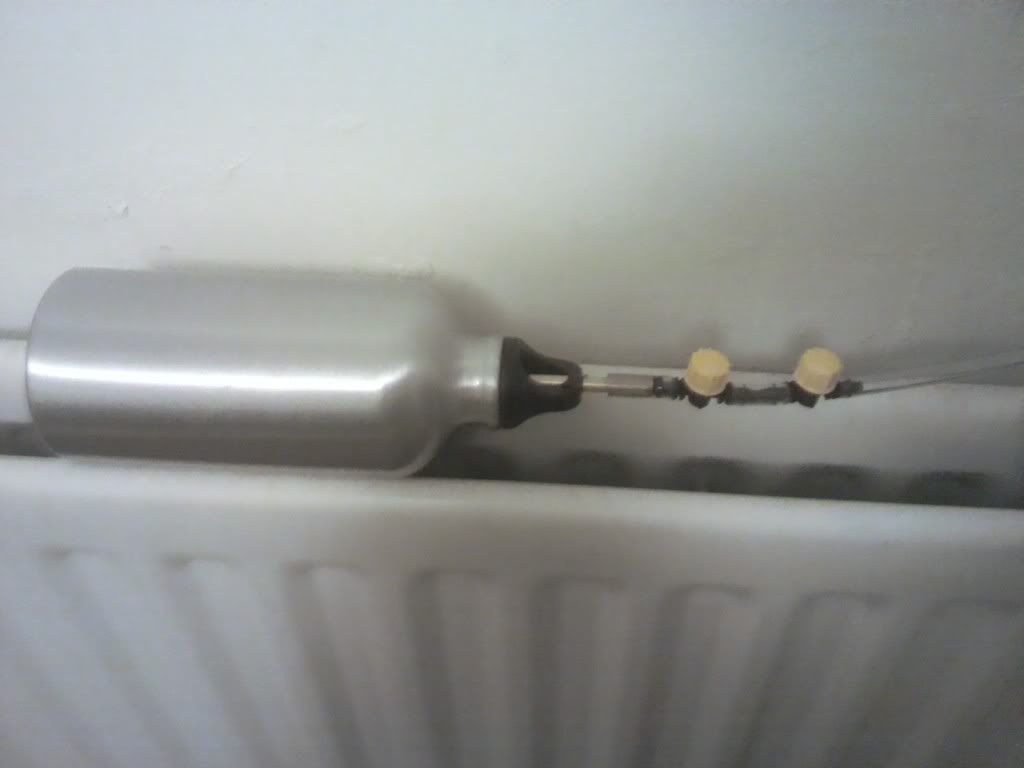
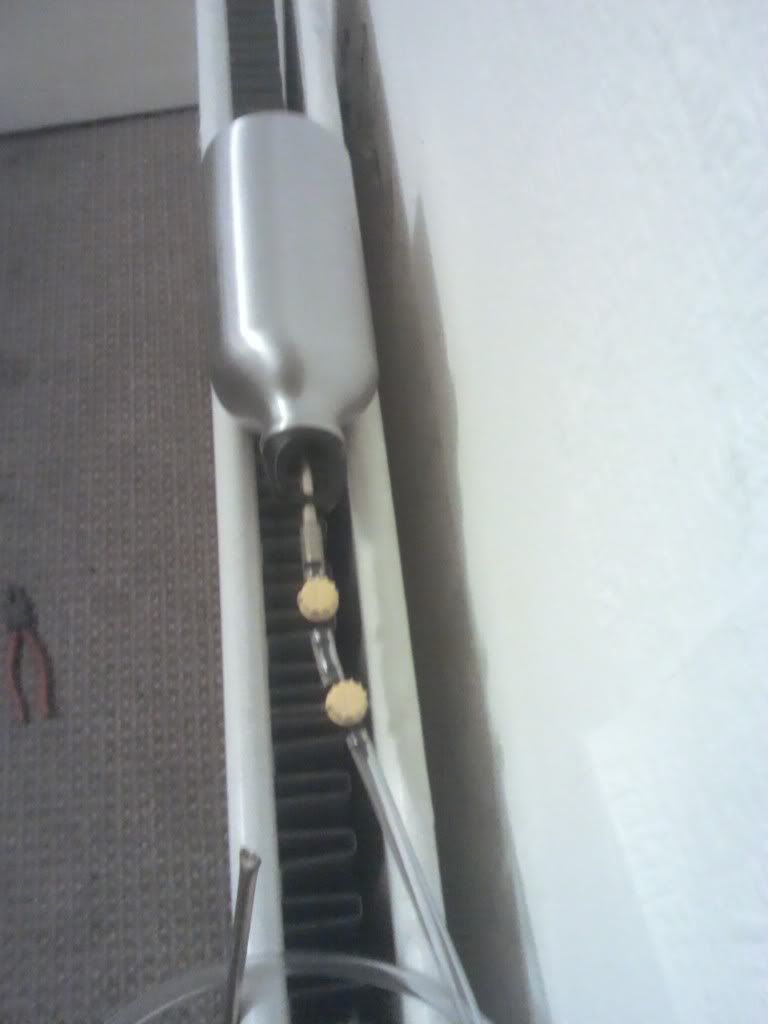
6. Fit the second 7 cm peice of tube onto the end of the valve and fit the final valve (it should look like this below)

7. Fit the rest of the tubing onto the end of the valve
8. With the last of your brass tubing fit onto the end of your tubing.
9. Crush the end of the brass tubing that is not connected to anything so that only a small hole remains (this is were the oil will drip onto the chain). (you can kinda see it on this photo)

10. Set both valves to closed then Fill the bottle with oil.
11. Fit to bike so that the outlet of the bottle is facing down (so the oil can flow out).
12. Use the cable ties to route the clear tubing to the rear sprocket then bend the brass tubing so that the crushed end with the hole is nearly touching the sprocket. You want to get the oil onto the bottom edge of the rear sprocket and the force of the cog spinning will force the oil onto the chain.
13. Once all setup check to make sure all is secure as once primed it will be flowing oil onto the rear sprocket (we dont want it to come off and cause harm to either you or anyone else).
14. Take the bike for a ride on some bumpy road and then check again that its secure !!!! ( safety n all that stuff)
The fun part working out oil flow
Now the rules of oil flow are pretty easy, oil flows faster when its warm so you want to set the oil flow according to the temp.
The first valve (closest to the bottle) is your on and off so when you park up you can just turn the first valve and kill all flow to the system with out affecting the valve for flow rate.
The second valve is your flow control and you want to have this adjusted so that your getting between 1-2 drops of oil per minute. (this is the rate at which a scott oiler works from my limited interweb info hunting on them). The last thing you want is a flow rate too high that dumps oil onto the rear wheel and you have an off (YOU HAVE BEEN WARNED)
Now enjoy a longer lasting chain and sprockets
I,m already working on a dual head now so that both side of the chain get an oil supply. You can fit a real scott oiler dual head onto this system but its £25 and i,m sure i can make the same thing from the left overs of this build.
Karl
I,m sure ive made loads of errors and left out a step or too so if you notice one p.m me and i will amend this.

here is a quick guide i knocked up to make one
!!! Disclamer !!!
This is a home brewed idea from my head so if you done like it dont do it, the last thing i want is someone hurting themselves because of one of my ideas, But if you are not a fool you should be able to build this it works very well on my xl600v Transalp or Tranny as most know it

Right now i got the don't sue my ass part out of the way we shall begin !!!
Parts & were bought
Poundland
one alloy anodised water bottle £1
A bag of cable ties £1
B&Q
Two micro Irragation valves 5mm £3
5mm hollow tubing of some description 30cm (I got damaged brass tube reduced for a 80p
3m of clear tubing again 5mm I/d (so it fits sungly over the brass tube). £3
local garage
Some 80w90 weight transmission oil £2.50
O.k really should have taken some build pictures but here is a run through. (i will build another one and take some pictures tomorrow)
Instructions
1. Take a 5 mm drill bit and drill a hole through the screw off lid of water bottle (i drilled through the handle too to give it extra support).
2. Cut about 8 cm of the brass hollow tubing and insert it into the hole you drilled ( it should be pretty snug so no glue will me needed to get a good seal if not use some glue). leave about 4 cm sticking clear on which to squeeze over the clear tubing.
3. Cut two strips of clear tubing about 7cm long
4. Squeeze the first 7 cm piece of tubing onto the end of the brass tube that is sticking out of the bottle top it should go on 3cm
5. Then fit your first valve (direction doesnt matter)
6. Fit the second 7 cm peice of tube onto the end of the valve and fit the final valve (it should look like this below)

7. Fit the rest of the tubing onto the end of the valve
8. With the last of your brass tubing fit onto the end of your tubing.
9. Crush the end of the brass tubing that is not connected to anything so that only a small hole remains (this is were the oil will drip onto the chain). (you can kinda see it on this photo)

10. Set both valves to closed then Fill the bottle with oil.
11. Fit to bike so that the outlet of the bottle is facing down (so the oil can flow out).
12. Use the cable ties to route the clear tubing to the rear sprocket then bend the brass tubing so that the crushed end with the hole is nearly touching the sprocket. You want to get the oil onto the bottom edge of the rear sprocket and the force of the cog spinning will force the oil onto the chain.
13. Once all setup check to make sure all is secure as once primed it will be flowing oil onto the rear sprocket (we dont want it to come off and cause harm to either you or anyone else).
14. Take the bike for a ride on some bumpy road and then check again that its secure !!!! ( safety n all that stuff)
The fun part working out oil flow
Now the rules of oil flow are pretty easy, oil flows faster when its warm so you want to set the oil flow according to the temp.
The first valve (closest to the bottle) is your on and off so when you park up you can just turn the first valve and kill all flow to the system with out affecting the valve for flow rate.
The second valve is your flow control and you want to have this adjusted so that your getting between 1-2 drops of oil per minute. (this is the rate at which a scott oiler works from my limited interweb info hunting on them). The last thing you want is a flow rate too high that dumps oil onto the rear wheel and you have an off (YOU HAVE BEEN WARNED)
Now enjoy a longer lasting chain and sprockets
I,m already working on a dual head now so that both side of the chain get an oil supply. You can fit a real scott oiler dual head onto this system but its £25 and i,m sure i can make the same thing from the left overs of this build.
Karl
I,m sure ive made loads of errors and left out a step or too so if you notice one p.m me and i will amend this.


 Nice one