Huddys Post build log

Man of Honour
Joined
17 Feb 2003
Posts
29,640
Location
Chelmsford
Sorry this is a post blog as I've been rather busy recently..I kept a journal and pictures but never got time to post.

Anyway, I never really liked my Xigmatek Elysium i bought last year. It's a little cheap looking and the build quality isn't that great so I decided some while back to replace it.


7b2cc022a46e006de2709b0b4d1304b3.JPG


For a while, I though about replacing it completely with a smaller factor, possibly the Betfenix Prodigy, which in my opinion is a superb looking case, but a little restrictive and sicne i already have watercooling I'd thought id stick with the larger form for now. Anyway, after some deliberation I decided to go for the NZXT 810 Switch and go for a white theme.


As part of the upgrade, I've decided to replace my XSPC Dual 750 Bay Reservoir with a separate bay res and pump. I'm also replacing the Scythe Kaze Jyuni 120mm fans with GT 1850s.

Here's my shopping list


  • NZXT Switch 810 in White
  • XSPC D5 Vario Pump & EK-D5 X-TOP CSQ Plexi Combo
  • XSPC Dual 5.25” Bay Reservoir (Alu Front)
  • 6 x Bitspower Connection 14 inch to 1611mm - Deluxe White
  • 2 x Mayhems X1 UV Blue Premixed Watercooling Fluid 1L
  • NZXT Front Panel connections cable set 30cm sleeved - White
  • XSPC HighFlex Hose 716" ID, 58" OD, 15.911.1mm, 2m, White
  • 3 x 120mm Skythe Gentle Typhoons 1850rpm for radiator


this adds to my existing system:


  • Intel Core i5-3570K 3.40GHz (Ivybridge) Socket LGA1155 Processor (77W)
  • Ggabyte Z77X-UD3H Intel Z77 (Socket 1155) DDR3 Motherboard
  • Crucial Ballistix Tactical Tracer 8GB (2x4GB) DDR3 PC3-12800C8 1600MHz Dual Channel Kit (BLTCP2G3D1608DT2TXRGCEU)
  • Gigabyte GeForce GTX 670 Windforce 3X 2048MB GDDR5 PCI-Express Graphics Card
  • EK-Supremacy - CPU Waterblock - Copper Plexi
  • Swiftech MCR320-QP-K Triple 120mm
  • Corsair HX 620W ATX2.2 Modular SLi compliant
  • Patriot Inferno 120GB 2.5" SATA-II Solid State Drive
  • Samsung Spinpoint T 500GB SATA-II
  • Zalman ZM-MFC1 Plus Black multi fan controller
  • Sony Optiarc AD-7280S 24x DVD±RW SATA ReWriter
  • Creative X-Fi Gamer Fatal1ty Pro
  • Microsoft Windows 7 - Home Premium (retail)

This is going to be a single loop for the CPU only at this stage. The 670 I have is non-reference and I'm thinking of replacing early next year anyway so seem senseless to break it down now if i'm to sell it on in a few month.


_MG_0844.jpg


1 of 6 Bitspower G1/4 - 7/18 Compression fittings.. A bit expensive but very neat :)

_MG_0848.jpg


XSPC D5 Vario Pump & EK-D5 X-TOP CSQ Plexi Combo

The chaps at OcUK fit the pump to the Plexi top do as part of their combo deal which works out a little cheaper than buying separate and saves me the bother..

_MG_0851.jpg


XSPC Bay res

_MG_0854.jpg
 
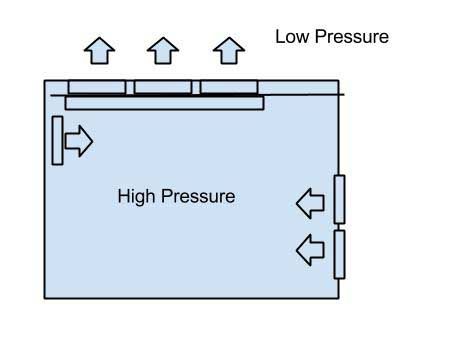
Here's the planned cooling diagram:

Opt1_zps44fd9148.jpg


I've decided to go for an exhaust option by pulling the air through the radiator underneath. The 3 scythe GTs can be placed and hidden in a neat concealed area at the top of the case. You’ll notice I've turned the rear 140mm inwards so that the radiator receives cooler air whist trying to reduce the pressure inside the case. So I have 3 fans blowing air in, and 3 fans blowing air out through the roof.. Seems logical to me.


Into the workshop then :

Side off and first look inside.. Good first impressions. Plenty of cable holes.

_MG_0864.jpg


Plenty of drive space but i won't be needing the bottom caddy so that can come out later.

_MG_0865.jpg


14cm Stock fans pre installed in the rear and the roof. The coincidentally the system could take 3 x 14cm fans and there's no mesh either so the fans have free open space to do their stuff. Bonus as I was prepared t get the drimmel out here.

_MG_0866.jpg


This is the area at the top I was mentioning so a quick "try for size " to see if the Scythe GTs can be concealed easily withing the compartment.

_MG_0868.jpg
 
Quick look at the front before i take that apart.

The front bezel does look and feel a bit cheap and plastic looking compared to the rest of the case but I'm prepared to lie with that...

_MG_0875.jpg


Ok let's take the back panel off.

Pleanty of space to hit all the cables cables later.

_MG_0874.jpg


Time to get rid of the bottom drive bay then.. Slips out easily enough.

_MG_0880.jpg


I don't like leaving my HDDs and SSD hangoing around so I'll get these in place. Note the drives are concealed round the back. What a great idea! The caddy also support SSDs without an 2.5" adopter tray. Simple but clever ideas. :)


_MG_0872.jpg


Unlike some cases that boast "tool free" the 810 really is. Drives just slip nicely in.

Can't wait for affordable high capacity SSDs

_MG_0876.jpg
 
PSU is placed at the bottom and the ATX cables are going to be fed through that hole just to the rear.

_MG_0883.jpg


Might as well get the motherboard in before I step on it. You can see where I fed the ATX cables..

_MG_0886.jpg


The Dual Bay res goes into place. XSPC have at last put gully's into the sides of their bay reservoirs which means you don't have to bend the drive bay supports in. About time!!


_MG_0889.jpg
 
Here's a side taks, I'm wanting the radiator frame white.

I've not sprayed anything since my Austin Alegro days so this'll be interesting..

Preparing the radiator, masking off the fins.

_MG_0901-001.JPG


_MG_0902-001.JPG


I have placed some old barbs to suspend the radiator in a spary box

_MG_0904-001.JPG


Applying the primer during the course of the day in small amounts then leave overnight ready for first coat of gloss white.

_MG_0907-001.JPG
 
Meanwhile.. time to clean the Ek Supremacy. I'm also going to change the jet to the 2011 plate as i've red this now ships as default and is an improvement.

_MG_0909-001.JPG


You can see the dirt in the fine fins..Time for a wash with an old tooth brush and de ionised water..

_MG_0918.JPG


All cleaned and new bitspower connections fitted

_MG_0920-001.JPG


_MG_0926.JPG
 
Looking good so far :D

How solid are the hard drive mounts, my Shinobi ones you just need to sneeze and they drop of the rails! :mad:
 
Thanks


Ok so this is where I left things last

_MG_0938.JPG


Let's get on with attaching the pump base to the Shoggy sound dampener

_MG_0929.JPG


then the pump with the Bitfenix 60 rotation and compression fitting.

_MG_0931.JPG


_MG_0932.JPG


_MG_0934.JPG
 
Ok first little problem. I wanted the pump on the bottom but there's a wacking great gap in the bottom which hosts a dual fan or rad. Although very nice, it doesn't help me.

_MG_0941.JPG


:?

Solution : A sheet of Perspex from hobby craft and as luck has it, it's a perfect fit :)

_MG_0942.JPG


I drilled through aligning fan holes to attach the Perspex plate, then two more holes for the Shoggy/Pump base.

_MG_0946.JPG


_MG_0948.JPG


I guess another benefit is to keep the air flowing inwards rather than than down to the floor.
 
Ok back the radiator.. Finally, putting the final coats but I did get a slight run on the very last coat ( i got a bit excited :p ). Anyway, I needed to let it cure for a few days before sanding down with wet n dry and applying a new coat.. Oh well.

Again sorry about the quality of the pictures..

_MG_0945.JPG


Let's get it in

_MG_0950.JPG


Not without a few problems though. The standard 3M 30mm screws aren't quite long enough to go through fan casing, the chassis and in to the radiator holes. It took me an afternoon to find someone that sells 35mm versions and over a week to deliver..

_MG_0954.JPG


Still they arrived in the end.
 
After a flush through.. The radiator is fitted on the underside of the roof fans..

_MG_0958.JPG


Here's the top fan enclosure

_MG_0955.JPG


_MG_0956.JPG


_MG_0957.JPG


Wiring the fan controller is always a pain the ****.

_MG_0949.JPG
 
Is the clear perspex going to be your final fix or are you going to swap ot out for a white piece?

I had the same problem as you regarding the radiator screws, it drives me wild that they cant add a few mm onto them, i managed to source some localy but they are silver :mad:
 
I quite like it to be honest. I did contact a few companies that supply either a 3mm or 5mm think white perspex. but they were around £3.95 plus £20 shipping.. No ta. :D
 
I love connecting the tubing.. Quite satisfying when it all comes together.

_MG_0965.JPG


_MG_0966.JPG


nearly there

_MG_0968.JPG


fill her up please :)

_MG_0970.JPG


Here the loop is on a 24 hour leak test. I've attaché the pump to a spare PSU and hot wired the ATX connectors.

_MG_0971.JPG


I'd love to cover the black motherboard tray holes with some white perspex.. A little project for later perhaps.
 
Looking good!

More cables to sleeve? Thinking CPU 12v connectors being quite visible with no fans above! (I have the same issue as had to mount my top fans externally) :)
 
Back
Top Bottom