

Man on the street Mod
Optical drive to switch panel mod
Let me introduce myself. I'm just your average chap, no engineering skills, no fancy tools or behind the scenes guys helping out, but I'm willing to have a go and learn new skills and enjoy myself creating something at the same time.
My mods are intended as very basic and to show what you, the man on the street, can do with a few basic tools and a bit of patience and perseverance. I aim to show that while undoubtedly truly great results can be achieved with an engineering degree and access to high end design and fabrication equipment and a paint shop, it's also possible for your average chap (or lady of course) to make something bespoke and professional looking themselves using nothing but basic tools and techniques. I am not claiming to be unique here, neither am I claiming credit for the ideas shown as many of these will have been done before by others. My aim is just to show these ideas and techniques in the hope that it inspires others to have a go and get modding.
First up is a modification of an old CD ROM drive, turning it from a knackered old piece of prehistoric kit into a multi function switch box that can be installed into any 5 1/4" drive bay.
First thing you're going to need then in any old optical drive, If you haven't got an old one lying around you can usually pick them up at boot sales for a few quid or so. Maybe have a word with your friendly neighbourhood PC sales and repair shop. they may have some ready for the skip and you'll be saving them the trouble
You're also going to need a either a solid plastic optical drive bay cover or a small piece of steel or aluminium to make the front surface of the switch unit. It's much easier to do this mod with the drive bay cover, but I happen to think it looks better with a piece of metal as the mount for the switches. In case you're undecided I'll be covering both methods.
We're obviously going to need some tools as well, as we can't do this with our teeth. If your living at home, odds are your old man has some of this around the place. I'm also fairly sure he'd be delighted to help out in a "Father and son bonding session" way. If you no longer have the benefit of the Bank of Mum and Dad then you may well have these around, otherwise it's a trip to the hardware store for you. Car boot sales are also great for picking up new and second hand tools very cheaply
However you get your mits on them you're going to need the following as a minimum:
An electric drill
A drill bit that corresponds to the size of the switch you're going to use (probably quite a large bit)
A Hacksaw or junior hacksaw. with both flat and fret blades
A straight edge (preferably a steel ruler)
An adhesive such as "liquid metal" or "No more nails"
Selection of screw-drivers, flat and Philips head in varying sizes (these will stand you in good stead anyway)
if you're doing the metal front variant then you will also need:
Some metal files D, rat tail and flat medium size
A square (for making sure your angles are 90 degrees
You're also going to need some way of holding the item you're cutting or drilling. Obviously a vice is best, but if you don't have one and don't fancy splashing out then a selection of G-Clamps will do.
Some bits of wood about 20cm long and 2.5cm square (measurements not crucial, you're going to be using them to help clamp things etc.
You are of course going to need your switches. Which Switches you go for depends on a few things
What you want to control with them,
What you want them to look like,
How much you want to spend.
And most of all which ones you WANT.
The best bit of this Mod is you get o choose exactly which switches you have and how many. I'm a bit of a fan of the Military style "missile command" toggle switch. this style of switch is also popular amongst the auto modding community as a means of engaging their NOS. Looking for something with a bit more stealth? You can't do much better than a Vandal switch. Available in a variety of finishes, styles and lighting options. Want something nice but maybe a bit cheaper? you'll be pleased to know the internet positively heaves with websites selling all manner of cheap and stylish switches.
Stage 1 Dismantling the drive.
You've got your switches, you've got your tools and you're sorted with everything else. Time to crack on. First things first, we need to take the drive apart, strip the guts out of it. We're not bothered about the internals, they're going in the bin, but we don't want to bend the case in any way. Unscrew all the screws on the base, usually 4 and ease the smaller base section away from the larger upper section.
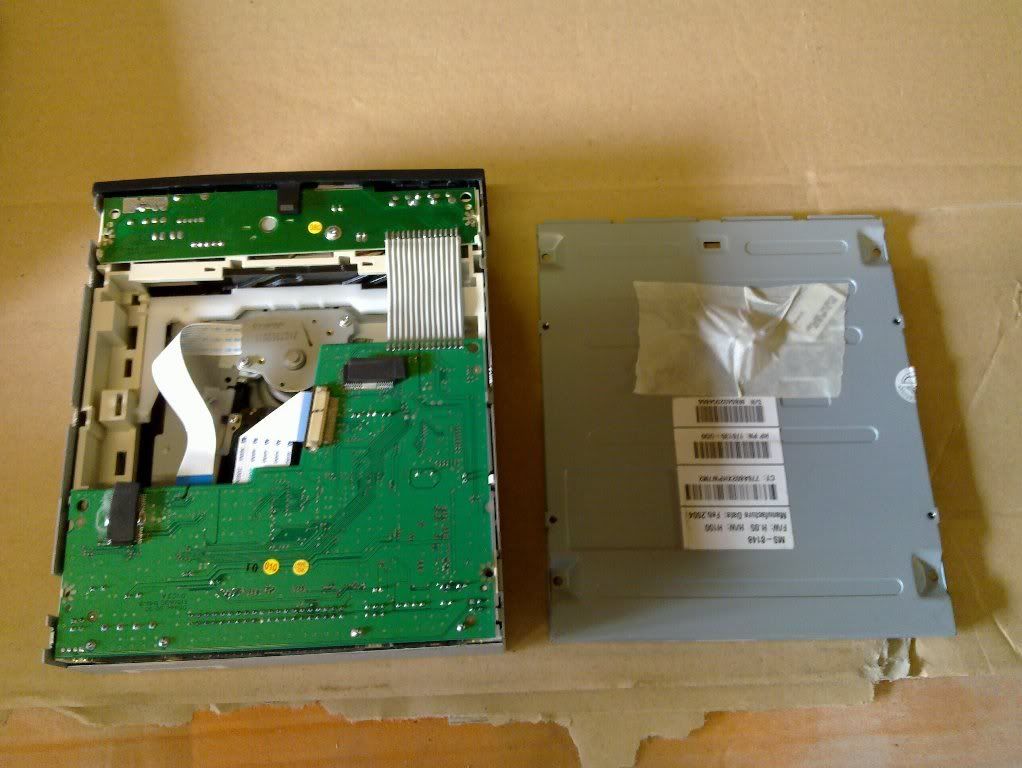
In my experience these drives all vary a bit inside with regards to how the mechanism is held in place. A bit of prying and poking around inside should have you work out how to remove it.
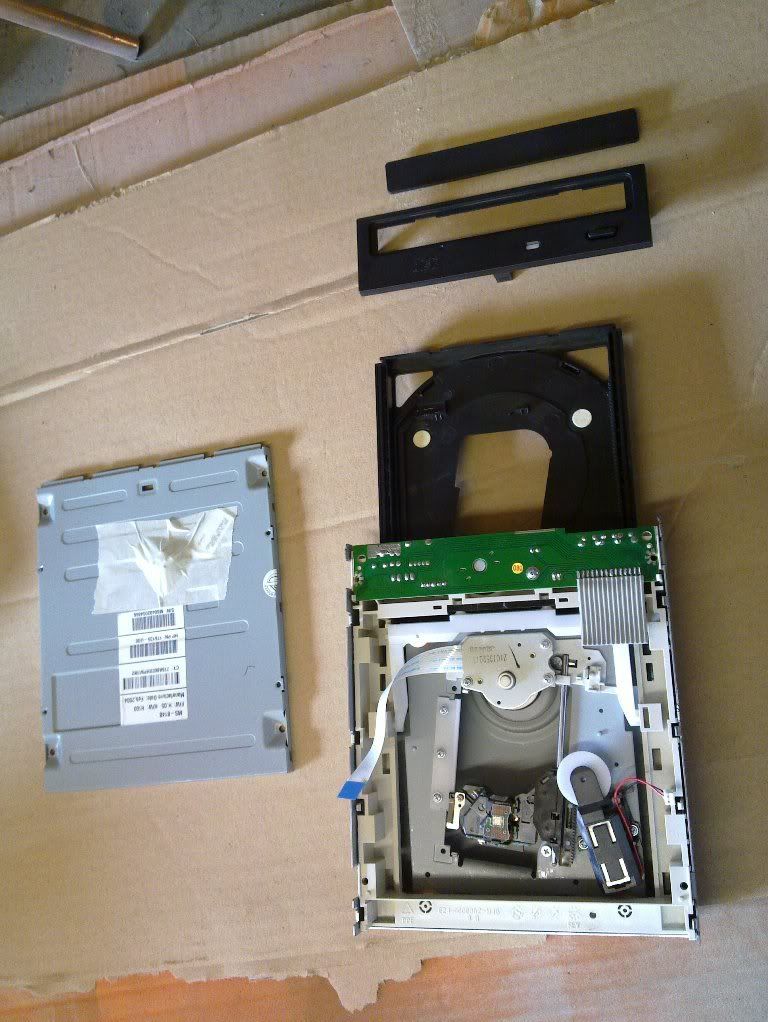

retain the two case sections and the front facia. All the rest can go in the bin.
Stage 2 making the front panel
I'm going to cover the method that uses the metal plate first as although not difficult it's the harder of the two, so if you can do this, and I'm sure you can, you can do the plastic drive bay mod easily. if this method seems a bit too much or your not feeling brave enough just yet then carry on reading and you'll get to the bit where I use a plastic drive bay cover.
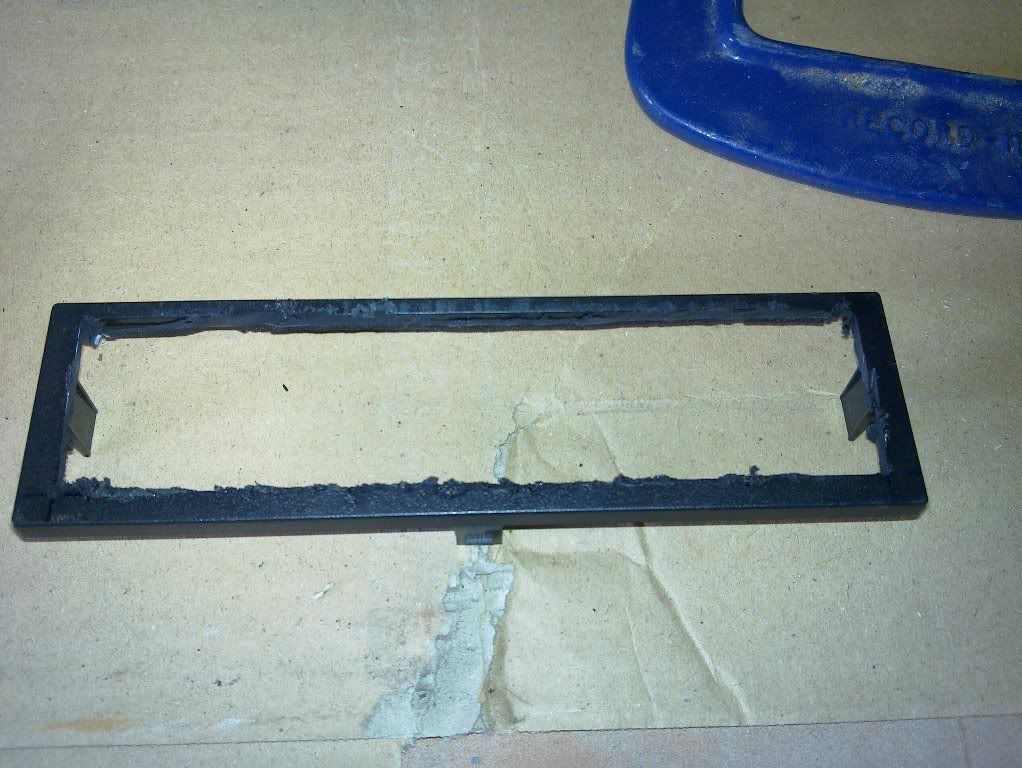
Putting the case elements to one side take the plastic facia and using a hacksaw cut out the centre leaving a small margin around the outside. What you're left with should look like the image below.
You now need to find some material for the new front of the switch box. I've used a few materials over the years I've been doing this mod and have found that either a thin piece of steel or a thicker piece of aluminium work very well. whatever you choose it needs to be fairly rigid as it will be used to mount the switches so having it flex every time you push a button or flick a switch would be a tad annoying. You can get small sheets of steel from your local hardware store for about £5, but you may well have something knocking about the place. You only need a piece about the same size as the front of a drive bay 147mmx41mm to be exact (at least that's the measurement I use, but do please measure your own)
Having decided how many switches you want to use you need to ensure they are spaced evenly along the panel front and all at the same level. Well all at the same level is the easy one, measure the height of you drive bay cover, divide by 2 mark both sides of the cover, check your measurements again and if correct draw a line between them. You now have the centre line for your switches. Time for a bit of basic maths i'm afraid. Essentially what you need to do is work out the spacing for the centre point of each switch leaving a gap in between each switch which is big enough so it doesn't look to crowded. In my experience 4 or 5 switches max. Allowing a margin at either side of the panel, measure the length of your drive bay and divide by the number of switches you have and that will give you the spacing. I usually draw mine out on a bit of paper first to check I've got it right.
Mark the centre points of all your holes and then secure the panel ready for drilling. The drill bit you need will be determined by the diameter of the barrel of the switch you are using, Take tour time with the drilling and remember to wear eye protection at all times. It's a good idea when drilling to place an inch thick piece of wood under the item you are drilling. This gives a better finish to the hole and also reduces the risk of you drilling into something you didn't mean to.
Ok you've done all your measuring you're 100% sure everything is spot on and you're ready to drill. Not so fast. Time for a break, put the kettle on, have a brew and chill. When you're ready, come back and have a final check of your measurements before you carry on. You'll be surprised how often the final check reveals something really obvious you missed.
To be continued.....
Optical drive to switch panel mod
Let me introduce myself. I'm just your average chap, no engineering skills, no fancy tools or behind the scenes guys helping out, but I'm willing to have a go and learn new skills and enjoy myself creating something at the same time.
My mods are intended as very basic and to show what you, the man on the street, can do with a few basic tools and a bit of patience and perseverance. I aim to show that while undoubtedly truly great results can be achieved with an engineering degree and access to high end design and fabrication equipment and a paint shop, it's also possible for your average chap (or lady of course) to make something bespoke and professional looking themselves using nothing but basic tools and techniques. I am not claiming to be unique here, neither am I claiming credit for the ideas shown as many of these will have been done before by others. My aim is just to show these ideas and techniques in the hope that it inspires others to have a go and get modding.
First up is a modification of an old CD ROM drive, turning it from a knackered old piece of prehistoric kit into a multi function switch box that can be installed into any 5 1/4" drive bay.
First thing you're going to need then in any old optical drive, If you haven't got an old one lying around you can usually pick them up at boot sales for a few quid or so. Maybe have a word with your friendly neighbourhood PC sales and repair shop. they may have some ready for the skip and you'll be saving them the trouble
You're also going to need a either a solid plastic optical drive bay cover or a small piece of steel or aluminium to make the front surface of the switch unit. It's much easier to do this mod with the drive bay cover, but I happen to think it looks better with a piece of metal as the mount for the switches. In case you're undecided I'll be covering both methods.
We're obviously going to need some tools as well, as we can't do this with our teeth. If your living at home, odds are your old man has some of this around the place. I'm also fairly sure he'd be delighted to help out in a "Father and son bonding session" way. If you no longer have the benefit of the Bank of Mum and Dad then you may well have these around, otherwise it's a trip to the hardware store for you. Car boot sales are also great for picking up new and second hand tools very cheaply
However you get your mits on them you're going to need the following as a minimum:
An electric drill
A drill bit that corresponds to the size of the switch you're going to use (probably quite a large bit)
A Hacksaw or junior hacksaw. with both flat and fret blades
A straight edge (preferably a steel ruler)
An adhesive such as "liquid metal" or "No more nails"
Selection of screw-drivers, flat and Philips head in varying sizes (these will stand you in good stead anyway)
if you're doing the metal front variant then you will also need:
Some metal files D, rat tail and flat medium size
A square (for making sure your angles are 90 degrees
You're also going to need some way of holding the item you're cutting or drilling. Obviously a vice is best, but if you don't have one and don't fancy splashing out then a selection of G-Clamps will do.
Some bits of wood about 20cm long and 2.5cm square (measurements not crucial, you're going to be using them to help clamp things etc.
You are of course going to need your switches. Which Switches you go for depends on a few things
What you want to control with them,
What you want them to look like,
How much you want to spend.
And most of all which ones you WANT.
The best bit of this Mod is you get o choose exactly which switches you have and how many. I'm a bit of a fan of the Military style "missile command" toggle switch. this style of switch is also popular amongst the auto modding community as a means of engaging their NOS. Looking for something with a bit more stealth? You can't do much better than a Vandal switch. Available in a variety of finishes, styles and lighting options. Want something nice but maybe a bit cheaper? you'll be pleased to know the internet positively heaves with websites selling all manner of cheap and stylish switches.
Stage 1 Dismantling the drive.
You've got your switches, you've got your tools and you're sorted with everything else. Time to crack on. First things first, we need to take the drive apart, strip the guts out of it. We're not bothered about the internals, they're going in the bin, but we don't want to bend the case in any way. Unscrew all the screws on the base, usually 4 and ease the smaller base section away from the larger upper section.
In my experience these drives all vary a bit inside with regards to how the mechanism is held in place. A bit of prying and poking around inside should have you work out how to remove it.
retain the two case sections and the front facia. All the rest can go in the bin.
Stage 2 making the front panel
I'm going to cover the method that uses the metal plate first as although not difficult it's the harder of the two, so if you can do this, and I'm sure you can, you can do the plastic drive bay mod easily. if this method seems a bit too much or your not feeling brave enough just yet then carry on reading and you'll get to the bit where I use a plastic drive bay cover.
Putting the case elements to one side take the plastic facia and using a hacksaw cut out the centre leaving a small margin around the outside. What you're left with should look like the image below.
You now need to find some material for the new front of the switch box. I've used a few materials over the years I've been doing this mod and have found that either a thin piece of steel or a thicker piece of aluminium work very well. whatever you choose it needs to be fairly rigid as it will be used to mount the switches so having it flex every time you push a button or flick a switch would be a tad annoying. You can get small sheets of steel from your local hardware store for about £5, but you may well have something knocking about the place. You only need a piece about the same size as the front of a drive bay 147mmx41mm to be exact (at least that's the measurement I use, but do please measure your own)
Having decided how many switches you want to use you need to ensure they are spaced evenly along the panel front and all at the same level. Well all at the same level is the easy one, measure the height of you drive bay cover, divide by 2 mark both sides of the cover, check your measurements again and if correct draw a line between them. You now have the centre line for your switches. Time for a bit of basic maths i'm afraid. Essentially what you need to do is work out the spacing for the centre point of each switch leaving a gap in between each switch which is big enough so it doesn't look to crowded. In my experience 4 or 5 switches max. Allowing a margin at either side of the panel, measure the length of your drive bay and divide by the number of switches you have and that will give you the spacing. I usually draw mine out on a bit of paper first to check I've got it right.
Mark the centre points of all your holes and then secure the panel ready for drilling. The drill bit you need will be determined by the diameter of the barrel of the switch you are using, Take tour time with the drilling and remember to wear eye protection at all times. It's a good idea when drilling to place an inch thick piece of wood under the item you are drilling. This gives a better finish to the hole and also reduces the risk of you drilling into something you didn't mean to.
Ok you've done all your measuring you're 100% sure everything is spot on and you're ready to drill. Not so fast. Time for a break, put the kettle on, have a brew and chill. When you're ready, come back and have a final check of your measurements before you carry on. You'll be surprised how often the final check reveals something really obvious you missed.
To be continued.....
Last edited:
") !
!