Noctua NH-U12F installation help

Soldato
Joined
30 Aug 2006
Posts
8,381
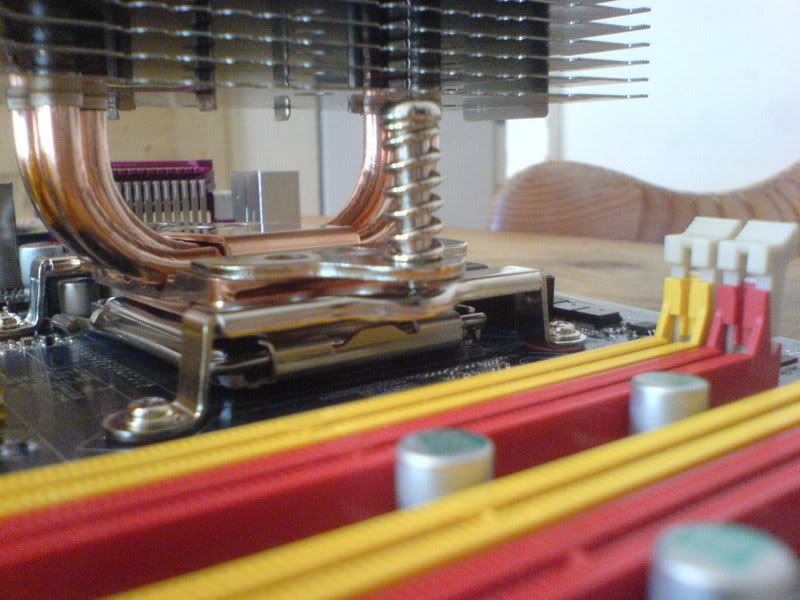
Im trying to attach my heatsink to the mobo and I have screwed in the backplate and the mounting bracket as well as the fastening brackets. When I try to screw the fastening brackets to the mounting brackets the screw & spring doesnt seem long enough to get through the fastening bracket to the mounting bracket, theres about a 3mm clearance between them. The screw will get through without the spring attached but that won't secure the heatsink.

What am I doing wrong?
 
Last edited:
Heres some pictures of what I mean

DSC00515.jpg


DSC00514.jpg


DSC00513.jpg
 
Hi there mate, was trying to find some images of mine of when I did the review/installation but can't find. I will link you to this it may assist you:

http://www.modders-inc.com/reviews-print-118.html

Once you have the positioning and the clearances checked out, you can secure the cooler to the board with the two stepped screws. You can not apply to much pressure here, the stepped screws will stop turning once the shoulder of the screw hits the shoulder of the backplate.

NoctuaNHU12F-16.jpg


Just looking at your images... There doesnt appear to be a screw hole for the screws to secure into on your motherboard? I think thats a different socket type though.

Found an additional link to assist you - http://www.cpu3d.com/index.php?option=com_content&task=view&id=1014&Itemid=2&limit=1 This one seems better.
 
Last edited:
Thats the installation method for the AMD socket from what I can see, and Im trying to install it into a LGA775 socket which uses a different fastening bracket.
 
Have a quick look over the images on those reviews, it was quite tricky to install. You might want someone to assist you to make it easier, get them to hold in position whilst you screw down into the springs takes moderate force.
 
Hmm looking at the other link you posted that guy installing his there doesnt have any clearance between his mounting and fastening brackets whereas I have a gap. The spring is stopping the screw reaching the mounting bracket through the fastening bracket.
 
weringo said:
Well I managed it in the end but with a lot of force, thanks for your help.
Glad to hear you're sorted now, sometimes it takes a bit more force than you would usually think to need. Least its secure ;)
 
I've got the same problem here, a big gap as shown in weringo's photos.

How much force are we talking about there? When I try moderate force, all I get is the CPU making cracking noises! :eek: But still can't get the spring compressed enough to let it reach the screwthread.

EDIT: Think I've got it now, it's more technique than force.
 
Last edited:
I had a hard time trying to install the same cooler on my q6600 - getting the 2nd of the sprung screws in was an arse - had two mates pushing down on the heatsink in order to allow me to screw the bloomin thing down !!

Idles at 35-40 now though so not bad although I'll re-seat it sometime as the amount of movement while seating the heatsink must have led to some air pockets forming :/

That second screw cetainly was an arse! lol

The amount of movement I got, probably wiped all the thermal compound off. There should be some warning in the otherwise superb instructions!

I'll see what temps I get from my Q6600, see if it needs a re-seat.
 
When you put the first screw in only do one turn then put the second screw in and then tighten them both one bit at a time until you can't tighten no more ;)
 
My case has the mobo around the other way to most cases so the heatsink is near the bottom end above the psu and i've got it mounted vertically - might try it horizontally - although with it mounted the way it is the 120mm intake on the back of my case blows nicely over all the fins ... horizontally would block that airflow :/ ... hmmm
 
When you put the first screw in only do one turn then put the second screw in and then tighten them both one bit at a time until you can't tighten no more ;)

I only had the first screw in 1/2 a turn, it took some force to squash that spring down far enough so that the second screw would make contact. Once both screws were in, I did what you decribed. :)
 
The screws were plenty long for my AM2 but short for my 775, I had simply to press down on them to get the threads started, your only pushing against the springs and try not move the Heatsink about and mess up your new Tim application.
 
The screws were plenty long for my AM2 but short for my 775, I had simply to press down on them to get the threads started, your only pushing against the springs and try not move the Heatsink about and mess up your new Tim application.

Indeed. I also noticed that the AM2 screws were longer, I think Noctua should extend the screw-thread length on the LGA775 kit, it would make installation a lot easier.
 
My case has the mobo around the other way to most cases so the heatsink is near the bottom end above the psu and i've got it mounted vertically - might try it horizontally - although with it mounted the way it is the 120mm intake on the back of my case blows nicely over all the fins ... horizontally would block that airflow :/ ... hmmm
I'm installing into an Antec P182 case, I couldn't decide whether to orientate the heatsink to blow towards the back or the top. I went for blow towards the back, I'll see how it goes. I'm working this week, not had enough time to complete my build yet :(
 
D'uh.

This "looked" one of the better thought out coolers as well.
I HATED the amount of pressure needed to clip down Socket A coolers, and the Noctua looks like a trip down memory lane :(
 
Back
Top Bottom