

*** Please note this is my first ever review of something like this and my knowledge isn't great***
NZXT Sentry LXE Fan controller.
Ok. So I got this about a month ago and decided that I'd live with it for a few weeks before I made my mind up. I apologise for these images, in my excitement I didn't take any of my own so I've 'borrowed' these from Google. All the images are clickable for larger versions
Firstly I will say that yes it's an expensive choice for a fan controller however there isn't on similar on the market currently.
Unboxing
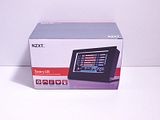
The box is fairly big compared to some fan controller boxes I've seen on other reviews.

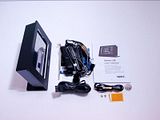
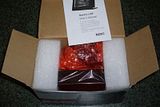
Opening the box you are presented with a well packaged and protected product.
NZXT list the specifications as:
Fan Adjustment Range: 3.7V to 12V
Fan Channel: 5
Max watt per channel: 10W
Temperature Module Channel: 5
Temperature Range: 0 ~ 99℃ / 32 ~ 199.9℉
Measurement Frequency: Every 2 Seconds
Temperature Alarm Range: 30℃ to 90℃
Screen Size: 5.27 inches
External Cable Length: 6.8 feet
Now I will point out at this stage that the front box has a different Max watt figure printed on it, it states just 8W whilst the back states the above 10W. For me this isn't really an issue as I am only using a single fan per channel.
Installation
Installation is pretty simple as is the instruction manual supplied which is a double side A3 sheet folded into A5, featuring installation/operation instructions in 7 languages.
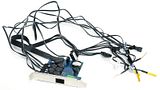
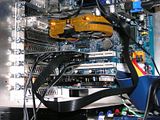
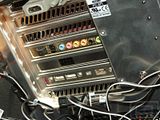
The internal control board features 5 x 3-pin fan connector cables, 5 temp probe connectors and Molex power connector. This board fits into an expansion slot in the back of the case but doesn't need to be connected to the mainboard directly.
Also there is a battery slot for a CMOS style battery (supplied) I assume this is for keeping your settings whilst the system is powered off. There is no mention of the battery in the instructions beyond fitting and identification.
Once you've fitted the internal board, plugged in your fan & placed your temp probes that's it for the internal installation.
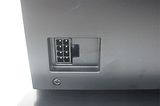
The external display plugs into the back of the internal board via a 8-pin connector. Now this cable has two connectors, one at either end but one differs from the other in the fact that the end that fits into the display has a retaining clip, the board end does not, however it's a stiff fit.
The display itself takes power from the internal board so there's no need for an external power source.
Operation
Once you've installed the internal board and plugged in the external display it's time to power on.
Now initially when powered up the fan controller pushes 12v to ALL fans. This is for about 40ish seconds. My assumption is that it's to check each fan's max RPM in as they all settle down.
NOTE: This happens at every system power up including resuming from standby/hibernation modes. Again I can only surmise that this is to check the fan's max RPM in case you've made a change.
Initially you will have to set things like the time and date but this is fairly straight forward, just touch the corresponding item and using +/-
In Auto Mode to set the temp alarms you push the number of the corresponding fan (1-5) and use the +/-
In Manual mode to set the fan speeds, again you push the corresponding fan (1-5) but this time twice then the RPM display flashes and you use +/- However the selection is percentage based in steps of 10%. The range is 40% > 100%. Below 40% the controller turns the fan off.
This for me doesn't correlate to the specifications claim of having an adjustment range of 3.7v -12v
12v/10= 1.2v
1.2v x 4 = 4.8v
A clear 1.1v difference.
When changing the RPM in manual mode the fans will respond to increases almost immediately. Decreases however take about 10-15 seconds to take effect and reduce gradually

The display shows all 5 temps & RPM speeds permanently in a list type format. There is a progress style bar divided in to 10 blocks, each block denoting 10% of 12v.
Also for each fan there is an animated fan graphic to show fan operation. If a fan stops spinning the fan graphic stops spinning and begins to flash. If enabled the alarm will also activate.
The screen can be turned off without disturbing the fan controller operation. To do this you just hold the power icon until the display turns off. To re-enable you just touch anywhere on screen. It's a nice feature but the display isn't overly bright nor are the animations disturbing.
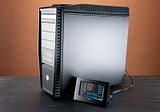
The display itself is quite sharp, it's clear and as stated it's not overly bright. There are 3 colours in use, White predominately with blue and orange highlights. It's readable from most angles other than from below but being a desktop display I wouldn't have seen the point. The construction is solid using a mixture of aluminium and plastic.
So far it's done everything a fan controller should do. I've mostly had mine on Auto mode as that's why I bought a micro-processor controller over a manual. However I have used manual to push the fans to minimum when I've been using my PC to watch a movie as my PC is also my DVD player.
One feature I will mention that I love about manual mode is that if a temp goes above what I set in Auto mode, the fan controller despite being in manual will take control of the corresponding fan and push the fan to max speed. So even in manual the controller is keeping an eye out.
Ok so I've waffled on a bit about it's good bits. Now for the bits that aren't so good.
1. The fan connectors - It would have been nice if I could have connected my fan direct to the control board instead of having faf around routing the cables everywhere to keep them tidy. 3 of the fans I have on the controller would have easily and tidily reached without.
2. The battery - Minor niggle but I would have liked to have seen even a breif description of what it's for. I know it's not hard to work out but as most controllers don't have them it'd have been nice
3. Time and date – The time just has AM/PM mode, there's no option for 24hr. With the date it's in US format (M/D/Y)
4. NZXT need to get the info right on the specifications, even the box has conflicting info which is fairly amateur.
Other than those 4 niggles it's still a fantastic fan controller. It doesn't need a 5.25 inch bay for mounting, opting for a desktop style display so you don't have to do chair gymnastics to read the screen
NZXT Sentry LXE Fan controller.
Ok. So I got this about a month ago and decided that I'd live with it for a few weeks before I made my mind up. I apologise for these images, in my excitement I didn't take any of my own so I've 'borrowed' these from Google. All the images are clickable for larger versions
Firstly I will say that yes it's an expensive choice for a fan controller however there isn't on similar on the market currently.
Unboxing
The box is fairly big compared to some fan controller boxes I've seen on other reviews.


Opening the box you are presented with a well packaged and protected product.


NZXT list the specifications as:
Fan Adjustment Range: 3.7V to 12V
Fan Channel: 5
Max watt per channel: 10W
Temperature Module Channel: 5
Temperature Range: 0 ~ 99℃ / 32 ~ 199.9℉
Measurement Frequency: Every 2 Seconds
Temperature Alarm Range: 30℃ to 90℃
Screen Size: 5.27 inches
External Cable Length: 6.8 feet
Now I will point out at this stage that the front box has a different Max watt figure printed on it, it states just 8W whilst the back states the above 10W. For me this isn't really an issue as I am only using a single fan per channel.
Installation
Installation is pretty simple as is the instruction manual supplied which is a double side A3 sheet folded into A5, featuring installation/operation instructions in 7 languages.
The internal control board features 5 x 3-pin fan connector cables, 5 temp probe connectors and Molex power connector. This board fits into an expansion slot in the back of the case but doesn't need to be connected to the mainboard directly.
Also there is a battery slot for a CMOS style battery (supplied) I assume this is for keeping your settings whilst the system is powered off. There is no mention of the battery in the instructions beyond fitting and identification.

Once you've fitted the internal board, plugged in your fan & placed your temp probes that's it for the internal installation.

The external display plugs into the back of the internal board via a 8-pin connector. Now this cable has two connectors, one at either end but one differs from the other in the fact that the end that fits into the display has a retaining clip, the board end does not, however it's a stiff fit.
The display itself takes power from the internal board so there's no need for an external power source.


Operation
Once you've installed the internal board and plugged in the external display it's time to power on.
Now initially when powered up the fan controller pushes 12v to ALL fans. This is for about 40ish seconds. My assumption is that it's to check each fan's max RPM in as they all settle down.
NOTE: This happens at every system power up including resuming from standby/hibernation modes. Again I can only surmise that this is to check the fan's max RPM in case you've made a change.
Initially you will have to set things like the time and date but this is fairly straight forward, just touch the corresponding item and using +/-
In Auto Mode to set the temp alarms you push the number of the corresponding fan (1-5) and use the +/-
In Manual mode to set the fan speeds, again you push the corresponding fan (1-5) but this time twice then the RPM display flashes and you use +/- However the selection is percentage based in steps of 10%. The range is 40% > 100%. Below 40% the controller turns the fan off.
This for me doesn't correlate to the specifications claim of having an adjustment range of 3.7v -12v
12v/10= 1.2v
1.2v x 4 = 4.8v
A clear 1.1v difference.
When changing the RPM in manual mode the fans will respond to increases almost immediately. Decreases however take about 10-15 seconds to take effect and reduce gradually

The display shows all 5 temps & RPM speeds permanently in a list type format. There is a progress style bar divided in to 10 blocks, each block denoting 10% of 12v.
Also for each fan there is an animated fan graphic to show fan operation. If a fan stops spinning the fan graphic stops spinning and begins to flash. If enabled the alarm will also activate.
The screen can be turned off without disturbing the fan controller operation. To do this you just hold the power icon until the display turns off. To re-enable you just touch anywhere on screen. It's a nice feature but the display isn't overly bright nor are the animations disturbing.
The display itself is quite sharp, it's clear and as stated it's not overly bright. There are 3 colours in use, White predominately with blue and orange highlights. It's readable from most angles other than from below but being a desktop display I wouldn't have seen the point. The construction is solid using a mixture of aluminium and plastic.
So far it's done everything a fan controller should do. I've mostly had mine on Auto mode as that's why I bought a micro-processor controller over a manual. However I have used manual to push the fans to minimum when I've been using my PC to watch a movie as my PC is also my DVD player.
One feature I will mention that I love about manual mode is that if a temp goes above what I set in Auto mode, the fan controller despite being in manual will take control of the corresponding fan and push the fan to max speed. So even in manual the controller is keeping an eye out.
Ok so I've waffled on a bit about it's good bits. Now for the bits that aren't so good.
1. The fan connectors - It would have been nice if I could have connected my fan direct to the control board instead of having faf around routing the cables everywhere to keep them tidy. 3 of the fans I have on the controller would have easily and tidily reached without.
2. The battery - Minor niggle but I would have liked to have seen even a breif description of what it's for. I know it's not hard to work out but as most controllers don't have them it'd have been nice
3. Time and date – The time just has AM/PM mode, there's no option for 24hr. With the date it's in US format (M/D/Y)
4. NZXT need to get the info right on the specifications, even the box has conflicting info which is fairly amateur.
Other than those 4 niggles it's still a fantastic fan controller. It doesn't need a 5.25 inch bay for mounting, opting for a desktop style display so you don't have to do chair gymnastics to read the screen

Last edited:
")