Re-Pointing Brickwork

Soldato
Joined
18 Oct 2002
Posts
8,565
Location
Hereford
I started here in getting some advice and opinions: https://forums.overclockers.co.uk/threads/exterior-wall-maintenance-advice.18954815/

Which has lead to me teaching myself how to re-point brickwork. I've read a bunch online and looked at so many YouTube videos, it felt good this weekend to actually make a start. So thought it could be cool to document what I've done, maybe a little of the why, but also the costs involved.

Stage 1 - stripping back/repairing water damage

Tools (so far) - I took advantage of local Toolstation for the first stuff as couldn't find a Plugging chisel elsewhere. Then got more supplies from B&Q as they have/had vouchers £10 off a £50 spend and ease of getting stuff on a sunday/click & collect etc:
Plugging Chisel - £8 Toolstation
1kg club hammer - £9 Toolstation
Trowel set - £15 B&Q
Wire brush set for drill - £2.66 & £2 Toolstation
Safety goggles - £6 Toolstation
Hand wire brushes - £4 Toolstation
Mortar gun - £13.26 B&Q
Blue circle mastercrete cement 25kg - £5.54 B&Q
4x Tarmac builders sand Large bag (approx 23kg) - £8.12
Various other things like measuring jugs, buckets and scrubbing brushes (actually got from B&Q for ease).

Method / reasoning / what I'm doing
The wall I've started with is the rear wall (with a door) of the garage which faces south. The paint peeling in places was the worst of the property, it's exposed to more wind and rain so the water damage/ingress is the worst point. Also huge benefit for me is it's hidden from view so I can practice and figure out what I'm doing, while getting the skills required to do a tidier job of the rest of the house. The property built in the 70's during a brick shortage, so half of it is 'builders bricks' and painted white. This is the area I'm working on. The upper brickwork is in a better condition and will not need any attention - so I have no danger of working at height while doing this.

Resources:
Pics to come shortly along with weekend #1 of plugging work
 
if you have a lot to point a 4" angle grinder for the horizontal joints saves a lot of the effort/work needed
vertical joints are a bit trickier so best use a pointing chisel :)
I considered it but had heard you can easily damage bricks with them. Didn't have much to do so got the pointing chisel figuring I'd do a tidier job - not convinced I did but that's another story...

Also don't have a grinder (have considered getting a grinder for a while) but it didn't happen this time... One of the main things I was looking at was stripping the multiple layers of old paint from the brickwork before repainting to get a good finish avoiding any future flaking. A grinder/wire brush type setup would've been best for that... Decided against it as the brickwork isn't great anyway and lots of things online saying you generally end up doing more damage than good to the brick surfaces. Certainly the rest of the house looks better than where I've been working, plus the brickworks being 'builder bricks' means they're not very tidy compared to the 1st floor - no point exposing them, so therefore no need to totally strip paint from them. Also came to the conclusion that a print stripper would be the best way, before then a grinder/wire brush combo to finish up/remove semi-loose. But again, do more damage to the bricks than required - as not exposing them, so don't need them 'perfect'.

May still get a grinder, but more with the aim of roughing up the paint surfaces and removing the rough/loose before repainting. Have wire brushes for my battery drill I'll use first and see how I get on. It's an old cheap/budget Dewalt which I killed a battery of a while ago - I'm not expecting it to survive so will replace it as needed - aiming to go the combo route of a drill/grinder set and then standard type batteries which cross between. Dewalt/Makita/etc

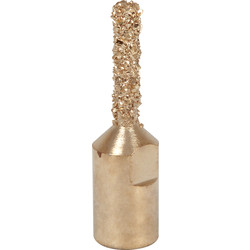
Can also get a small carbide tool that attaches to the grinder that can sink in to narrow places
This was mentioned in the other thread, quite an impressive tool (+ there are others), but well over my price bracket. Might be possible to hire one and you would get quite a consistent finish over a large area with one.


It’s a little bit less messy than a stone cutting disk but takes slightly longer , if the mortar is very tough it can be difficult to cut , my mortar was like dry soil so it was easy and I didn’t cause huge dust clouds so my neighbours didn’t complain

Re plugging chisels , ok for very small jobs (1 or 2 joints) but you’d be there forever raking out if you have a whole wall
Great advice and pointers... I'd already been dampening the wall and it worked well. Have also continued to daily/twice daily mist the wall with water after I did the mortaring on Monday - also semi-covered it and fully shaded to protect it from as much of the crazy sun this week as possible - only uncovered it last night. It looks good! Hopefully I've done well protecting it so it cures well... Although my mix came out slightly watery (would kinda also stick to the trowel inverted but not as good as I'd seen), while also quite sandy. It seems to have dried well and feels pretty hard - did a 4 parts sand to 1 part cement (Blue circle mastercrete) mix, but without plasticiser. I did get a mortar gun, but I didn't end up using it, will try and return to B&Q.
 
Rear wall before I started:
vh0LSXW.jpg
Have not done anything this side yet:
w3ob7Xh.jpg

Day1:
yXyp5oe.jpg

After 5 hours of work:
IeOHcxk.jpg

Not sure why, but didn't take any pictures of the plugging. It was a hot afternoon so I just cracked on. Tunes on and gradually worked my way along. I found the bricks being quite poor that the corners and edges of them would come away as I chipped the mortar out. They're hard red bricks, so I guess just weaker on the surface. Also didn't help whoever built the wall some of the 'perps' (vertical bits - the flat bit is the 'bed') where almost narrower than my plugging chisel, yet further along some of them almost triple the width. Very sloppy bricklaying! The beds all fairly even with only a couple of tighter bits.

The technique I used I found it easier to do the beds first - just easier to get in a line and keep plugging away. Generally at a depth from 1.5 - 3cm depending how it came away. Several points the mortar would disappear into a cavity behind - almost like the bricks had a concave area, or the mortar was not across the whole brick surface. These areas I put a bit of a mark above them so when it came to repoint I put a bunch more mortar in to fill it. I found when plugging to 'dink' the surface of the mortar first to almost fracture the layers of paint, then when I plugged it came away in smaller bits rather than massive lumps coming out (as found they generally damaged the brick edges then too).
 
Day 2:

While plugging away I could see the bottom 'lip' thing moving and generally coming away. So I pulled it off. The plan has always been to either remove, or repair this and refit it. I don't even know what it's called and have drawn a bit of a blank finding out, finding a replacement, or even really knowing what it's for. I'm inclined to think what I've seen online about it's like a 'run off' for rainwater and/or splashback from rain on the patio slabs to run off away from the wall base/foundations.

I'll continue in my other thread about this - as want to just do the repointing work in here - why I did a separate thread for it!

GzooLmP.jpg hN46Tg5.jpg

As I investigated the looseness of the render below this plinth, I found air cavities and the render is actually mostly a thin 'rubbery' bitumen (paint?) on there had lots of splits/gaps in it. The water has obviously got behind it so I need to strip this off and repair behind, cover again with some kinda render (I guess) to protect the brickwork. The surface of a brick there came off (a 'spalled' brick) and needs replacing. Have another at the doorway where the corner has come away... Going to try and replace these myself (now I'm happy with the repointing)! :D

ofRXbLi.jpg UUuWbKY.jpg

So after another 4-5 hours plugging work on the sunday:
hUqMobY.jpg mkL2akL.jpg

I realised then I should probably stop. The couple of courses I've left near the doorway are perfect. Did 1 above them which had swelled out and a couple at the bottom.
 
Last edited:
Monday night I couldn't wait any longer and wanted to get mortaring! :D

I went for a 4-1 mix. Not sure why but that's what I'd read somewhere! So using a 1L jug levelled off of each...
d0QPpZB.jpg

But I found it far too watery... Did another 1L jug of sand with around 300ml of cement had my mix.
bn3KtZf.jpg

It felt pretty good and would just about hold on an inverted trowel... Maybe not as good as Tibby's so couldn't really work like he did - mine wouldn't stick to my brick jointer! I tried a few times and gave up, so used the pointing trowel with came with my set, putting around this much on my plasterers trowel each time:
JeAI4e9.jpg

Pointing trowel 'scooping' into the beds like this:
wsuDEiV.jpg

Around 10-15 mins after smoothing around with the brick jointer:
UzOdXmA.jpg
 
1/2 brick jointing:
2arIibG.jpg

I then scraped off the 'snots' as best I could with the pointing trowel, this fetched a bunch of it off. I then brushed (in circles) over the top with a soft brush (an old floor brush). Looking afterwards I maybe did this too soon - it seemed to take a bit too much off most of the pointed surfaces than I would've liked:
OyeVYRZ.jpg

I tidied everything up and then misted the surface with a spray nozzle on my hose:
H59uCrz.jpg uufclXD.jpg F6vL74M.jpg

It still looks good - will take another picture tonight a few days on as it has faded colour wise quite a bit now. I'm really 95% happy with it. At least for a first attempt! When I do the other corner wall I won't be brushing it as hard afterwards - probably won't even brush it for a few hours. I'll also see if I can patch a few of the worst bits and see if the mortar will stay there. Not a huge problem to plug out a section to re-do it at this point now I know how!

For my original 5L of mortar & sand mix I'd originally put in 1L of water. It was too much - I think possibly the sand I got from B&Q was carrying too much moisture. It came out the bag quite soggy feeling (so I'm blaming that!) and I added another 1L sand and 300ml cement. This came out quite sandy, although it was good to work with. Next time I'll likely try less water. Quantity wise it was about perfect for the area I did. I used around half of a 25kg bag of sand and only 1L of the 25kg bag of cement so have a bunch of both left...!

I leant an old pallet and a board against the wall to 'cover' it from the really hot sun we've had. Misted it with water every morning and afternoon (once the sun is off it). Last night (48h after) I removed the boards/shade so it is exposed to the sun today...
 
Last edited:
Pics from last night (so after 24 exposed/uncovered). A few close ups so you can see how the surface looks. I'm happy with it - but a couple of rough bits I'm going to put some mortar in to level them up a bit and see if it holds. If it doesn't may just re-plug a couple of inches wide section to do it. It's dried/cured really hard, can't mark it with a thumbnail, so I'm fairly sure my 'wet sandy mix' actually came out well enough!?

kiLpbWu.jpg
Side on so you can see some of the roughness

CS02NhI.jpg
I brushed this side less (as it was generally tidier and didn't need as much clearing), looks super smooth

dlZM3AK.jpg
The whole section cleaned up. I'm going to get a cloth on the bricks to clean them a bit more - but also figure out what I'm going to do with their painted surfaces before re-painting.

Also nicely shows the bottom area I need to sort out/probably plug & point to check how the bricks are on these 2 bottom courses, before protecting again with some bitumen paint. Maybe if it looks good and I can be sure I'm protecting it well, render it rather than putting the plinth thing back...!?
 
Last edited:
Yeah I saw these 'raking bits' but with only a cheapy poor battery drill (with only 1 battery) figured doing it by hand. If I had more of an area to do I would consider it - much more control than a grinder.


Back
Top Bottom