Small Form-factor gaming desk/area - heavily modded desk

Associate
Joined
6 Feb 2013
Posts
9
I have couple more minor questions, could you tell me the depth of the monitor shelf, i have a monitor with a stand that has depth of 22cm and just wondering because if i ever start project like this i don't want my monitor shelf look dodgy, also was the front piece that you attached at the beggining made from mdf?
Thanks!
 
Associate
OP
Joined
31 Jul 2012
Posts
1,016
Location
Cheshire
Hi PAN3K, the monitor shelf depth is 21.5 cm and the angled/belvelled front piece is made from several pieces of MDF glued and screwed together. Again, car body filler was applied to the rough angled edges and sanded down before applying the vinyl to ensure a smooth finish.
 
Associate
Joined
27 Dec 2012
Posts
14
This looks amazing! Cracking looking area to use, and clearly into your gaming also!

I've recently got back into photography, and made the move from console gaming to a pc! Will never have anything like this though haha!

Questions though... Which screen is that? How do the gaming glasses work? and also, what is the pad on the opposite side to the mouse? Feel free to message me as I don't wanna take up to much of your log.. :)
 
Associate
OP
Joined
31 Jul 2012
Posts
1,016
Location
Cheshire
Thanks again for the feedback :)

@BenjiW1991, the screen is a 27 inch iiyama Prolite B2712HDS with which I'm really pleased (I remember iiyama from days of old ....).

The gaming glasses work by filtering out light in the blue spectrum ... apparently those wavelengths cause eye fatigue. Once they're on, your eyes adapt to the yellow tint quite quickly and make your eyes more relaxed. They work for me.

The pad is a Logitech G13. Mostly excellent but I've had issues with recent drivers not working correctly so am using an old version. I would definitely recommend it. I find the thumbstick really useful as is the display (monitor GPU temps, GPU usage, fan speed etc) and the macro facility. The ergonomics are also excellent. I'd rate it as an 8.5/10.
 
Associate
Joined
6 Feb 2013
Posts
9
Hey, sorry for the amount of questions but i still have couple more.
First of all how did you shape the mdf pieces, i don't own any wood cutting tools and i'm looking for advice on what should i get, and also when you applied the vinyl to the front piece you mentioned that you sanded down the surface, did you do anything to the main desk surface and the vanity board or did you just apply the vinyl straight onto the desk surface?
 
Associate
OP
Joined
31 Jul 2012
Posts
1,016
Location
Cheshire
No problem PAN3K. The pieces were shaped with a router - I'd definitely recommend that you look at borrowing one of these initially, they're such a versatile tool. The only other tool I used for the wood was a jigsaw.

The vinyl went straight onto the desk surface and vanity board - no preparation was required. It does help having an extra pair of hands when applying it to help smooth it down.
 
Associate
OP
Joined
31 Jul 2012
Posts
1,016
Location
Cheshire
Hi PAN3K, the front piece was shaped with a router using a chamfer bit. Alternatively, you could use a circular saw with the angle set at 45 degrees.

Just added some Audioengine A2s to replace my previous speakers. Still breaking these in so the jury is still out on the performance at present:

GamingDesk10_zps946ffd71.jpg


Added another hanger on my accessory tidy to fit my gaming glasses case:

GamingDesk11_zps1b7db1c6.jpg
 
Associate
Joined
6 Feb 2013
Posts
9
Thanks, can you please tell me what kind of router bits you used throughout the desk, i really appreciate the help!
 
Associate
OP
Joined
31 Jul 2012
Posts
1,016
Location
Cheshire
No problem PAN3K - really happy to help. I use Trend router bits on a Trend router. The only two used for all the woodwork on the desk were a chamfer bit and a flush trim bit.

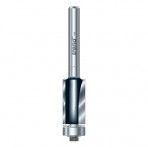
Flush trim bit (the guide bearing on the bottom allows you to track a straight edge under the piece you're making a straight edge on - typically from a 'rough' cut piece you have used a jigsaw to cut out):

Flushtrimbit_zps6c34584a.jpg


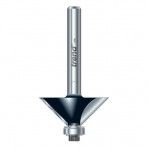
Chamfer bit: This allows you to create a bevelled edge on a piece of wood with a straight edge or, alternatively, create a bevel the full depth of the wood by tracking a second piece of wood underneath - make sure you get a bit with the right depth for the wood if you want to go full depth! :

chamferbit_zpscc7dc69f.jpg


The steps I generally follow are as follows:

Either have strips of MDF cut at the hardware store
or
Rough cut the MDF to the desired shape, clamp the rough cut piece on the top of piece with a straight edge and use the flush trim bit to give the top piece a straight edge.

For creating a bevelled edge - prepare the piece of wood using either of the above methods, clamp the piece to bevel on top of another piece with a straight edge and run the chamfer bit along the edge.

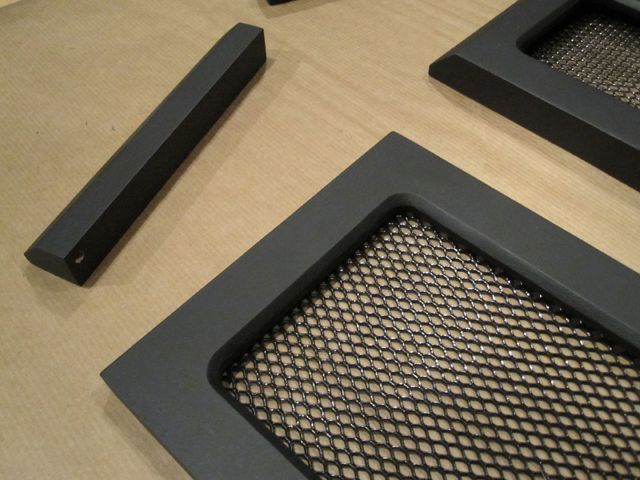
Once you get a bit of experience, you can create some very interesting pieces - here are a couple of doors I made for another arcade cabinet again just using the two router bits:

XBOXArcade87_zps321fd6e9.jpg


Edit: Thanks for the comments Tom and Pete :)
 
Last edited:
Associate
Joined
6 Feb 2013
Posts
9
Thank you very much for all the help, at the begging the mods looked very difficult but with some guidance it's pretty straight forward!
The setup looks even better with the a2's great work!
 
Back
Top Bottom