Soldato
TECHNIQUE DISCUSSION - Panning
This is just an idea that was talked about in the discussions recently, basically to have technique orientated threads where we can share our cumulative experiences. I don't have a lot to offer when it comes to techniques to be honest but I thought it may be worth sharing my experiences with the technique of panning. I enjoy this and have dabbled with it the last couple of years. Hopefully others much more experienced in other areas may think about starting other technique focussed threads?
For those who are thinking "what on earth is panning?!" it's a technique use whereby you use a slower shutter speed in order to achieve the effect of motion. To do this you need to pan your camera with your subject, this keeps the subject in focus but will blur the background. The amount of blur will depend on how slow your shutter speed is. This technique is routinely used for motorsports and aviation (generally propeller driven aircraft so you can see a prop blur rather than the propellers frozen in space, but is also good for take-off and landings).
So a quick example of a panning shot. This was taken with a 70-200 lens set at 70mm, 1/40, f16, ISO 100:
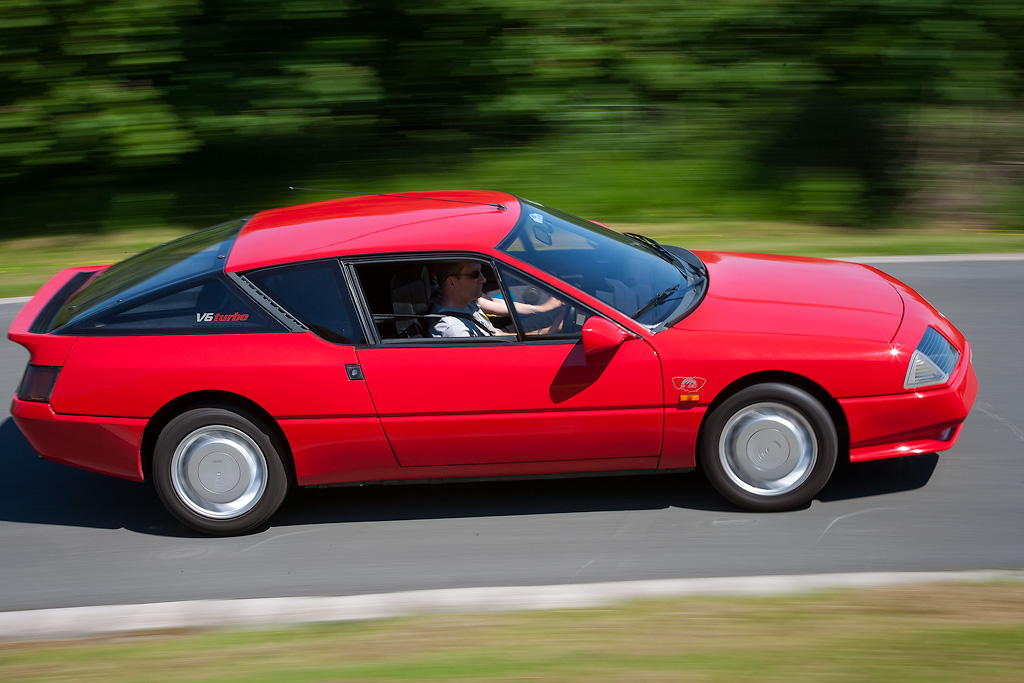
This was taken at Prescott where you have nice access close up to the track, so even with 70mm this isn’t a cropped shot. It is a typical side on panning shot with a large amount of the car in focus.
For aircraft and prop blur, this is a shot taken with a 70-200 and 1.4x TC set at 200mm, 1/125, f11, ISO 160:
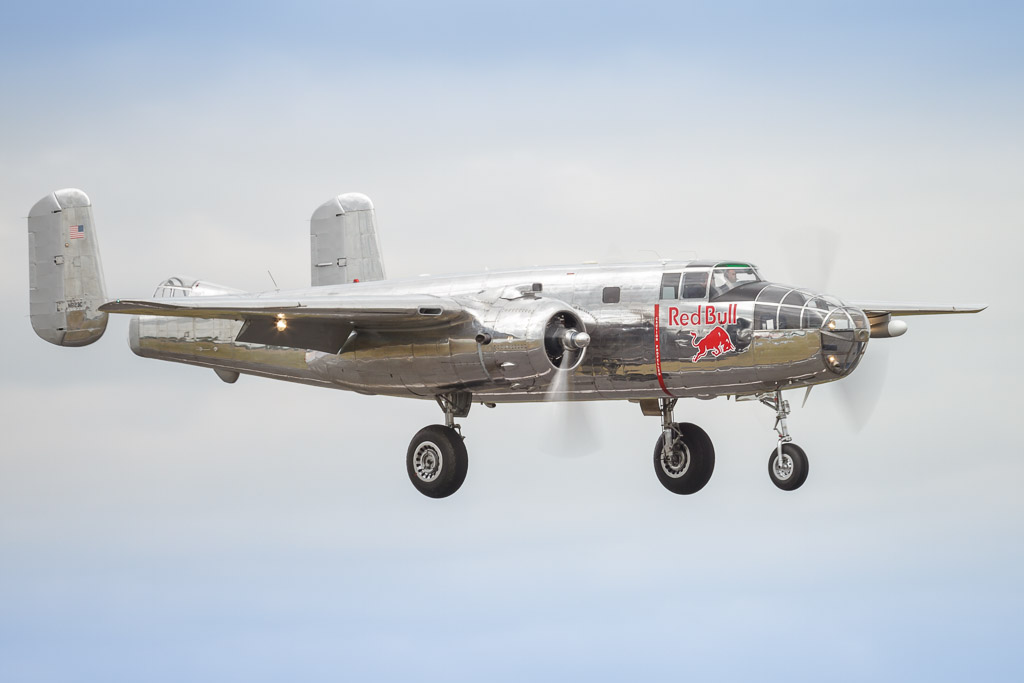
This was taken at RIAT 2013 where the crowd line is quite close to runway so take off and landings can be had with a shorter lens. As the aircraft is slowing for landing the prop speed is slower so you will not get a “full disc” prop blur.
Equipment
Now especially as OcUk is a gear head mecca, we all tend to get hung up on gear! The good news with panning is that it doesn't require any exotic hardware at all. Any gear specific requirements will actually be more determined by the environment you are shooting in. So for example for airshows you are likely to need a longer lens, and dependant on the racetrack you are visiting (and the access available) a long lens may also be essential.
The stabilisation feature provided on a lens may offer a dedicated panning mode. This will restrict movement compensation to the axis that you are not panning in, so for example if you are panning horizontally it will only compensate for vertical movement. I have used lenses with this option and have only found it partially useful for long lenses where you are working in an easy to pan horizontal plane such as an airshow. I haven't used any of the expensing long primes for this, and I imagine they perform better than the consumer zoom (150-500) I have used previously. For motorsports I actually found it impacted my results negatively. This was on a 70-200 lens. I was shooting in a hill climb environment where you are panning at an angle and I can only assume the lens IS system didn’t particularly like this.
Autofocus performance will depend on how you are shooting, if you are trying to track the drivers’ helmet with the far top right AF point then you are going to need a camera body capable of doing that. However, as you are working with a small aperture (typically in the f8-f16 range) it is entirely possible to pre-focus and just concentrate on your panning technique.
Monopods and tripods are something that I personally never use. I tried a monopod once for an airshow but found it restricted my movement far too much. With longer lenses a tripod with a gimbal head setup is something you see a lot of at airshows. I haven't ever personally used these, and if you are in a position to consider this I imagine your panning experience far exceeds mine!
Other items you may want to look into are ND filters. On a sunny day if you want to shoot at a low shutter speed of 1/20 for lots of blur you may easily end up at an aperture of f22. You are now into diffraction possibly impacting on the IQ (especially on crop bodies). In order to limit the aperture you may be able to select ISO 50 on the camera body which helps keep a wider aperture. ISO 50 is generally not a true ISO setting though, and is in fact ISO 100 overexposed, therefore your dynamic range will be impacted slightly as you will lose headroom in the highlights. An ND filter reduces the light through your lens and are available in specifications determined by the amount of light they reduce by. So if you purchased a 3 stop ND filter it will allow you to reduce your aperture by 3 stops. So if we take the previous 1/20 - f22 example, this would now become 1/20 - f8. An ND filter is also useful with a fast long lens as you can shoot wide open at a slow shutter speed to really blur that background.
Settings
Your starting shutter speed point for automotive panning should be around 1/125. This is merely a guide though so if you are finding this difficult try 1/250 and just work your way down as your panning technique improves. For aviation you are likely to be using a longer lens and 1/250 is a challenging starting point. Again look at your results and raise the speed if needed.
You will likely get very few keepers as you learn to pan, so don’t worry about it. Panning is also a punishing mistress in that it is likely that your keeper rate will not improve greatly as your panning skills improve. This is because as you start to nail the results at one shutter speed, you will start to see how you get on at the next lower speed. Once you get down to 1/20, 1/10 and lower the keepers are something to treasure.
Initially I would suggest using shutter speed priority set at your required speed and ISO set at 100. For metering go with your experience on your camera body of choice and dial in compensation as required dependant on sun position. Evaluative is a good starting point, spot metering will change per paint job so isn’t recommended.
Autofocus may be set to AI Servo mode or you can pre-focus at the required point the subject will pass you. Back button focusing is also useful, especially in conditions where the light changes throughout your capture area. For example cars driving through a wooded area moving from bright sunlight to shade. You can keep the AF tracking working at all times with the back button depressed, and use the shutter button half press to determine the metering and take the shot.
Shooting in RAW or JPEG is a personal choice, RAW will give you much more leeway in post processing. This setting may also impact the drive setting that you choose. If you enable your fastest frames per second setting you will end up with a lot of shots so be warned. Shooting in JPEG would mean that it is unlikely that you will run into buffer problems when shooting like this, whereas the larger RAW files will fill the buffer quickly.
Technique
Now we get down to the nitty gritty of the matter. I’m sorry to disappoint but there isn’t a closely guarded secret to always getting the shot. It is all a matter of practice, practice, practice!
If you are starting off for the first time it is worth concentrating just on the side on pan as posted above. Position yourself so that you are perpendicular to the point on the track (or in the air) where the subject will pass you by. Plant your feet in this perpendicular position brace your camera and lens in a position that is comfortable and stable for you. Keep your elbows in close to your sides, and practice swivelling your body from the hips following the direction of travel of your subject. Do this at first with the camera at head height but not looking through the viewfinder, this is so you can check that you’re not about to knock out the spectator stood next to you or hit a fence etc! Setup your AF as AI Servo or pre-focus at the point on the track perpendicular to your position. When you start taking the shots, keep the panning motion as smooth as possible at the same speed as your subject and release the shutter as the subject passes the point perpendicular to your position. Ensure that you continue the panning motion as the subject passes, do not try to stop the camera at this point! Repeat, repeat, repeat…
Initially keep the subject to the centre of the frame, but also start to have the subject off centre but still side on to your position. 183mm, ISO 50, 1/20, F9:
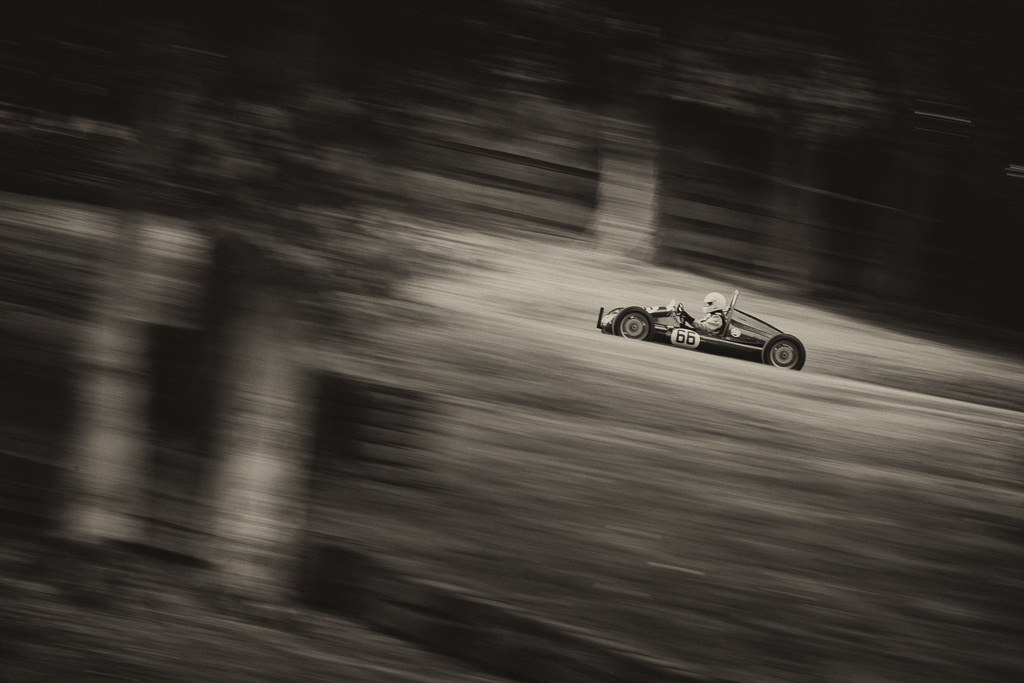
Obviously lens choice will impact your result compositionally. You can go for tight framing of the subject using a telephoto lens (or even only a portion of the subject such as the drive and cockpit), or start to use a wider lens. As you start to use a wider composition you can also start to vary the position and direction of travel of your subject (you can also do this with the tighter framing). For example you can get shots of the subject as it is moving towards you, so you are now seeing the subject at an angle and the front of the subject is also visible instead of only the side. As you start taking these shots you will find that you are now having trouble getting the whole car in sharp focus. Only a “slice” of the car is in focus. This is due to the front and rear of the car being at different distances to you and therefore moving at different speeds in relation to the speed and direction of your panning motion. You now have two options; you can raise the shutter speed to get more of the car in focus or you choose the area of the car that you wish to have in focus.
In this example the driver and passenger are the focus of the shot. 70mm, f11, 1/40, ISO 50:

For this shot the front of the car is the focus (you gotta love the Alfa grille). 200mm, f11, 1/40, ISO 50:

You can still see that the left headlight is still slightly out of focus, this highlights how small this “slice” of in focus area can be. The slower the shutter speed the smaller this slice gets.
With a wider lens you can show some context and still have your motion blur. 28mm, f9, 1/60, ISO 100:

You can also tilt your camera as you take a shot to get an interesting angle. 93mm, f11, 1/80, ISO 100:
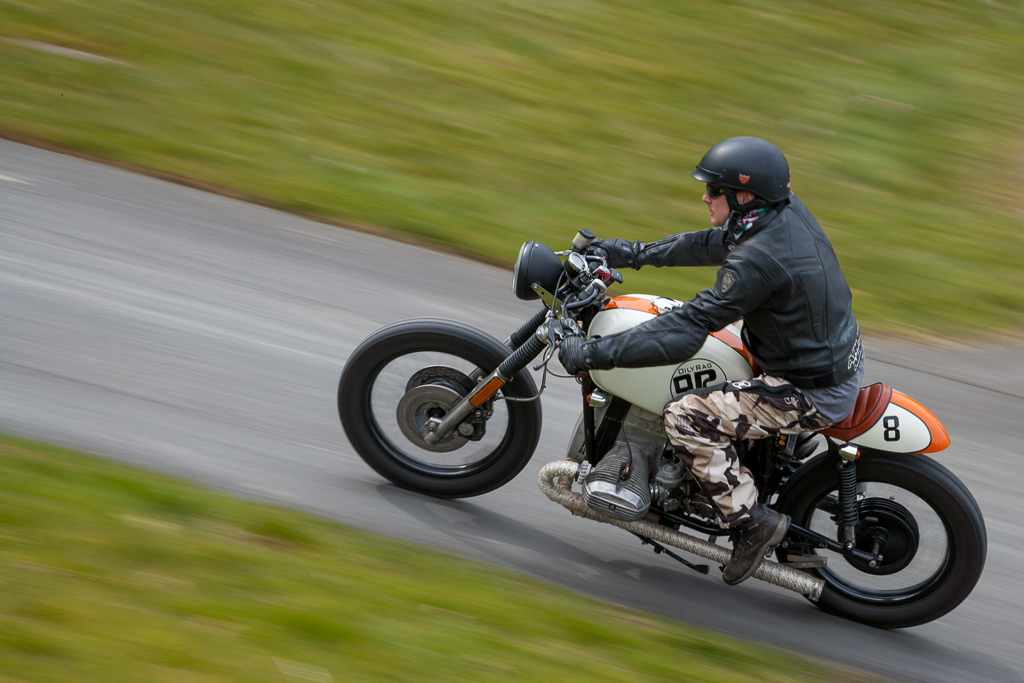
Once you have the basics of your panning motion together just keep trying new ways to make an interesting shot. You’ll quickly get bored of going through shot after shot of just the side of a car that’s for sure!
As you experiment with the shutter speed you’ll get lots of disasters, some of these disasters though might still be interesting in an abstract way? So don’t discount them all. 200mm, f22, 1/5, ISO 500:

Another thing to mention, whilst you are at a motorsport event to capture panning shots, don’t forget to take in the other aspects of the event. If you’re able to walk the paddock area or pits get in there, there is plenty of scope for documentary type photography at these events.
All of the above is just my take on the subject of panning, please also add to this thread with your experiences and correct any rubbish that I have posted above. Sharing this knowledge and discussing the technique will hopefully prove useful for all interested (however small that group of people is!). If others could start more threads discussing other techniques\areas of photography that would be great. I know the interest in panning is small, but it’s all I know a little bit about so I’ve used it as an example that others may take up the gauntlet for more challenging techniques.
This is just an idea that was talked about in the discussions recently, basically to have technique orientated threads where we can share our cumulative experiences. I don't have a lot to offer when it comes to techniques to be honest but I thought it may be worth sharing my experiences with the technique of panning. I enjoy this and have dabbled with it the last couple of years. Hopefully others much more experienced in other areas may think about starting other technique focussed threads?
For those who are thinking "what on earth is panning?!" it's a technique use whereby you use a slower shutter speed in order to achieve the effect of motion. To do this you need to pan your camera with your subject, this keeps the subject in focus but will blur the background. The amount of blur will depend on how slow your shutter speed is. This technique is routinely used for motorsports and aviation (generally propeller driven aircraft so you can see a prop blur rather than the propellers frozen in space, but is also good for take-off and landings).
So a quick example of a panning shot. This was taken with a 70-200 lens set at 70mm, 1/40, f16, ISO 100:

This was taken at Prescott where you have nice access close up to the track, so even with 70mm this isn’t a cropped shot. It is a typical side on panning shot with a large amount of the car in focus.
For aircraft and prop blur, this is a shot taken with a 70-200 and 1.4x TC set at 200mm, 1/125, f11, ISO 160:

This was taken at RIAT 2013 where the crowd line is quite close to runway so take off and landings can be had with a shorter lens. As the aircraft is slowing for landing the prop speed is slower so you will not get a “full disc” prop blur.
Equipment
Now especially as OcUk is a gear head mecca, we all tend to get hung up on gear! The good news with panning is that it doesn't require any exotic hardware at all. Any gear specific requirements will actually be more determined by the environment you are shooting in. So for example for airshows you are likely to need a longer lens, and dependant on the racetrack you are visiting (and the access available) a long lens may also be essential.
The stabilisation feature provided on a lens may offer a dedicated panning mode. This will restrict movement compensation to the axis that you are not panning in, so for example if you are panning horizontally it will only compensate for vertical movement. I have used lenses with this option and have only found it partially useful for long lenses where you are working in an easy to pan horizontal plane such as an airshow. I haven't used any of the expensing long primes for this, and I imagine they perform better than the consumer zoom (150-500) I have used previously. For motorsports I actually found it impacted my results negatively. This was on a 70-200 lens. I was shooting in a hill climb environment where you are panning at an angle and I can only assume the lens IS system didn’t particularly like this.
Autofocus performance will depend on how you are shooting, if you are trying to track the drivers’ helmet with the far top right AF point then you are going to need a camera body capable of doing that. However, as you are working with a small aperture (typically in the f8-f16 range) it is entirely possible to pre-focus and just concentrate on your panning technique.
Monopods and tripods are something that I personally never use. I tried a monopod once for an airshow but found it restricted my movement far too much. With longer lenses a tripod with a gimbal head setup is something you see a lot of at airshows. I haven't ever personally used these, and if you are in a position to consider this I imagine your panning experience far exceeds mine!
Other items you may want to look into are ND filters. On a sunny day if you want to shoot at a low shutter speed of 1/20 for lots of blur you may easily end up at an aperture of f22. You are now into diffraction possibly impacting on the IQ (especially on crop bodies). In order to limit the aperture you may be able to select ISO 50 on the camera body which helps keep a wider aperture. ISO 50 is generally not a true ISO setting though, and is in fact ISO 100 overexposed, therefore your dynamic range will be impacted slightly as you will lose headroom in the highlights. An ND filter reduces the light through your lens and are available in specifications determined by the amount of light they reduce by. So if you purchased a 3 stop ND filter it will allow you to reduce your aperture by 3 stops. So if we take the previous 1/20 - f22 example, this would now become 1/20 - f8. An ND filter is also useful with a fast long lens as you can shoot wide open at a slow shutter speed to really blur that background.
Settings
Your starting shutter speed point for automotive panning should be around 1/125. This is merely a guide though so if you are finding this difficult try 1/250 and just work your way down as your panning technique improves. For aviation you are likely to be using a longer lens and 1/250 is a challenging starting point. Again look at your results and raise the speed if needed.
You will likely get very few keepers as you learn to pan, so don’t worry about it. Panning is also a punishing mistress in that it is likely that your keeper rate will not improve greatly as your panning skills improve. This is because as you start to nail the results at one shutter speed, you will start to see how you get on at the next lower speed. Once you get down to 1/20, 1/10 and lower the keepers are something to treasure.
Initially I would suggest using shutter speed priority set at your required speed and ISO set at 100. For metering go with your experience on your camera body of choice and dial in compensation as required dependant on sun position. Evaluative is a good starting point, spot metering will change per paint job so isn’t recommended.
Autofocus may be set to AI Servo mode or you can pre-focus at the required point the subject will pass you. Back button focusing is also useful, especially in conditions where the light changes throughout your capture area. For example cars driving through a wooded area moving from bright sunlight to shade. You can keep the AF tracking working at all times with the back button depressed, and use the shutter button half press to determine the metering and take the shot.
Shooting in RAW or JPEG is a personal choice, RAW will give you much more leeway in post processing. This setting may also impact the drive setting that you choose. If you enable your fastest frames per second setting you will end up with a lot of shots so be warned. Shooting in JPEG would mean that it is unlikely that you will run into buffer problems when shooting like this, whereas the larger RAW files will fill the buffer quickly.
Technique
Now we get down to the nitty gritty of the matter. I’m sorry to disappoint but there isn’t a closely guarded secret to always getting the shot. It is all a matter of practice, practice, practice!
If you are starting off for the first time it is worth concentrating just on the side on pan as posted above. Position yourself so that you are perpendicular to the point on the track (or in the air) where the subject will pass you by. Plant your feet in this perpendicular position brace your camera and lens in a position that is comfortable and stable for you. Keep your elbows in close to your sides, and practice swivelling your body from the hips following the direction of travel of your subject. Do this at first with the camera at head height but not looking through the viewfinder, this is so you can check that you’re not about to knock out the spectator stood next to you or hit a fence etc! Setup your AF as AI Servo or pre-focus at the point on the track perpendicular to your position. When you start taking the shots, keep the panning motion as smooth as possible at the same speed as your subject and release the shutter as the subject passes the point perpendicular to your position. Ensure that you continue the panning motion as the subject passes, do not try to stop the camera at this point! Repeat, repeat, repeat…
Initially keep the subject to the centre of the frame, but also start to have the subject off centre but still side on to your position. 183mm, ISO 50, 1/20, F9:

Obviously lens choice will impact your result compositionally. You can go for tight framing of the subject using a telephoto lens (or even only a portion of the subject such as the drive and cockpit), or start to use a wider lens. As you start to use a wider composition you can also start to vary the position and direction of travel of your subject (you can also do this with the tighter framing). For example you can get shots of the subject as it is moving towards you, so you are now seeing the subject at an angle and the front of the subject is also visible instead of only the side. As you start taking these shots you will find that you are now having trouble getting the whole car in sharp focus. Only a “slice” of the car is in focus. This is due to the front and rear of the car being at different distances to you and therefore moving at different speeds in relation to the speed and direction of your panning motion. You now have two options; you can raise the shutter speed to get more of the car in focus or you choose the area of the car that you wish to have in focus.
In this example the driver and passenger are the focus of the shot. 70mm, f11, 1/40, ISO 50:

For this shot the front of the car is the focus (you gotta love the Alfa grille). 200mm, f11, 1/40, ISO 50:

You can still see that the left headlight is still slightly out of focus, this highlights how small this “slice” of in focus area can be. The slower the shutter speed the smaller this slice gets.
With a wider lens you can show some context and still have your motion blur. 28mm, f9, 1/60, ISO 100:

You can also tilt your camera as you take a shot to get an interesting angle. 93mm, f11, 1/80, ISO 100:

Once you have the basics of your panning motion together just keep trying new ways to make an interesting shot. You’ll quickly get bored of going through shot after shot of just the side of a car that’s for sure!
As you experiment with the shutter speed you’ll get lots of disasters, some of these disasters though might still be interesting in an abstract way? So don’t discount them all. 200mm, f22, 1/5, ISO 500:

Another thing to mention, whilst you are at a motorsport event to capture panning shots, don’t forget to take in the other aspects of the event. If you’re able to walk the paddock area or pits get in there, there is plenty of scope for documentary type photography at these events.
All of the above is just my take on the subject of panning, please also add to this thread with your experiences and correct any rubbish that I have posted above. Sharing this knowledge and discussing the technique will hopefully prove useful for all interested (however small that group of people is!). If others could start more threads discussing other techniques\areas of photography that would be great. I know the interest in panning is small, but it’s all I know a little bit about so I’ve used it as an example that others may take up the gauntlet for more challenging techniques.


