*** The definitive Apple macOS sticky ***

Status
Not open for further replies.
Commissario
Joined
16 Oct 2002
Posts
343,121
Location
In the radio shack
Welcome to the all-new and definitive Apple macOS sticky. Someone (not me) accidentally nuked the last one :o

OS X is a series of Unix-based graphical interface operating systems (OS) developed and marketed by Apple Inc. It is designed to run on Macintosh computers, having been pre-installed on all Macs since 2002. Within the market of desktop, laptop and home computers, and by web usage, OS X is the second most widely used desktop OS after Windows


1. Release history of OS X / macOS

2. Switching from Windows to Mac

3. How to install Windows using Boot Camp

4. Mac basics

5. Commonly asked questions

6. Important keyboard shortcuts

7. Installing applications

8. Uninstalling applications

9. Creating a bootable USB
 
Last edited:
Release history of OS X / macOS

With the exception of Mac OS X Server 1.0 and the original public beta, OS X versions were named after big cats until version 10.9, when Apple switched to using California locations. Prior to its release, version 10.0 was code named "Cheetah" internally at Apple, and version 10.1 was code named internally as "Puma". After the immense buzz surrounding version 10.2, codenamed "Jaguar", Apple's product marketing began openly using the code names to promote the operating system. 10.3 was marketed as "Panther", 10.4 as "Tiger", 10.5 as "Leopard", 10.6 as "Snow Leopard", 10.7 as "Lion", 10.8 as "Mountain Lion", and 10.9 as "Mavericks". "Panther", "Tiger" and "Leopard" are registered as trademarks of Apple, but "Cheetah", "Puma" and "Jaguar" have never been registered. Apple has also registered "Lynx" and "Cougar" as trademarks, though these were allowed to lapse

Public Beta: Kodiak (September 13, 2000)
Version 10.0: "Cheetah" (March 24, 2001)
Version 10.1: "Puma" (September 25, 2001)
Version 10.2: "Jaguar" (August 23, 2002)
Version 10.3: "Panther" (October 24, 2003)
Version 10.4: "Tiger" (April 29, 2005)
Version 10.5: "Leopard" (October 26, 2007)
Version 10.6: "Snow Leopard" (August 28, 2009)
Version 10.7: "Lion" (July 20, 2011)
Version 10.8: "Mountain Lion" (July 25, 2012)

Version 10.9: "Mavericks" (October 22, 2013)
Version 10.10: "Yosemite" (October 16, 2014)
Version 10.11: "El Capitan" (September 30, 2015)
Version 10.12: "Sierra" (September 20, 2016) ** Latest release **

macOS 10.12 "Sierra" was announced at WWDC 2016. During the keynote, Apple announced that OS X would be renamed macOS to stylistically match Apple's other operating systems, such as iOS, watchOS, and tvOS. New features announced during the keynote include the addition of Siri, Optimized Storage, and updates to Photos, Messages, and iTunes


Switching from Windows to Mac

If you're planning on moving your data across from your PC to the Mac then you need to familiarize yourself with the migration tools.

Apple has comprehensive documentation on how to do this (link). I suggest you read this - and print it out if possible - before you begin to move your data. Pay careful attention to what and what isn't moved. Alternatively, you can get an Apple Retail Store to do it for you.

Use these steps to make sure your migration goes smoothly.

  • Make sure Windows is up to date. Migration Assistant works with Windows XP and later.
  • Make sure you know the name and password of an administrator account on your PC.
  • Connect your Mac and PC to the same network, such as your home Wi-Fi network. You can also connect an Ethernet cable between the Ethernet port on your Mac and your PC to create a direct network connection.

 
How to install Windows using Boot Camp

What is Boot Camp?

One of the key benefits of running a Mac is that you can enjoy the unique experience of having OS X and Windows on the same computer. Now that Windows 10 is readily available, it means you can run Windows 10 and OS X on the same machine. Boot Camp is the method of installing Windows on the Mac, natively.


How to install Windows using Boot Camp

As with running any non-OS X operating system on your Mac, there are two ways to get the Windows 10 on your Mac. You can install Windows on a separate partition of your hard drive using the built-in Boot Camp. Thus, you can boot your OS X device directly into Windows 10, as if it was a Windows PC (you can still use OS X, of course).

Before you begin, check your requirements

  • An Intel-based Mac
  • A Microsoft Windows installation media or disk image (ISO) containing a 64-bit version of Microsoft Windows 8 or later*
  • An Apple keyboard, mouse, or trackpad, or a USB keyboard and mouse
  • At least 55 GB of free disk space on your startup drive
  • For most Mac models, you also need a blank 16 GB or larger USB flash drive

Apple have produced a step-by-step guide on how to install Windows using Boot Camp (link)


What if I want to run it inside a virtual machine?

You can use the free VirtualBox from Oracle, Parallels Desktop (£64.95) or VMWare Fusion to run Windows inside a VM. Your mileage may vary.

 
Mac Basics

Apple have a very good section on their website where you can learn the basics by browsing through a virtual interface. It also covers using applications, connecting accessories, internet and wi-fi, transferring files and more (link).

If you have the time there is an excellent 1hr video on YouTube, also showing these mac basics.


If you don't have a whole hour Screencasts Online have an excellent introductory video (link)

Other guides which you may find useful:
 
Commonly asked questions

Right-clicking on a Mac

This one gets people. Despite the fact that there's no buttons on the Magic Mouse of the trackpad you can still accomplish this. You can hold down the CTRL key while you click, but this is very kludgy. Alternatively, go to System Preferences > Trackpad and turn on Secondary Click. Now you can tap two fingers to accomplish a right-click.

If you have a Magic Mouse then go to System Preferences > Mouse and enable Secondary Click, which makes the right mouse button act as a right click.


How to CTRL + ALT + DEL

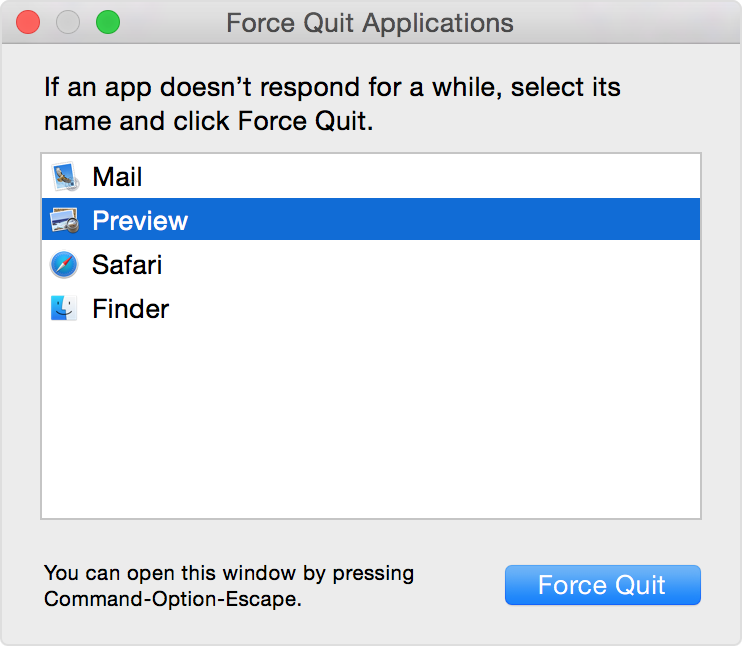
OSX is a very stable system but from time to time an application may stop responding, requiring you to manually shut it down. The Mac doesn’t have a delete key, meaning the time honoured Ctrl-Alt-Del combination won't work, so use instead Cmd-Option-Esc to bring up the Force Quit window. Now select the problematic application from the list - which will often have a message next to it - and click the blue Force Quit button. This menu can also be accessed by clicking on the Apple icon in the top left corner, then selecting Force Quit from the drop-down menu.

yosemite-apple-force_quit.png


How to close, maximise, minimise on a Mac

The way windows function on OS X can be a little bewildering at first for long-time PC users. The traffic light buttons in the top left of the pane look similar to Windows, but they behave differently. Clicking the red cross will close the current window, but not the app itself. The quickest way to achieve this Cmd-Q. The yellow minus does minimize the app exactly as Windows does, but the green plus button doesn't maximise the pane. Instead it’s enlarged to a size that fits the information on the page. Mountain Lion does have a maximise feature though, for most apps, that’s engaged by clicking on the two grey arrows in the upper right corner of the window.

RRvFNyZ.jpg

How to find the control panel on a Mac

When you need to check various system or hardware details on a PC the first port of call is the Control Panel. You won't find this on a Mac, but in its place is System Preferences. To access this click on the three-silver-gears icon in the dock or click on the Apple icon in the top left corner and then select it from the menu. Once inside you are presented with a pane displaying the various areas of the system. Simply click on the one you want to adjust and the options will appear.

lIaunks.png
Set up multiple user accounts on a Mac

If more than one person is regularly using your new Mac then you might want to create different user accounts, just as you would on a PC. Setting them up is easy. Navigate to System Preferences>Users and Groups, and click on the padlock in the bottom left corner. You’ll be prompted for your administrator password, enter this then click on the plus sign above the padlock to enter a new user account. When you’ve finished, click the padlock once again to complete the process. To switch users either log out from the Apple icon, or click on the user name displayed in the top right corner and select another account.

 
Important keyboard shortcuts

Learning keyboard shortcuts will greatly improve the speed at which you can use the OS. Here are a few to get you started:

  • Command + C - Copy
  • Command + V - Paste
  • Command + A - Select All
  • Command + W - Close window
  • Command + Q - Quit app
  • Command + Spacebar - Open Spotlight
A full list of shortcuts is available on the Apple website (link) or a massive list here (link)


Where is the cut command on OS X? (Ctrl + X)

It's there, but it is hidden away and doesn't show up when you right click normally. However, the solution is easy and involves changing the way you think of cutting and pasting.

I used to think this when I got my first MBP six year or so ago. Actually, you're just looking at it wrong; that is, back to front. :p

Windows: 1) Cut this file. 2) Paste it here.

So cut is the first instruction in the set, and you only have to confirm the destination afterwards, with 'copy it here and delete the original' thus being the only available option. Conversely,

macOS/Finder: 1) Select the file to work with (Copy command). 2) Right click in desired folder, then select either 'Paste Item' (copy and paste a duplicate here), or alternatively alt+right click for 'Move Item Here' (put the file here, delete the original).

Therefore Finder gives you more flexibility to work with a file then decide what t do with it. I know it's counterintuitive (literally back to front) to Windows habits, but it makes sense once you know. How many times in Windows I've cut or copied a file in a rush/absent-mindedly, only to realise I needed the opposite command... On a Mac you just say 'this is the file' and then decide what to do with it. Simples.

To cut (copy and move) the files..

  1. Select the files
  2. Copy the files (Cmd + C)
  3. Go to the directory where you wish to move the file
  4. Hold down the Option key, right-click and choose "Move item here"

Note: You could skip step 4 and use the keyboard shortcut Cmd + Option + V

 
Installing applications

Installing applications on the Mac is straightforward but there are two ways to do this:
  1. Install from the Mac App Store
  2. Install from the web

Install from the Mac App Store

Recent versions of OS X include the Mac App Store, inspired by the iPhone and iPad App Store. Just open the App Store application included with your Mac and you can search for and install apps. Apps automatically update through here, just as they do on iPhone and iPad. For example, Apple’s iWork apps and even new versions of OS X arrive through the Mac App Store. Any apps you purchase from here are also tied to your Apple ID, so you can install them on your other Macs.

URlo4uM.png

The Mac App Store sounds great, and can be very convenient. However, one of the first things you’ll probably learn as a new Mac user trying to install software is that not all the apps you want are available in the Mac App Store.

The process can be broken down to 3 simple steps. If you have used iOS this process will be familiar to you.

  1. Click on the price located beneath the app's star rating. If an app is free, the button will read Get.
  2. Click on the green Install App button that appears. Enter your Apple ID password if prompted.
  3. The app you just downloaded from the Mac App Store should automatically show up in Launchpad, ready for you to open with a single click.


Install from the web

If you’ve downloaded a program straight from the Web, however, the installation process becomes slightly more complicated. If the file you've downloaded ends with the .zip extension, just double-click the file to unpack it and follow the installer instructions.

If the file you've downloaded is a disk image (these end with the .dmg extension), you’ll first have to "mount" the image onto your machine. These application bundles are generally used for smaller pieces of software, such as simple applications downloaded from the Internet. Here, the software publisher has provided you with the actual program — all you have to do is copy the program to your desired location (usually your Applications folder) and run it. Copying the program is performed simply by using drag and drop.

The process is as follows:

  1. Download the application from the internet
  2. Click on the Finder icon at the bottom left of the screen
  3. Click Downloads on the left side of the window
  4. Double-click the downloaded file. If you get an error message that says the program "can't be opened because it wasn't downloaded from the Mac App Store," right-click the downloaded file and select Open.
  5. When the application is mounted, you will see it appear in Finder
  6. Drag the application from the mount in to the Applications folder
  7. Done

 
Uninstalling applications

Uninstalling applications in Mac OS X is very different than uninstalling in a Microsoft Windows environment because Mac OS X has nothing like the Windows Registry. While most Windows programs include an uninstaller that can be run through using the Add/Remove Programs control panel, no such feature exists in Mac OS X and so most users simply move application bundles (see below) to the Trash. However, often times there is more to uninstalling than a simple drag-and-drop to the trash.

Most Mac OS X applications (anything that ends in .app), like Safari and iTunes, are known as application bundles. The application icon you see in Finder (typically the Applications Folder) is usually a special folder itself, made to appear as a single double-clickable file. These "folders" contain all, or at least most, of the files needed to run the application, ie they are self-contained. This means that to uninstall these applications, you only have to drag them to the Trash


Removing associated files

Sometimes an application will leave behind preference files etc. To manually remove an application and all associated files:

  1. Launch Activity Monitor and change "My Processes" at the top to "All Processes", then make sure the app you want to remove is not running. If it is, quit the process before proceeding.
  2. Launch Finder and search for the app name (hopefully unique, such as Skype)
  3. You can narrow the search to specific folders or search your whole Mac
  4. Searching "File Name" vs "Contents" usually provides better results.
  5. Click the + button below the search term to add criteria
  6. Click the search criteria drop-down and select "Other...", then "System files"
  7. Click the "don't include" and change to "include"
  8. Sort by name, kind, date, etc. to identify components of the app, such as folders, .plist files, cache files. etc.
  9. Delete all files and folders related to the app.
  10. Don't empty your Trash until you've determined that everything is working OK, in case you need to restore something you deleted by accident.
  11. A reboot might be necessary to completely remove some apps.

Applications with uninstallers

If you ran an installer to install an application, you may wish to try running the installation program again to see if an uninstall option is available at any point during installation (many times in a drop-down menu). Check the installation CD or disk image for the original installer file. Some vendors have included simple Perl scripts that will run in the command line to uninstall applications, and may be named "uninstaller.pl".


Third-party uninstallers

Third party uninstallers exist which will search for these preference files for you, such as AppCleaner, AppTrap, AppZapper, CleanApp and TrashMe, but please be warned that these apps will not remove all components of installed apps, so it may be best to use a combination of this and the method above.
 
Creating a bootable USB

When it comes to reformatting macOS, there are several methods to start afresh. Firstly, you will need a copy of the most current OS. Long gone are the days when you'd get a DVD with the OS. These days Apple release the full OS for free on the Mac App Store.

Simply fire up the Mac App Store and search for the OS you wish to download. Depending on your connection speed this may take a while. Once you have a copy downloaded you can create a bootable USB using a combination of Terminal and Disk Utility.

To start, close the installer which opened when you downloaded the OS. Now open Terminal from Applications > Utilities > Terminal. Before you begin please note that the following Terminal command should be used with caution. It makes the assumption that your USB volume is called "Untitled" and the OS installer is in the default location (/Applications).

If your volume has a different name you can use Disk Utility to format the drive. Set the volume name as Untitled, the partition to GUID and the file system to Mac OS (Journaled). These should be defaults, but it's worth checking.

Copy and paste the following code in to Terminal and hit enter. Input your admin password and wait. The process may take 15-20 minutes depending on the speed of your USB stick and a minimum size of 8GB is recommended.

Code:
sudo /Applications/Install\ macOS\ Sierra.app/Contents/Resources/createinstallmedia --volume /Volumes/SierraInstaller --applicationpath /Applications/Install\ macOS\ Sierra.app --nointeraction &&say Done

If you get an error then you can follow this video guide from the 9to5mac.com website.

 
Status
Not open for further replies.
Back
Top Bottom