watercooling fill and drain design help

Associate
Joined
29 Apr 2016
Posts
134
hi,

iv built a few watercooling setups in the past but nothing this complex, my issue seems to lie with fluid dynamics which i cant seems to get my head around this time

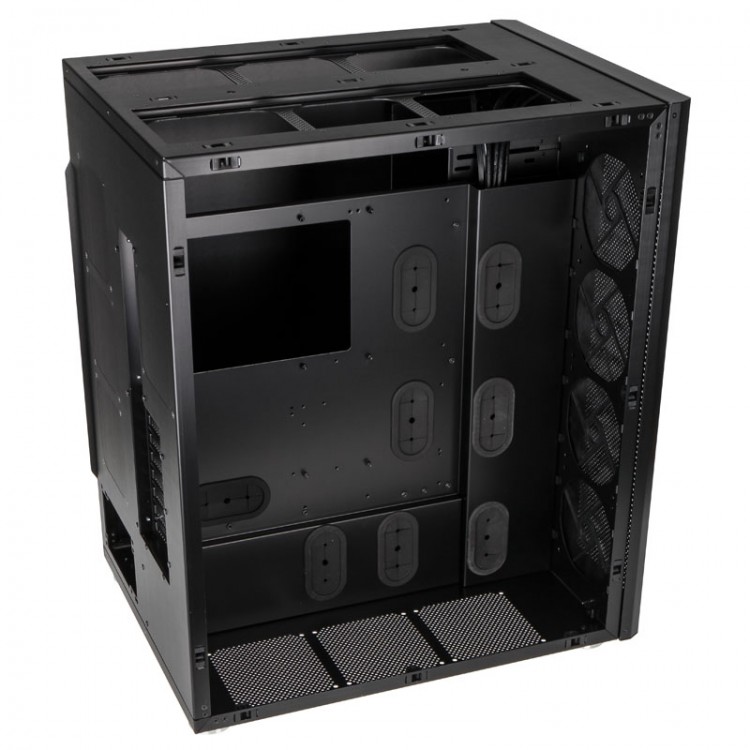
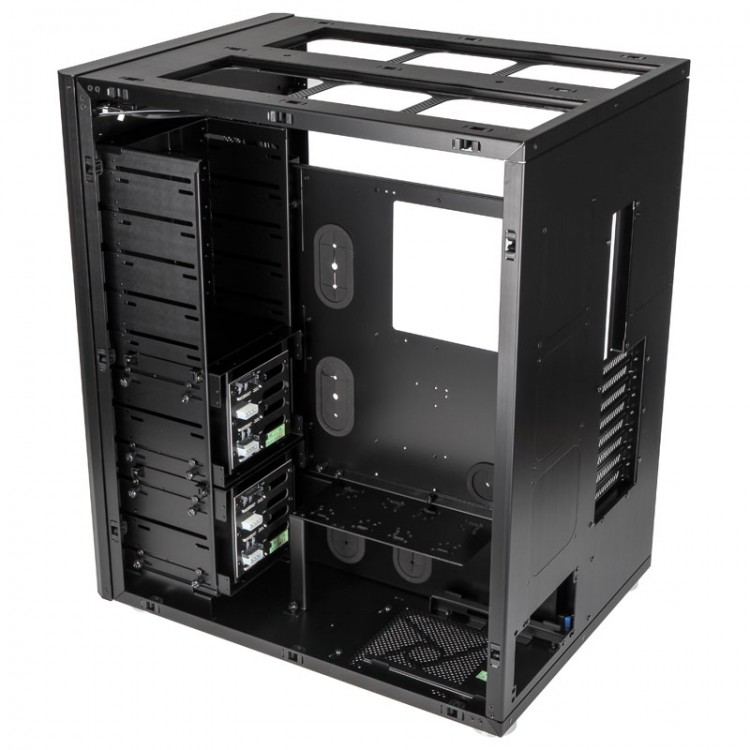
im using the d888wx
CA739LL_139163_750x750.jpg

CA739LL_139162_750x750.jpg


my loop order
bay rez koolance rp-542x2 inc pumps
over the the other side into gpu 1
into top rad
into gpu 2
into front rad (top ports)
into bottom rad
then into a t-peice with a valve that i can lower out of the case a small amount
into cpu
over to the other side into top rad
then into a T-peice with another value for drainage
back in the rez

the idea being the left have main drain would drain everything down that side, then use the right drain to empty out the rez and anything left in the top right rad

however it seems to really not be happy about drainage or filling (fill in rez)
when trying to fill it really struggles to get the air out to the point where i cant even get the water into the pumps, this includes when im resting the rez out of the case on top (usual way i fill is to place it at the highest point)

right hand drain is fine, only lets out a small amount as expect, the left hand drain again does some but not as much as expect, it takes around 2.5 litres to fill but drains (caps off rez tilting but not removing rads etc) under a litre.

annoyingly the first fill i did was with blitz part 2 and it filled up fine good amount went in before needing to fire the pumps up, since then i just wont drain down very much to allow for a good flush through let alone putting in premix

iv tried to change the design abit and tubing slightly with no luck, not that any water came out while doing it, i should add that once it running and finally managed to get the air out its great, but that initial fill and drain is the issue.

i would like to do a bottom fill, however that also failed im guessing due to trapped air in a rad and the water just goes the other route and does not vent out the rez

any suggestions?
 
A photo of the layout would help a lot.
The loop order sounds unusual especially the rad between the GPU that may be trapping air in the top of the case. Can you add a drain on this rad as well?

Rather than filling into the res it may be worth trying to attach tubing the both drains.
Fill into the lower one and allow air to escape from the higher one.

By closing the valves and running the pump you should be able to fill the system most of the way and then bleed out any final air using the res.

Once the system is full enough air trapped in the top res should come out with time and rocking the case.
 
hope these pics help
IMG-20181208-135935.jpg


IMG-20181208-140003.jpg


IMG-20181208-140025.jpg


from those above pics
my left hand drain is in the bottom right of the first pic
my right hand drain is in the last pic behind the inlet for the pump

my thoughts were the front and bottom rad getting trapped air rather than the top

just now i tried adding tube onto the bottom left drain port and held above the top of the case to fill from, to use as a bottom fill, however it took very little, no air really got out, i knew i had just under a litre missing at that point but i could not even get a 1/4 of that back in, but the rez and drain port were full, i disconnected and then went back to trying to fill from the rez again and was back stuck with it not really taking much in at a time, very long process to get a small amount of water in due to trapped air im guessing

however its again full now with no trapped air

the right hand drain is basically the rez, however i have a cpl quick disconnect on the way to attach to both drains to then hold above the case for filling and drainage, im not not sure thats going to do the trick, so thought i would ask

the main thing annoying me is the pumps struggling to get water when the rez is full, then when it does catch some water and start running turning it off fills the rez back up and overflows making it very hard to fill, as almost nothing is getting in each time, i admit iv not turned the pumps down yet which i should have done for filling really

currently im thinking a longer tube on the pump to gpu will allow a higher rez so gravity should be more in my favour with a higher pressure to fill the top rad onards

to have so much water left in would suggest its not just 1 rad that wont empty, the top right rad seems to at least drain down well, plenty of air goes back up to it from the rez once i open the left drain for it to be clear, the right drain only gets the rez and a dribble from the rad

i feel like the top left rad is draining as there is quite the gurgle while it continues to let water out, im not sure on the front and bottom doing anything, on the other hand the gurgle could be from the right top rad as the cpu drains down

iv been doing this for 2 days and my brain is starting to fry lol
 
Get rid of that crazy order i would say. Run flexi pipes between GPU's using normal comp fittings, not the rotary type as they are too high. Flip the top radiator and bottom around. Top radiator fittings on the left, bottom radiator fittings on the right.

Go from pump to bottom radiator via the bottom grommets. Then bottom radiator to top radiator via bottom grommets and open section at the top behind mobo tray (add valve, flow meter what ever behind mobo tray), then out to CPU, out to GPU's, out to front radiator, out back to res via grommets.

Thats the easiest way i can think. You could if you really wanted to make it neat run pass through fittings in the case with a bit of drilling.
 
Last edited:
well the loop order is not how i planned, however the order does not matter it was more convenience, i do like to have a block as my first part on the line
so i went gpu, then due to the cards being different and unable to match blocks it created a pain to get them to connect, plus its nice to be able to remove them separately and have a little movement outside of the case, hence i like long tubes
so it made sense to start with the top rad, which has to have the ports on the right, then its a pain again to drop to the front rad and limits movement when being removed, so it it made sense to go to the second gpu and then to the front then rather than go to the cpu then down and back up, i thought i would go down to the bottom then back up allowing a small space for flow meter and drainage port then onto the cpu

the other side is simple just rad to rez

theory was it does not matter the order of items in the loop, so just go with the easiest and which would allow me freedom to remove a component to either drain it outside or angle it around to bleed out air

overall im happy with it, trapped air goes nice and quick once im done filling i have perhaps 20ml max of trapped air that i refill, which is not insane considering
its was just that initial air trapped at the pump (solved by moving the drainage port to the out rather than the in)
plus the drain then only letting out perhaps 40% of the water, but with more thought now im slightly more awake the remaining water is sat in the front and bottom rad
the filling issue seems to be due to ease of flow, the water ofc takes the easiest path which is cpu and over rather than gpus and over, which is why there is also trapped air in the pump section

once new parts arrive which should allow me to use left drain as the fill and the right drain as the vent i expect better results

im trying to avoid going through the grommets as they get packed out with all my cables in there, i really dont want to add the tubing to the mix, plus again flexibility of movement is far better over the tray
i dont want to go duel loop, i know its easy enough and my rez is designed for it, but i prefer single loops these days
 
You want to see the back of my case for room lol. I had to remove the radiator fit the tube, then refit otherwise couldn't be screwed on. As well as dremel a slot in the back fan mount for the collar.

I still think you could make it look a lot neater with a few adjustments. Namely sorting those fan cables out, shortening the tubes and connecting those gpu’s together. As well as a few new tube runs.

Sure running extra long tubes is easier but on the motherboard side other than reseating your pcie slot (which you could do with normal runs) it’s much easier and quicker to just drain, Remove a few screws and two pipes. I could probably take half the stuff out of mine as fast as I could as if it was air cooled.
 
dont worry ill play with cabling etc after
currently fan cables are not connected up they are just in the pc on the rads, i have no interest in what it looks like, the case does have a window but its never going to be seen by anyone due to its placement in the room, i could make it neater but i really do love the movement, iv had tighter setups in the past which looked better but were just not as flexible when removing or playing with other kit in and out so since then iv always had longer tubes on my builds
im quite happy now tho with a slight change im confident it going to be fine but have to wait a few days for it all to arrive and build up again
 
bit of a thread necro
but iv just redone my water cooling slightly to try and tidy up and reduce over all length and make it easier to flush in the future
think i remove around 1 foot of tubing

after trying many different orders and positions connections, fill options etc i ended on the following

i solved my filling issue with an interesting fix, so thought i would share it

loop order is now
rez/pump combo > T piece+valve > gpu 1 > top left rad > gpu 2 > front rad > bottom rad > T piece > flow meter > cpu > right top rad > T piece+valve > rez

to fix the filling and drain issue, i now drain from the T after the bottom rad
i have 1 port on the top of my main rez
then i have 2 spare rez just sat on top of the case connected by their 2 bottom ports, the left rez is sealed the right rez has the fill cap open

i use quick disconnects at each of the drain/fill ports so i can move it around
i start by closing both valves in and out from the main rez

then on the fill port for the main rez i have a T piece, the straight up goes to the left rez, the right goes to a quick discon
right spare rez i fill with fluid, and connect to the pumps side out T piece, this then fills from that point up into the main rez, pushing air back up into the top spare left rez

i then discon that pumps out QD with valve still closed and connect it to the bottom rads T piece and start to fill, once it stops i then open the valve on the inlet to the main rez which then pushes out more air and allows the bottom QD to continue to fill
once thats full i then move that filling QD to the T piece on the main rez which is now connected with a QD to the right "level" and a normal connection with a valve straight up into left "air" rez
this allows air to take the easy route directly up and fluid will fill from the side without air pockets created and ofc the QD creates a restriction to aid that process

once thats done, i fill the spare top right rez to the top and seal it, pop the pumps on and the air bubbles hit the main rez go straight up the pressure pushes the air to the right rez which in turn pushes the fluid into the main rez
takes about 2.7lt total so i just have to measure how much i put in as i go along which leaves the main rez completely full, little bit of excess in the up tube with the valve,
discon the spare rez and tubing etc then remove the valve grab the 2/3 drops connect the pressure valve, pressure goes up to around .2 when off, bit of tissue around, top grab the little bit that comes out the valve, 30 mins later no micro bubbles or air pockets and water level is nearly full on the main rez leaving just air above to the pressure valve

took about 100lt during rebuilds and testing lol
but finally done
next flush im going to grab a bigger 800ml+ single rez to use for filling instead of my 2 spares, and might try the bypass idea again, mainly just so i have to refill the rez less to get all the fluid in
but really happy, to go from a nightmare fill process to as close as i can get perfect fill without the need to remove any rads etc

when i first drained it for this flush i could only get 1.2lt out with lots of tilting, had to remove all the rads to get the rest out, now i can get just over 2.6lt just by using the valves and drain ports, bottom rad and front rad still need to be removed to get the last little bit
30 mins to no micro bubbles im crazy happy with it, that took ages to get rid of them before
 
Back
Top Bottom