Watercooling loop in a Lian-Li DK-Q2 "desk" case

Associate
Joined
9 Aug 2009
Posts
247
Location
Chislehurst, Kent
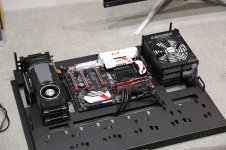
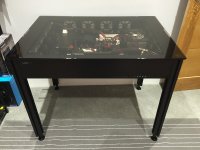
Hi guys. I'm about to attempt my first watercooling setup in a slightly unconventional case! I have the DK-Q2 and as such my setup will be all horizontal. Here is a picture of the case. The tray which houses all of the components pulls out. There is a certain amount of space around the outside of it where the cooling components could be located. the vertical clearance is 14cm from the base to the top of the case.

ynTAqM8.jpg

I already have a Corsair H100i which I could use for the CPU, but I need to put the GPUs under water ideally because of their proximity to each other and to get the best from them.

Do you guys think I should just build one large loop to include the CPU and two GPUs or stick with the H100i and a separate loop for the Titans? Any advice and product recommendations gratefully received!
 
Last edited:
Associate
OP
Joined
9 Aug 2009
Posts
247
Location
Chislehurst, Kent
Thanks Bio, not sure what I did wrong there!

@Samsung, yes there is enough clearance to fit 480mm rads behind left and right and also removable panels at the rear of the case which would mean room for another 480mm rad.
 
Associate
OP
Joined
9 Aug 2009
Posts
247
Location
Chislehurst, Kent
Do you have any recommendations for a good pump/reservoir which would be powerful enough to run the system? Bearing in mind that I'm limited to a max height of 14cm inside the case unless I wanted to run the reservoir outside of it which wouldn't be ideal. Are there such things as horizontal reservoirs?
 
Associate
OP
Joined
9 Aug 2009
Posts
247
Location
Chislehurst, Kent
A d5 would be fine and there are some nice tops. The reservoir horizontal is also fine as long as the the outlet is below the water level.

Make sure to consider how you are going to fill and drain your system when you design it!

The filling/draining was what I was slightly worried about if I just turned a reservoir which was designed to be vertical on its side. I should probably rephrase slightly and ask whether there are any reservoirs or reservoir/pump combos which have been designed to have a more horizontal orientation?
 
Associate
OP
Joined
9 Aug 2009
Posts
247
Location
Chislehurst, Kent
Be interesting to see how this progresses as I am thinking of going this route myself. I would be ditching my lovely caselabs though, but could have a desk and pc all in one - which appeals.

Mark

I'd be happy to keep this thread updated or create a build log for you Mark. Please bear in mind that I'm a total newbie when it comes to water cooling, so it probably won't be the best you've ever seen, but it might give you a decent idea about what's involved!
 
Associate
OP
Joined
9 Aug 2009
Posts
247
Location
Chislehurst, Kent
24 hour leak testing finished successfully. Turning it on for the first time was scary!

NRciw25.jpg

This has been by FAR the hardest build I have ever done because of the added complications of my first ever custom loop and the unusual dimensions of the case. I hope it pays off :)

More pics and updates to follow.
 
Associate
OP
Joined
9 Aug 2009
Posts
247
Location
Chislehurst, Kent
Thanks a lot :)

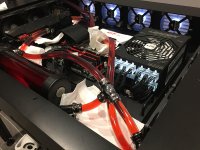
That T fitting you can see in the foreground is leading to a tap fitting with a length of spare tubing tucked away which I can trail outside of the case for draining. The desk doesn't exactly lend itself to being easily manoeuvred!
 
Associate
OP
Joined
9 Aug 2009
Posts
247
Location
Chislehurst, Kent
Yes definitely, but that's a job for when I next do some maintenance on the loop. Ideally I'd like to have something in all four corners so I can just lift the desk slightly in each direction to make sure I get everything out. The back of the case has a hole in each corner for rubber grommets for cables so the rear will be easy. I think I might have to go Dremel crazy for the front corners and buy some extra grommets when the time comes!
 
Associate
OP
Joined
9 Aug 2009
Posts
247
Location
Chislehurst, Kent
Here's a few more random pics of various stages of the build.

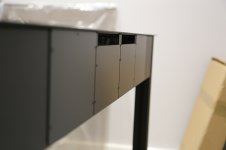
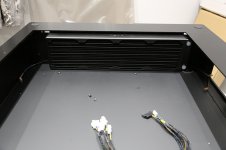
This is the rear of the case where you can see four removable plates. I HAD hoped that I'd be able to mount a 480mm rad there and had based my original case layout on that.

jdZzOul.jpg

When the time came to try it out though you can see that it wasn't even close to lining up!

0ywmLsQ.jpg
 
Associate
OP
Joined
9 Aug 2009
Posts
247
Location
Chislehurst, Kent
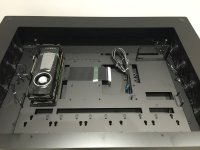
The case has a removable tray which can be taken out so that the build can actually be performed away from the desk at a more comfortable location which is very nice. Obviously carpet not being the best choice! ;)

Video cards installed there before my water blocks came for space testing purposes.

UbnRxNj.jpg
 
Associate
OP
Joined
9 Aug 2009
Posts
247
Location
Chislehurst, Kent
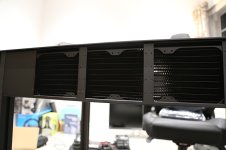
Installation of an XSPC RX480 46mm rad. It's interesting to note that because the tray which houses the PC components themselves does not sit centrally in the case I couldn't fit identical rads on each side. The other side I used a slimmer EKWB Coolstream SE 480 with a 25mm core.

9qW5NdK.jpg
 
Associate
OP
Joined
9 Aug 2009
Posts
247
Location
Chislehurst, Kent
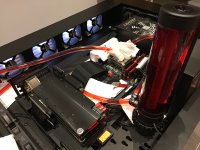
This picture was taken during the filling process hence the reservoir being up on its end. Since the horizontal placement of the res means that I'm not exactly going to be fighting gravity to keep it in place, it's secured with strong velcro so that I can easily pick it up to add biocide or top it up.

This pic also clearly shows the PCIe risers which run from the GPUs to the motherboard. They caused a problem with the loop output from the GPUs which was on the underside due to their orientation. Out with the Dremel to cut a small slot out of the mounting tray to make extra room!

gTFefUp.jpg

There is also nowhere to mount the loop temperature display easily in the case so I slotted it into a cutout in the tray. It doesn't sit flush, but it's good enough.
 
Last edited:
Associate
OP
Joined
9 Aug 2009
Posts
247
Location
Chislehurst, Kent
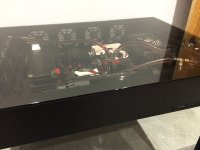
In this picture you can clearly see how the tray is slightly offset to the right.

CqmL0FK.jpg

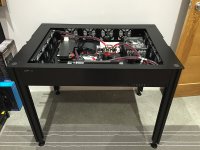
And here is the almost finished article with the glass top fitted. It looks very nice in my opinion and it'll be a shame to put a keyboard and mouse on top of it!! ;)

kfb9G2G.jpg

WDXIlky.jpg

I have yet to actually turn it on so I don't know whether it's going to work!
 
Associate
OP
Joined
9 Aug 2009
Posts
247
Location
Chislehurst, Kent
Mate, I'm so pleased to find this.

I've been crawling over youtube and the like to find a build log, all I could find was that harbringer desk..

In a few years, when I move out, this is the goal! :D

I'm really pleased that this has actually been of use to somebody! I was in exactly the same situation as you before I started the build. There is very little in the way of information out there because the cases aren't common.

What I really wanted to know before I bought were the drawbacks of the case and the problems I would have to deal with in getting it built. I found absolutely nothing so just had to fly by the seat of my pants. If you have any questions at all I'd be happy to answer them :)
 
Associate
OP
Joined
9 Aug 2009
Posts
247
Location
Chislehurst, Kent
eBnftIY.jpg

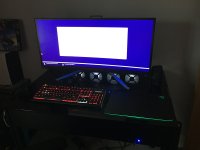
Thank god for that!! Turned on first time which was a relief because if I need to do lots of fiddling inside it's not like I can just take the side of the case off. The table top needs to be lifted off. That in itself isn't too much of a problem because the monitor and peripherals can go on the floor if you know you need to tinker. It's just not as convenient as a standard case.

iUzn444.jpg

Crappy quality phone pic just installing the OS. A lor of the internals are obscured by everything on the top. I'll be wall mounting the monitor this weekend to get rid of the OBSCENELY large base. That should help a lot.
 
Associate
OP
Joined
9 Aug 2009
Posts
247
Location
Chislehurst, Kent
The desk itself is 70x100cm and you can push it right up against the wall. There is a lip which means that the fans I have installed at the rear of the case have plenty of room as an intake.

The motherboard and graphics cards are coated centrally in the case so they aren't actually connected at the rear of the case. The cables are run into the case through two grommets on the underside.
 
Back
Top Bottom