Windows 10 Power plans with games

Associate
Joined
27 Aug 2009
Posts
712
High folks,

Anyone know a way to enforce the High performance power plan when only playing games, and then reverting back to balanced out of games? Reason I ask is that balanced causes a very small amount of stuttering, high performance is perfect, but obviously uses more power when doing nothing.
 
Can a .vbs script be written to switch the power settings. Maybe have to have two, one for High Performance and one for Balanced. Simply running one or the other changes it.

I once had the Power setting on the Context menu, saved looking for it. Probably be able to find that reg edit.
 
this also looks interesting

https://www.tenforums.com/tutorials/43655-power-plan-create-windows-10-a.html?filter[1]=Power Management

I have just tested it out..With a combo of the first link ( Same site )
I listed my plans. Set it to Balanced.

Then noting the power plans numbers I saw this

powercfg -setactive GUID

so in Command Promt I typed

powercfg -setactive 04d034a7-d404-406a-bfc4-36204a3c07c3

Checking my Power Plans indeed the High Performance had been set.

So in theory having two .cmd files, one seting active the Balanced and the other setting active the High Performance.
Running them when desired would give you the result you want, would it not..

I will test this further.

Sounds fun..
 
Just tested it...Works well

Two .cmd files on my desktop

#1 = Set High Performance Power Plan.cmd
Code:
powercfg -setactive 04d034a7-d404-406a-bfc4-36204a3c07c3

#2 = Set Balanced Power Plan.cmd
Code:
powercfg -setactive 381b4222-f694-41f0-9685-ff5bb260df2e

Running chosen .cmd as Admin changes the power plan.

Of course if this is infact what you had in mind I think you would have to change the numbers
381b4222-f694-41f0-9685-ff5bb260df2e
to your own power plan settings. I can imagine they will be different to mine.

Next in my mind would be to add these files to The Context menu. Have the files hidden in C:\Windows say, and called upon when needed. All nice and neat.

Hope this is of help..
 
.vbs may be better

not made it Option Explicit yet, so mistakes cab be seen but

Code:
Dim objShell

Set objShell = CreateObject("WScript.Shell")

objShell.Run "cmd /c powercfg /setactive ""381b4222-f694-41f0-9685-ff5bb260df2e""", 0, True

Set objShell = Nothing

Works just as well. Plus I do have a couple of .vbs scripts I can run from the Context Menu so making a new reg to add these should be just as easy..

I will get on with it...Work becons now though...

cheers .
 
Well been messing and done it.
Yep I know the last post I did let you download a ready made .reg file but where's the fun in that.

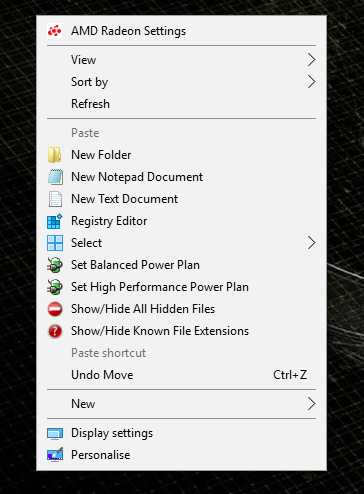
this is my Context Menu

Context%20Menu_zpstmk4dyls.png

These are the files I made

SetBalancedPowerPlan.vbs
Code:
Option Explicit
Dim balanced

Set balanced = CreateObject("WScript.Shell")

balanced.Run "cmd /c powercfg /setactive ""381b4222-f694-41f0-9685-ff5bb260df2e""", 0, True

MsgBox "Balanced power plan has been set" ,64, "Balanced Power Plan"

SetHighPerformancePowerPlan.vbs
Code:
Option Explicit
Dim performance

Set performance = CreateObject("WScript.Shell")

performance.Run "cmd /c powercfg /setactive ""04d034a7-d404-406a-bfc4-36204a3c07c3""", 0, True

MsgBox "High Performance power plan has been set " ,64, "High Performance Power Plan"

Both of the .vbs files need to be placed into C:\Windows !

To add to the Context Menu
Add Set Balanced & High Performance to the Context Menu.reg
Code:
Windows Registry Editor Version 5.00

; Add Set Balanced Power Plan to the Context Menu
; Add Set High Performance Power Plan to the Context Menu
; Place SetBalancedPowerPlan.vbs into C:\Windows
; Place SetHighPerformancePowerPlan.vbs into C:\Windows


[HKEY_CLASSES_ROOT\Directory\Background\shell\Set Balanced Power Plan]
"Icon"="powercpl.dll"

[HKEY_CLASSES_ROOT\Directory\Background\shell\Set Balanced Power Plan\command]
@="WScript C:\\Windows\\SetBalancedPowerPlan.vbs"

[HKEY_CLASSES_ROOT\Directory\Background\shell\Set High Performance Power Plan]
"Icon"="powercpl.dll"

[HKEY_CLASSES_ROOT\Directory\Background\shell\Set High Performance Power Plan\command]
@="WScript C:\\Windows\\SetHighPerformancePowerPlan.vbs"

To remove these from the Context Menu

Remove Set Power Plans From the Context Menu.reg
Code:
Windows Registry Editor Version 5.00

; Remove Set Power Plan Options from the Context menu

[-HKEY_CLASSES_ROOT\Directory\Background\shell\Set Balanced Power Plan]

[-HKEY_CLASSES_ROOT\Directory\Background\shell\Set High Performance Power Plan]

Save the .vbs files, place them in C:\Windows.
Save the .reg file, run it and add the registry edits.

It would be best to check the long numbers and change as needed. It may not be necessary ? I will have to look further into it.

This was fun and I may adapt it so when I do a fresh install I can set High Performance right from the get go, just depends on those numbers. Going to have to test that..

Hope this helps.

cheers

Forgot to mention, using my method I added a nice little message box informing you the power plan has been set..
 
Just to add a little note.
From what I have read and from testing out on new Win 10 x64 these are the default numbers for the power plans.

Power Scheme GUID: 381b4222-f694-41f0-9685-ff5bb260df2e (Balanced)
Power Scheme GUID: 8c5e7fda-e8bf-4a96-9a85-a6e23a8c635c (High performance)
Power Scheme GUID: a1841308-3541-4fab-bc81-f71556f20b4a (Power saver)

So it may well be the numbers do not change until the user changes something it a particular power plan and that is why my given High Performance number is different. First thing I always do on a new install, set to H.P and turn display off = never.

This was fun. Going to adapt the .vbs for my own needs, then as I install a fresh Windows the power plan is automatically set for me.

cheers
 
Just because i was bored and learning some powershell and it was a good lesson on parsing output to grab and use the guid's

A powersehll gui to swap between balanced and high, it should work regardless of the GUID.
Save as a ps1 run and right click run with powershell, you will probably get a warning about running scripts if you have not run any in the past.

Code:
#### This hides the powershell console
Add-Type -Name Window -Namespace Console -MemberDefinition '
[DllImport("Kernel32.dll")]
public static extern IntPtr GetConsoleWindow();

[DllImport("user32.dll")]
public static extern bool ShowWindow(IntPtr hWnd, Int32 nCmdShow);
'
$consolePtr = [Console.Window]::GetConsoleWindow()
[Console.Window]::ShowWindow($consolePtr, 0)


##### Grabbing the GUID
$Max = powercfg /aliases | where-object {$_ -like "*SCHEME_MIN*"}
$Max = $Max -replace {  SCHEME_MIN}

$Balanced = powercfg /aliases | where-object {$_ -like "*SCHEME_BALANCED*"}
$Balanced = $Balanced -replace {  SCHEME_BALANCED}


Function GetCurrent {
$LiveScheme = powercfg /getactivescheme
$LiveSchemeGUID = $LiveScheme.Split() 

If ($LiveSchemeGUID[3] -eq $Balanced) {
$PowerCommander.Text = "Current - Balanced"
} Else {
$PowerCommander.Text = "Current - High Perf"
}
}


Add-Type -AssemblyName System.Windows.Forms


$PowerCommander = New-Object system.Windows.Forms.Form
$PowerCommander.TopMost = $true
$PowerCommander.Width = 200
$PowerCommander.Height = 100
$PowerCommander.FormBorderStyle = [System.Windows.Forms.FormBorderStyle]::FixedToolWindow 


$Swap = New-Object system.windows.Forms.Button
$Swap.Text = "Change Power Plan"
$Swap.Width = 100
$Swap.Height = 40
$Swap.Add_Click({
If ($PowerCommander.Text -eq "Current - Balanced"){powercfg -setactive $Max}
If ($PowerCommander.Text -eq "Current - High Perf"){powercfg -setactive $Balanced}
GetCurrent
})
$Swap.location = new-object system.drawing.point(50,10)
$Swap.Font = "Microsoft Sans Serif,10"
$PowerCommander.controls.Add($Swap)

GetCurrent
[void]$PowerCommander.ShowDialog()
$PowerCommander.Dispose()
Yeah i know its not neatly laid out :p
 
Last edited:
Back
Top Bottom