Project: Clear & Simple

Associate
OP
Joined
29 Dec 2014
Posts
2,350
Location
The "North"
0ZLhwEG.png

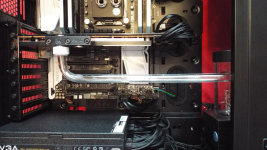
So today I finished off two tubes, they took around 2-3 hrs each but I couldn't be happier. The first one was pretty easy with the use of the extender that was included with the EK pump.
6iZmNy8.png

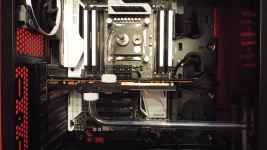
However the second bend was a pain in the **** as no matter how hard I tried I couldn't get the damn thing to fit and look good. It's hard to show but there is not a direct bend route from the CPU to the GPU aided by the issue that the Monsoon insert isn't a perfect fit into the Primochill tubing due to the manufacturing tolerances. This meant I had to employ a second pair of hands into the task and now it looks good (after numerous attempts) :D
UmbQiJv.png

Now I'm tired and too lazy to make a tea or coffee so tomorrow after I have had some refreshment I shall continue. :D
 
Associate
Joined
23 May 2012
Posts
31
Location
Edinburgh
So today I finished off two tubes, they took around 2-3 hrs each but I couldn't be happier. The first one was pretty easy with the use of the extender that was included with the EK pump.


However the second bend was a pain in the **** as no matter how hard I tried I couldn't get the damn thing to fit and look good. It's hard to show but there is not a direct bend route from the CPU to the GPU aided by the issue that the Monsoon insert isn't a perfect fit into the Primochill tubing due to the manufacturing tolerances. This meant I had to employ a second pair of hands into the task and now it looks good (after numerous attempts) :D


Now I'm tired and too lazy to make a tea or coffee so tomorrow after I have had some refreshment I shall continue. :D


Did you use any tools to bend them or did you do them by hand? looks neat, Can't wait to see this completed.

the one thing i don't like about Rigid tubing builds, the tubing alone takes a ton of time which i don't have :(
 
Associate
Joined
17 Mar 2009
Posts
2,474
Location
Scotland
I know your pain, I've only bent two pipes for mine and its not easy at all. First one for me was easy but the second one took 3 hrs. My third pipe was an all day affair and I gave up in frustration.

It just looks so good though its worth the effort.
 
Associate
OP
Joined
29 Dec 2014
Posts
2,350
Location
The "North"
Did you use any tools to bend them or did you do them by hand? looks neat, Can't wait to see this completed.

the one thing i don't like about Rigid tubing builds, the tubing alone takes a ton of time which i don't have :(
For the first bend I used my right angled mandrel from the monsoon kit. For the second it was a combination of the right angle mandrel and guestimation. :D

I know your pain, I've only bent two pipes for mine and its not easy at all. First one for me was easy but the second one took 3 hrs. My third pipe was an all day affair and I gave up in frustration.

It just looks so good though its worth the effort.
Yes, it is worth the effort but I think this will be a hybrid loop where I use soft tubing for the tubing you cant see such as the radiator to pump connection as I can't find a way to get the tubing to bend in such a tight space :confused:
 
Associate
OP
Joined
29 Dec 2014
Posts
2,350
Location
The "North"
That cpu to gpu bend looks spot on, I don't think you could have made it look any better.

Thanks :D
Unfortunately I had an issue today and now I'm out of tubing. I tried to finish off my last bit of tubing which goes from the CPU to the radiator. However the Monsoon 13/10 insert wasn't quite a perfect fit so the piece ended up bulging and looking awful. So now I need to order some more tubing to finish the build and just to be safe I'll get a Primochill insert.
 
Last edited:
Associate
Joined
23 May 2012
Posts
31
Location
Edinburgh
Yes, it is worth the effort but I think this will be a hybrid loop where I use soft tubing for the tubing you cant see such as the radiator to pump connection as I can't find a way to get the tubing to bend in such a tight space :confused:

I've always wondered how the heck people do those really tight spaces, But yeah best using Soft tubing for parts you don't see, JayzTwoCents did that in skunkworks, He used a bunch of Soft tubing in lower compartment which you couldn't see and just left the top part purely rigid
 
Associate
OP
Joined
29 Dec 2014
Posts
2,350
Location
The "North"
I've always wondered how the heck people do those really tight spaces, But yeah best using Soft tubing for parts you don't see, JayzTwoCents did that in skunkworks, He used a bunch of Soft tubing in lower compartment which you couldn't see and just left the top part purely rigid
Yep, it certainly is a better idea as I just cant see a feasible way of bending the tubing to get it to fit without using a ton of fittings. It is just simpler to get the soft tubing for the locations were you can't see it. :)

Is the lower tube coming out the fitting at a angle from the gpu? Gpu to cpu looks good.
Why didn't you sand the monsoon insert to fit or buy the correct insert from ocuk?

The issue is that the Monsoon insert was too small and I didn't for see this being a massive issue as although it was small for the other tubing it was only by micro fractions. But in the last bit of tubing it was way too small. Also I couldn't buy a Primochill insert as they were out of stock :D

As for the slight angle yes a little bit but it fits into the acrylic fitting snug as it goes in straight and in person it looks fine. I've also made sure they're all air tight :D
 
Last edited:
Associate
OP
Joined
29 Dec 2014
Posts
2,350
Location
The "North"
0ZLhwEG.png
Long time no updates :D

So as with most things the plan has changed slightly. I am going to attempt to purchase some more hard tubing and a Primochill insert as I hope it will fit a little better allowing me to get the bend from the CPU to the radiator spot on.

As for the rest of the tubing the space required for the tight bends is simply not there for me to get them to a standard I would be happy with. Because of this I am going to go with soft tubing for the rest as it will not be visible and it will be considerably safer to avoid kining in the bends of the hard tubing. Unfortunatley OverclockersUK don't have the Primochill insert without buying a kit and it appears there's no plans to restock so I'll have to do some ingenius thinking about the choices available :(

So heres the part's list:
YOUR BASKET
1 x PrimoChill 13/10mm Acrylic Tube 60cm 4-Pack - Clear £15.95
5 x EK Water Blocks EK-ACF Fitting 10/16mm - Black £4.79 (£23.95)
2 x EK Water Blocks EK-Tube ZMT Hose 16/10 mm - Matte Black - 1m £3.49 (£6.98)
1 x XSPC G1/4" Female to Female Rotary Fitting (Black Chrome) £2.99
Total : £59.46 (includes shipping : £8.00 Ex.VAT).


Also I'm currently taking a quick break from the project to go on holiday but don't worry as I shall be continunuing with this project immediatley upon my return :D
 
Last edited:
Associate
Joined
26 Dec 2013
Posts
580
Location
404 Not Found
Send it this way and I'll finish the tubes :D Loving that motherboard and ram though!

Oh not sure if you have ordered the primochill insert, but mine was a blue alphacool measuring 9.2mm and 1 meter long. Fits my tubes perfectly and getting some clean bends from it.

Enjoy the rest of your holiday!
 
Associate
Joined
24 Apr 2012
Posts
811
Location
Carlow, Ireland
0ZLhwEG.png
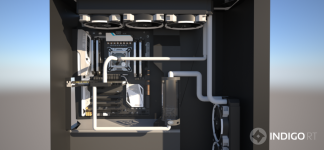
Just produced some quick models of how the PC's interior may look using some models from Google and drawing tube runs. The pipes in the actual build will be clear but I could not find a way to draw clear pipes in Sketchup. I'm pretty pleased with the tube runs and hope I can get them as clean as this when I build it. There are some more renders but this is the best one :)
PFMuQx2.png

Man nice work in SketchUp!
 
Associate
OP
Joined
29 Dec 2014
Posts
2,350
Location
The "North"
Send it this way and I'll finish the tubes :D Loving that motherboard and ram though!

Oh not sure if you have ordered the primochill insert, but mine was a blue alphacool measuring 9.2mm and 1 meter long. Fits my tubes perfectly and getting some clean bends from it.

Enjoy the rest of your holiday!
Thank you, I'll have a look at it when I get back:D

Man nice work in SketchUp!

Thanks, must admit I downloaded the models from sources on the internet as my skills are nowhere near good enough to make models as accurate as the ones I used. :)
 
Associate
Joined
12 Nov 2011
Posts
86
Location
Lancashire
this looks very similar to the build i want to do with regards to the case and watercooling setup, ill be keeping an eye on this, nice work so far, cant wait to see the finished product
 
Associate
OP
Joined
29 Dec 2014
Posts
2,350
Location
The "North"
0ZLhwEG.png
Well after returning home I've decided to make some changes in the build.

Although I've had no issues regarding the tube breaking/being air tight I've decided to change and go the route of Monsoons PETG as it should (hopefully) allow the insert to fit better so it doesn't squash when bending. Also I've finally found a seller of PETG tubing. Apparently PETG is more robust and is easier to bend so I shall be interested to see what it's like.

This means I'm going to have to re-do the current tubes but I think it will be worth it in the long run and hopefully their should be less stalls in updates as I've made sure to order a large amount of tubing. :D
 
Last edited:
Associate
Joined
18 Aug 2014
Posts
185
I'm interested to hear how you get on with the PETG. I've never had any issues with acrylic but with the distinct lack of clear acrylic tubing in the size I need for my fittings I'm having to order direct from the maker anyway so I have either option now. I was put off the idea of PETG by a few things I've read but not seen first hand results yet.
 
Back
Top Bottom