Lian Li A20

Associate
OP
Joined
23 Aug 2007
Posts
1,699
Location
Rothesay
If you look at Pic 3 which i have updated where the red circles are you remove these and the door and supports can be removed.
Looking at Pic 4 the central column can be moved or removed to suit the user, i moved mines to the rear to make use of the supplied
optional 120mm cooling fan over the memory slots, also supplies extra air flow for CPU cooler as well. (i have some of the older longer dvd-rw drives)
Also the PCI fan 140mm can also be removed if you wish i use it to help vent some of the excess heat my two GPU's produce running at full tilt.
 
Associate
OP
Joined
23 Aug 2007
Posts
1,699
Location
Rothesay
Lian -Li A20 Watercooling Mod

OK instead of starting a new thread i thought i would reserect my old thread

Prior to stripping my system this was its spec.

Amd Phenom II 940 @ stock
Asus M3A32-MVP Delux
4 Gb Kingston Hyper-X 8500 DDR2
2 x Maxtor DiamondMax 21 320Gb drives in raid 0
2 x Maxtor DiamondMax plus 9 160GB drives
1 x Maxtor DiamondMax 10 300GB drive
1 x Seagate Baracuda 7200.11 500GB drive
Ide DVD-RW by LG
1 x BFG GTX280 OC
1 x Leadtek 9800GX2
1 x Sparkle 8800GT
Tagan Turbo-Jet 1100Watt PSU

Cooling

D-Tek Fusion V1 CPU waterblock
Swiftech D4 Laing Waterpump
HW Labs 120mm Extreme Alpha Rad externally mounted on rear 120mm Fan
Zalman Reserator V1 being used as a res and additional passive Rad.
2 x 120mm Sythe Slipstream Juni 1900RPM
2 x 140mm Lian-Li stock fans.
Various lengths of 7/16" tubing over 1/2" barbs
Distilled water as coolant

So now onto the upgrades and mods i plan to do.

First is the mobo is being changed for an Asus M3A79-T Deluxe
The seagate baracuda 7200.11is being removed and added to my NAS Drive to give me 1TB as it already contains one of them.
DVD-RW being swapped for a new black sata version.
Lian-Li EX33 drive cage being added and the fan changed for one of my scythe juni's
Zalman ZM-MCF2 fan controller being added
sparkle 8800gt will have an ek waterblock added.
a Thermochill PA120.2 Rad added
an EK Multioption 150 res added and the reserator removed from the loop.

i think thats all the upgrades now for the mods to the case.

I intend on cutting two wholes in the mobo tray to allow better cable routing these will be deburred and edged with the rubber edging.
the two wholes inbetween two zones in the case will be increased in size and again edged with rubber edgeing.
the left hand side panel will be cut to allow the heat from the thermochill rad to be pushed out. For the time being this will be tidied up with a PA120.2 rad grill attached to the case side but not to the rad to allow me access to the system.
In a couple of months time this will be increased in size and covered with black modders mesh from that well known online store as well as some plexiglass so i can add in a window.
i will also be adding a whole in the roof to add in a fill port for the res.
and removing the the partition in the lower chamber between the psu compartment and hdd compartment to fit the pa120.2 into.
i was originally going to mount the extra rad in the roof like most do but with the mobo i use the memory gets in the way
had it been a xspc rs model or a swiftech stacker i could have but as ive read for what im cooling and looking to add in once i know they are still working the thermochill PA120.2 with my current rad will give me better cooling and less noise.

i will be updating the post as i do the work and adding pic's once i get some batteries for the wifes cheap*** camera
 
Associate
OP
Joined
23 Aug 2007
Posts
1,699
Location
Rothesay
As promised here are some pics of the work as it is getting done.

So far Modding wise i have only been brave enough to start with the mobo tray.

GEDC0140.jpg


As you can see ive done the two holes and wrapped them with rubber edging as well as added the support brackets for the new resovouir.
The hole at the far left is for my sata cables and the one inbetween the res brackets for the ATX 24pin cable.

I,ve marked out the next two cuts i need to make in the case which i hope to do tommorow.

GEDC0143.jpg


As you can see im increasing the current cutouts by approx 60% again these will be wrapped with rubber edging, also you will notice ive already removed the panel between the psu compartment and harddrive compartment.

I will also have to purchase another half round file after snapping the needle half round file i had, but now i know how much pressure they can take and will be less exhuberent when i get the next one.

More updates to come as i get more of the work done.
 
Associate
OP
Joined
23 Aug 2007
Posts
1,699
Location
Rothesay
Another update

Ive cut the lower panel now and spent hours filing it and before i appllied the U-trim it looked like this

GEDC0146.jpg


For my first mod its looking not too bad

GEDC0148.jpg


After ive applied the u-trim it tidies it up very nicley

Heres a couple of pics showing how the inside now looks with my mobo added and the new res in place.

GEDC0151-1.jpg


And now from underneath

GEDC0150.jpg


If you look just to the right of the little square patch is on the roof this is where im looking to place the fillport once i cut the hole for it.
Ive bought the 1" hole saw and arbour yesterday and will mark up and cut that later today hopefully.
I,ve also decided im not going to wait to install the window and mesh panel as ive already got the system apart and im enjoying the modding so far im just going to order the stuff for it this week and get it done.

Next on the list is working out how im going to mount the radiator in the lower chamber and sort that before measuring and marking out the side panel ready for cutting.
 
Associate
OP
Joined
23 Aug 2007
Posts
1,699
Location
Rothesay
Well thats the fillport cut and installed was a nice quick simple mod thanks to the correct drill bit etc. :D
I will post a pic of it next time once ive done a couple more mods.
Im now debating whether or not to cut 2 holes at the rear of the case just above the 120mm fan hole for tubing to connect my 120mm HWLabs Alpha extreme rad.
it would help in routing the tubing and making it a neater job.

now onto working out how im mounting my PA120.2 rad in the bottom of the case.
 
Last edited:
Associate
OP
Joined
23 Aug 2007
Posts
1,699
Location
Rothesay
Time for another update.

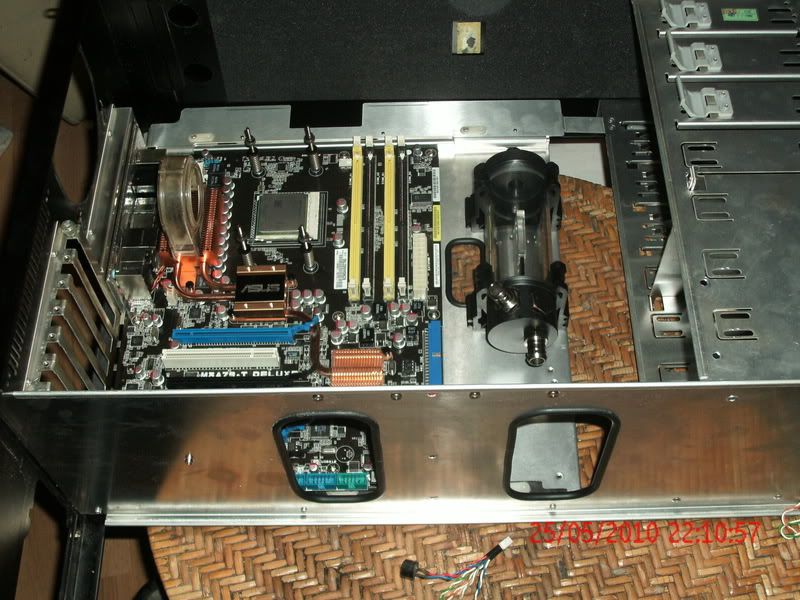
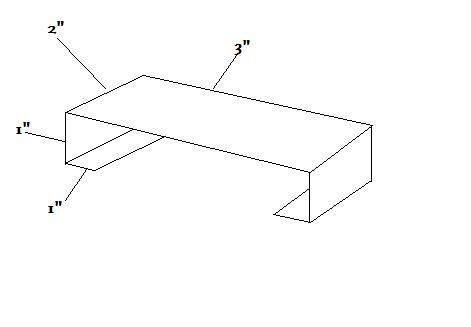
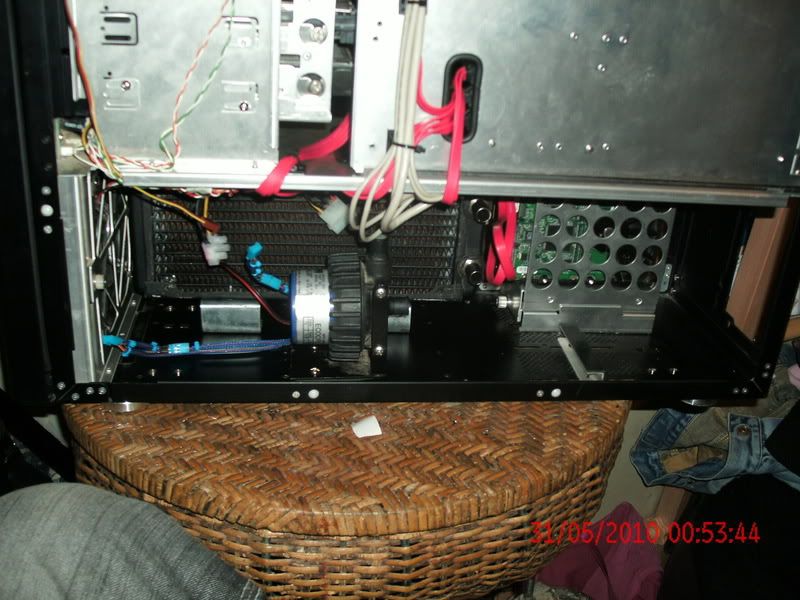
Ive worked out my mounting method for my PA120.2 in the bottom of my case.
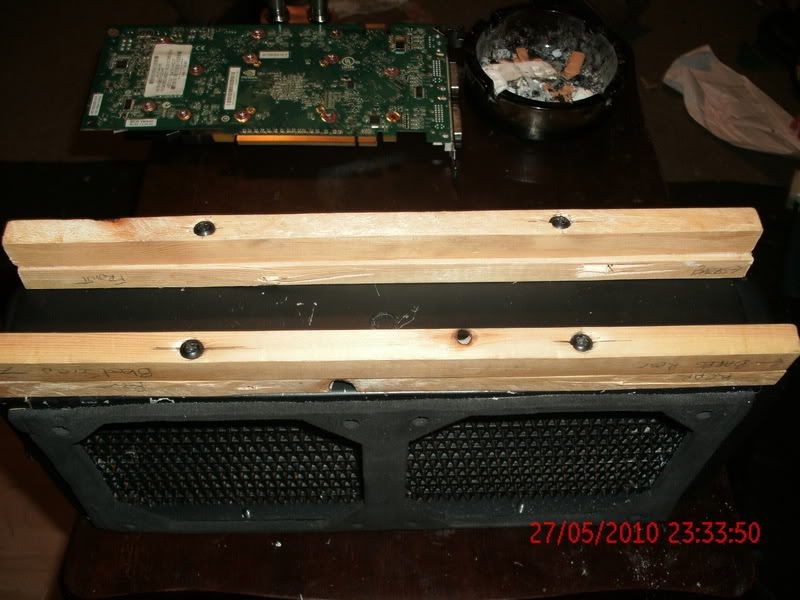
Instead of spending £15 or so on a pre fabricated rad stand ive created one from some spare 1/2" square wood edging i had.

GEDC0163.jpg


As you can see ive doubled it up and secured it with screws that match the holes meant for a shroud. (excuse the ashtray)

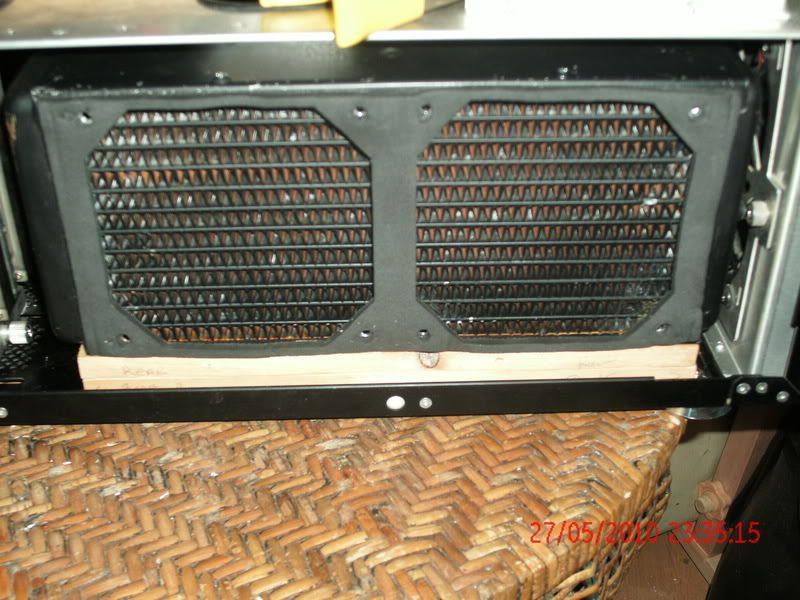
below is a pic of what it should look like once secured in the bottom of the case.

GEDC0164.jpg


I will paint the wood rails black before final install to help it blend in.
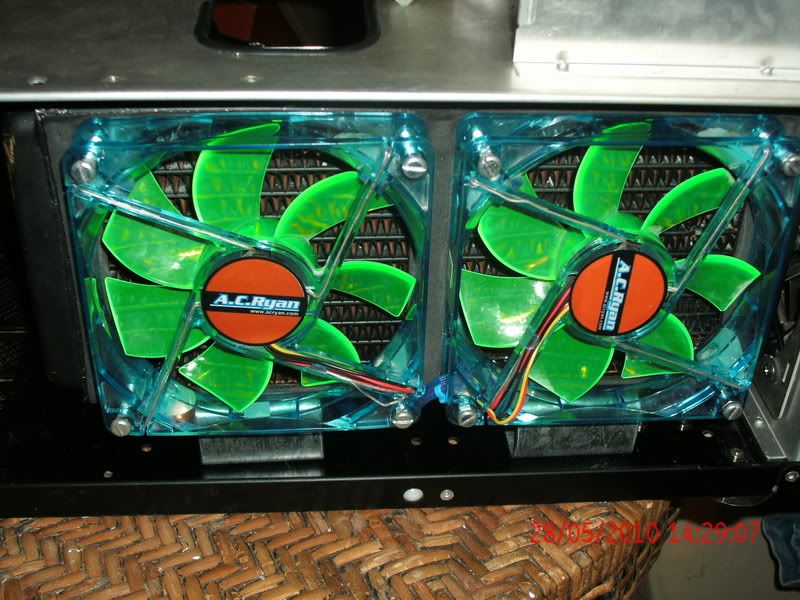
I only need to work out which side im going to mount my fans on as they are led fans im inclined to have them the same side as the side panel.

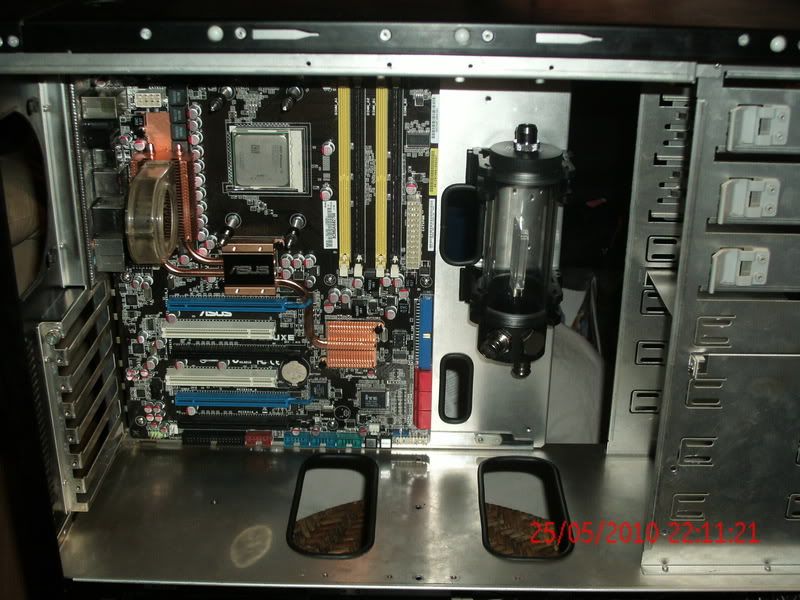
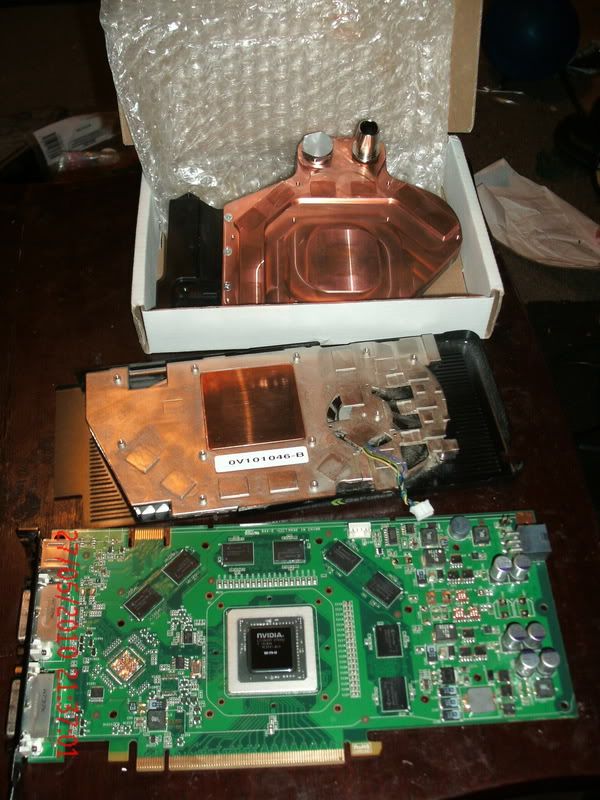
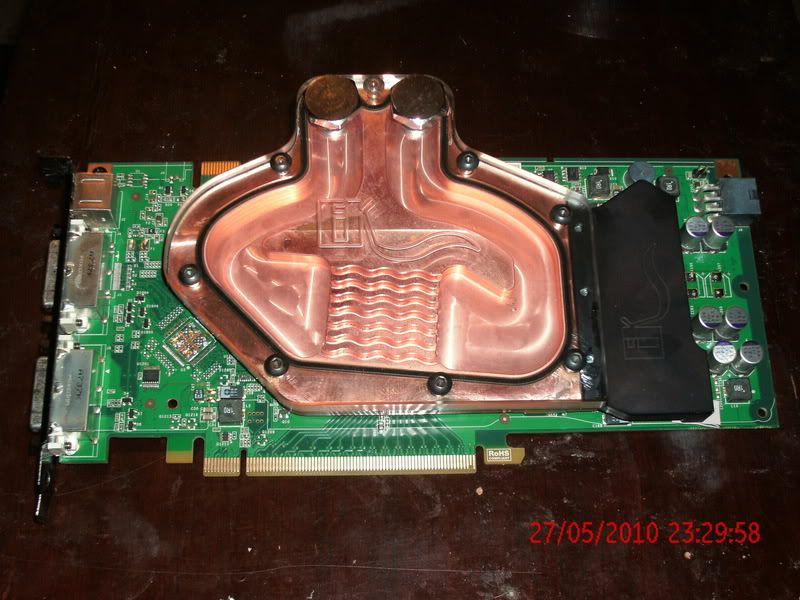
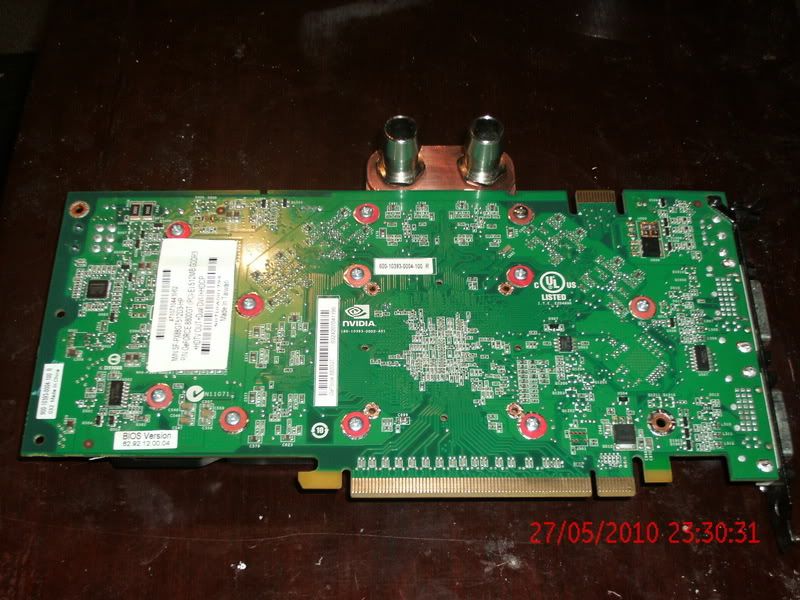
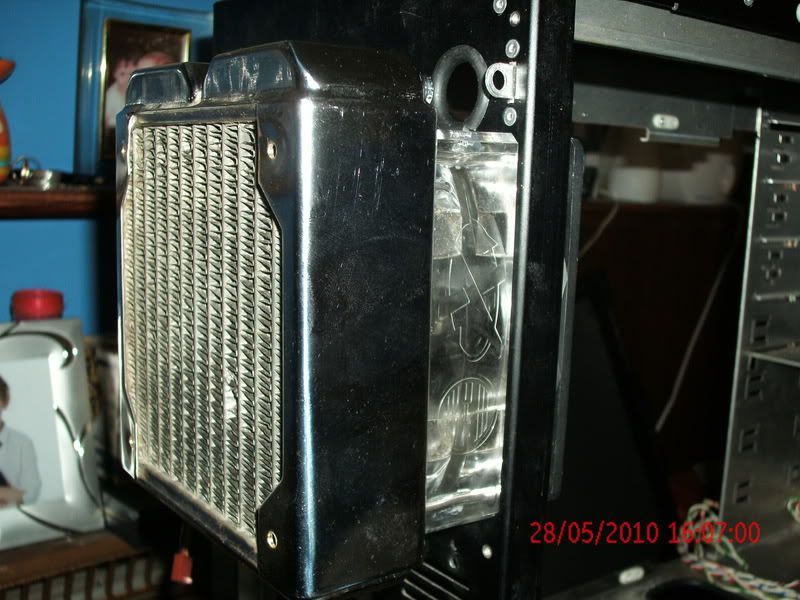
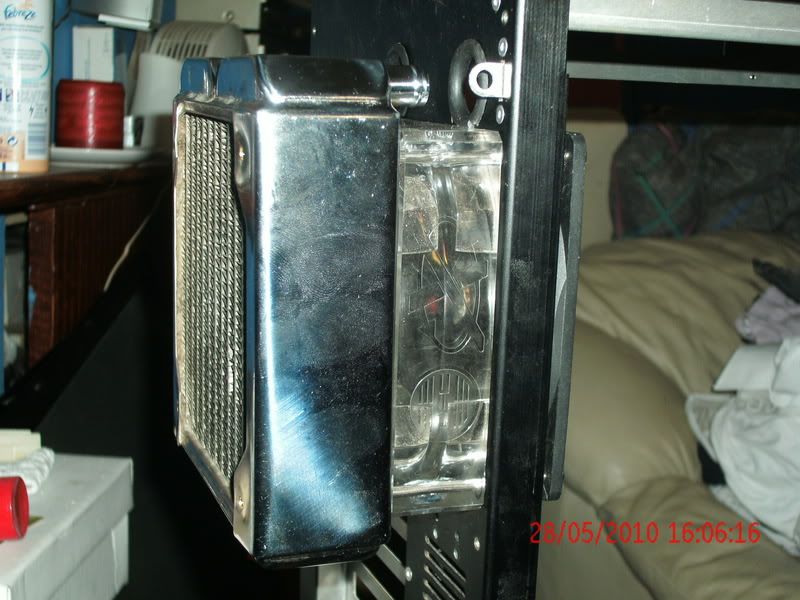
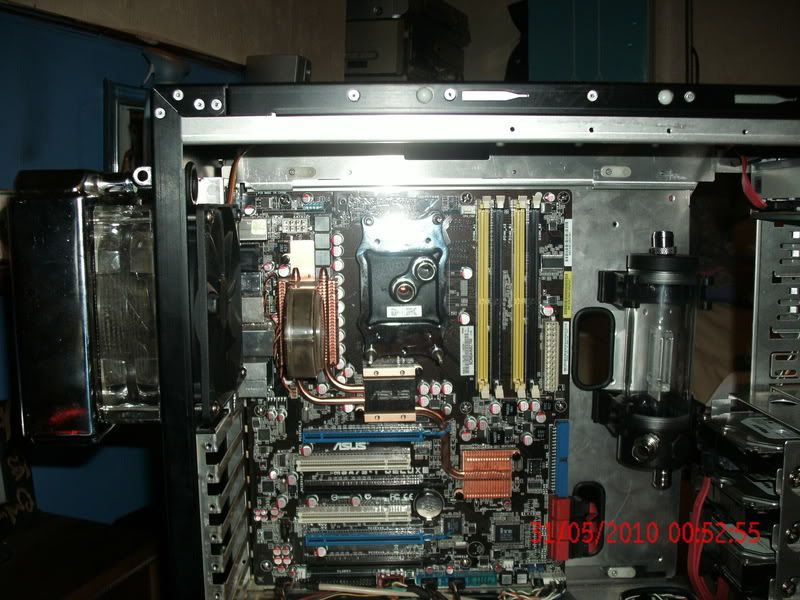
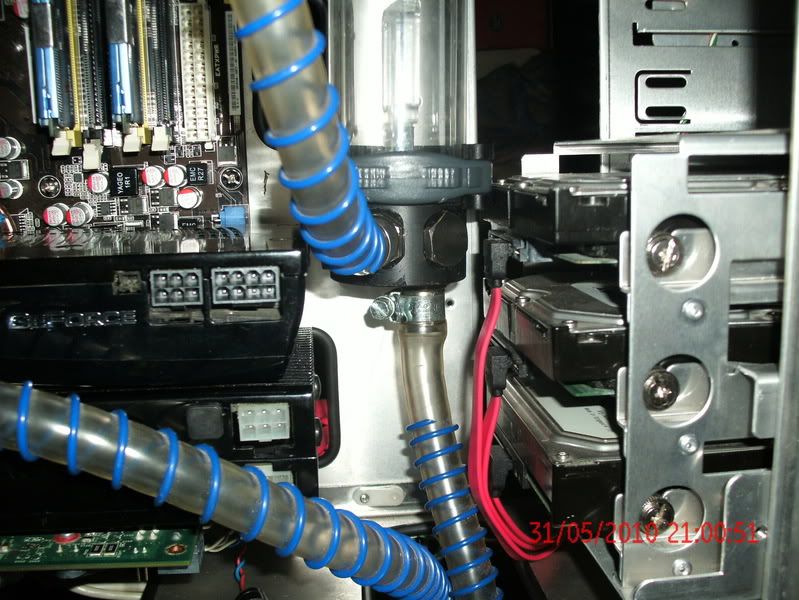
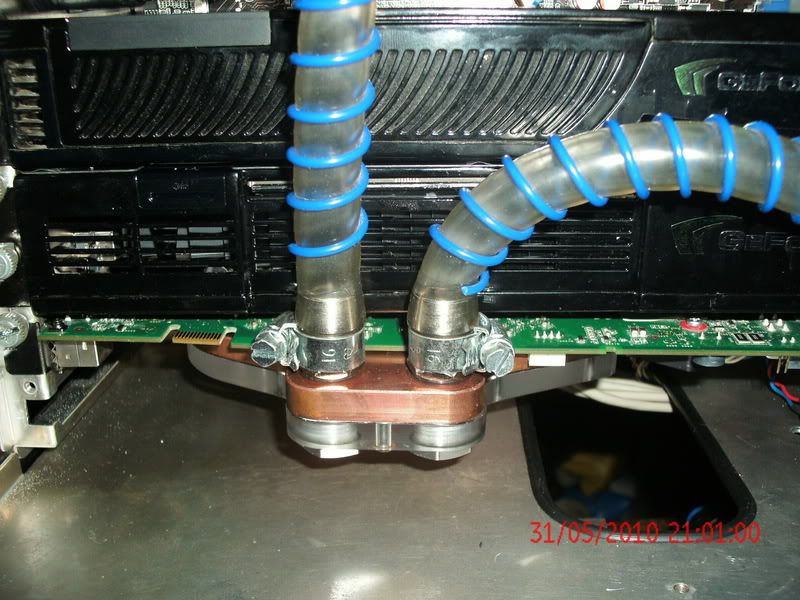
I have also done some more work on the water cooling system by removing the HSF from my 8800gt and installing the waterblock.

GEDC0154.jpg


Stock cooler removed, all the gunk cleaned off and the waterblock ready to install.

GEDC0160.jpg


Front with new block installed.

GEDC0162.jpg


Rear of card with new block installed.

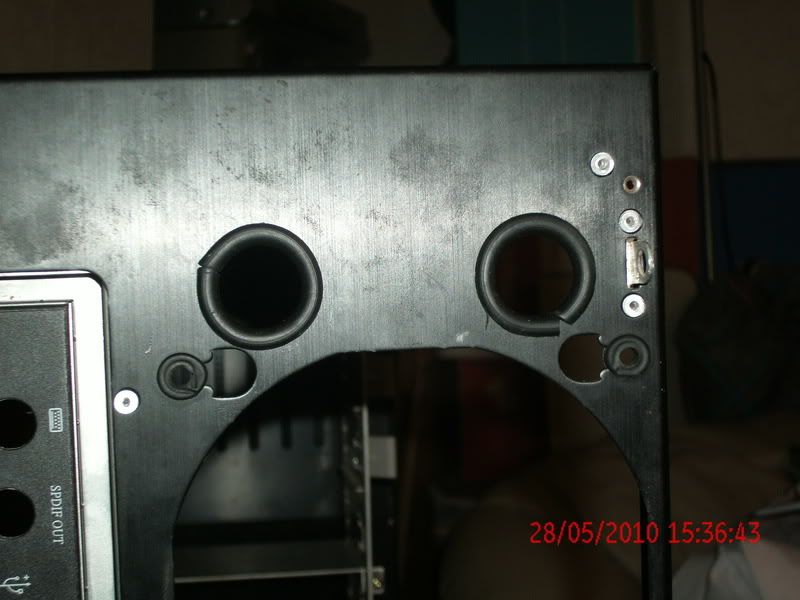
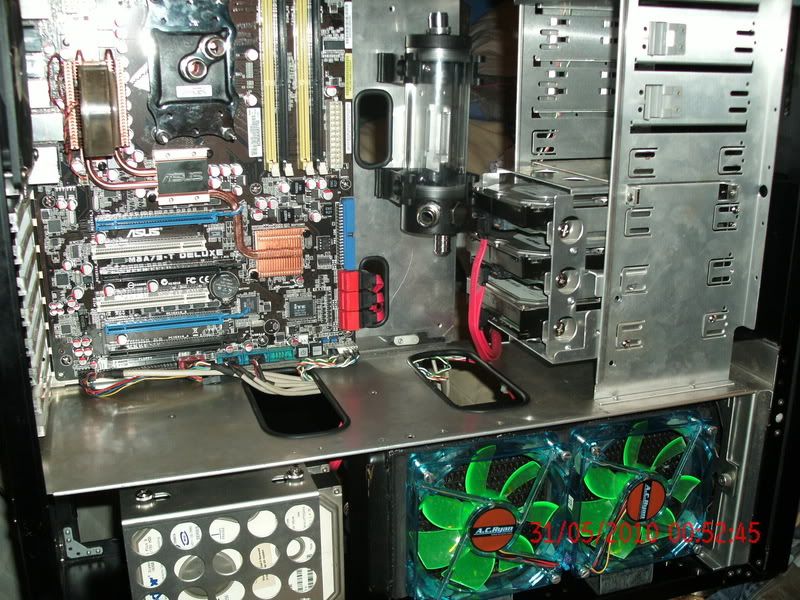
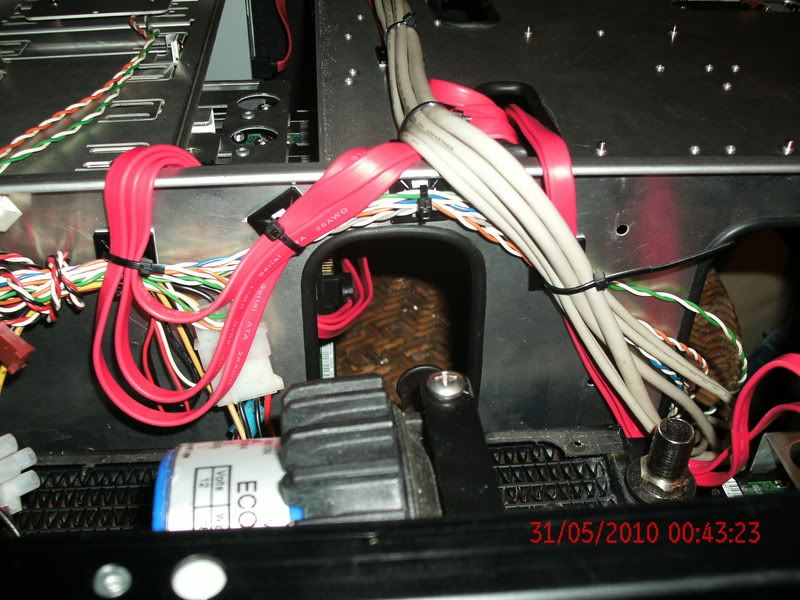
After some tinkering and measuring ive had to increase the size of the screw holes on the reverse side of my HWLabs 120.1 rad in order to turn it round and bore holes in the reverse of the case for tubing.
Now i need to get another hole saw as the 1" saw will be too large a hole for 7/16th tubing even though the OD is 5/8th looking at the size's a hole saw with a diameter of 3/4" will be just right even after i wrap the edges with U-Trim.
So thats tommorows worked planned out, purchase 3/4" hole saw, measure and bore holes for tubing, tirm holes ready for tubing.
Secure Pump and pa 120.2 to bottom of the case and begin working on route for tubing.
Sat should hopefully be leak testing before final install of the remaing hardware.
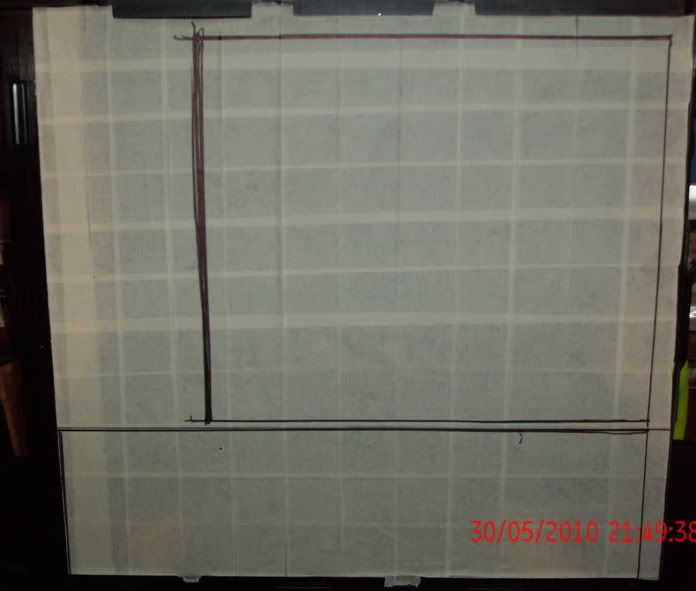
Which will only leave me my side panel to design and complete. I have a rough idea of the window size and have sourced where i can get the acrylic for it, however im still trying to work out whether or not to install mesh along the whole bottom of the case which would allow me to install a Thermalchill PA 120.3 rad in or just enough to allow the PA120.2 to have air.
As it is not possible to get a spare side panel for the PC A20 case what would you do if it was your build. Would you future proof the design or just complete it for the hardware currently in use and possibly look at another case in the future if the loop needed more cooling.
 
Last edited:
Associate
OP
Joined
23 Aug 2007
Posts
1,699
Location
Rothesay
Ive done a mid mod redesign
Although the wood rails i made would have supported my PA120.2 in the lower chamber of my case i was not completley happy with them.
So today i went down to our local blacksmiths and had them make a couple of brackets for me which i designed this morning on a bit of paper. see image below

RadBracket.jpg


Heres what it looks like attached to the rad and secured to the case.

Front

GEDC0166.jpg


Back

GEDC0167.jpg


Must admit they do look a lot better than my DIY attempt, ive also bored the holes for my tubing and installed the rear rad.

Holes with U-Trim

GEDC0168.jpg


It took me nearly 20mins to get the U-Trim on with it being such a small hole.

Rad installed

GEDC0170.jpg


GEDC0169.jpg


Ive also bored the screw holes required for mounting my pump in the lower chamber.
As you can also see ive chosen how im mounting the fans to the rad in pull config out of the side. With the amount of room availeable at the rear side of my PA120.2 rad i may set it up in a push/pull config allowing me to lower the RPM of the fans further without sacrificing cooling performance.

Next on the list before i can start putting her together is to remove the acoustic coating from the side panel, temporaly install it and mark out the lower chamber space and upper chamber so i can work out my design for cutting for mesh and acrylic.
 
Associate
OP
Joined
23 Aug 2007
Posts
1,699
Location
Rothesay
UPDATE

I have removed the acoustic padding from the side panel and taped up and marked the outer extremes of the two area's ready for marking out for my Acrylic and Mesh

Before padding removed.

GEDC0171.jpg


After padding and glue removed.

GEDC0173.jpg


Taped and Marked out.

GEDC0176.jpg


Now to turn my attention to re installing everything and cable management.
First on the list was the D-Tek Fusion V1 waterblock for my cpu this done i can start adding in my Hdd Cages and Mobo tray.


GEDC0180.jpg


With that done i turned my attention to the sata cables and cables for the case front panel.

GEDC0179.jpg


GEDC0182.jpg


GEDC0177.jpg


GEDC0178.jpg


GEDC0182.jpg


GEDC0181.jpg


As you can see most of the cables will be completely out of site and the mess will either be behind the mobo tray or underneath hidden behind the PA120.2.

Next on the agenda is to install the Zalman ZM-MFC2 Fan controller and the tubing for the water cooling loop.
 
Associate
OP
Joined
23 Aug 2007
Posts
1,699
Location
Rothesay
Update

Ive installed the Zalman ZM-MFC2 and routed all my tubing applying hose clamps as required.

GEDC0189.jpg


GEDC0188.jpg


GEDC0186.jpg


GEDC0187.jpg


GEDC0184.jpg


GEDC0183.jpg


As a result im now using less tubing than i did when i was using the reserator as my reservoir, which if im correct increase the presure the water travels round the loop.
Ive also installed my PSU and routed all the cables and attached them ready for start up, leaving unconected the 8pin cpu power,the pci-e power cables and the 24pin atx cable so i could leak test.
i filled the loop via the res and before starting up the pump horror upon horror my HWLabs 120mm rad had sprung a leak behind one of the mounting holes.
Ive had a good look and cant see where it is so that rules out the soldering patch to seal it. So full leak test wont take place till i recieve my new Thermochill PA120.1 rad i found on the bay for £20 including barbs.

Ive also managed to get an online retailer to cut my mesh to size for me saving me a good few £'ss all i have to do now for the side panel is work out the exact measurements for the holes i need and cut them ready.
I might as well get on with that over the next few days while i await the replacement rad, as everything in the case is ready to go other wise.

I will post pics of the psu cable routing later
 
Associate
OP
Joined
23 Aug 2007
Posts
1,699
Location
Rothesay
Well ive ordered tha last few parts today.
1 sheet 400mm x 400mm dark tinted acrylic
3 metres blow hole U-Trim
1 dual 12" green cathodes
and a 150mm x 500mm modders mesh

total of £27 including P&P.

with luck they will arrive by friday and i can finish of the side panel and complete my mod over the week end.
 
Associate
OP
Joined
23 Aug 2007
Posts
1,699
Location
Rothesay
Well i was rudely awoken this morning by the postman nearly breaking down the door.
but i will let him off as he delivered my PA120.1 rad which i sourced from the bay.
Unpacking it took a whole 2 mins and she appears to be in excellent condition, however there is one snag the barbs that came with the rad appear to be 3/8" and not 1/2" like the rest of my loop.
I have test fitted the rad to where my borked HWLabs one was and she fits nicely.

Now i need to decide if i purchase 2 new barbs that are 3/8"bsp to 1/2" barb or to use the existing barbs with my current tubing which appears to seal tightly when using a jubilee clip.
I will contemplate this while i patch a leak i have found in the PA120.2 rad thankfully its not a large leak and seems easy enough to get to using a soldering iron and solder. Its the hour or so removing it, patching the hole and replacing it thats annoying.
 
Associate
OP
Joined
23 Aug 2007
Posts
1,699
Location
Rothesay
Update

Since i last posted here ive been busy building the system fully with the odd problem here and there.
Firstly i found a rather large leak in the PA120.1 rad i got from the bay but she was easily patched using solder and soldering iron.
I also patched the corners of the PA120.2 i have as well and they both now seem to be leak free.
I installed all the hardware into the case and set about a 24Hour leak test which im happy to say the build passed.
Ive got windows installed and system is up and running however there is a problem somewhere with the mobo i think as it is reporting the cpu in bios as running @ 3Ghz but in windows it comes u[p as running @ 800Mhz.

Ive tried varoius settings and bios version's to no avail at present, i'm intouch with Asus tech team via email and they are looking into it. So before i rip the mobo out and replace with my old Asus M3A32-MVP Deluxe i will give Asus a chance to work out my issue.

I'm going to test this mobo with another cpu if i can get one at the correct price.

In the mean time my GPU's are running at full speed and folding away. And with the system running ive gotten hold of a free 2D cad program to help me with the look and design of my side panel.

sidepanel.jpg


Im no expert with it but for the first time i think ive done not bad. The blue dash lines are the the sizes of the chambers within the case which i measured at least three times.
With the mesh panel i decided to make it central and set it 45mm in from each end of the case and 40mm from the bottom this way the fans get plenty of breathing room.
With the window i decided to make it 25mm from the measured opening giving plenty of overlap which i can use to secure it with.
As a conciquence of this the window will also be 45mm from the rear of the case which will make it look quite symetrical.
 
Associate
OP
Joined
23 Aug 2007
Posts
1,699
Location
Rothesay
Update.
Due to life in general ive not managed to get the side panel done yet but things started to get back to normal pace and i should be able to get round to it within the next couple of weeks.
As before i will take pics of the work as im doing it.

On a side note after running the system for a while ive picked up a few gremlins within they system the major one seems to be i appear to have a leak somewhere in the loop as ive had to top the res up on a couple of occasions, but have not been able to source where the leak is.
 
Man of Honour
Joined
30 Oct 2002
Posts
15,807
Location
Surrey
It might just be air, the deeper radiators always seem to take the longest to get all the air out of them, my rig with three 60mm rads took a couple of days where I had to keep topping it up. Its settled down now.
 
Associate
OP
Joined
23 Aug 2007
Posts
1,699
Location
Rothesay
neat cable management, how come you removed the acoustic pads?

It will make cutting the side panel a lot easier as im taking away most of it to put in my window and mesh panel.

i have kept the material i removed from the side panel in the hope i can reapply it to the panel once ive done my cutting to sound proof what is left of the panel before i secure the window and mesh

As you should be able to see ive only removed the padding from one panel the one im going to cut.

As for the cable management that took me ages to get it routed the way i wanted it
 
Associate
OP
Joined
23 Aug 2007
Posts
1,699
Location
Rothesay
It might just be air, the deeper radiators always seem to take the longest to get all the air out of them, my rig with three 60mm rads took a couple of days where I had to keep topping it up. Its settled down now.

I hope you are correct the thought of having to strip down the loop to investigate a possible leak is just down right anoying apart from time consuming as well.
 
Back
Top Bottom