

Ahhh the joys of hindsight! You see the top two mounting holes? Where the track goes rather close to them? Yeah, that's where the stand-offs will sit against. Now there's maybe enough room it doesn't touch and there is solder mask over the top so it might not cut through it and short it out....but I don't like "maybe" and "might"! A couple of plastic washers between the standoffs and the board will sort it....but it's annoyingly short-sighted!
You are using an out of date browser. It may not display this or other websites correctly.
You should upgrade or use an alternative browser.
You should upgrade or use an alternative browser.
Project: Self-Inflicted
- Thread starter Cenedd
- Start date
More options
Thread starter's postsSoldato
- Joined
- 13 Mar 2006
- Posts
- 6,712
The two uppermost holes on the pcb board from those pics? It's fine! Plastic washers and you're fine! Not having to remake the pcb or machine the standoffs is a win imo.Ahhh the joys of hindsight! You see the top two mounting holes? Where the track goes rather close to them? Yeah, that's where the stand-offs will sit against. Now there's maybe enough room it doesn't touch and there is solder mask over the top so it might not cut through it and short it out....but I don't like "maybe" and "might"! A couple of plastic washers between the standoffs and the board will sort it....but it's annoyingly short-sighted!
Soldato
- Joined
- 13 Mar 2006
- Posts
- 6,712
Haha! I got a 14mm OD metal pipe bender for copper tubes - polished the tubes - beautiful! Trued a bend and it mangled it with marks and couldn't get the pipe out without disassembling the bolts from the pipe bender. They didn't even make the channels for the pipe bender close to line-up. Gotta love that Chinese QC!Tiny update. Had a quick go at bending the CPU to rad tube since it was possible to do that in isolation. I give you.....an unimpressive looking bit of tube
Also the rad to rad run that I've no shortened once I realised the fans were mounted the wrong side of the rad
Obviously, because I've done this before (a number of years back now), I had no problem getting this done perfectly, first time off the bat....so there aren't any pictures of (in order of appearance):
- Too cold - creased on bending
- Too hot - bubbles at bend
- perfect temperature.....but not realising that it hadn't gone a full 90 on my butchered mandrel
I've also just received the extra 4mm wide ARGB strip for making up the RAM blocks....so I'll try to get my finger out on that
It does seem of late that you buy a tool only to have to finish/adjust/perfect it yourself. That or you pay an arm and a leg for it....and then it's 50-50 at best!
Yeah, the PCB issue is certainly fixable...I'm just annoyed that I failed to engage brain enough to realise there would need to be clearance for the screw head and the standoff. For the next one maybe I'll have learned!
In the meantime, I've found enough nylon washers of a near enough size to fit - thought I was going to have to machine my own for a bit...which is just nuts. Haven't got any spare jumpers so have ordered a pack. For the moment I found two of the three jumpers I need on some Splittys (which will need them back) and I've made one from dupont crimps just so I can get it tested. Can't test it quite yet as I share a home office with my wife and the beep of the continuity tester wouldn't go down well on her video conferences Sooon though
Yeah, the PCB issue is certainly fixable...I'm just annoyed that I failed to engage brain enough to realise there would need to be clearance for the screw head and the standoff. For the next one maybe I'll have learned!
In the meantime, I've found enough nylon washers of a near enough size to fit - thought I was going to have to machine my own for a bit...which is just nuts. Haven't got any spare jumpers so have ordered a pack. For the moment I found two of the three jumpers I need on some Splittys (which will need them back) and I've made one from dupont crimps just so I can get it tested. Can't test it quite yet as I share a home office with my wife and the beep of the continuity tester wouldn't go down well on her video conferences
Sooon though Soldato
- Joined
- 13 Mar 2006
- Posts
- 6,712
Very true - the 6/8/10mm pipe bender I originally used needed paintstripping to be in spec. The 14mm hand pipe bender I got from china as the cheapy Chinese ones I could find were £50 rather than 150+ from the uk, and I'll still need to punch out a thick pin and put a spacer in to make it work properly then put the pin/replace mangled pin with a bolt.It does seem of late that you buy a tool only to have to finish/adjust/perfect it yourself. That or you pay an arm and a leg for it....and then it's 50-50 at best!
Yeah, the PCB issue is certainly fixable...I'm just annoyed that I failed to engage brain enough to realise there would need to be clearance for the screw head and the standoff. For the next one maybe I'll have learned!
In the meantime, I've found enough nylon washers of a near enough size to fit - thought I was going to have to machine my own for a bit...which is just nuts. Haven't got any spare jumpers so have ordered a pack. For the moment I found two of the three jumpers I need on some Splittys (which will need them back) and I've made one from dupont crimps just so I can get it tested. Can't test it quite yet as I share a home office with my wife and the beep of the continuity tester wouldn't go down well on her video conferences
Look forward to seeing it up and running!
I don't mind fettling a tool if I've knowingly bought it for a song with the understanding that it: won't be deburred in any way, will need some adjustment (possibly with a fourteen-pound lump hammer - bonus points for getting the reference!) and will be liberally coated in some old engine oil that's been round the factory manager's car for a good few thousand miles. I get upset if I buy a well-respected brand for an heirloom price and then find that they've outsourced it to China and it's all of the above but with some of the oil wiped off and in a nice red box. 
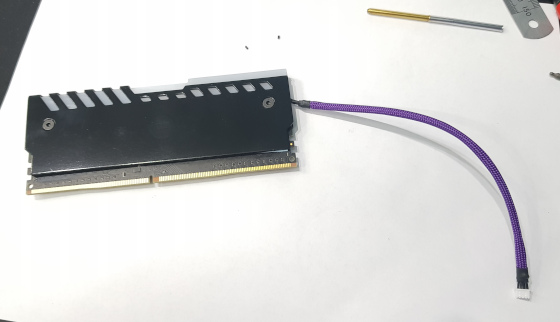
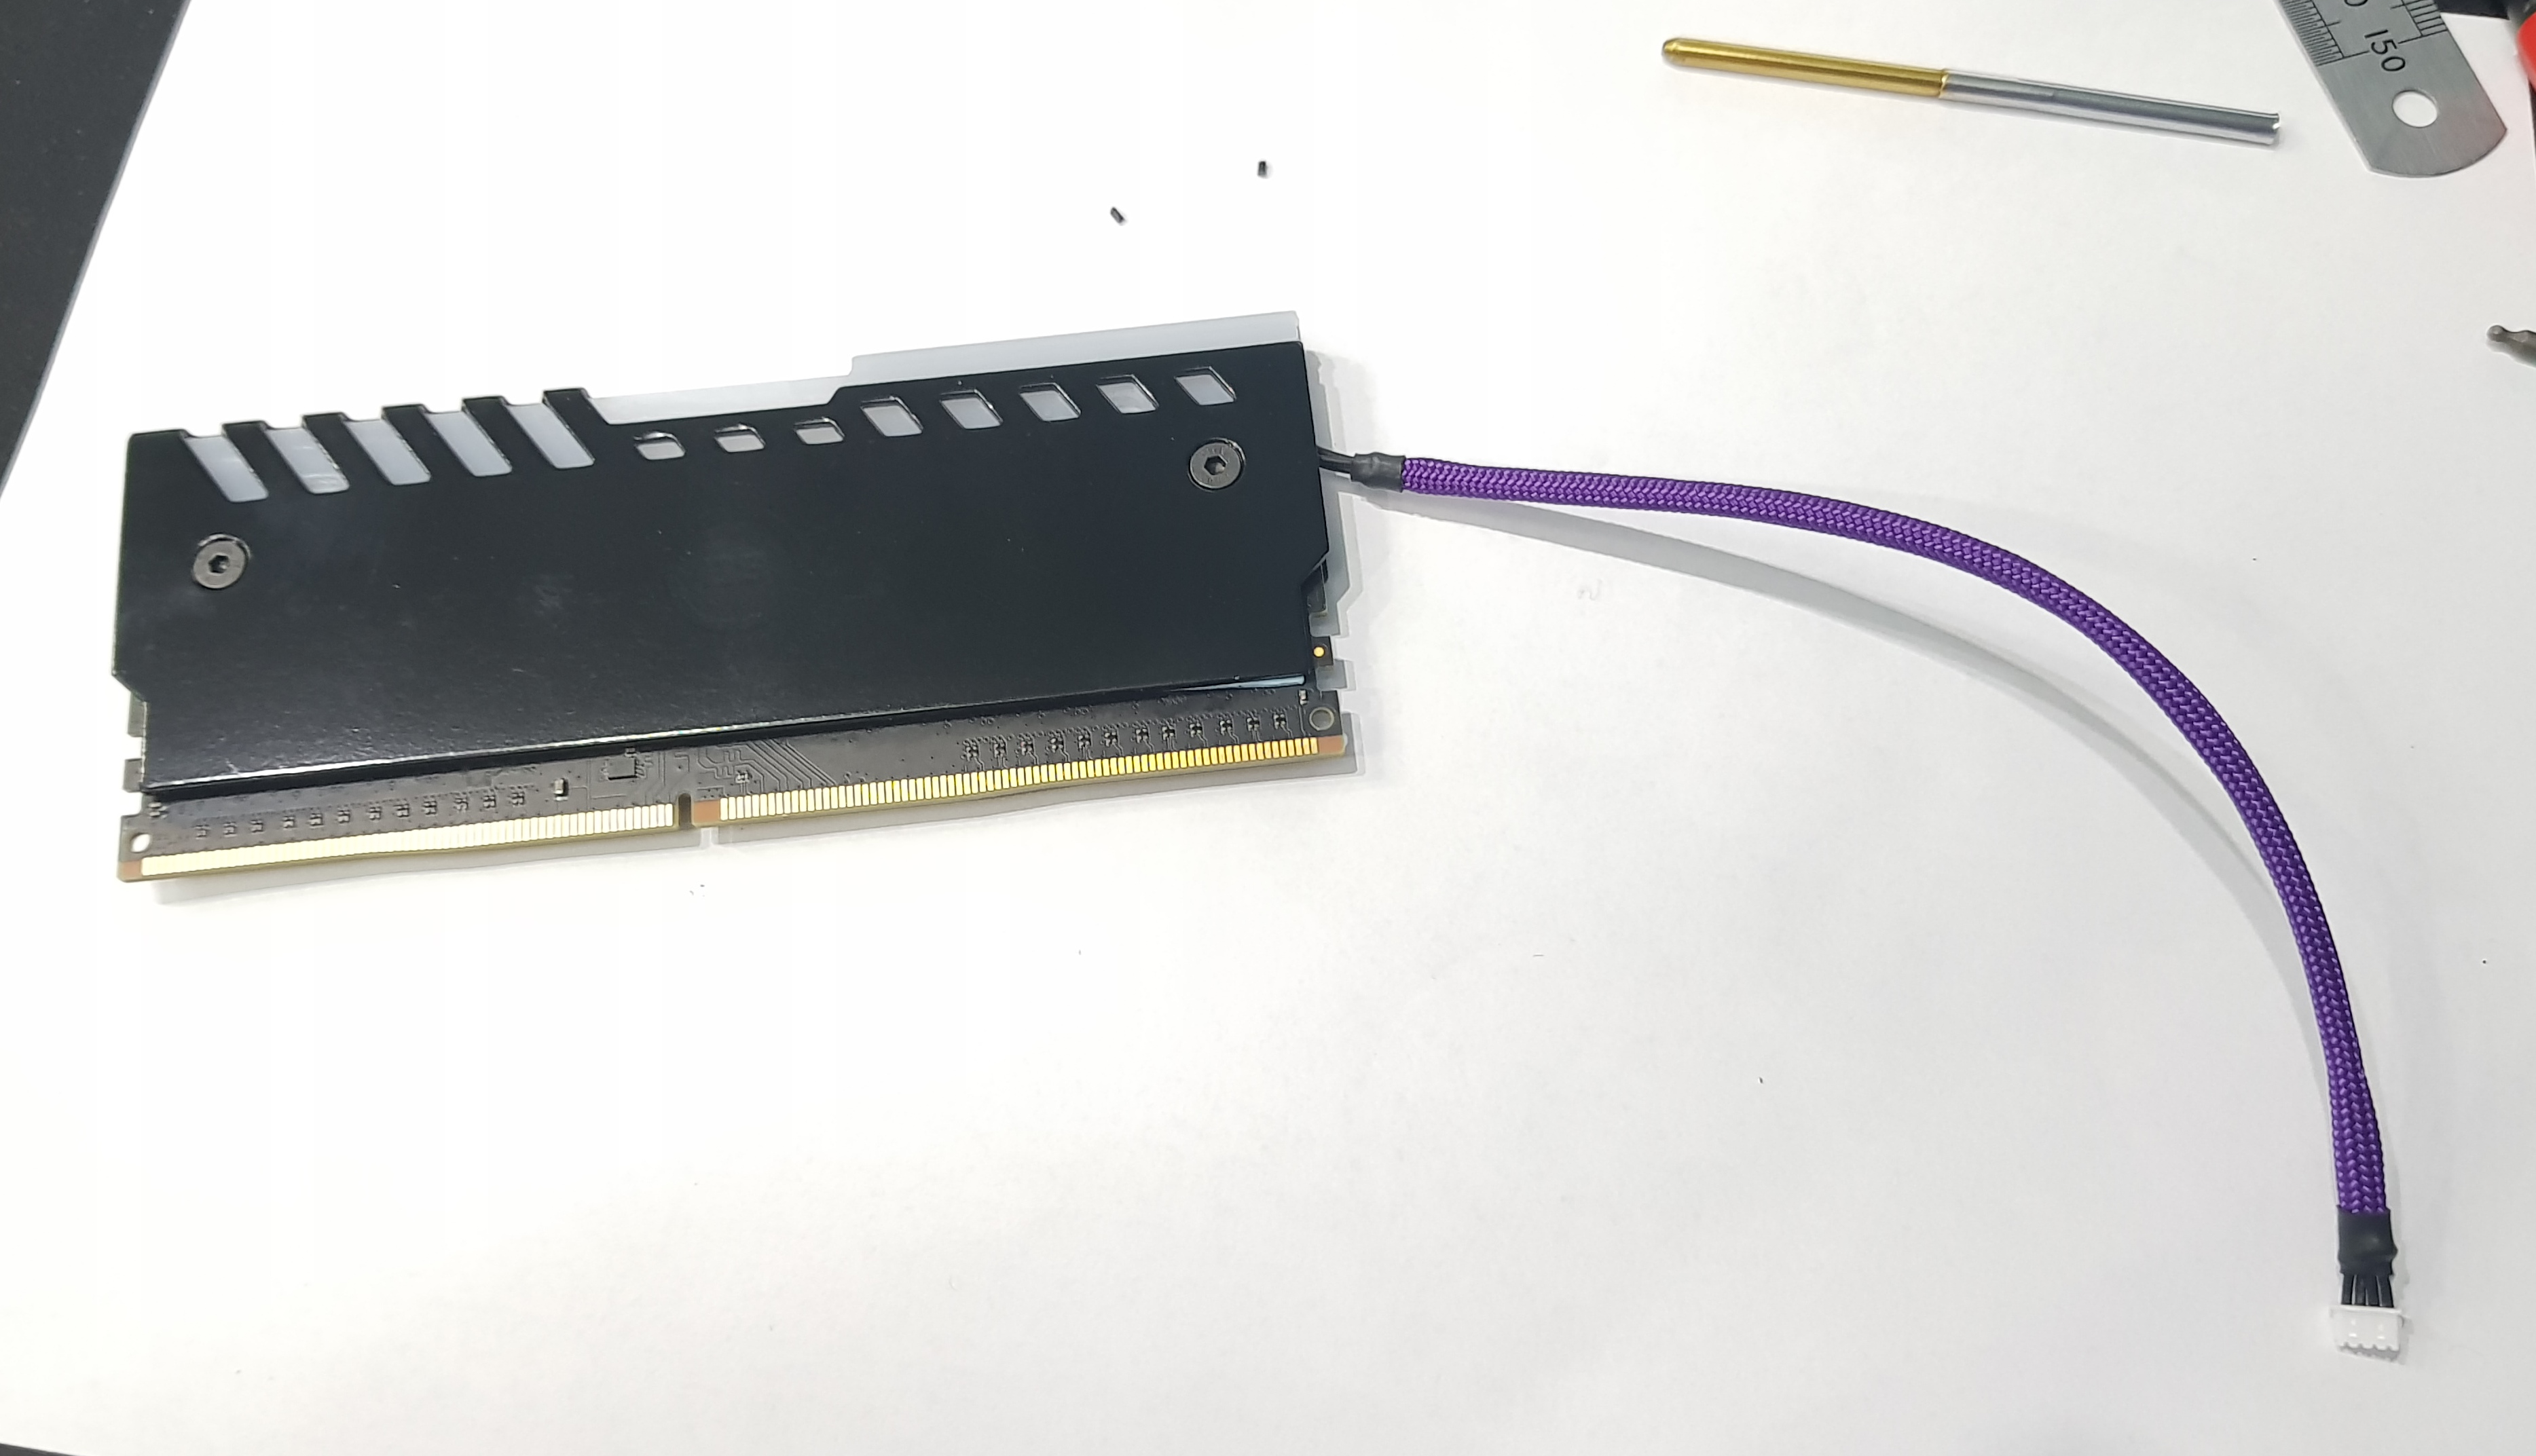
A rather insipid-looking picture (I think the camera was having trouble with the white balance as it's not like that in the 'flesh') of progress so far:

Continuity testing done, jumper fabricobbled, mounted and new sleeved cable of insanely small crimps made up. Realised that I'm going to need more of the crimps (and shells) as I'm now going to need one for each DIMM. I should probably get on and finish the RAM sink wires to length...but I'm going to need the crimps, half of the sink shells are drying and will need another coat of paint...and I've just taken delivery of and planted three trees. Yeah, it's been an odd day at work in IT! So I'm knackered and going to crack open a cold beer!
A rather insipid-looking picture (I think the camera was having trouble with the white balance as it's not like that in the 'flesh') of progress so far:
Continuity testing done, jumper fabricobbled, mounted and new sleeved cable of insanely small crimps made up. Realised that I'm going to need more of the crimps (and shells) as I'm now going to need one for each DIMM. I should probably get on and finish the RAM sink wires to length...but I'm going to need the crimps, half of the sink shells are drying and will need another coat of paint...and I've just taken delivery of and planted three trees. Yeah, it's been an odd day at work in IT! So I'm knackered and going to crack open a cold beer!
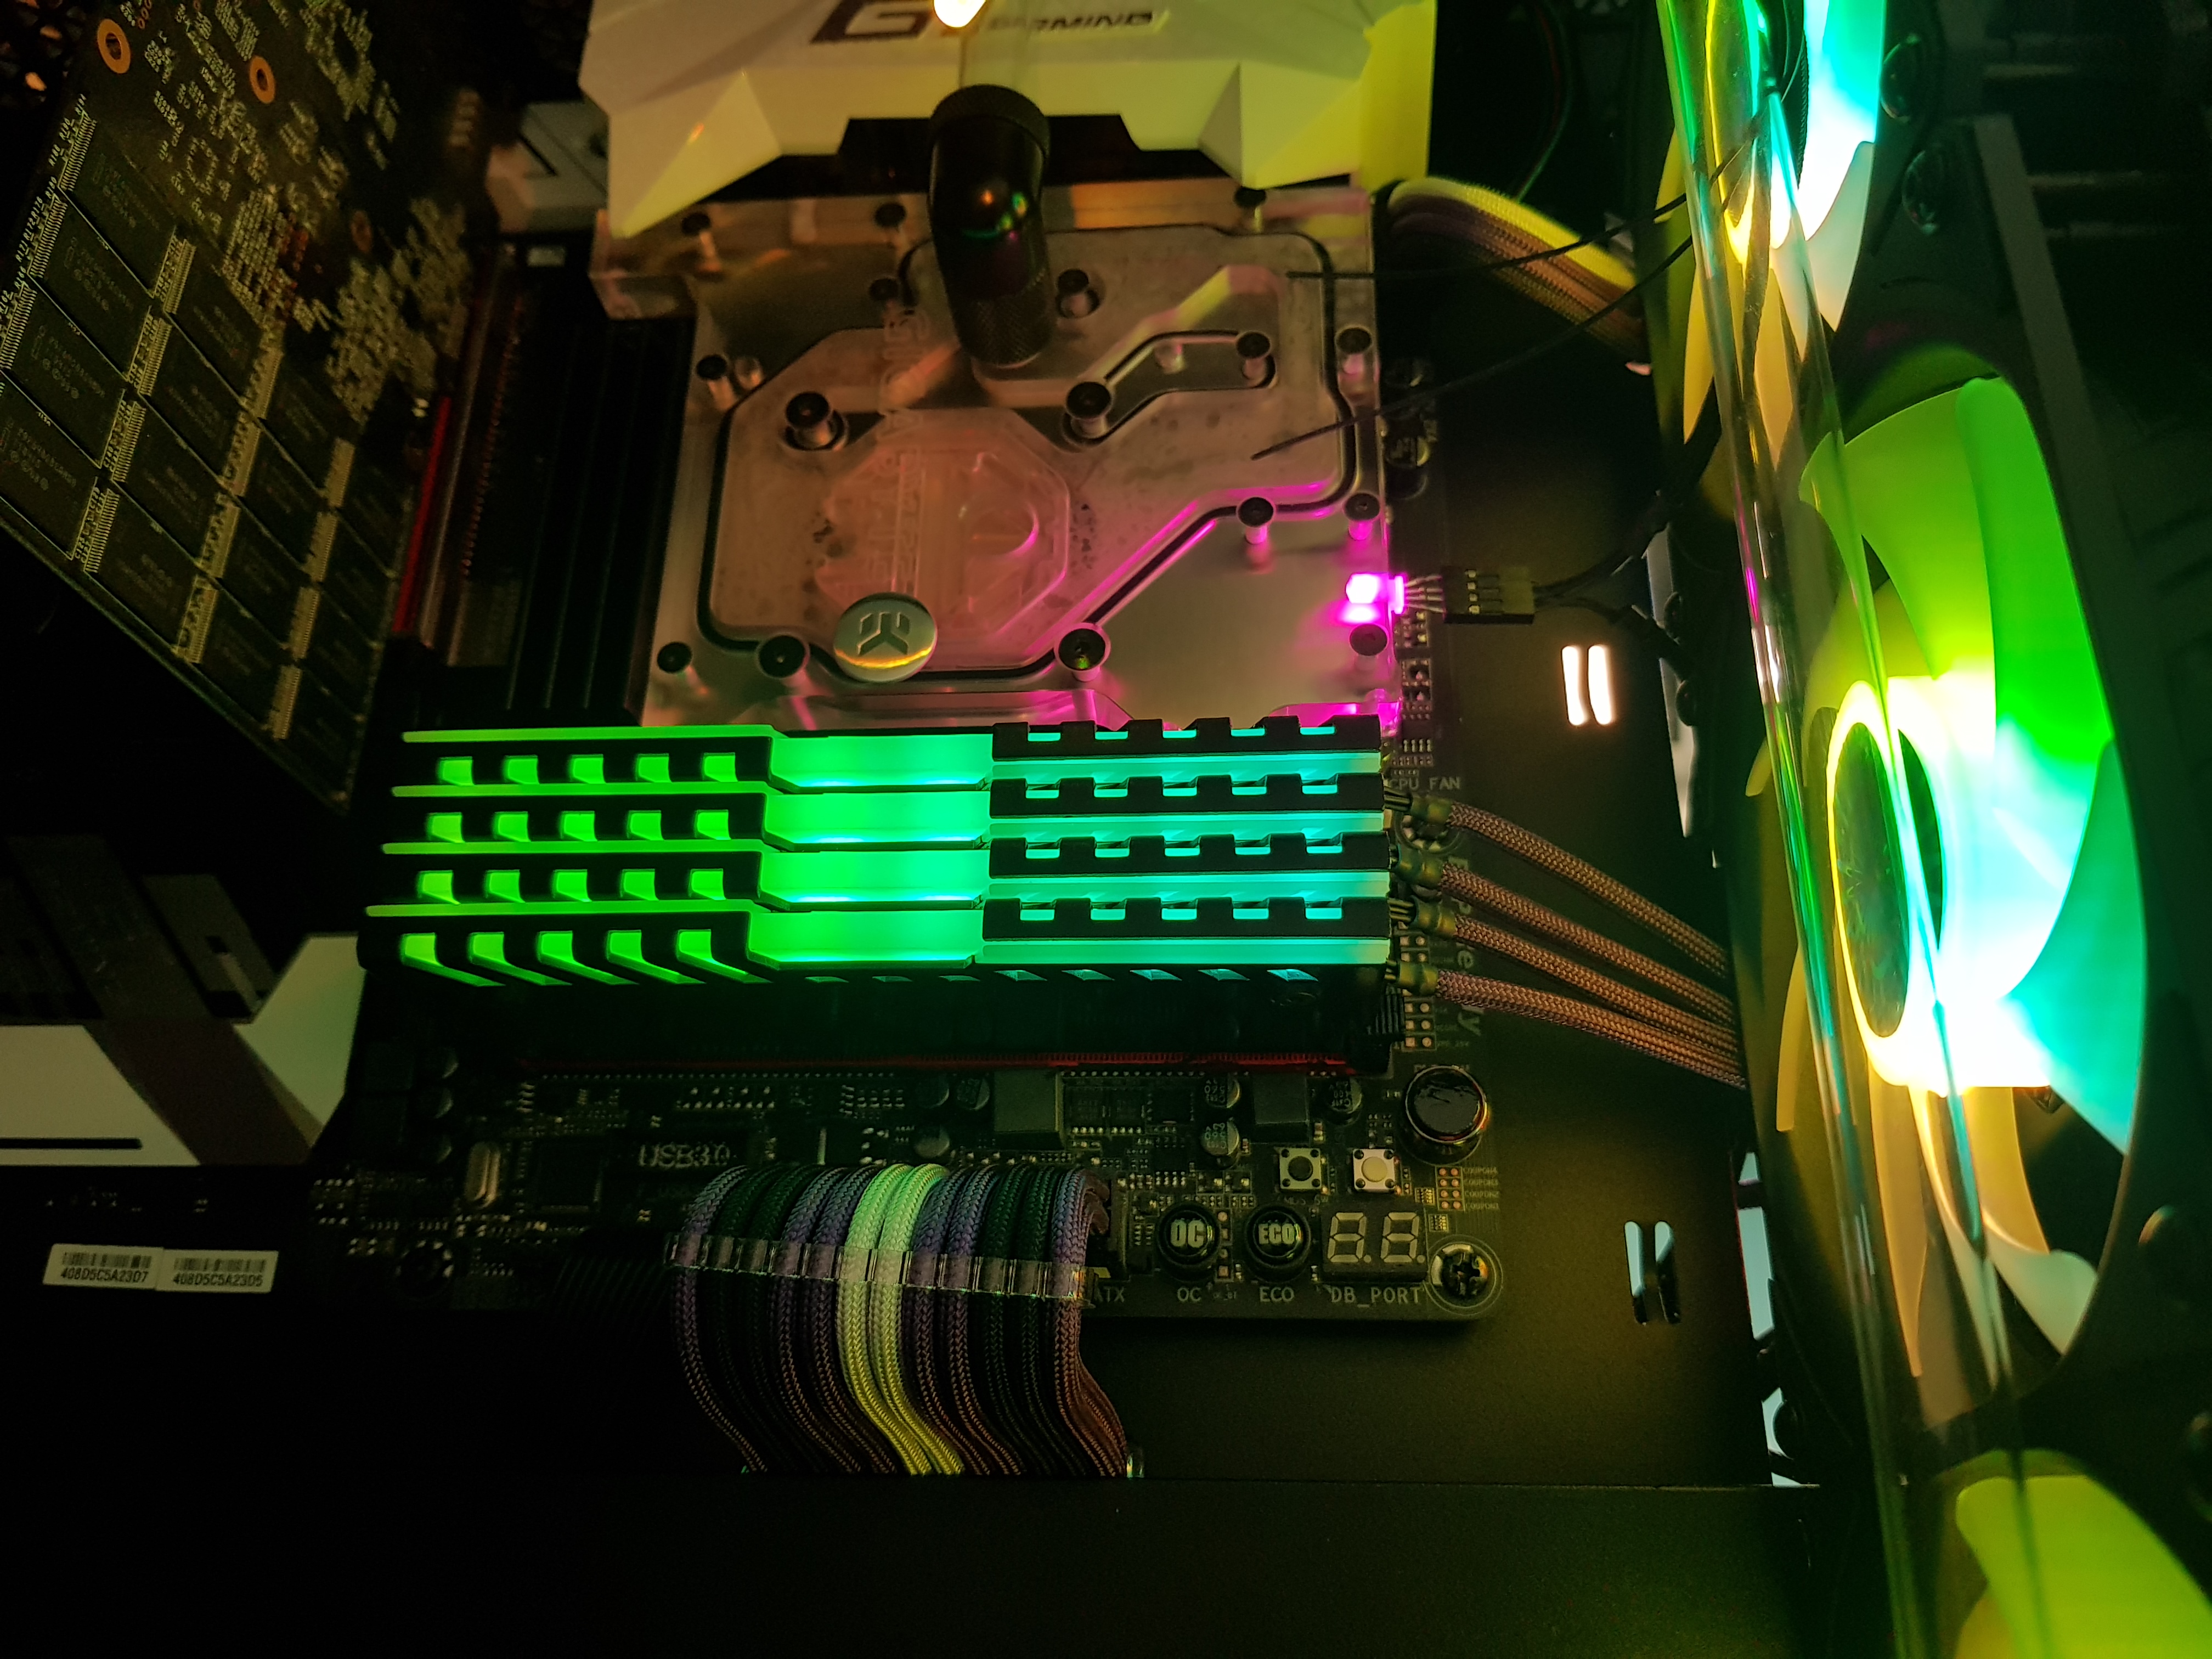
Ok now we're getting somewhere....not far mind!
Smurf poo applied - not enough to a complete strip but there aren't any chips in that middle bit so it should be fine.
Buttoned up, sleeved and crimped
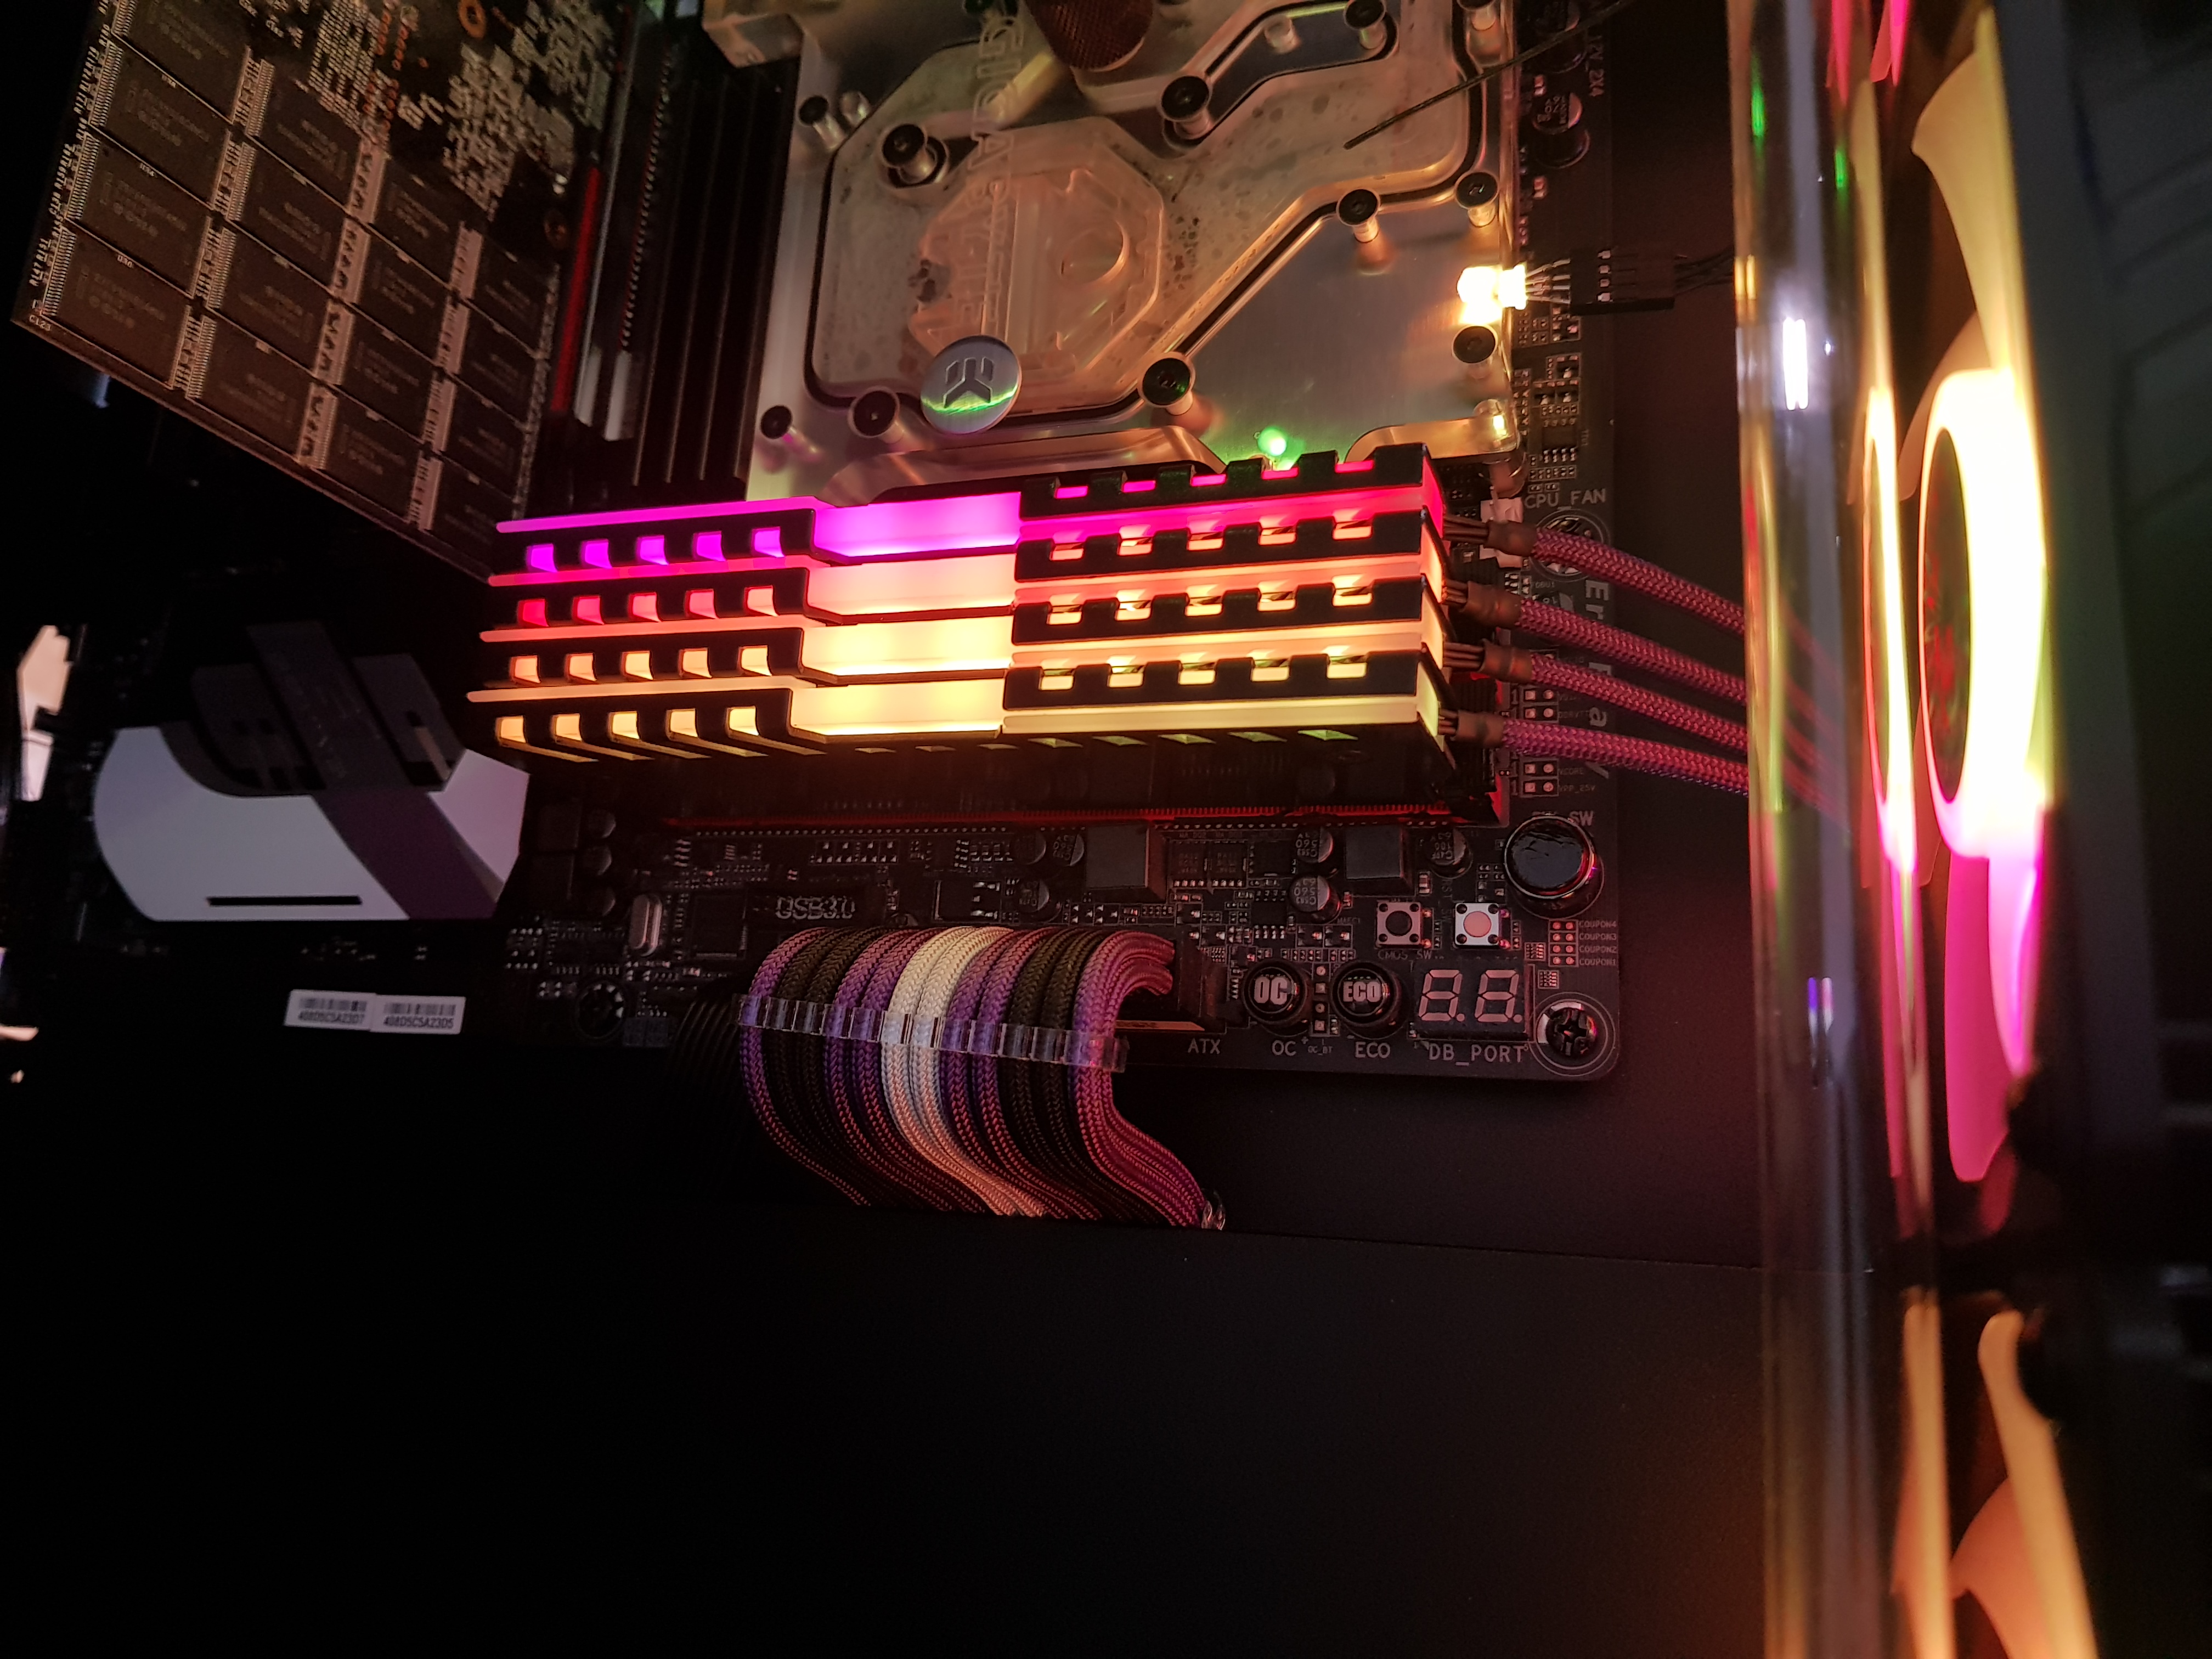
These are just the default "Rotating rainbow" but depending on the jumper setting of the PCB, they all go in sync like this:
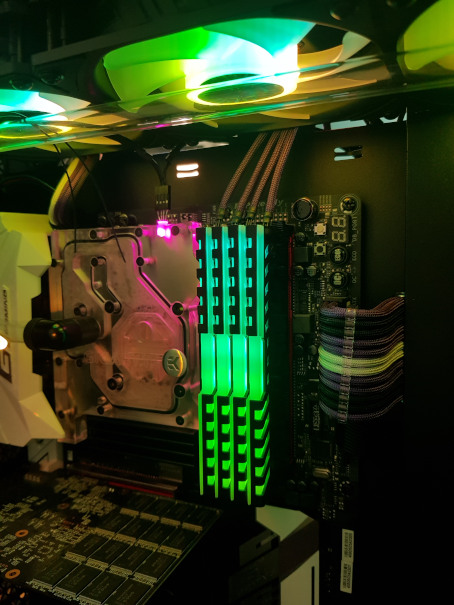
Or in series like this:

Could also use that to make each one a different colour or whatever as necessary. Could even replicate the colour striping of the wiring...although obviously without the black!
Smurf poo applied - not enough to a complete strip but there aren't any chips in that middle bit so it should be fine.

Buttoned up, sleeved and crimped
These are just the default "Rotating rainbow" but depending on the jumper setting of the PCB, they all go in sync like this:
Or in series like this:
Could also use that to make each one a different colour or whatever as necessary. Could even replicate the colour striping of the wiring...although obviously without the black!
Soldato
Those ram coolers look awful familiar lol.
Smurf poo
Smurf poo
Nah, they're clearly a (badly sprayed) different colour to the ones you gave me! ")

Soldato
*insert Jurassic Park "clever girl" meme*
The gauntlet has been thrown down now though: can I make my custom LED heatspreader wiring look tidier than yours?
Find out when I begin Ortux: Asteria 3...sometime in 2035 at this rate
The gauntlet has been thrown down now though: can I make my custom LED heatspreader wiring look tidier than yours?
Find out when I begin Ortux: Asteria 3...sometime in 2035 at this rate
Soldato
- Joined
- 13 Mar 2006
- Posts
- 6,712
Looks nice! - is the brightness adjustable?
@LePhuronn Just don't make it too good...really can't be bothered to do it again! (I hate redoing things with a passion)
@Monkey Puzzle Yes. You can change colour/pattern/speed/brightness etc from Aquasuite. Even set individual LEDs to various colours depending on things like temperature or (I believe) events. Also runs (and would react to hardware temperature sensors) without software involvement.
@Monkey Puzzle Yes. You can change colour/pattern/speed/brightness etc from Aquasuite. Even set individual LEDs to various colours depending on things like temperature or (I believe) events. Also runs (and would react to hardware temperature sensors) without software involvement.
Soldato
- Joined
- 13 Mar 2006
- Posts
- 6,712
Aha - I must have missed it - are you using an aquaero with display or the standalone fan/rgb controller board?
Farbwerk 360 for the ARGB and there will be an Aquaero added for fans later but its a case of removing it from the donor PC as late as possible so that PC remains useable for as long as possible. Ditto with the GPU.
The Aquaero is, if I remember correctly, a 6XT but I think the plan will be to de-screen it and mount it in the rear next to the Farbwerk yiu cab see in post 106 above. Might seem a bit heathen but to be honest the screen is very rarely used - even initial setup is easier by plugging it into a laptop.
The Aquaero is, if I remember correctly, a 6XT but I think the plan will be to de-screen it and mount it in the rear next to the Farbwerk yiu cab see in post 106 above. Might seem a bit heathen but to be honest the screen is very rarely used - even initial setup is easier by plugging it into a laptop.
Soldato
Mwuhahahahhaaaaaa...I'll try not toJust don't make it too good...really can't be bothered to do it again!
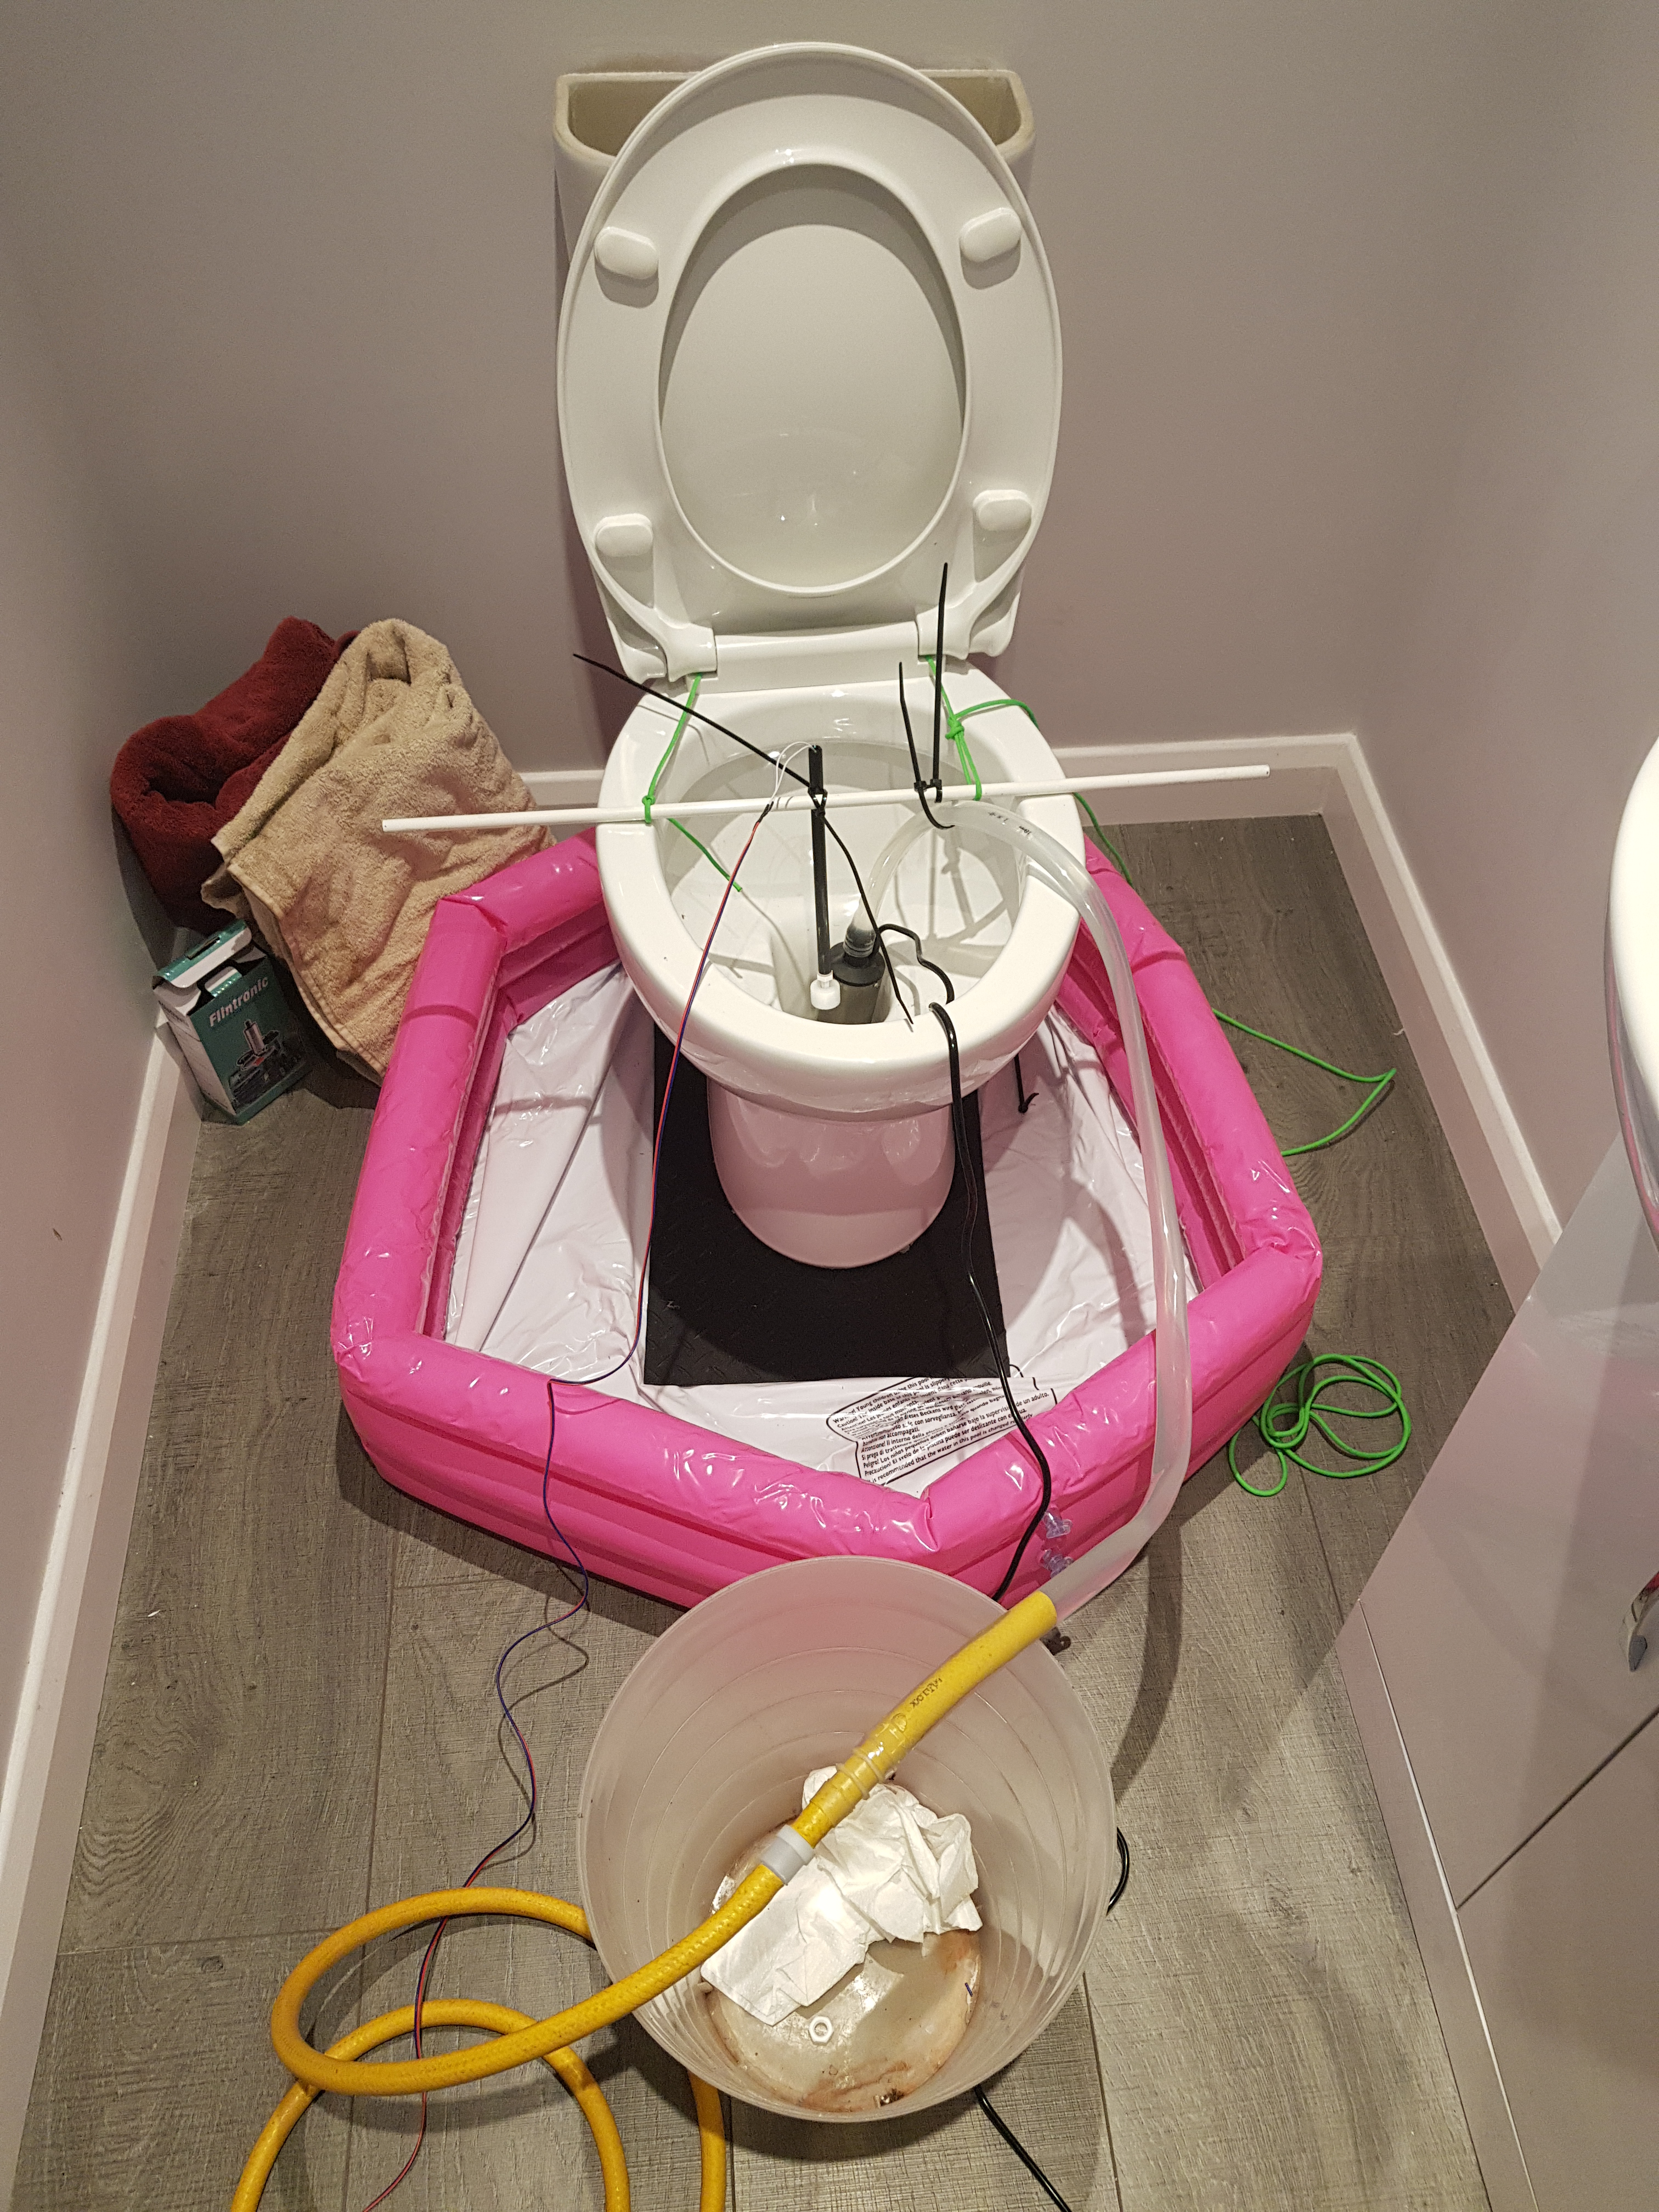
So, four months or so down the line and no progress. Given up? Nope, just "side-tracked". To cut a long story short (-ish!) it turns out that if you have a new downstairs toilet fitted, it doesn't work very well for very long if they connect it to a (shared) soakaway instead of an actual sewer. More fun when it rains and your new toilet has become the lowest opening *facepalm* So much fun ensued, some colourful language, almost literal throwing money down a hole and on top of that my workshop (small though it is) was the route between the BIG hole and the skip. So everything had to be packed up and has only just come out of storage.
Just for comedy, this is how you temporarily 'fix' the problem when you're told "Yeah, good luck with that!"

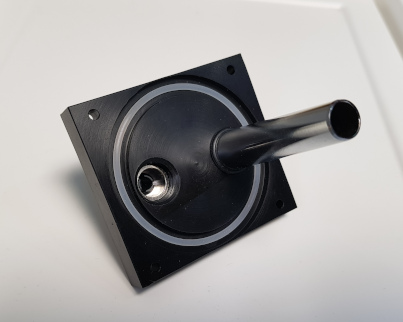
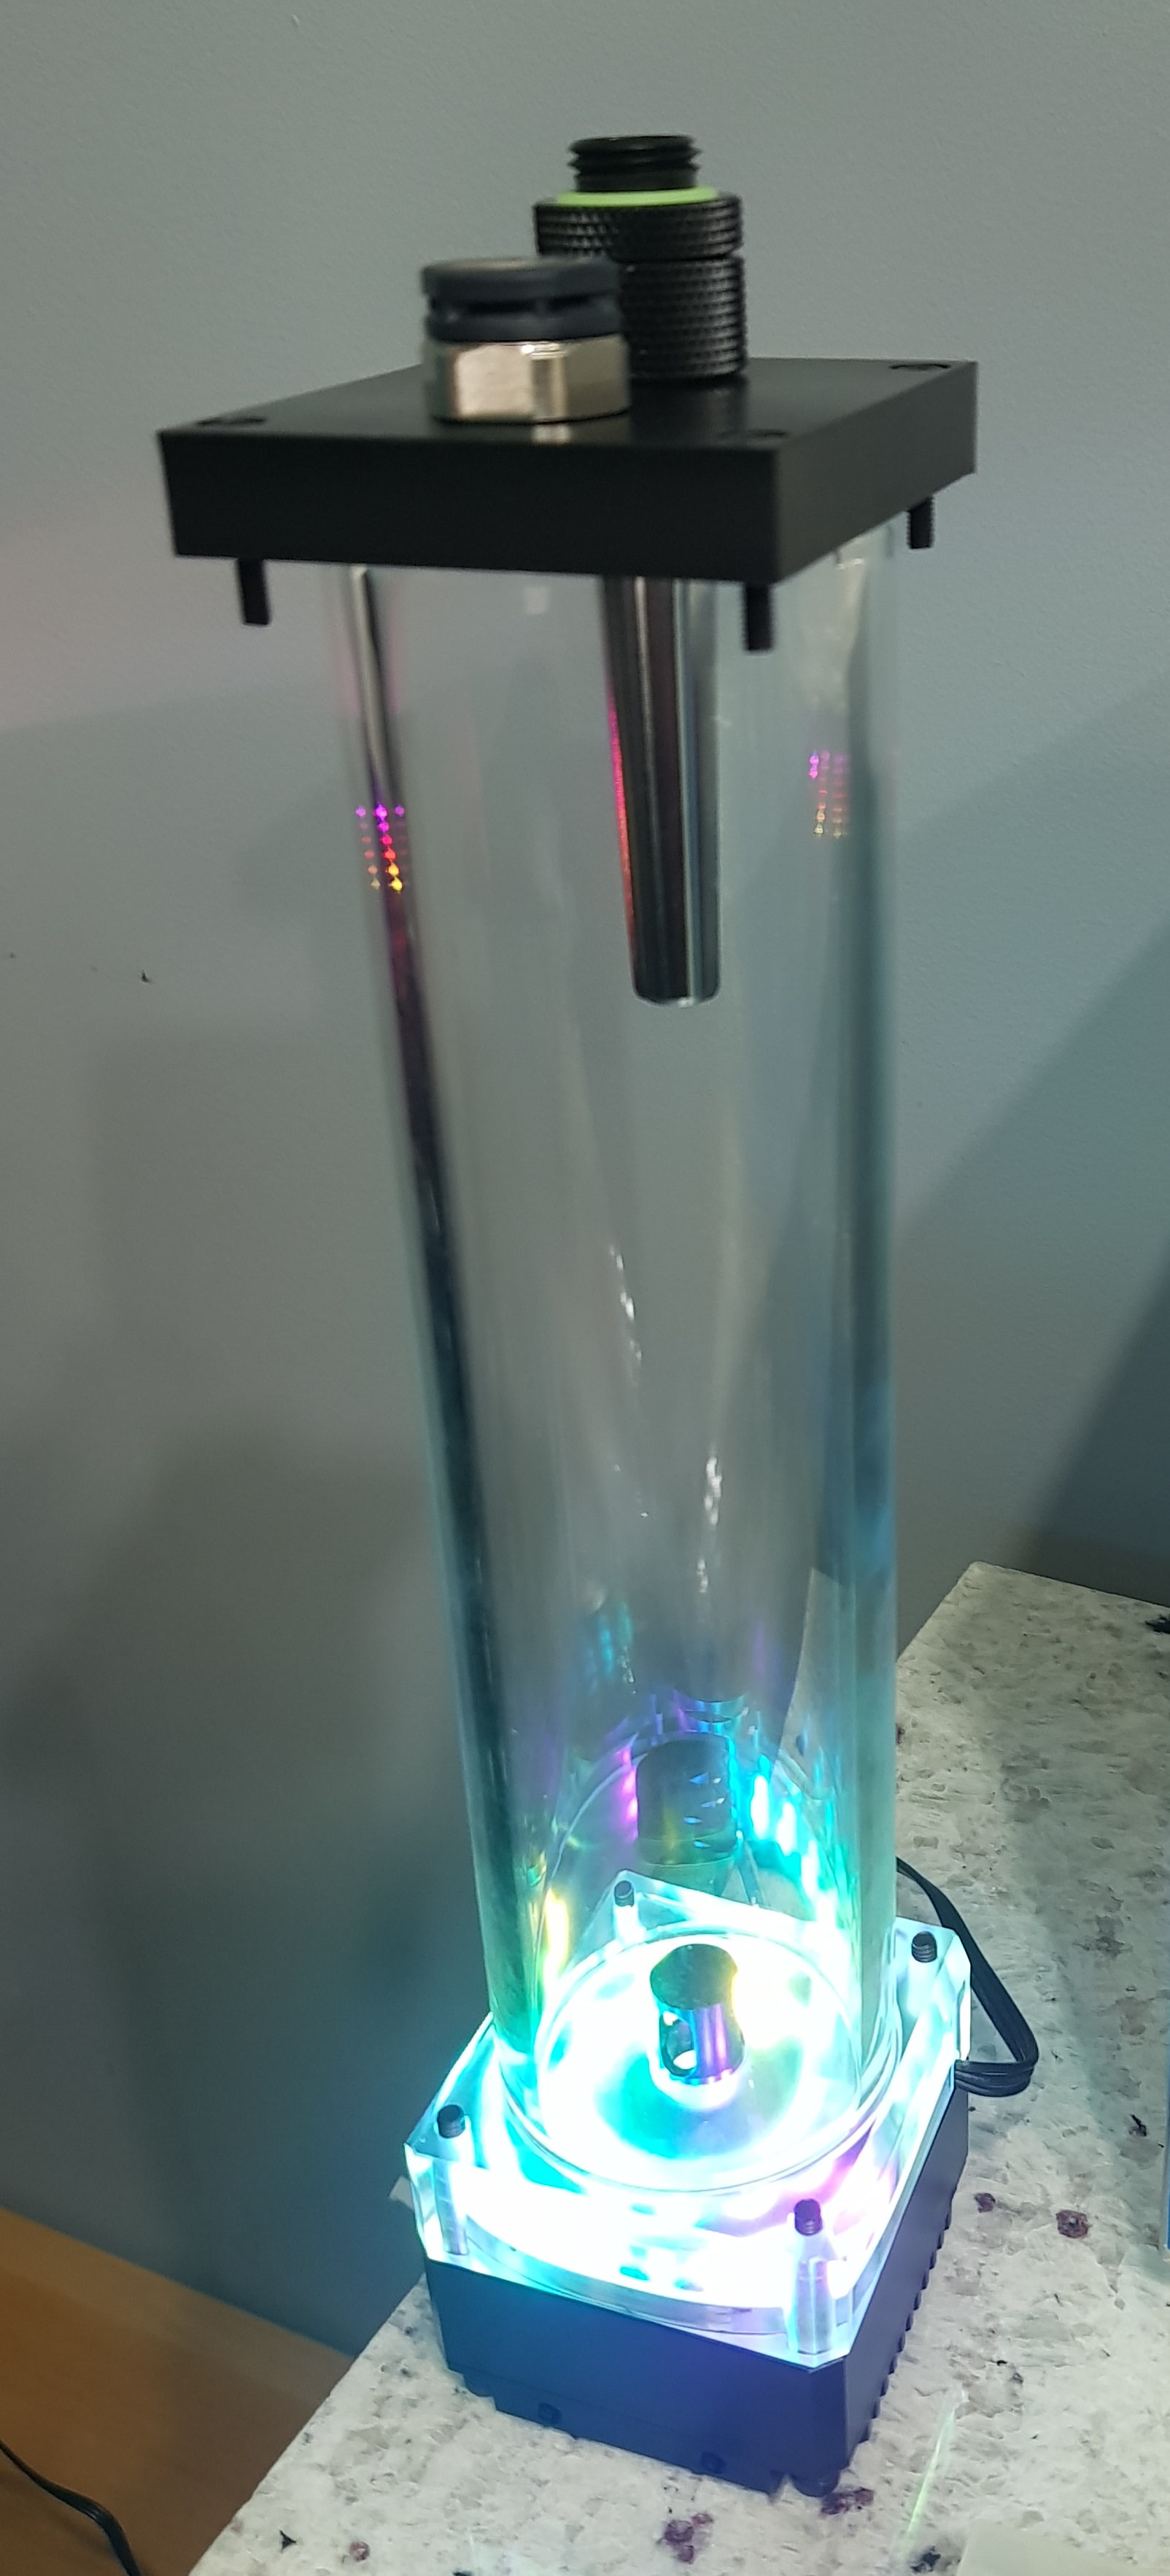
Right, and back to the point. Having previously made some proof of concept bits out of scrap acrylic, I got in some Delrin that was thick enough to take back-to-back fittings (inlet and anti-splash cone) and cut a 6mm circle into the bottom for the glass and a 2mm circle into the bottom of that for the o-ring:
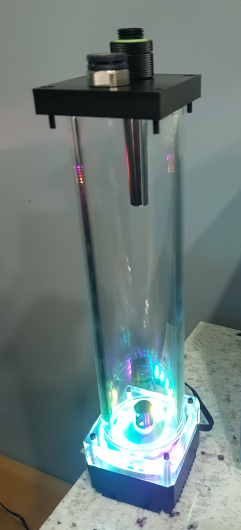
Same was done to the top of the pump and I was forced to have a little lighting test. I'm hoping that it might illuminate the res more once it's filled but I'll need to wait until it's actually water-tight before I test that
I've started making the struts to compress the whole thing together. The astute of you (or those who still have enough fingers left to count up to four!) will notice what's wrong. I bought enough aluminium square bar to make four....but when the plan was for a wider, shorter glass tube. Now it's longer, I don't have enough...so that's in the post.

Why the numbers? Well each one is hand-fitted to the hole top and bottom so they're unique. I'll polish off the numbers when I'm done and have tested it. Shouldn't they all be identical? Well, yes but one of the top holes is off by about half a mm and one of the bottom holes has wandered by something similar. Not a lot but enough to make them all slightly different. Who needs simple anyway?!
There's a bit of a gap showing at the top but once I have the last strut done, I can tighten them down and squish the o-rings. Worst case if there's still too much of a gap, I can shim it but there glass isn't perfectly square so some slack for adjustment is necessary unless I start lapping the ends of the glass....and I don't want to unless I'm absolutely forced to!
So at least there's some progress for you. One more strut and we get to see if it leaks horribly!
Just for comedy, this is how you temporarily 'fix' the problem when you're told "Yeah, good luck with that!"
Right, and back to the point. Having previously made some proof of concept bits out of scrap acrylic, I got in some Delrin that was thick enough to take back-to-back fittings (inlet and anti-splash cone) and cut a 6mm circle into the bottom for the glass and a 2mm circle into the bottom of that for the o-ring:

Same was done to the top of the pump and I was forced to have a little lighting test. I'm hoping that it might illuminate the res more once it's filled but I'll need to wait until it's actually water-tight before I test that
I've started making the struts to compress the whole thing together. The astute of you (or those who still have enough fingers left to count up to four!) will notice what's wrong. I bought enough aluminium square bar to make four....but when the plan was for a wider, shorter glass tube. Now it's longer, I don't have enough...so that's in the post.
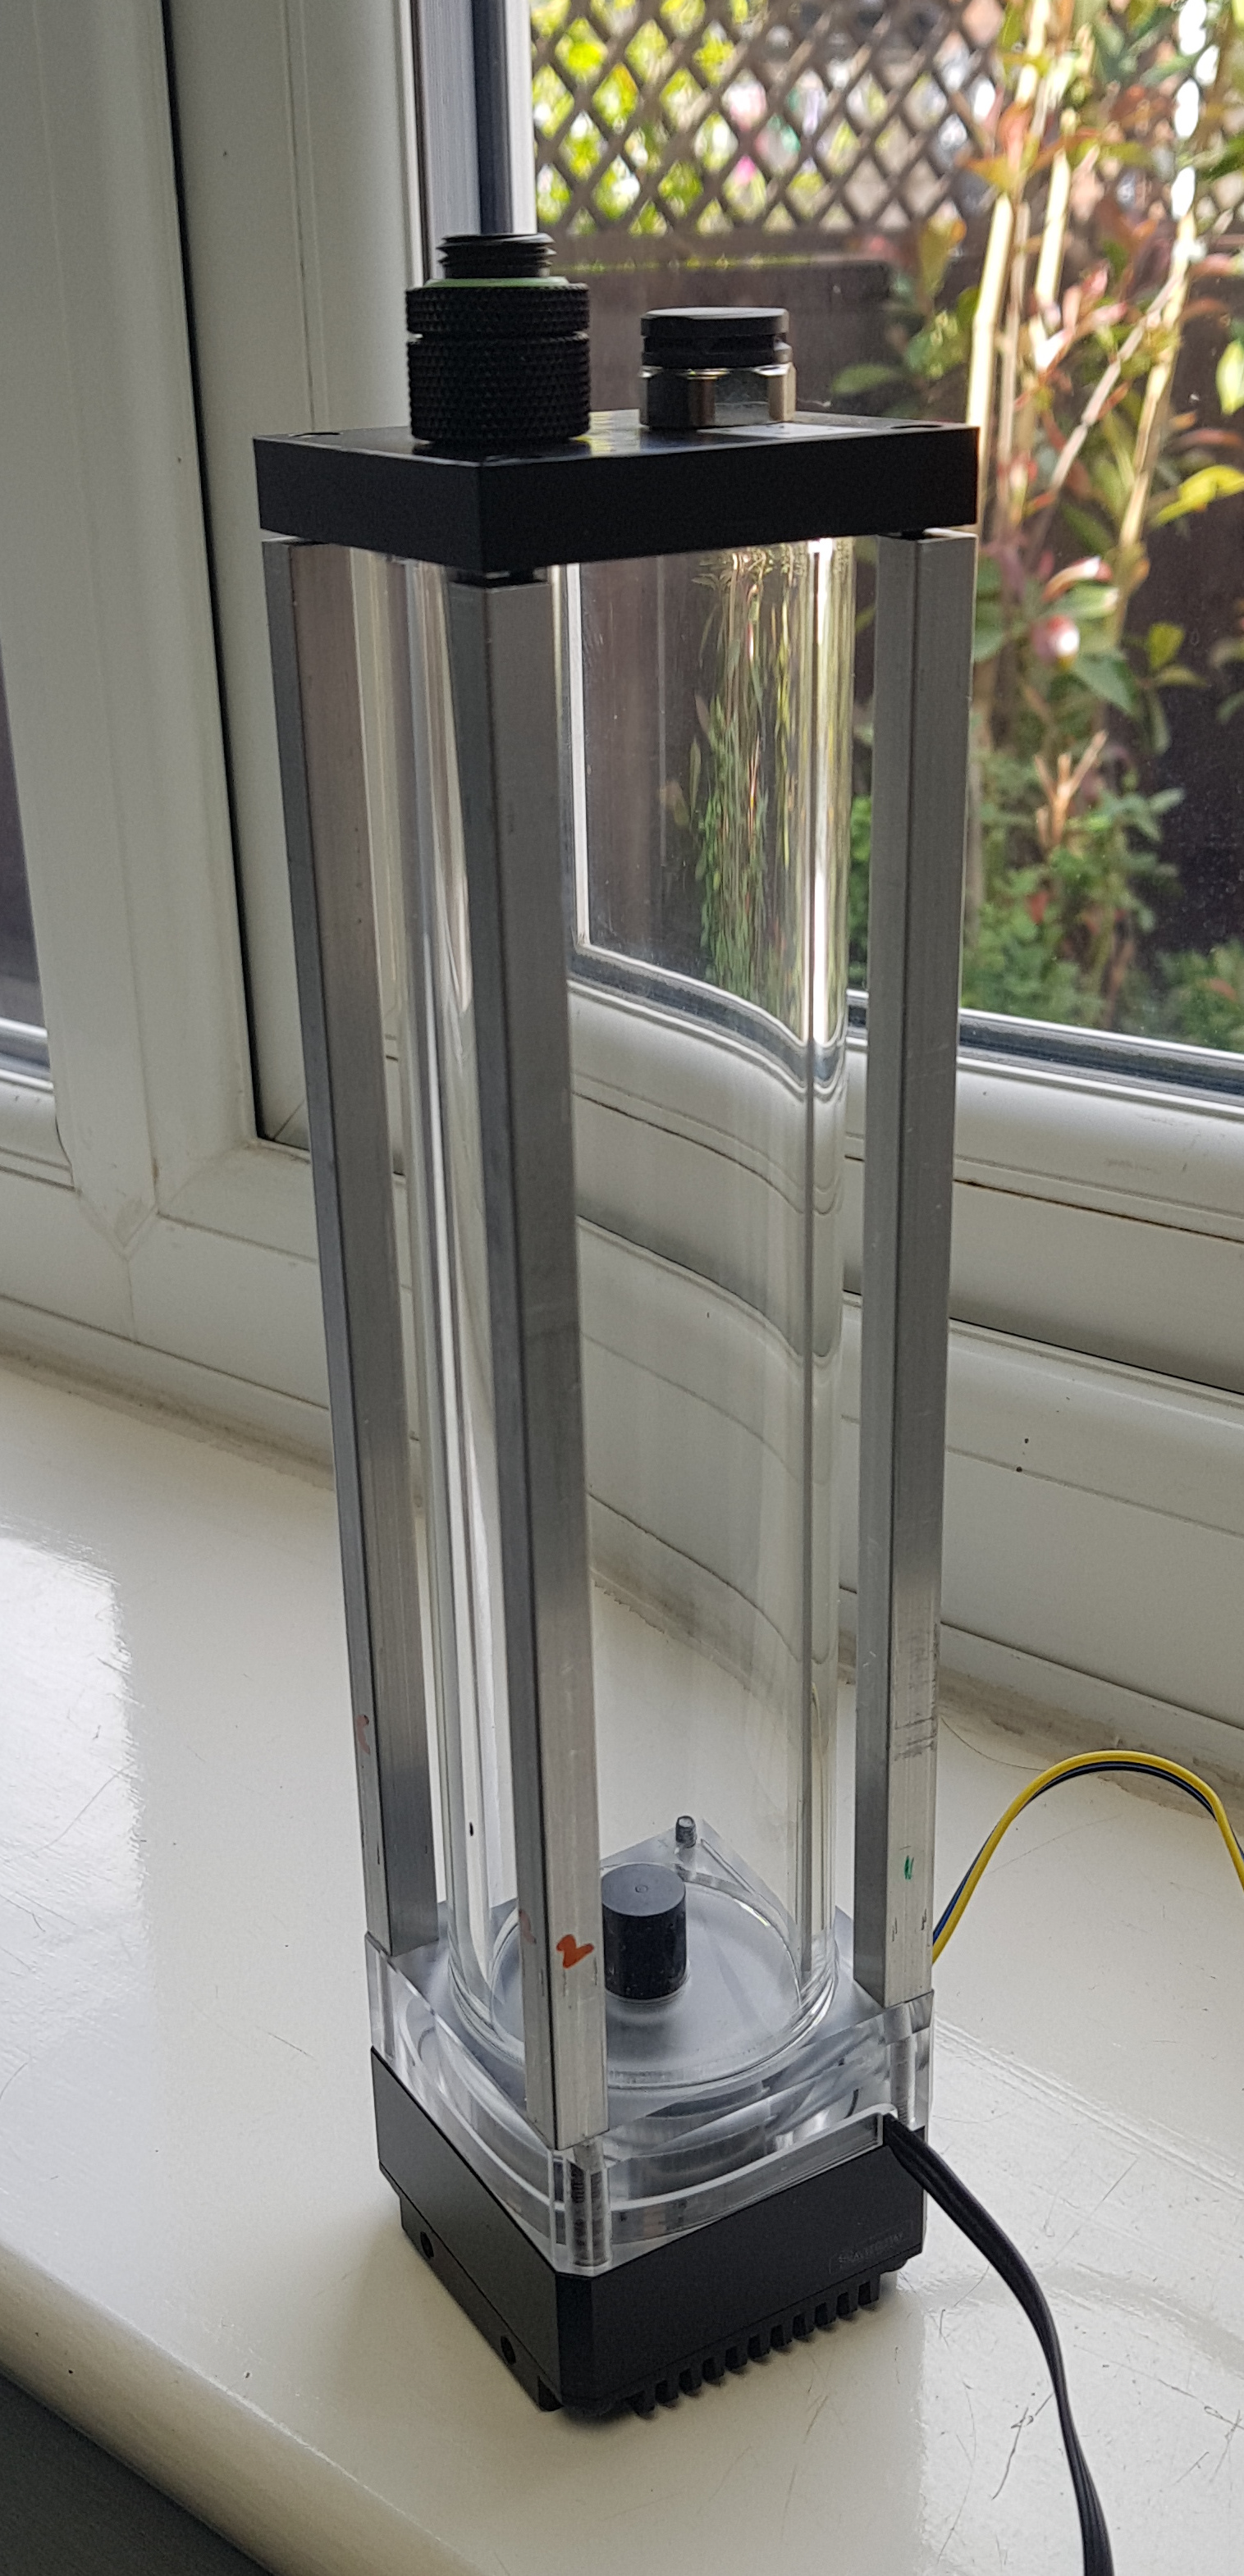
Why the numbers? Well each one is hand-fitted to the hole top and bottom so they're unique. I'll polish off the numbers when I'm done and have tested it. Shouldn't they all be identical? Well, yes but one of the top holes is off by about half a mm and one of the bottom holes has wandered by something similar. Not a lot but enough to make them all slightly different. Who needs simple anyway?!
There's a bit of a gap showing at the top but once I have the last strut done, I can tighten them down and squish the o-rings. Worst case if there's still too much of a gap, I can shim it but there glass isn't perfectly square so some slack for adjustment is necessary unless I start lapping the ends of the glass....and I don't want to unless I'm absolutely forced to!
So at least there's some progress for you. One more strut and we get to see if it leaks horribly!
Also, cast your votes (we can pretend this is entirely democratic! ) for whether the struts should stay silver (bare aluminium) or be badly sprayed black. I'm torn to be honest.
) for whether the struts should stay silver (bare aluminium) or be badly sprayed black. I'm torn to be honest.Soldato
Mirror polish the alu struts. I'll be too much black otherwise, plus will pick up the lighting for some extra glinting too.
As an aside, do you have any of that Delrin left? I need me a dual port passthrough connector making
As an aside, do you have any of that Delrin left? I need me a dual port passthrough connector making
Last edited:
You're the second that said polish then...and fir the same reason. That's good enough recommendation for me!
Well the Delrin came in a range of sizes with one of them being about perfect size for the part. You know that if you have just enough to do only one that you're BOUND to fubar it in some fashion....so I took the cheap insurance for that and bought a sheet U could get three of 'em out of. Just in case!
It's 10mm (nominal) thick so there is in theory, enough space for two fittings down one hole. I skimmed both sides on a lathe as the surface is as-extruded - not bad but not flat. Had to check, and it's 10.60mm +0/-0.04
If that's any good, drop me a sketch by email and I'll see what I can do.
Soldato
- Joined
- 13 Mar 2006
- Posts
- 6,712
+1 on mirror-polishing them.
That's the least enticing paddling pool I've ever seen.
That's the least enticing paddling pool I've ever seen.