

You are using an out of date browser. It may not display this or other websites correctly.
You should upgrade or use an alternative browser.
You should upgrade or use an alternative browser.
Vigoro's MX-5
- Thread starter Vigoro
- Start date
More options
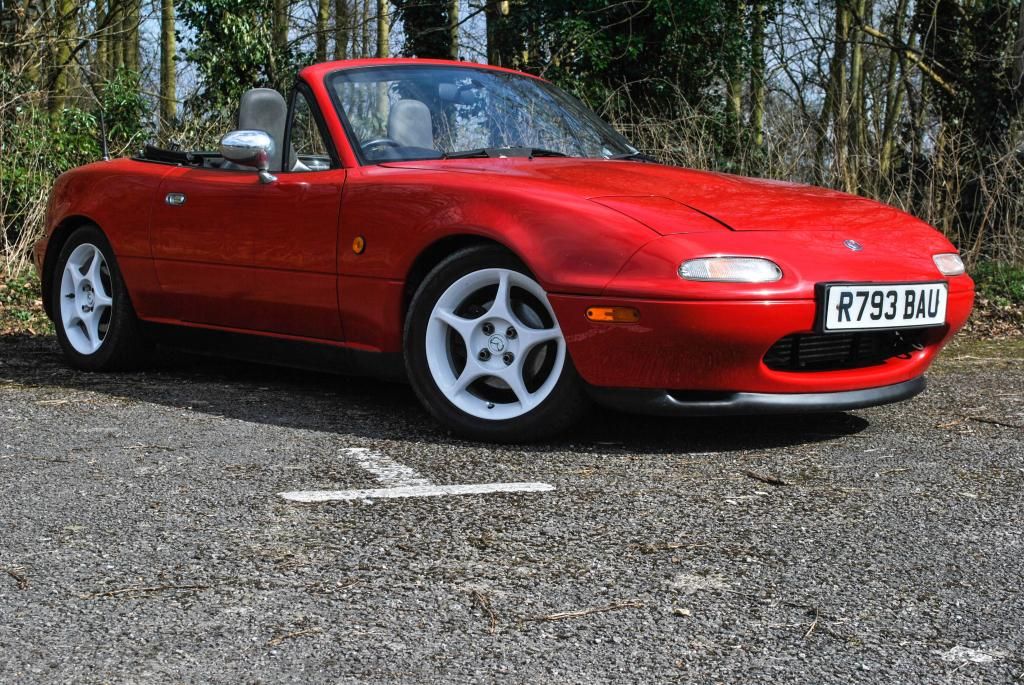
Thread starter's postsAbout a month ago, before I had purchased the seats, I bought a front lip for the car. The reasons for this, are at higher speeds, the front end of the car gets a bit light, which means the steering feel isn't as good. Also, I think it makes the car look a bit better at the front!
Fitting was pretty simple, had to drill 6-8 holes in the front bumper for bolts to go through, put two self tapping screws on the ends inside the wheel arches, then put two self tappers into the under tray to hold the ducts in place.
Fitting was pretty simple, had to drill 6-8 holes in the front bumper for bolts to go through, put two self tapping screws on the ends inside the wheel arches, then put two self tappers into the under tray to hold the ducts in place.

Your mx5 continues to be sexy, congrats. Where did you get the front lip?
Off someone on mx5nutz. OEM lip, which also means it is PU and not fibreglass, so won't crack if i do come across a speedbump that is higher than usual!
Have to admit, looks sweet, did you think about colour coding or decide against or just prefer black? When I went front lip on the RX8, I went colour coded rather than black... wanted to hanker the car down a little lol... regretting it now as it's getting chipped by damn gritting machines lol
Have to admit, looks sweet, did you think about colour coding or decide against or just prefer black? When I went front lip on the RX8, I went colour coded rather than black... wanted to hanker the car down a little lol... regretting it now as it's getting chipped by damn gritting machines lol
Don't think it would look right colour coded on the MX5, so black it was!
Soldato
- Joined
- 5 Aug 2006
- Posts
- 11,433
- Location
- Derbyshire
When I first saw your MX5 I thought it was in good nick, but your photos of it polished up certainly make it look a stunner! Red does tend to fade but I do love a bright red polished car!
I look forward to seeing it at the next RR day. I feel I am getting a bit more car knowledge now") .
.
I look forward to seeing it at the next RR day. I feel I am getting a bit more car knowledge now
.When I first saw your MX5 I thought it was in good nick, but your photos of it polished up certainly make it look a stunner! Red does tend to fade but I do love a bright red polished car!
I look forward to seeing it at the next RR day. I feel I am getting a bit more car knowledge now
Amazing what photos can hide

That looks stunning Vigoro
Thanks!
Love the car and always wanted those wheels on my 5! One niggle in your last pic, pull the dam headlight cover in line with the bonnet
They were lined up before, but I couldn't be bothered lining them up after changing the bulbs
As some of you are aware, my car decided on Saturday that it didn't really like coolant. So it spat it out all over the floor! 
This resulted in a wait for 6 hours for a low loader, then a speedy journey home!
The part that had broken, was the water pump inlet pipe, which is bolted to the side of the water pump (no surprise here...) and has 3 hoses attached. There is also only 2 bolts holding it in, nice easy job then!
.....If I didn't have a Supercharger or power steering, seems I brought more work on myself!
Anyway, got home this evening, and after sorting out my halfords socket set so I had more than 2 sockets in it I set to work. First removing the pipe attaching the intercooler to the supercharger outlet, then removing the p/s + supercharger belt. After this, the supercharger can come off. Removed the two bolts holding the charger to the engine, remove the throttle cable going to the throttle body pre-charger, disconnect the ICV pipe and finally unplug the MAF. All of this lifted out in one piece, easier to put it back together this way!
Next was the power steering pump. Now this was a bit harder, as I had forgotten how I put the big bolt holding it in on. So, removed the two bolts holding the top of the pump mount off the block, tilt the pump upward, and the bottom bolt holding the pump to the bracket can slide out. After this I needed to push the drift metal thingy back so I could access the bottom bolt of the bracket.
After this was off, lots of WD40 was applied to the bolts of the waterpump inlet. Whilst that was soaking in, I removed the small pipe at the front of the inlet. Remove the two 12mm bolt, really easy to do, then pull it away from the engine to remove the first pipe in the side, as this is a solid pipe with an o-ring on the end. After removing this, I could move the inlet around to make removing the last pipe easier. This pipe is about 20mm thick, but using a wide flat head screwdriver, it comes off with a bit of persuasion.
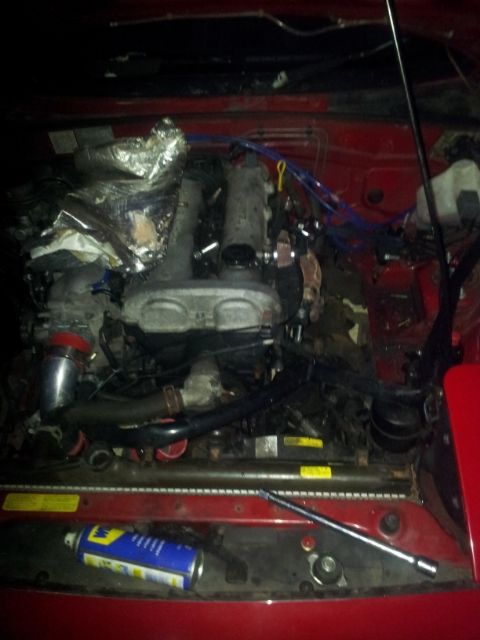
So what are you left with, well, this is sort of what my engine bay looked like before the power steering and supercharger went in, obviously with an inlet!
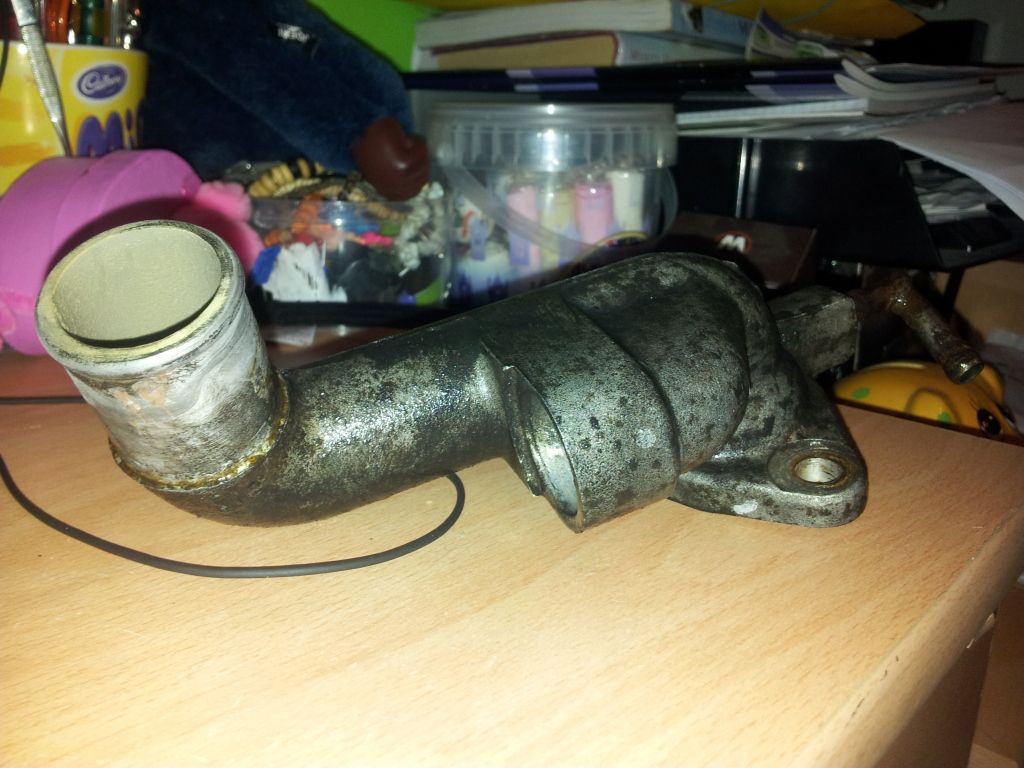
The inlet pipe had come from the front of the engine, where the two bolts and hole are.

And this is the offending item, the little elbow on the right side has a small hole in it, that I can't even see. Looks like this lump of metal will cost ~£100
This resulted in a wait for 6 hours for a low loader, then a speedy journey home!
The part that had broken, was the water pump inlet pipe, which is bolted to the side of the water pump (no surprise here...) and has 3 hoses attached. There is also only 2 bolts holding it in, nice easy job then!
.....If I didn't have a Supercharger or power steering, seems I brought more work on myself!
Anyway, got home this evening, and after sorting out my halfords socket set so I had more than 2 sockets in it I set to work. First removing the pipe attaching the intercooler to the supercharger outlet, then removing the p/s + supercharger belt. After this, the supercharger can come off. Removed the two bolts holding the charger to the engine, remove the throttle cable going to the throttle body pre-charger, disconnect the ICV pipe and finally unplug the MAF. All of this lifted out in one piece, easier to put it back together this way!
Next was the power steering pump. Now this was a bit harder, as I had forgotten how I put the big bolt holding it in on. So, removed the two bolts holding the top of the pump mount off the block, tilt the pump upward, and the bottom bolt holding the pump to the bracket can slide out. After this I needed to push the drift metal thingy back so I could access the bottom bolt of the bracket.
After this was off, lots of WD40 was applied to the bolts of the waterpump inlet. Whilst that was soaking in, I removed the small pipe at the front of the inlet. Remove the two 12mm bolt, really easy to do, then pull it away from the engine to remove the first pipe in the side, as this is a solid pipe with an o-ring on the end. After removing this, I could move the inlet around to make removing the last pipe easier. This pipe is about 20mm thick, but using a wide flat head screwdriver, it comes off with a bit of persuasion.
So what are you left with, well, this is sort of what my engine bay looked like before the power steering and supercharger went in, obviously with an inlet!
The inlet pipe had come from the front of the engine, where the two bolts and hole are.
And this is the offending item, the little elbow on the right side has a small hole in it, that I can't even see. Looks like this lump of metal will cost ~£100
I know your pain as mine fell off tuther day whilst doing my belts, I say fell off as snapped off is wrong as it was rusted to **** & was barely touched, Once touched it leaked like **** & then when touched it fell off corroded to ****.
We used a piece of brake pipe turned down at both ends & then a 3 way high pressure water connector.
Here's a pic of the brake pipe tapped in before we fitted the 3 way connector & linked the pipes up. Epic bodge if you ask me & a damn sight cheaper than a new thermo housing.

We used a piece of brake pipe turned down at both ends & then a 3 way high pressure water connector.
Here's a pic of the brake pipe tapped in before we fitted the 3 way connector & linked the pipes up. Epic bodge if you ask me & a damn sight cheaper than a new thermo housing.

Bit of quiksteel on it would have been easierNot joking that stuff can fix anything, no matter how wet or oily
Was just looking at the elbow that was broken, either it has a load of crud built up on it, or someone has already done this. So, new/used part it is!
Soldato
- Joined
- 14 Jul 2005
- Posts
- 17,616
- Location
- Bristol
That looks annoying but surely you can do something along the lines of what 4T5 has done, or you should be able to get a more sensible replacement pipe?
I have issue with using the brake pipe as copper is soft so when you clamp the hose onto it you could well crimp and buckle the pipe.
I have issue with using the brake pipe as copper is soft so when you clamp the hose onto it you could well crimp and buckle the pipe.
That looks annoying but surely you can do something along the lines of what 4T5 has done, or you should be able to get a more sensible replacement pipe?
I have issue with using the brake pipe as copper is soft so when you clamp the hose onto it you could well crimp and buckle the pipe.
The replacement pipe is that whole lump of metal, not sure I can recreate that myself
Think the pressure there is only 15psi (God knows where I got that from?) They don't need tightening down that much & I'm hoping for some corrosion to seal it in there for life kind of thing. Not noticed any loss at all & I'm really starting to boot it about after the recent work I've had done.
Proper Stupid design though & a weakness that Nobody mentions Before you go fiddling about around there.
Proper Stupid design though & a weakness that Nobody mentions Before you go fiddling about around there.
Snap it off, drill it out, tap the hole and screw in a fresh brass "tail" of the correct size for the pipework.
Not bodged
Cheaper than a new one
Satisfaction for fixing it with a bit of ingenuity instead of English pounds!
http://www.bearingboys.co.uk/Male_Tapered_Hose_Tail-1440-c
There you go..
Not bodged
Cheaper than a new one
Satisfaction for fixing it with a bit of ingenuity instead of English pounds!
http://www.bearingboys.co.uk/Male_Tapered_Hose_Tail-1440-c
There you go..
Last edited: