Spring/screw cooler mounts

Associate
Joined
6 Jan 2018
Posts
359
Got a cooler I want to mount and came with some screws/springs to fit it and I have no idea how they work lol

They come packaged like this

15fa4604-3c33-455c-9ae7-f248658e88fd.jpg


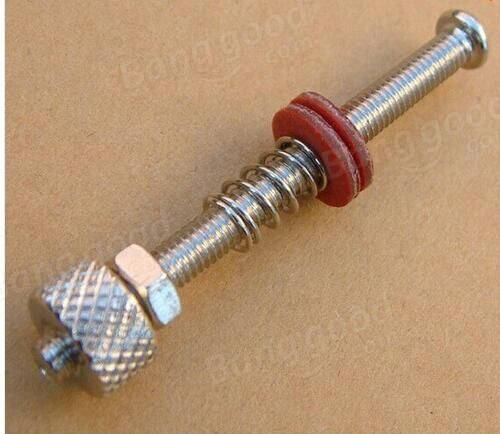
And as far as I can tell the only way that makes sense to fit them is like this

sgecoce.jpg

With the screw tightened onto the PCB with the nut at the bottom and then the springs in between the thumb screws and cooler bracket?

The screws only came with 2 washers each - if that’s how it fits I will have to pick up some more washers as there should be 3 per screw. M

Now realised it’s probably supposed to be different from my pic and that the PCB is supposed to be tightened with the screw and nut with the 2 nylon washers, but the spring nearly pulls through the hole in the bracket when you tighten it with no washer on so will probably throw some on there

Am I correct there before I mount it wrong and screw my cards/CPU up lol?
 
Last edited:
Associate
Joined
19 Jul 2011
Posts
1,899
Location
Reading
I take it that's a very cheap waterblock , save yourself a lot of aggro and get something better with a less deadly mounting mechanism.
 
Associate
OP
Joined
6 Jan 2018
Posts
359
I take it that's a very cheap waterblock , save yourself a lot of aggro and get something better with a less deadly mounting mechanism.

Lol, yes it is a very cheap water block but I just wanted to confirm how the mounts work. If I fit it and it’s no good I’ll swap it for a better (universal) one. (Not worth investing in a full cover one for my cards)
 
Man of Honour
Joined
12 Jul 2005
Posts
20,488
Location
Aberlour, NE Scotland
Thats a very old way of mounting a block. Put a fibre washer on the bolt then put the bolt through from the bottom of the board/card. Put the other fibre washer on next so you have a pair of them sandwiching the motherboard/GPU then the nut goes on. Tighten that up but not so tight to damage the board/card. It's job is to stop the bolt from spinning when you tighten or loosen the knurled nut when fitting/removing the block. Next is the block then the spring and then finally tighten the knurled nut to seat the block. Go from one corner to the diagonal opposite and tighten a bit at a time. In the end you should have Bolt>Fibre washer>Motherboard/GPU>Fibre washer>block>spring>knurled nut.

If this is for your 780ti's then you are going to have to do something for the vrm's. I had a EVGA GTX780 FTW with a core only block and ran into some big problems trying to keep the vrm's cool. In the end I bodged my own block together just for cooling the vrms. It was cheap, looked ok and worked a treat. Before that I tried several designs of copper heatsinks that I made from various old low profile cpu coolers which while they were better than the basic stock vrm heatsink still had the vrm's getting toasty without sticking a fan over them.
 
Associate
OP
Joined
6 Jan 2018
Posts
359
Thats a very old way of mounting a block. Put a fibre washer on the bolt then put the bolt through from the bottom of the board/card. Put the other fibre washer on next so you have a pair of them sandwiching the motherboard/GPU then the nut goes on. Tighten that up but not so tight to damage the board/card. It's job is to stop the bolt from spinning when you tighten or loosen the knurled nut when fitting/removing the block. Next is the block then the spring and then finally tighten the knurled nut to seat the block. Go from one corner to the diagonal opposite and tighten a bit at a time. In the end you should have Bolt>Fibre washer>Motherboard/GPU>Fibre washer>block>spring>knurled nut.

If this is for your 780ti's then you are going to have to do something for the vrm's. I had a EVGA GTX780 FTW with a core only block and ran into some big problems trying to keep the vrm's cool. In the end I bodged my own block together just for cooling the vrms. It was cheap, looked ok and worked a treat. Before that I tried several designs of copper heatsinks that I made from various old low profile cpu coolers which while they were better than the basic stock vrm heatsink still had the vrm's getting toasty without sticking a fan over them.

Wow thank you for that, that is extremely helpful. I might put some extra washers between the spring and block to stop them pulling through then. Almost had it right lol.

Yes I was aware of the VRM issue, I like the idea of a separate block for them. How did you go about doing it, you don’t have any pictures of that by any chance do you?

My plan for the VRMs was to try something similar to what this person has done
d3bb2883_IMG_1105.jpeg


Which uses the stock fan and cooling plate and pulls air through the heatsink attached to the VRM plate, do you think that would be sufficient?
 
Man of Honour
Joined
12 Jul 2005
Posts
20,488
Location
Aberlour, NE Scotland
That would work. Corsair basically nicked that idea and started selling coolers like that for use with AIO's on gpu's. Not sure if they are still on sale but I was pretty disgusted with them for selling something that people had already been doing for quite some time. Then again that's Corsair for you.

I don't have any pictures but what I did was to pick up a Heatkiller motherboard vrm block kit (the black delrin version of this for brand new £6 on ebay :D) along with a length of 2mm copper plate (was £6.50 on ebay at the time). Using the stock cooler I made a template for the vrm area including enough mounting holes and then marked it out on the copper plate. Using a angle grinder I cut the plate to size, chamfered the edges and then drilled the mounting holes. Next I removed the baseplate from the smaller of the two motherboard vrm blocks and marked the holes that fixed it to the top on the plate that I had made. I then drilled the holes and countersunk them on the bottom so that the screw heads would sit flush with the base of the plate. I then fitted the vrm block top to my baseplate, added a pair of 90 degree fittings and had a working vrm block for my 780. It worked on the same principle as the original vrm block but with a much bigger baseplate. The actual block top was fitted over the part of the baseplate directly over the vrm's so it didn't really matter that a large part of the plate wasn't under the block as the main heat producing area was. My vrm temps went from the high 70's-low 80's under load down to the high 30's so it was a massive success. The memory chips were just cooled by Zalman memory heatsinks stuck on with Akasa thermal tape and cooled by case airflow.
 
Associate
OP
Joined
6 Jan 2018
Posts
359
That would work...

This is superb info thank you. I’ve seen the Corsair things and wasn’t awfully impressed with what nearly £40 buys you.

That’s a great idea making a custom base plate for it and sounds really worthwhile in terms of VRM temps. Sadly I can’t find anything cheap enough that’s comparable - only the generic square blocks with fixed fittings and some south bridge blocks that could be made to fit. Unfortunately they are only about 40mm across so I’m not sure if that’d be enough to cool all the VRMs if I fitted it to a copper plate in the middle. I could however put some biggish heatsinks on the part of the copper plate not covered by the block and then hopefully even the VRMs at each end would be covered by some combination of water and air cooling...

Got me thinking now lol
 
Man of Honour
Joined
12 Jul 2005
Posts
20,488
Location
Aberlour, NE Scotland
That's why I used a vrm block as the basis so it covered the whole width of the card. I had toyed with the idea of using a northbridge block but it would leave a lot of the vrm's with only the copper plate to cool them. I could have then stuck some ramsinks to the copper plate that the block didn't cover but that would be more or less back to where I started and I really wanted to do the job properly.
 
Associate
OP
Joined
6 Jan 2018
Posts
359
Yeah I can see the reasoning. I guess worst case if I couldn't find any cheap ones and I bought the two for £30 then I could probably transfer them over to a future card.

I'm just conscious that the cards I have aren't worth spending any money on parts I can't reuse. Don't mind getting some better universal GPU blocks if the cheap ones turn out to be no good (although they look perfectly fine) but I'm definitely trying them out first.
 
Back
Top Bottom