

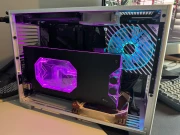
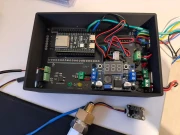
I wanted to share a project I’ve been working on over the past months: a fully custom, variable-speed, compressor-driven chiller integrated into an ITX system, controlled by a custom-designed PCB and purpose-built control software.
Images should be clickable to enlarge.
The goal was to build a sub-ambient cooling solution that:
• Uses proper vapor-compression refrigeration (not TEC)
• Actively prevents condensation
• Allows variable compressor speed control
• Provides full telemetry and system visibility
Below is a breakdown of the system.
Core System Hardware
PC Hardware
• CPU – 9800X3D
• GPU – 5090 Astral OC
• Motherboard – Asus ROG STRIX X870-I ITX
• RAM – 64GB Trident Z DDR5 C26
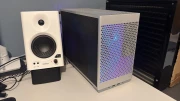
• Case – Ncase M2 Grater ITX
• PSU – LOKI 1000W SFX
Watercooling Components
• GPU Block – Bykski
• CPU Block – Optimus Signature V3 AMD
• Radiator – Mo-Ra 360 with Phanteks T30 fans
• Pump – Aqua Computer D5 Next
• Fan Controller – Aqua Computer Octo
• Reservoir – Watercool Heatkiller 200mm
The stat display and control interface are shown on a Corsair Xeneon Edge.
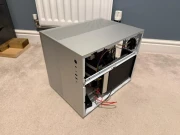
Refrigeration / Chiller System
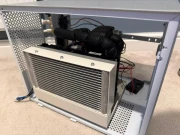
This is a true vapor-compression system built around:
• Rotary compressor with 24VDC to 3 Phase inverter.
• R134a refrigerant
• Brazed plate heat exchanger (evaporator)
• Dedicated condenser with forced airflow
The compressor is not simply on/off controlled. Instead, it is driven via a 0–5V analog speed signal into the inverter, allowing variable RPM operation.
Custom Control PCB
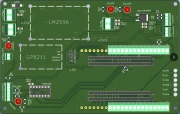
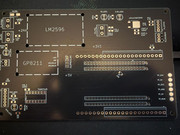
Rather than using external controllers, I designed a dedicated control PCB in KiCad to manage the system.
Core Controller
• ESP32-S3 microcontroller
• Dual I²C buses
• Onboard WiFi
• Embedded HTTP server
Sensors
• SHT40 (ambient temperature + humidity)
• DS18B20 (water temperature)
• Dew point calculated in firmware (Magnus equation)
Compressor Interface
• GP8211 12-bit DAC generating 0–5V speed command
• RUN/DIR logic control
Fan Control
• 4-pin PWM condenser fan control
• Software-based ramp logic
Protection & Safety
• Dew-point constrained operation
• Minimum run and rest timers
• Automatic shutdown on unsafe conditions (like if a temperature sensor fails)
The PCB acts as a dedicated refrigeration controller rather than a generic microcontroller board. Everything has been hand soldered.
Control Logic
The system does not target a fixed water temperature.
Instead, it operates on a dew-point constrained control model:
1. Ambient temperature and humidity are read.
2. Dew point is calculated in real time.
3. Water target temperature is set to: target = dew point + safety margin
4. Compressor speed is dynamically adjusted based on the difference between current water temperature and target.
As water approaches the dew threshold, compressor speed reduces.
If water reaches the safe limit, the compressor shuts down.
This ensures:
• Sub-ambient cooling
• Active condensation prevention
• Smooth variable-speed operation
• Reduced compressor cycling
Control Software (Built in Tauri)


To complement the embedded firmware, I developed a desktop control application using:
• Tauri (Rust backend)
• Frontend UI for telemetry and configuration
• REST-based communication with the ESP32
• JSON polling for live metrics
The application provides:
• Real-time ambient, dew, and water temperatures
• Compressor RPM and state
• Inverter fault decoding
• Adjustable speed limits, margins, and hysteresis
• Start/stop control
• Live status monitoring
The interface runs on a Corsair Xeneon Edge for a dedicated system control panel.
System Behaviour
With the system tuned:
• ~3°C water delta across the plate HX at current flow rate
• Stable superheat (~8°C)
• Variable-speed compressor control
• No condensation under normal ambient conditions
• Continuous telemetry and system visibility
The objective was not just sub-ambient cooling, but controlled, measurable, and safe sub-ambient cooling.
Summary
This project combines:
• High-end ITX hardware
• Custom refrigeration integration
• Custom PCB design
• Embedded firmware development
• Desktop application development
• Dew-point-aware thermal control
It has been an exercise in combining watercooling, embedded systems, and refrigeration engineering into a single integrated platform.
I’m happy to share further details on the PCB design, firmware architecture, or refrigeration tuning if there’s interest.
Images should be clickable to enlarge.
The goal was to build a sub-ambient cooling solution that:
• Uses proper vapor-compression refrigeration (not TEC)
• Actively prevents condensation
• Allows variable compressor speed control
• Provides full telemetry and system visibility
Below is a breakdown of the system.
Core System Hardware
PC Hardware
• CPU – 9800X3D
• GPU – 5090 Astral OC
• Motherboard – Asus ROG STRIX X870-I ITX
• RAM – 64GB Trident Z DDR5 C26
• Case – Ncase M2 Grater ITX
• PSU – LOKI 1000W SFX
Watercooling Components
• GPU Block – Bykski
• CPU Block – Optimus Signature V3 AMD
• Radiator – Mo-Ra 360 with Phanteks T30 fans
• Pump – Aqua Computer D5 Next
• Fan Controller – Aqua Computer Octo
• Reservoir – Watercool Heatkiller 200mm
The stat display and control interface are shown on a Corsair Xeneon Edge.
Refrigeration / Chiller System
This is a true vapor-compression system built around:
• Rotary compressor with 24VDC to 3 Phase inverter.
• R134a refrigerant
• Brazed plate heat exchanger (evaporator)
• Dedicated condenser with forced airflow
The compressor is not simply on/off controlled. Instead, it is driven via a 0–5V analog speed signal into the inverter, allowing variable RPM operation.
Custom Control PCB
Rather than using external controllers, I designed a dedicated control PCB in KiCad to manage the system.
Core Controller
• ESP32-S3 microcontroller
• Dual I²C buses
• Onboard WiFi
• Embedded HTTP server
Sensors
• SHT40 (ambient temperature + humidity)
• DS18B20 (water temperature)
• Dew point calculated in firmware (Magnus equation)
Compressor Interface
• GP8211 12-bit DAC generating 0–5V speed command
• RUN/DIR logic control
Fan Control
• 4-pin PWM condenser fan control
• Software-based ramp logic
Protection & Safety
• Dew-point constrained operation
• Minimum run and rest timers
• Automatic shutdown on unsafe conditions (like if a temperature sensor fails)
The PCB acts as a dedicated refrigeration controller rather than a generic microcontroller board. Everything has been hand soldered.
Control Logic
The system does not target a fixed water temperature.
Instead, it operates on a dew-point constrained control model:
1. Ambient temperature and humidity are read.
2. Dew point is calculated in real time.
3. Water target temperature is set to: target = dew point + safety margin
4. Compressor speed is dynamically adjusted based on the difference between current water temperature and target.
As water approaches the dew threshold, compressor speed reduces.
If water reaches the safe limit, the compressor shuts down.
This ensures:
• Sub-ambient cooling
• Active condensation prevention
• Smooth variable-speed operation
• Reduced compressor cycling
Control Software (Built in Tauri)
To complement the embedded firmware, I developed a desktop control application using:
• Tauri (Rust backend)
• Frontend UI for telemetry and configuration
• REST-based communication with the ESP32
• JSON polling for live metrics
The application provides:
• Real-time ambient, dew, and water temperatures
• Compressor RPM and state
• Inverter fault decoding
• Adjustable speed limits, margins, and hysteresis
• Start/stop control
• Live status monitoring
The interface runs on a Corsair Xeneon Edge for a dedicated system control panel.
System Behaviour
With the system tuned:
• ~3°C water delta across the plate HX at current flow rate
• Stable superheat (~8°C)
• Variable-speed compressor control
• No condensation under normal ambient conditions
• Continuous telemetry and system visibility
The objective was not just sub-ambient cooling, but controlled, measurable, and safe sub-ambient cooling.
Summary
This project combines:
• High-end ITX hardware
• Custom refrigeration integration
• Custom PCB design
• Embedded firmware development
• Desktop application development
• Dew-point-aware thermal control
It has been an exercise in combining watercooling, embedded systems, and refrigeration engineering into a single integrated platform.
I’m happy to share further details on the PCB design, firmware architecture, or refrigeration tuning if there’s interest.
Last edited:

")