

You are using an out of date browser. It may not display this or other websites correctly.
You should upgrade or use an alternative browser.
You should upgrade or use an alternative browser.
OCUK Official IC Diamond/ Perihelion Test Results
- Thread starter IC Diamond
- Start date
More options
Thread starter's posts

- Joined
- 7 Dec 2010
- Posts
- 223
H70 default TIM (Shin Etsu) I believe.......
I have been looking for a source on what compound they use and the rumor is Shin-Etsu X23-7762 or the X23-7783d.
Can anybody nail this down with something from the manufacturer?
- Joined
- 7 Dec 2010
- Posts
- 223
Nice
Since moving from my old Thermaltake Big Typhoon cooler to Thermalright IFX-14, the base of the latter felt different. Big Typhoon seemed to have more of a flat base whereas mounting of IFX-14 felt a bit more awkward as it tended to produce slightly more movement sideways.
The convex base of IFX-14 has now been confimed by the pressure and contact test. It will be very interesting to know the average pressure exerted by unlapped IFX-14.
Judging from the contact pattern, I would say that unlapped contact pattern or the 'I' pattern isn't making a good contact at the centre as colour seems to become lighter in that area.
The 4 cores in Q6600 are aligned horizontally as shown below numbered 1 -4 with contact pattern superimposed roughly (paint work) :
[
As seen above the light pink colour is emphasising lighter contact in the centre as seen in the original picture aswell. It is interesting to note that unlapped IFX-14 seems to only partially cover core 2 and core 3 areas while no contact is made with core 1 and core 4 areas.
So more heat is accumulated faster at Q6600 IHS than can be transferred by IFX-14 via heat pipes resulting in higher cpu core temperatures overall. May be this another reason why there is 6-8C difference between hottest and coolest cores on my Q6600.
To me this suggests that unlapped IFX-14 base or even unlapped Q6600 IHS are a poor heat transfer mechanisms
I am very glad that I took part in this thread as I have learnt something further about thermal compounds and mating contacts between heatsinks and cpus. Plus it has been an eye opener into the world of PC cooling
It will be interesting to see how the contact and pressure results along with thermal compound results turn out when I lap both the IFX-14 and Q6600 in near future")
Nice bit of analysis you have there - looks that even on a rotation the cores would be off center.
What other sinks mount in that orientation?
I have been looking for a source on what compound they use and the rumor is Shin-Etsu X23-7762 or the X23-7783d.
Can anybody nail this down with something from the manufacturer?
Really not a clue, but I do have some X23-7783D here.
OPTIONAL INFO:
PROCESSOR=i5 750
VOLTS=1.256v
CLOCKS=3770MHz
HEAT SINK=EK HF Supreme,copper,clear top.
COOLING=Custom loop
Before Compound:Arctic MX3
Ambient Temp:21ish(no way to measure)
Idle Temp:30
Load Temp:59
mx3 idle
 and load

ICD/Perihelion:ICD
Ambient Temp:21ish(no way to measure, but room feels the same as it did at 4pm, no sun into the room since dinner so it stays pretty much the same all afternoon)
Idle Temp:29
Load Temp:56
ICD idle
 and load

PROCESSOR=i5 750
VOLTS=1.256v
CLOCKS=3770MHz
HEAT SINK=EK HF Supreme,copper,clear top.
COOLING=Custom loop
Before Compound:Arctic MX3
Ambient Temp:21ish(no way to measure)
Idle Temp:30
Load Temp:59
mx3 idle
ICD/Perihelion:ICD
Ambient Temp:21ish(no way to measure, but room feels the same as it did at 4pm, no sun into the room since dinner so it stays pretty much the same all afternoon)
Idle Temp:29
Load Temp:56
ICD idle
Soldato
- Joined
- 1 Jun 2010
- Posts
- 7,054
- Location
- London
Nice bit of analysis you have there - looks that even on a rotation the cores would be off center.
What other sinks mount in that orientation?
I think it would depend on the heatsink base design and how manufacturer would want the contact to be made or in what orientation on CPU IHS. However another interesting bit about I contact pattern is that it would be highly suitable for dual cores processors as the cores in both positions are mostly covered by the I contact pattern as seen below especially if people are using IFX-14:


- Joined
- 7 Dec 2010
- Posts
- 223
WingZero30
your results are in and emailed to you
your results are in and emailed to you
Soldato
- Joined
- 1 Jun 2010
- Posts
- 7,054
- Location
- London
WingZero30
your results are in and emailed to you
Received and many thanks

Early on when I emailed you about results pattern not matching my IFX-14/Q6600 raw pattern, I was looking at different patterns lol as I noticed that within excel file there were contact/pressure patterns for other configs aswell.
Anyway here are the unlapped IFX-14/Q6600 pressure/contact results.
Raw Image

Pseudo Representation

Pressure Statistics

Pressure Histogram

Line Scan

3D Image

Measure in Grid 10 x 10 (Raw Data)

So generally the average pressure exerted is almost 70 PSI which is a good thing with pressure reaching about 80 PSI in majority of the contact area judging by the pseudo representation. As seen the pressure decreases in the centre.
The contact surface of both Q6600 IHS and IFX-14 base is terrible as I placed the flashlight/torch directly infront of the contact point between Q6600 and IFX-14 and could see the light coming through either side of the central contact point.
- Joined
- 7 Dec 2010
- Posts
- 223
Looking at the analysis you only have .55 inches of contact area out of around 2.6 inches and the bulk of that is biased towards the edges of the heat spreader in the zone of diminishing returns in sectioned areas 2&3 and 8&9.
From the results I am seeing I think the doctrine of convex bases has some shortcomings on the contact/pressure trade off side of the equation as the heat spreaders do work and after crossing a limit point of perhaps <50% contact vs high pressure temps go up.
So WingZero30 are you going to belt sand it flat or hand lap all the way?
Soldato
- Joined
- 1 Jun 2010
- Posts
- 7,054
- Location
- London
So WingZero30 are you going to belt sand it flat or hand lap all the way?
I used hand lap and kitchen countertop for lapping as I didn't have glass
.The grit of wet and dry sand papers I used were as follows:
Q6600:
120, 180, 240, 320, 400, 600, 800, 1000, 1500, 2000 grit
IFX-14:
120, 180, 240, 320, 400, 600, 800, 1000, 1200, 1500, 2000 grit
BEFORE LAPPING
Q6600

IFX-14

DURING LAPPING
Q6600

IFX-14

AFTER LAPPING
Q6600

IFX-14 (Although this isn't my IFX-14 picture as I forgot to take the pic after lapping but the result is similar to what is shown in the photo)

First Lapping session duration
Q6600
3.5 hours
IFX-14
1.5 hours
Contact Pattern after 1st lapping session

Second Lapping session duration (120 grit paper)
Q6600
1 hour
IFX-14
3.5 hours
Third Lapping session duration (120 grit paper)
IFX-14
1 hour
Contact pattern after 3rd lapping session

As this was my first lapping experience, one thing I learnt was that lapping requires lots of patience and time. After all we are shaving surface of metal especially considering this was hand lap.
I started with using 400 grit paper and wetting it slightly with water that was filled with some dishwashing liquid. I used Q6600 first for lapping and used the black protection cover for CPU backside,as seen in the photos above.
In terms of lapping method I held the Q6600 by the edges and letting the weight of CPU do the work and used about 20-30 passes of back and forth. Then rotated the CPU 90 degree and repeated the same movements and so on.
However during lapping, I checked the backside of Q6600 and saw slight water on some of the lga 775 contact points!!
 . I then stopped lapping, dried the Q6600 backside and rushed back to my PC case and motherboard to check if Q6600 was working perfectly fine. It was!! phew Afterwards I didn't bother with wetting sand papers in the case of Q6600 and just used dry surfaces of sand papers.
While using 400 grit paper, I noticed I wasn't making much progress, so moved to 320 grit and then 240 grit. The latter two sandpapers were mostly used to do most of the work of removing nickel plating from Q6600 IHS. However they left scratches which were mostly removed by making use of rest of sand papers starting with 600 grit and finishing with 2000 grit leaving a nice shiny mirror like copper IHS of Q6600.
From the pic of Q6600 during lapping, it can be seen that IHS isn't flat either but rather convex at the centre and edges. However when starting lapping Q6600, the edges of IHS were the first one to show copper indicating that the Q6600 IHS is concave at the beginning. This is also further supported by my unlapped IFX-14/Q6600 contact pattern where greatest pressure was exerted at the edges.
In the case of lapping IFX-14, I started with 240 grit, moving to 180 grit and then finally to 120 grit as these three sandpapers I used generally did most of the lapping work.
These sand papers were wetted initially and I placed my hand on the top surface of IFX-14 base, applied light pressure and letting the weight of heatsink do most of the work. After about 30-40 passes of back and forth motion, I swapped sides and repeated the procedure. Then heatsink was rotated 90 degree and again repeating the same procedure of 30 passes of back and forth.
The back and forth method is more or less similar to what the guy does with his IFX-14 in this video starting at 05:15 :
IFX-14 is a nightmare on dry lower grit sand papers
 and requires slightly more pressure to move. However I have found dry surfaces to be more effective than wet surfaces in the case of both IFX-14 and Q6600.
The pic of IFX-14 during lapping complements the unlapped IFX-14/Q6600 I shaped pattern.
Here's the interesting part:
After 1st lapping session, the nickel plating was gone from both Q6600 IHS and IFX-14 base. Total time had already been 5 hours by then and I though that they would be both flats. How wrong was I. I did the pressure and contact and to my dismay the results weren't very encouraging
 .
.It seems even after 5 hours of hard work of lapping, there was still poor contact area. I have read many times on other forums that people saying lapping didn't improve their temperature results. I suspect they probably got more or less same result as me or that their heatsink/cpu sufaces were very flat already. So it shows that just having copper surfaces on both CPU IHS and Heatsink base after 'lapping' doesn't mean they are perfectly flat.
Any way two days later I carried out my second lapping session and this time only using 120 grit paper to work on both CPU and Heatsink. After the second session, I could feel the difference. Before lapping, IFX-14 used to wobble a lot sideways. However after second session that wobbliness reduced significantly.
On the following day I spent another hour lapping IFX-14 with 120 grit paper and by this time I have accumulated over 10 hours of total lapping time!! and was becoming tired and bored
 . Afterwards I did another contact and pressure test. Although I wasn't expecting perfect flat/contact area, the result showed an increased contact area as seen in the 2nd pic. The pressure has decreased slightly overall compared to first picture aswell as unlapped contact pattern.
When it comes to lapping, IFX-14 base is very stubburn and even after 6 hours of lapping IFX-14, it still wasn't perfectly flat. Plus the flashlight/torch showed still very small amount of light seeping through either side of central contact area between IFX-14 and Q6600.
CPU IHS seemed more flat with similar light test in that only very tiny amount of light could be seen near the edges while no light was going through the centre and beyond.
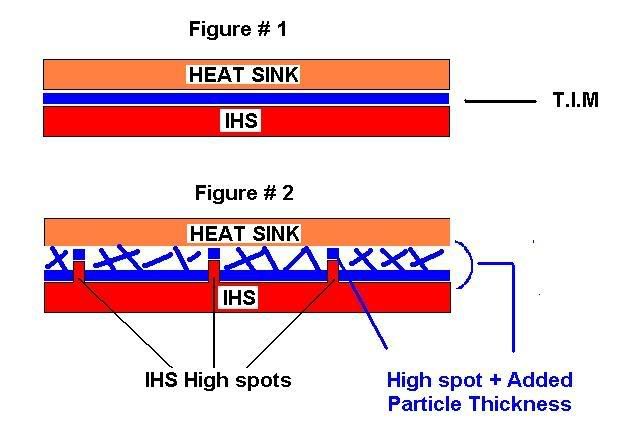
I think IFX-14 will still require few more hours of lapping before it can be perfectly flat. One thing I did notice when projecting light through was that there were tiny grains/particles/high spots residing between IFX-14 and Q6600 especially in those areas where light was still penetrating through. It seemed as though these particles were preventing the absolute contact between Q6600 and IFX-14.
I don't know if they are metallic particles/spots or just grit particles which have become attached to both IFX-14 base and Q6600 IHS. I used isopropyl alcohol in between changing sand papers for cleaning.
Those particles resemble the 2nd diagram in the following pic:
irregular contour on both sink & IHS and as few people lap to correct the problem (5%?)and fewer lap to perfection we add another .05 ml for a total of 0.1ml.
Another factor associated with irregular contours is another mil or two layer of compound is added on the high spots depending on the pressure applied. To fill that gap we add another .05 ml for a total recommended amount of 1.5 ml which approx. equals our 5-5.5mm size bead on center. or 3-4 applications with a 7 carat/0.5ml tube
Thermal compound is a volume application to fill gaps, not one of weight, liquid spread-ability etc. and our view that whatever the compound you still need the equivalent volume to close that gap.
Afterwards I installed everything back in my PC case. However in doing so I managed to warp/bend my motherboard and this affected the ram slots
. Luckily I managed to sort out problem.http://forums.overclockers.co.uk/showthread.php?t=18273358
As much as I wanted to do proper lapped testing with all three thermal compounds which I used previously, sadly I won't be proceeding with lapped testing for fear of bending my motherboard again
.However on the bright side here is the IC Diamond results for [email protected] before and after lapping
") :
:Since testing previously I have overclocked my Q6600 further to 3.5Ghz. So some of the bios settings have changed from older settings but they remain same at 3.5Ghz. My unlapped testing was done about 3.5 weeks ago during afternoon.
[email protected]
Bios Vcore: 1.40V
Idle Voltage: 1.376 - 1.360V
Load Voltage: 1.360V
Load Line Calibration (LLC): Enabled
Ram Speed: 518.7MHz (DDR2 1037MHz)
Ram timings: 5,5,5,15
Dram Voltage: 2.00V
EIST and C1E: Disabled
Ambient room temperature: 20.0C (in both tests)
IC Diamond Before Lapping
Results taken from here:
http://forums.overclockers.co.uk/showpost.php?p=18930615&postcount=2287


IC Diamond After Lapping


The lapped testing took almost 4 hours with 120 passes of Intel Burn Test
starting at 12.06 pm and finishing at 15.50pm. So took the whole afternoon when the day is at it's warmest temperatures. Lapping although still not perfect has produced several astonishing results:
1) Temperature reduced by 6C for hottest cores
2) Temperature reduced by 3C for coolest cores
3) Temperature difference between hottest cores (core0,1) and coolest cores (core2,3) reduced by 3C
4) Average temperature reduced by 4.5C!!
I am impressed
I think for perfectly smooth and flat contact between Q6600 and IFX-14, average temperature could further reduce by 2-3C more. IFX-14 is an impressive cooler but only after lapping it.But as things stand I am very happy
.In my concluding thoughts the ideal case of temperature reduction and for thermal compound maximum performance is high pressure and large contact area.
However in my specific case, it wasn't the pressure but rather the increased contact area that astonishngly reduced my core temperatures.
I think there is definitely a tradeoff/balance between pressure and contact area and having high pressure doesn't always equate to higher performance although it is essential. The contact area is just as important as pressure
.What a journey it has been.
From learning about IC thermal compounds to asking questions/participating in IC threads to carrying out testing to further refining variables and finally today, it has been a brilliant knowledge gaining and understanding mission about how thermal compounds as part of PC systems work and why they behave the way they do.
WingZero30
Last edited:
Soldato
- Joined
- 14 Sep 2010
- Posts
- 2,910
- Location
- Port Talbot - Wales
Nice results! I so need to get my paws on an IFX-14!! lol
I only ever lapped one cooler, it took hours (as you said) and made no real difference at the time lol (was a CoolerMaster HHC-001 fitted onto an Athlon XP2000) temps didn't seem to change, maybe a degree... So have never thought about it since - after this though, the TRUE might be getting a shave
I only ever lapped one cooler, it took hours (as you said) and made no real difference at the time lol (was a CoolerMaster HHC-001 fitted onto an Athlon XP2000) temps didn't seem to change, maybe a degree... So have never thought about it since - after this though, the TRUE might be getting a shave
Soldato
- Joined
- 1 Jun 2010
- Posts
- 7,054
- Location
- London
Nice results! I so need to get my paws on an IFX-14!! lol
I only ever lapped one cooler, it took hours (as you said) and made no real difference at the time lol (was a CoolerMaster HHC-001 fitted onto an Athlon XP2000) temps didn't seem to change, maybe a degree... So have never thought about it since - after this though, the TRUE might be getting a shave
Haha. This made me laugh
Yeah it will be a good idea to lap TRUE heatsink. However don't expect big drops in temps after just shaving all the nickel plating as I found out. You will more likely need few more hours to make the base more flat.
Also lower grit papers from 120 to 240 make much difference compared to 400 grit which seems to be recommended across different forums for starting lapping. But lower grit papers also leave more scratches which can be reduced by making use higher grit papers such as 1500 or 2000. I am sure you know this already.
- Joined
- 7 Dec 2010
- Posts
- 223
Devil is in the details
Faster way is to use a belt sander, I use a variac to control belt speed so the pieces do not get to hot. It gets me flat to within .001 the edges are a little rounded but that's ok for this application. Machine's, files work and and save time, that is what they do in the factory.
Then for finish I use Dmt sharpening stones to 8000 grit
http://www.dmtsharp.com/products/diasharp.htm

They vary in cost and quality I bought a 4 sided block 200 - 800 grit for $10 USD and works fine and I think cheaper than sandpaper at least in the long run if you opt for the more expensive blocks.
I rarely spend more than an hour
flat is best and going beyond a 600 - 800 grit yields little improvement as most particle sizes are to large to fill the micro scratches at this level.
Faster way is to use a belt sander, I use a variac to control belt speed so the pieces do not get to hot. It gets me flat to within .001 the edges are a little rounded but that's ok for this application. Machine's, files work and and save time, that is what they do in the factory.
Then for finish I use Dmt sharpening stones to 8000 grit
http://www.dmtsharp.com/products/diasharp.htm
They vary in cost and quality I bought a 4 sided block 200 - 800 grit for $10 USD and works fine and I think cheaper than sandpaper at least in the long run if you opt for the more expensive blocks.
I rarely spend more than an hour
flat is best and going beyond a 600 - 800 grit yields little improvement as most particle sizes are to large to fill the micro scratches at this level.
Soldato
- Joined
- 1 Jun 2010
- Posts
- 7,054
- Location
- London
Devil is in the details
Faster way is to use a belt sander, I use a variac to control belt speed so the pieces do not get to hot. It gets me flat to within .001 the edges are a little rounded but that's ok for this application. Machine's, files work and and save time, that is what they do in the factory.
Then for finish I use Dmt sharpening stones to 8000 grit
http://www.dmtsharp.com/products/diasharp.htm
They vary in cost and quality I bought a 4 sided block 200 - 800 grit for $10 USD and works fine and I think cheaper than sandpaper at least in the long run if you opt for the more expensive blocks.
I rarely spend more than an hour
flat is best and going beyond a 600 - 800 grit yields little improvement as most particle sizes are to large to fill the micro scratches at this level.
Yeah 1500 - 2000 grit paper is mainly used for polishing and to give smooth mirror like finish.
- Joined
- 7 Dec 2010
- Posts
- 223
From OCUK IC Diamond Review


WingZero30 Results
These are two great tests for the reason that initial contact patterns are the same and in both tests the variable of pressure has been fixed at more or less at the upper limit.
In the review result overall improvement was 5C from initial AS5 to IC Diamond with lapping with an extra 2C improvement with the added thermal contact/conductivity of IC Diamond-WingZero30 Result is 6.9C from initial MX4 test to IC diamond with lapping.
WingZero30 Results of greater improvement than the review test could be in part due the approx 18% less contact area at the start than the review, curve gets pretty steep fast under a inch.
Too bad there is no follow on with the MX4 as I believe the ICD/MX4 delta margins would have increased as with AS5 in the in the review - Poor contact and or pressure tends to minimize differences(homogenize) between compounds.
Perhaps the compound?
My thinking here on the bowed base concept is that it is either a manufacturer cost/convenience or not a fully developed idea.
For instance from zero and the contact points provided from the test you could draw a curve that would show the optimum pressure/contact combination which is probably 2x -3x of what we have seen in any contact image. Along with other design considerations a simple alternative would be to machine a flat step that would fit those optimum parameters.
Competitively it would make sense as high end sinks and water blocks margins are relatively close, the margin increase noted in these two tests would put them ahead of the pack performance wise.
BTW Great Job WingZero30!
WingZero30 Results
These are two great tests for the reason that initial contact patterns are the same and in both tests the variable of pressure has been fixed at more or less at the upper limit.
In the review result overall improvement was 5C from initial AS5 to IC Diamond with lapping with an extra 2C improvement with the added thermal contact/conductivity of IC Diamond-WingZero30 Result is 6.9C from initial MX4 test to IC diamond with lapping.
WingZero30 Results of greater improvement than the review test could be in part due the approx 18% less contact area at the start than the review, curve gets pretty steep fast under a inch.
Too bad there is no follow on with the MX4 as I believe the ICD/MX4 delta margins would have increased as with AS5 in the in the review - Poor contact and or pressure tends to minimize differences(homogenize) between compounds.
EniGmA1981-Nice results! I so need to get my paws on an IFX-14!! lol
I only ever lapped one cooler, it took hours (as you said) and made no real difference at the time lol (was a CoolerMaster HHC-001 fitted onto an Athlon XP2000) temps didn't seem to change, maybe a degree... So have never thought about it since - after this though, the TRUE might be getting a shave
Perhaps the compound?
My thinking here on the bowed base concept is that it is either a manufacturer cost/convenience or not a fully developed idea.
For instance from zero and the contact points provided from the test you could draw a curve that would show the optimum pressure/contact combination which is probably 2x -3x of what we have seen in any contact image. Along with other design considerations a simple alternative would be to machine a flat step that would fit those optimum parameters.
Competitively it would make sense as high end sinks and water blocks margins are relatively close, the margin increase noted in these two tests would put them ahead of the pack performance wise.
BTW Great Job WingZero30!
Soldato
- Joined
- 1 Jun 2010
- Posts
- 7,054
- Location
- London
BTW Great Job WingZero30!
You are welcome
Yup 10 hours of lapping was well worth it in the end.
I read about lapping before and never considered it until now and I am myself very impressed with the results.
Personally when I bought IFX-14 some months ago, I could instantly feel that placing the heatsink on the table or on Q6600 didn't feel right. Somehow the heatsink was wobbly but I went along with it anyway thinking that it is how IFX-14 was meant to be by Thermalright. I didn't really feel satisfied deep down especially for such a big cooler.
Couple of months ago I came across Xbitlabs article which I have linked to in my results post 291 of this thread stating convex base.
After reading it I probably thought that it may be few cases and not reflective of IFX-14 overall.
However it is only now it has been confirmed solidly that IFX-14 base was indeed convex and only providing 20% of total contact area.
There has also been mention of Thermalright Silver Arrow having convex base aswell plus on the internet there is also petition to Thermalright regarding the convex base of their coolers.
Perhaps this thread can be shown to Thermalright to see what they have to say. I doubt they will change their mind though. Yes I agree the base of any cooler should be plain flat and it is not fair on the customer to buy a cooler which can't give good cooling.
The thing that disappoint me though is that with IFX-14 being an excellent cooler and one of the first original dual tower heatsinks and being the original design on which later TR coolers are based such as Cogage Arrow and Silver Arrow; it only provided about 20% contact area.
As for Q6600, it's IHS surface wasn't flat either as seen in the photos and this definitely contributed towards less contact area aswell.
I believe manufacturers of both CPUs and Heatsinks should pay more attention to the importance of having flat surface and to facilitate large contact area.
But one thing is for sure; so many positive outcomes and developments have comeout of this thread and it was well worth it.
WingZero30
Last edited:
- Joined
- 7 Dec 2010
- Posts
- 223
As for Q6600, it's IHS surface wasn't flat either as seen in the photos and this definitely contributed towards less contact area aswell.
I believe manufacturers of both CPUs and Heatsinks should pay more attention to the importance of having flat surface and to facilitate large contact area.
To be fair manufacturers have to figure cost/benefit into the mix for the broader market, for Intel +/- 5C is no big deal and tighter tolerances will drive up cost.
for the sink people it looks to be that machining is done before assembly and the soldering process may engender the "bend" at which point machining the fully assembled piece by my guess would be awkward at best and probably falls under the same cost benefit consideration.
How do you clamp this for volume production machining ? also interesting are the outer heat pipes probably were under utilized having no contact at all with the IHS in that area.
I will say that your contact Image looks to be in the top 5% of those in my contact/pressure image library
Last edited:
Soldato
- Joined
- 1 Jun 2010
- Posts
- 7,054
- Location
- London
IC Diamond
I was thinking would it be ok if I also posted the lapped contact pattern to you and then results can be obtained from sensor products to give further insight?
I was thinking would it be ok if I also posted the lapped contact pattern to you and then results can be obtained from sensor products to give further insight?
- Joined
- 7 Dec 2010
- Posts
- 223
IC Diamond
I was thinking would it be ok if I also posted the lapped contact pattern to you and then results can be obtained from sensor products to give further insight?
It's all about contact and pressure in case nobody got the message..
Send it off and I will forward to Sensor Products
I know you had some issues but any chance we could get a before compound test on the lapped set up?
Soldato
- Joined
- 1 Jun 2010
- Posts
- 7,054
- Location
- London
Send it off and I will forward to Sensor Products
Posted
Let me know again when you have received it
I know you had some issues but any chance we could get a before compound test on the lapped set up?
After some thought I decided to conduct the lapped testing in June which is meant to be one of the hottest month in UK. It will be ideal time.
Lapped testing methodology will be similar to unlapped testing