

Back again after that earlier infamous wet belt issue (which has been running fine since replacement/clean out). The car has never been great for oil. Maybe 0.5L every 1-2k miles. Recently though i drove around 100 miles worth very hard at about 5k RPM and noticed it ate probably around 0.8L in less than 200 miles. No oil anywhere in the engine bay so it must be burning it. I had initially thought maybe the oil rings (hence running it hard to get it hot) but then started looking at the PCV system after seeing more oil that i'd like in the hoses to the intercooler. Checked the "PCV valve" but all seem relatively ok there although it seemed a little nasty with what looked like homogenized water and oil (aka mayo) in the general area next to what seemed like an emergency pressure relief valve.
Took the valve rocker cover/oil separator/oil vapor system off hoping to just clean it out and found what is likely the culprit, this small valve is ripped and seems to be letting by. After a bit of sucking and blowing its function seems to be that it should be closed under normal operation, which then allows the only air path to go through the "PCV valve". The negative pressure here should then close the valve under normal operations. With this smaller valve broken, its bypassing the PCV valve and also not allowing enough negative pressure to keep that closed.

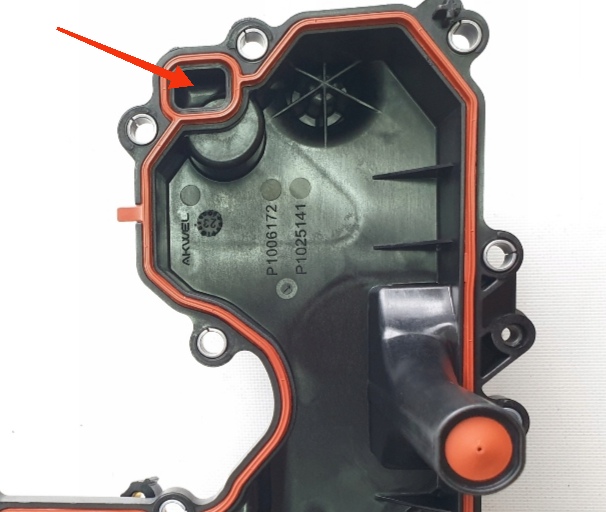
I've got a new one on order so will be replacing the entire assembly (Part: 9849189680), but it seems a bit mad for the sake of a 2pence size bit of silicone/rubber to need to do that. Also i don't understand the function of this small valve and why it exists. The only thing i can think of is there's a multi stage condenser to return oil. Otherwise if i blocked that whole thing up the evap system would function normally and i'd not need that part replacing. Below is a diagram of how it functions with the added broken valve near the number 6.

Will update the thread when the part arrives and i can run it through some tests but just annoying you have to spend £120 on a part for the sake of a 20p valve..
Took the valve rocker cover/oil separator/oil vapor system off hoping to just clean it out and found what is likely the culprit, this small valve is ripped and seems to be letting by. After a bit of sucking and blowing its function seems to be that it should be closed under normal operation, which then allows the only air path to go through the "PCV valve". The negative pressure here should then close the valve under normal operations. With this smaller valve broken, its bypassing the PCV valve and also not allowing enough negative pressure to keep that closed.
I've got a new one on order so will be replacing the entire assembly (Part: 9849189680), but it seems a bit mad for the sake of a 2pence size bit of silicone/rubber to need to do that. Also i don't understand the function of this small valve and why it exists. The only thing i can think of is there's a multi stage condenser to return oil. Otherwise if i blocked that whole thing up the evap system would function normally and i'd not need that part replacing. Below is a diagram of how it functions with the added broken valve near the number 6.
Will update the thread when the part arrives and i can run it through some tests but just annoying you have to spend £120 on a part for the sake of a 20p valve..
Last edited:


 . Would be nice if they just fitted these from the get go. I do wonder however how much of the belt damage is also caused by this oil separator issue (I had belt failure/bits blocking the oil pickup at 4 years/50k miles, so before their replacement interval as described in this previous thread
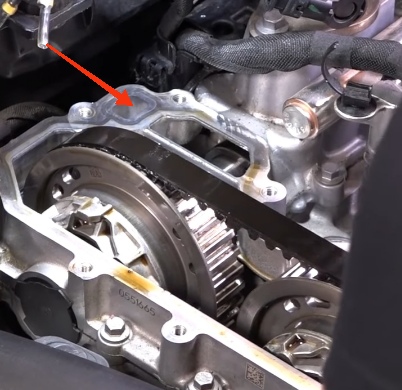

 . Not sure if this test confirms anything but you should be able to see the PCV valve working as there are two air holes in the top. Idle the engine and when you take the oil cap off the value should pop up, and when covering the oil cap again it pulls the valve down as the seal is made. Not anything i read anywhere but thats just how mine behaves after replacement. I only noticed it after replacement as the two holes were dirty before so i couldn't see the orange PCV value opening/closing. I wanted to try every possible avenue before committing to piston ring talk, but it looks like it might be time to look at the rings


