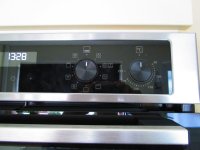
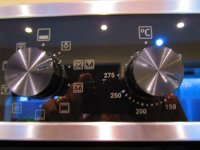
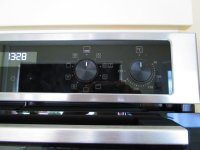
Anyone any good at bodge jobs

The white labels you use on letters, just cut a thin strip from that and stick it on, it should stick on ok. Replace when necessary. If you want it to stay on longer, stick sellotape over it.

Now that's a bodge, as it certainly wouldn't last 5 minutes from the heat on a hob, or from the splashes of any liquids.

Plus the sellotape would look terrible.

10/10 though!
 
Do they offer this model in a different finish? If so you could order replacement knobs in that finish, assuming those are easier to read.
These are push in push out knobs -Probably cost half as much as cooker.

Pictures of wife - You must be kidding -thats a Perma ban - For me that is.

I will try all the suggested fixes above after each one fails. :)
 
Does your wife have any fetching colours of nail polish? Fill below the surface and wipe the top surface with nail polish remover for a sharp cutline.

For added brownie points you can tell you're wife that her nails now match the cooker, just like her wedding dress matched the colour of the fridge, it's destiny!

Good luck OP ;).
Never in the 50 yrs we have been married have I seen her with nail polish on so that avenue is closed.
She may have used it when we got married but I can't remember that far back.
 
So I've solved this previously on an old cheap electric hob. It had black plastic knobs with exactly the same low contrast markings that meant, under the window, you couldn't see them.

After painting the same bit two or three times (on all 4 knobs) and it coming off each time, I "sealed" the whole knob by dipping it in clear epoxy that I had on hand. Worked a treat because you're removing any possible area of the paint to have an "edge" that can be lifted.

Interested to know how well the glass paint works though as it would be a much more straight forward solution :D
 
Take knobs off. Rough up existing indented marking (Dremel or similar) to remove any coating and provide a good key.

Mask face of knob leaving only area to be treated.

Lay knobs on flat, level surface. Fill prepared indent with coloured epoxy to desired level. Let cure, remove mask, reattach knobs.
 
The paint came this morning - I now accept doing small fine jobs with one and half eyes that can't focus properly at very close distance and hands that don't work is a total waste of time - I have them done but it's not the sort of job I would post pictures of on here -It looks ok as you stand back but won't stand up to close scrutiny - What knackered it up was the very finely cut circular machined lines on the face of the knob which allowed paint to seep under masking tape.

The wife being up to the point said Oh ******* leave it -it will do for us and no one else is ever going to see it.

It is nice to be able to see the off possition on knobs.

One more thing - Why was the first knob a right pain to remove where the other three were easy -I put knobs back on and tried again just to see if it was me -but no it was a hard pull where shouting loud english phrasings worked again.

Ps - thanks Mr.Cookie -will keep it in mind.

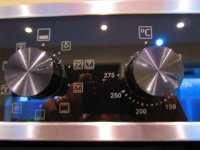
OK here it is

Old
374AOgnl.jpg

New

eUqE3Z9l.jpg
 
I think it looks alright to, might even send your pics in to technical if you don't mind so that the factories and design peeps can see what people are feeling they need to do.
 
The paint came this morning - I now accept doing small fine jobs with one and half eyes that can't focus properly at very close distance and hands that don't work is a total waste of time - I have them done but it's not the sort of job I would post pictures of on here -It looks ok as you stand back but won't stand up to close scrutiny - What knackered it up was the very finely cut circular machined lines on the face of the knob which allowed paint to seep under masking tape.

The wife being up to the point said Oh ******* leave it -it will do for us and no one else is ever going to see it.

It is nice to be able to see the off possition on knobs.

One more thing - Why was the first knob a right pain to remove where the other three were easy -I put knobs back on and tried again just to see if it was me -but no it was a hard pull where shouting loud english phrasings worked again.

Ps - thanks Mr.Cookie -will keep it in mind.

OK here it is

Old
374AOgnl.jpg

New

eUqE3Z9l.jpg
That's what they should be like imo. There's some products that I feel have been designed but just not tested out.
 
I think it looks alright to, might even send your pics in to technical if you don't mind so that the factories and design peeps can see what people are feeling they need to do.
Be my guest - I am sure that younger people with good eye's would have no problems but us OAPs do struggle with the simple things in life -
I did use a glass pen - in fact it was for glass -plastic - metal -wood and most other things.

I did cover up the paint running with black marker pen so no idea of how long that will last.

It certainly makes a world of difference just being able to see where the off position is.
 
No trust me I get a multitude of moans about how hard they are to read, we do have some where the function images are on the knob with the selection position being 12 o'clock.
If the install puts the panel above eye level ie pyro oven with combi oven above it user has to count clicks round :rolleyes:
 
Back
Top Bottom