Back to Black (&Red) [Meshify 2 XL][Hardline Loop]

Associate
Joined
22 Oct 2008
Posts
117
Hi all,

TL;DR: This will be my project log for my first water cooled custom loop with an X570/3700X inside a Fractal Design Meshify 2XL. Going mostly for Heatkiller blocks & res, Alphacool (rads, fittings & tubes) and possibly some EK parts using 13mm hard line acrylic tubes. Looks will be a fairly simple/clean black and red.
---------------------------------------
Background

Been building my own PCs for about the last 15 years and my last few builds have been a mix of AIO & air cooling. However, a full custom watercooling loop with more OC potential has always been something that I have wanted to do, wallet and time permitting.

For the last few weeks, I have been doing a lot of research and initially I was dead set on going with an O11D XL case from Lian Li, with that front distro plate from EKWB. While this seemed a great and easy way to get started with a clean WC build, the more I looked into it, and at pictures of it, I found myself disliking the excessive amount of parallel tubes with little character to the loop. Yes, it looks clean, but at the same time there is a little too much going on for my liking & the parts are very expensive.

So I went back to the drawing board and looked at other case options, eventually settling on the Meshify 2 XL, which to me while massive, looks fantastic (even though that front can be divisive). But more importantly than that, it looks to be a case with lots of WC options as well as being very easy and forgiving to work with.
---------------------------------------
Specs:

Last year I upgraded my current rig to X570 and will be looking to carry over most of the existing parts.
  • Board: Gigabyte Aorus Master X570
  • CPU: AMD Ryzen 3700X
  • RAM: 32GB Crucial Ballistix Sport LT CL 16 @ 3200 MHz
  • GPU: Palit GTX 1070 Gamerock
  • PSU: Corsair RM750i (fully modular)
  • Storage: 2x1TB Samsung 970 Evo Plus NVME drives and a couple older 2.5inch SSDs

The GPU is something that I am looking to upgrade in the near future, for now I am holding out and hoping for news of an upcoming RTX 3080TI in early 2021. The GTX 1070 still handles most games I play just fine at 1440p/60Hz.

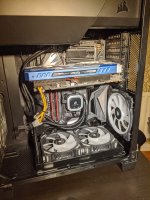
Here’s a dusty photo of my current rig inside the Carbide 600C inverted case. I shudder every time I look at that GPU cable but otherwise fairly happy with the layout, but want to go back to a normal orientation.
YOE3Luv.jpg
---------------------------------------
WC Parts:

  • CPU Block: HEATKILLER IV PRO (Black Copper)
  • GPU Block: TBD
  • Reservoir: Heatkiller Tube D5 (200mm)
  • Pump: EK D5 PWM Pump (w/ Sleeved cables)
  • Radiators: Alphacool NexXxoS V.2 XT45 Full Copper 360mm & 480mm
  • Tubes & Fittings: 13mm OD Acrylic Hard Tube - likely with Alphacool Eiszapfen Fittings (TBD)
  • Fluid: Distilled Water / EK Clear Blood Red (TBD)
Since the case has room for it, I will be going for a 480 and a 360 radiator @ 45mm thickness each. Hoping to make it work with the 480 at the front as intake and the 360 at the top as exhaust. Why the AlphaCool rads? I like the look of them, all water carrying bits are copper parts and the extra port at the opposite end for easy bleeding/draining, especially for that front rad.

The Heatkiller Tube looks great, and seems to have excellent build quality, I like the flexibility in terms of size, mounting options and aesthetics. Going with the D5 version, and getting the EK D5 PWM pump, simply because it has sleeved cables.

For the blocks, I will go for the Heatkiller IV Pro, in the Black Copper version. For the GPU, since I will upgrade soon (if the 3080Ti comes out and is available), I will look for a cheaper part either second hand, or go with a Byski block, or leave it on air for now.

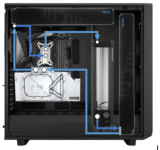
Loop Plan:

QrBwFxj.png

Other Stuff:

Sleeved Cable Extensions - Red/Black - Brand TBD
Lian Li Uni Fans - If I can get my hands on them
 
Last edited:
Associate
OP
Joined
22 Oct 2008
Posts
117
Small update here, mostly waiting on parts (not everything is ordered yet). Looks like some of the Heatkiller gear may arrive mid week. But case and radiators and fans, might even be 2021 at this point.

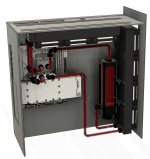
Anyhow, to keep busy, over the last couple weeks I started playing around with modelling in fusion 360, because I wanted to plan a bit more to get an idea of how things might work out layout wise.

I should say, the board and blocks were taken from grabcad and I also got the res model from there, but modified it into the taller 200mm version. The board isn't an exact match but gives a good indication of how things might align, plus the detail on the model is just amazing. Most of the Alphacool stuff has 3d models on their website, which is amazing. For the meshify, I reverse modelled the panels using product & review photos. Its not truly accurate, but good enough.

Likely not the final version, but a good first one. Plan is to use the top port on the front radiator for filling/bleeding. Any thoughts on this draft?

Ekk4Jxx.jpg
 
Last edited:
Soldato
Joined
18 Oct 2012
Posts
4,146
Location
Oxfordshire
Small update here, mostly waiting on parts (not everything is ordered yet). Looks like some of the Heatkiller gear may arrive mid week. But case and radiators and fans, might even be 2021 at this point.

Anyhow, to keep busy, over the last couple weeks I started playing around with modelling in fusion 360, because I wanted to plan a bit more to get an idea of how things might work out layout wise.

I should say, the board and blocks were taken from grabcad and I also got the res model from there, but modified it into the taller 200mm version. The board isn't an exact match but gives a good indication of how things might align, plus the detail on the model is just amazing. Most of the Alphacool stuff has 3d models on their website, which is amazing. For the meshify, I reverse modelled the panels using product & review photos. Its not truly accurate, but good enough.

Likely not the final version, but a good first one. Plan is to use the top port on the front radiator for filling/bleeding. Any thoughts on this draft?


Looks good, I have been too lazy to model it in something like that and just chucked mine into Sketchup. The lian-li fans are something I can see on yours and I need to do. Don't suppose you have the models to hand could share or let me know where you grabbed from?

In terms of layout, is there any reason you are going from some 90degree joints and some bends? Also can the GPU be mounted lower or anything similar? Just looks a little squashed at moment considering the case size is all :)
 
Associate
OP
Joined
22 Oct 2008
Posts
117
Looks good, I have been too lazy to model it in something like that and just chucked mine into Sketchup. The lian-li fans are something I can see on yours and I need to do. Don't suppose you have the models to hand could share or let me know where you grabbed from?

Not sure if I am allowed to link here, but check out Mark Wheeler on grabcad. He made the model of the Lian Li fans and the motherboard that I used. He did a triple fan layout, that I split up to get the 4th one for the front rad. If you can't find it, feel free to PM me.

In terms of layout, is there any reason you are going from some 90degree joints and some bends?
Good question and its not hundred percent decided yet. Overall I am leaning more towards 90 degree angled fittings everywhere, but thought some bends may give the loop some character. I will likely have to experiment a little with it once I have my parts. Also, was thinking to get some pre-bent tube as this is my first WC build, to make things easier, so the above planned layout kinda has that in mind.

Also can the GPU be mounted lower or anything similar? Just looks a little squashed at moment considering the case size is all :)
Yeah this isn't super accurate, since I didn't model the PSU shroud, so I roughly based the placement on the EKWB vertical mount, which has the card quite high up. I like that riser because of the additional anti sag support it has, and it would allow me to add some more fans below the card on top of the GPU shroud.

But that said, It may be better to mount the graphics card directly to the PSU shroud as intended by the case, because you are right, it has the potential to look much tighter/squashed than needed in that case!

Overall, I really want to get my hands on the case, so I can plan some of this out a little better. Thanks for giving me some things to consider!
 
Soldato
Joined
18 Oct 2012
Posts
4,146
Location
Oxfordshire
Not sure if I am allowed to link here, but check out Mark Wheeler on grabcad. He made the model of the Lian Li fans and the motherboard that I used. He did a triple fan layout, that I split up to get the 4th one for the front rad. If you can't find it, feel free to PM me.

That no problem, will have a google for the model, thanks for the reference info :)

Good question and its not hundred percent decided yet. Overall I am leaning more towards 90 degree angled fittings everywhere, but thought some bends may give the loop some character. I will likely have to experiment a little with it once I have my parts. Also, was thinking to get some pre-bent tube as this is my first WC build, to make things easier, so the above planned layout kinda has that in mind.

I would say if you going to do any 90degree fittings then do them all. Will look more uniformed but that just me. Also not sure what size tubing you are going for but I have found the larger the case, the bigger the tubing. For instance mine is medium sized build with MATX so used 14mm, for larger I would have gone with 16mm tbh. Also after doing my first two bends my view is it really isn't all that difficult if you take your time and don't rush to heat them up so don't let that get in the way of trying to design your loop. Go with what feels most natural.

Yeah this isn't super accurate, since I didn't model the PSU shroud, so I roughly based the placement on the EKWB vertical mount, which has the card quite high up. I like that riser because of the additional anti sag support it has, and it would allow me to add some more fans below the card on top of the GPU shroud.

But that said, It may be better to mount the graphics card directly to the PSU shroud as intended by the case, because you are right, it has the potential to look much tighter/squashed than needed in that case!

Overall, I really want to get my hands on the case, so I can plan some of this out a little better. Thanks for giving me some things to consider!

That is fair enough, my view at least from this would be to pull it down to the PSU shroud because you gain two things, it not looking squashed with empty space in the case and also no need for massive long runs that if not 100% perfect would look out of alignment. If you drop you GPU down what appears to be around 3" possibly then I feel that long run to the right of it would look more unified in the design you are going for from the redners you've done so far. Looks great though and can't wait to see how it comes out at the end. Oh and I renamed my build to "The Jaffacake" as rather liked that ;)
 
Associate
OP
Joined
22 Oct 2008
Posts
117
I would say if you going to do any 90degree fittings then do them all [...] for larger I would have gone with 16mm tbh.
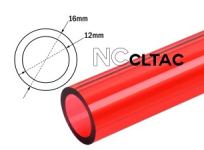
Yeah I think you are right, 16mm will be better, so you have convinced me and I placed some orders for the fittings and the tubes. Also, after playing around with it some more, I am going for the all fittings look, no bends. Additionally, after some more research into coolants etc, I decided to get some red transparent tubes from Bitspower instead of using a colored coolant. Figured that will save me some headaches down the line, with maybe slightly less asthestics, as the res and any GPU waterblock will rely on RGB to tinge the water red.
yWMXgX1.png

That is fair enough, my view at least from this would be to pull it down to the PSU shroud because you gain two things, it not looking squashed with empty space in the case and also no need for massive long runs that if not 100% perfect would look out of alignment. If you drop you GPU down what appears to be around 3" possibly then I feel that long run to the right of it would look more unified in the design you are going for from the renders you've done so far.

So it appears that I made a mistake with the placement of the gpu, it essentially is sitting 2cm to high as there is an extra PCIE shield/slot above the actual place where a normal mounted GPU would plug in. So that should bring things down a bit. I went with the EK vertical mount because of the anti-sag support, but can still pivot away from that if I dont like the look of it. But overall, the plan is to try and add a couple of fans on top of the PSU shroud, to make that space less empty. If I have to drill some mounting holes, so be it, but I hope I can just make use of the "mesh-cut" in the metal.

Looks great though and can't wait to see how it comes out at the end. Oh and I renamed my build to "The Jaffacake" as rather liked that ;)

Thanks I cant wait either, but while it looks like all the fittings and tools etc will arrive before Christmas, I will still have to wait for the case and some rads & fans until the new year sadly.
Yeah I saw haha, sounds good and hope you can get yours built soon!
 
Soldato
Joined
18 Oct 2012
Posts
4,146
Location
Oxfordshire
Yeah I think you are right, 16mm will be better, so you have convinced me and I placed some orders for the fittings and the tubes. Also, after playing around with it some more, I am going for the all fittings look, no bends. Additionally, after some more research into coolants etc, I decided to get some red transparent tubes from Bitspower instead of using a colored coolant. Figured that will save me some headaches down the line, with maybe slightly less asthestics, as the res and any GPU waterblock will rely on RGB to tinge the water red.

So it appears that I made a mistake with the placement of the gpu, it essentially is sitting 2cm to high as there is an extra PCIE shield/slot above the actual place where a normal mounted GPU would plug in. So that should bring things down a bit. I went with the EK vertical mount because of the anti-sag support, but can still pivot away from that if I dont like the look of it. But overall, the plan is to try and add a couple of fans on top of the PSU shroud, to make that space less empty. If I have to drill some mounting holes, so be it, but I hope I can just make use of the "mesh-cut" in the metal.

Thanks I cant wait either, but while it looks like all the fittings and tools etc will arrive before Christmas, I will still have to wait for the case and some rads & fans until the new year sadly.
Yeah I saw haha, sounds good and hope you can get yours built soon!

Fair one on the tubes. I would have gone solid orange but nobody makes them and I didn't want to try and pain them because getting them coated just right and all that would be a lot of work tbh. EK suggest a years life of their coolant in a system for their solids so gives me a reason to have a yearly maintenance cycle and allow any upgrades at same time :)

Hope you like your suggestions and end results then with slightly pivoting on your initial design. I am looking forward to seeing how it comes together in the new year then. I am sure it will look great with the colour and fittings combo. Once you have the case it will be much easier to see what space you really have and now it looks as sometimes the renders don't really show it as well as having it there in front of you.
 
Associate
OP
Joined
22 Oct 2008
Posts
117
Good news is that here in Ireland, the Heatkiller parts (CPU block & tube) have arrived (photos once more stuff comes), and all my other parts (other than the Unifans) are now "in transit", including the case. Bad news is that due to the situation developing in the UK/Eurotunnel/Ferries etc, looks like a few of my deliveries might get stuck for a while. Having seen some news reports and pictures, one's got to hope above all else that all those lorry drivers will be able to get home safely to their families & in time for Christmas.

@Curlyriff yeah, hoping that at least the case might make it before the holidays, so I can start to properly measure and plan. Already got some potential tweaks in mind, if I have the space for it. That said my build can wait.
 
Associate
OP
Joined
22 Oct 2008
Posts
117
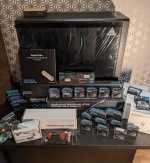
Big update time! In the days/weeks leading up to the holidays, a number of parcels did arrive containing the following:
  • Both the 360 & 480mm radiators
  • The Heatkiller tube and CPU Block (plus accessories)
  • A bunch of clear tubing (the soft tube is for draining)
  • A ton of fittings (hate that they each are individually packaged, urgh)
  • Some Thermal Paste
  • and most importantly the case
m9SpebXl.png.jpg

The handful of EK fittings are extenders, which I now realise were a mistake as they optically do not match at all and their diameter is larger than the Alphacool fittings, so will probably return these. Bitspower seems to have extensions with a similar style and the same diameter of the alphacool ones, but coming in all kinds of length, so a few of those will be ordered.

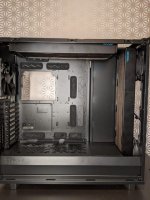
So, I immediately proceeded to do a test fitting of the radiators (using a couple of old 120mm fans), roughly matching my plan:
VUWMh1dl.png.jpg

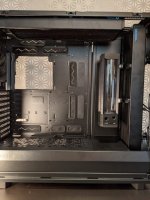
The front rad is sitting as far down as possible, and came up higher than I thought. It is just about possible to access the bleeding port at the top though, through the top part of the case. Most importantly, the distance from the front fan mount, to the larger PSU shroud cover, (i.e. the size of the smaller cover) is around 75mm, so it fits a 45mm rad & 25mm fans perfectly.

Mounting the top radiator was easy with the removable top mounting bracket, and I managed to just about mount the rad in the forward position that has it sitting further from the motherboard tray and closer to the TG side panel. Any radiator that has a bit more of a chunky exterior would have been hard/impossible to mount in this location, due to the clips that hold the side panel in place.

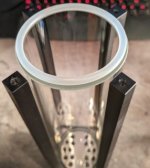
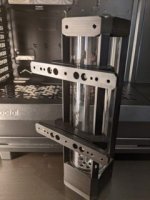
Next step was to get a feel for how the Heatkiller Tube Reservoir would fit in, so I took off the top, in order to slide on the 2 mounting kits. I really like the modular design of the tube, that gives you options in future to even just buy shorter struts and glass if needed to downsize.

First I added the mounting parts that directly attach to the tube, and reattached the top cover:
zACT1FHm.png.jpg

Then I added the radiator/fan mount parts:
txKF0HRm.png.jpg

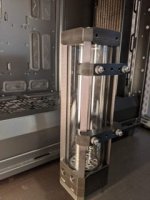
And finally mounted the whole thing to the front rad to see how it all can come together:
JSYQ1fOl.png.jpg

Overall very pleased with how it looks. I made the decision that removing that larger plastic cover and having the pipes go down into the big hole that creates, would look quite messy and detract from the clean look. So instead, I will be modding that plastic cover with a couple of holes and pass through fittings. The res can then be centered between the shroud and the top rad. This will also allow me to use soft tubing "down below", which should give me more space and flexibility as well as not having to fight with alignment issues and lots of fittings to make the connection from the res to the radiator.

Right now I am waiting for a delivery of the pump and the vertical mounting bracket which will alllow me to figure out a few more things for the loop. So next update will follow once I have those (currently delayed due to the delivery issues at the channel crossing).
 
Back
Top Bottom