

Man of Honour
- Joined
- 17 Feb 2003
- Posts
- 29,640
- Location
- Chelmsford
I would have never have guessed that when I installed my Intel Quad core Q6600 in October 2007, that I'd be replacing it almost five years later. A few generations of CPU have passed during that time but never really had the incentive to upgrade a chip that was otherwise performing as expected despite the fact the notable speed increase of the newer chips. Although very tempting at time to upgrade in the past, my decision to keep the CPU during this period was helped by the fact that it's performance never appeared to be a problem, although the overclock of 3.6GHz certainly helped it's cause.
However, the introduction of the IvyBridge and the Z77 chipset platform was just to much of a temptation to pass by this time and it was time to regretfully but to bed one the mightiest chips of modern times.
At the same time, I have decided to take the opportunity to completely overhaul my system, so I have replaced my Radeon ATI 5870 for a newer generation of GPU
Here is my shopping list:
- Intel Core i5-3570K 3.40GHz (Ivybridge) Socket LGA1155 Processor (77W) – Retail
- Gigabyte Z77X-UD3H Intel Z77 (Socket 1155) DDR3 Motherboard
- Crucial Ballistix Tactical Tracer 8GB (2x4GB) DDR3 PC3-12800C8 1600MHz Dual Channel Kit (BLTCP2G3D1608DT2TXRGCEU)
- Gigabyte GeForce GTX 670 Windforce 3X 2048MB GDDR5 PCI-Express Graphics Card
- Xigmatek Elysium Full Tower Windowed Case - Black/Silver
- EK-Supremacy - CPU Waterblock - Copper Plexi
- Masterkleer Hose Pack PVC 15,9/11mm (7/16ID) UV-Reactive Blue 3.3m
- 2 x Mayhems X1 UV Blue Premixed Watercooling Fluid 1L
- 4 xOcUK 7/16" [16/13mm] G1/4 - High Flow Style - Shiny Silver - Compression Fittings

The following items will be lifted from my existing system and used in my new:
- Corsair HX 620W ATX2.2 Modular SLi compliant
- Patriot Inferno 120GB 2.5" SATA-II Solid State Drive
- Samsung Spinpoint T 500GB SATA-II
- IBM/Hitachi Deskstar 250GB SATA-II
- Water cooling : Radiator - Manufacturer : Swiftech MCR320-QP-K Triple 120mm with 3 x Scythe Kaze Jyuni 120mm fans, XSPC Dual 750 clear Bay Reservoir with pump
- Zalman ZM-MFC1 Plus Black multi fan controller
- Sony Optiarc AD-7280S 24x DVD±RW SATA ReWriter
- Creative X-Fi Gamer Fatal1ty Pro
- Microsoft Windows 7 - Home Premium (retail)
So it's out with the old and in with the new. A full afternoon striping down the old system and cleaning the parts for either resale or reuse in the new system. The picture below shows the difference between the outgoing Coolermaster Cosmos S and the new Xigmatek Elysium. A huge difference.

My first impression of the Elysium was some what sceptical. Out of the box, it didn't appear to have the sleek appearance nor build quality of my existing Coolermater Comos "S". My decision for change was purely for ease of use and access to some of the watercooled components. The Comos was very tight for space and cable tidying was a nightmare. So after reading some great reviews for this case I thought it would be ideal to host my new Ivy Bridge system. Although it’s a decent enough case, it’s certainly not without its faults which you can read in my conclusion.
Some pictures of the case just out of the box.


First job with the new case was to remove all doors and panels for easier installation, then fit the existing Corsair PSU (how rock solid has this been). The case comes with two PSU placement options (top or bottom). Will have to be bottom as to not interfere with the triple radiator on the roof. Notice the generous amount of cables and tubing holes through the motherboard tray and rear panel?

Next up is to fit the triple radiator and the fans to the roof of the case. I'm re-using my Swiftech MCR320 radiator with 3 x Scythe Kazee 120mm fans. The radiator was flushed through and cleaned before fitting using de-ionised water. The radiator fins and the fans were cleaned with a soft clean paint brush. Amazingly, this fits with space to spare


I've opted to place the port holes to the front of the case so I can have a gentle flow in to CPU block.
Let's take a look at the motherboard.. The Gigabyte Z77X-UD3 sports an array of new features including PCi3 capability, native USB3 support, SATA 3 and on-board video connection.


The black PCB should look great in the new case.
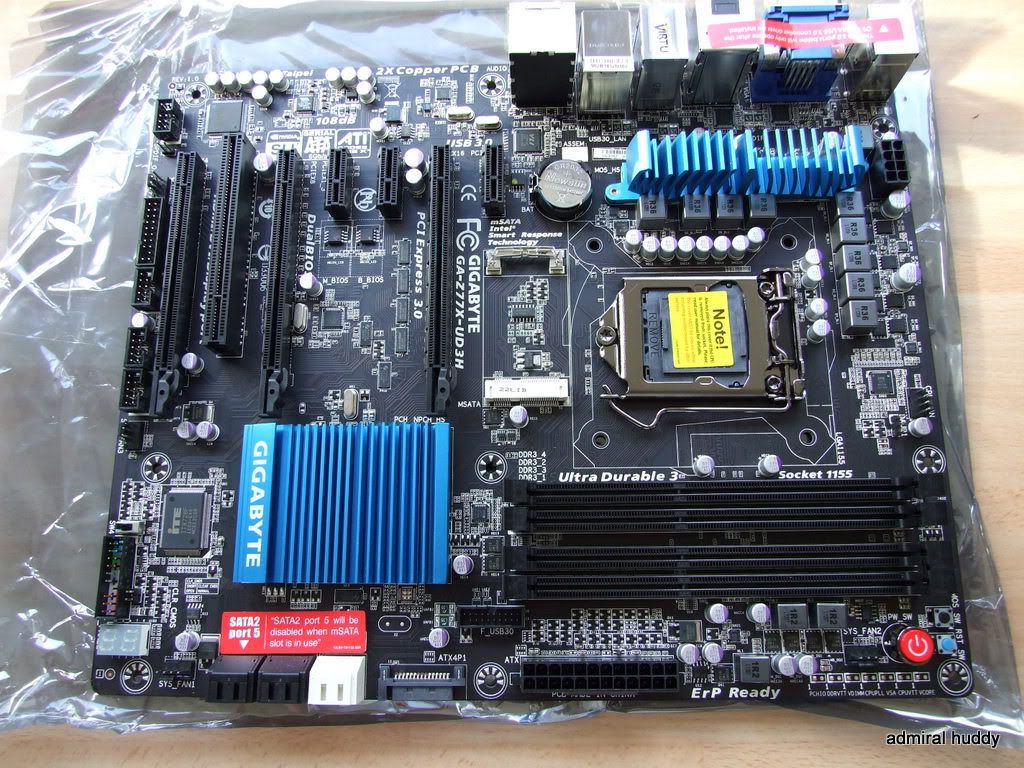
The Gigabyte Z77X-UD3H hosts a number of back panel ports including HDMI, Display-Port, DVI, audio sockets plus USB2 and native USB3 support. Not sure I'd use any of these. Surprised to still see the legacy PS/2 mouse/keyboard connector.

The socket 1155 retainer is lifted and ready for the Intel I5 3750k


I have chosen to cool the CPU with an EK-Supremacy Copper Plexi CPU waterblock as part of my watercooling loop. The block supports a range of CPU socket compatibility and requires different mounting mechanisms for each. I have used a small amount of MX5 compound for thermal contact. The waterblock is locked by four retainer bolts.

With the CPU fitted and waterblock mounted, time to fit the memory. Having being very fond of my DDR2 Ballistix tracer modules in my previous build, I have chosen the same modules in DDR3 equivalent. The new tactical tracers run at 1,600MHZ with 8-8-8-24 timings requiring a small 1.50V using the XMP set in the EFI. Although slightly more expensive than other DDR3 modules currently available, this was selected purely on reliability and looks. I have also doubled up the capacity to 8GB using 2 x 4GB modules in dual channel mode.

The modules are fitted and compliment the Gigabyte motherboard well. I later changed the LEDs from green to red using the MOD utility.

For tubing I have choosen Masterkleer Hose PVC 15,9/11mm (7/16ID) UV-Reactive Blue to accompany the 7/16ID compression fitting I purchased along with 2 litres of Mayhems X1 UV Blue Premixed Watercooling Fluid although I only used half the second bottle.
I have carried over the XSPC Dual 750 Res/Pump from my old system as I didn’t see the need for a new pump or reservoir and I prefer its neatness. I cleaned this out using a mould and mildew cleaner, and then rinsed with plenty of Deionised water. As with the previous build, I had to bend the middle shelf brackets used for single bay drives inwards order to insert the dual bay unit.
You'll also notice from the picture below that I've not used the 7/16” compression fittings after all but instead reverted back to the 1/2" barbs. The reason for this is that no matter how hard I tried, I couldn't get compression over the outside sleeve of the tubing. I ripped my hands to shreds trying. Apparently, others have experienced the same issue with the fittings and tubing combination. No idea? Anyway, I'm not too fussed to be honest; I ran the old system for years using a 7/16" over 1/2" barbs with no problems. Dipping the ends of the tubing helps with the fitting. Once cooled down, the fitting is lovely and tight.

With the tubes fitted and bay filled almost to the top, I connect the pump only to my workshop PSU. The PSU will be jump started in order to switch it on from the mains, rather from the motherboard/chassis switch. This is done by creating a bridge circuit between the green pin and any black pin on the ATX connector using a spare 12v wire. Leaving the fill port open, I start the pump by switching on the PSU and leave just for a few seconds for just enough time for the system to starting and for a quick leak test. I then fill up the reservoir and repeat the process until there is a constant 5mm gap at the top of the reservoir. This allows for heat expansion. Once happy, the fill port cover is secured and the area is cleaned. The pump is left running for 24 hours for a though leak test. I normally put clean white sheets of paper every where, particularly under the barbs. As the water is blue, this is a good indication for the smallest of leaks. It’s important to run a test without other components connected to a power source otherwise water can cause damage.


I always leave the exciting bit to last and the graphics card is finally unwrapped. As you see, I’ve opted for the Gigabyte GeForce GTX 670 Windforce 3X 2048MB. Good all round reports on this card according to some reviews. It’s apparently a decent overclocker, performance, cooling and noise. I hate noisy graphics cards! You might wonder why I’m not watercoolig cooling the card. The reason is that I have no idea if the card works so jumping in and ripping off the cooler and in doing invalidating any warranty so I tend to run the card on its own for a few months just to test. It might be the card is ok without watercooling and therefore can decide on that later with out the expense.
The card itself looks awesome. It’s always a shame that cards face is always placed downwards towards the bottom of the case. Those lovely windforce fans are hidden shamelessly away from view. I’m, looking forward to see how this 980Mhz monster performs and overclocks.


Nearly there then! The water loop is connected, tested and fully working. All power and data leads are connected and cables tidied. I had a small problem here. The 8=pin EPS12v connector couldn't reach the socket on the top side of the motherboard. An 8-pin female to male extender was required.
I keep looking as to how big this case is. It’s huge. The motherboard and graphics card look lost in a black sea of chassis. Even behind the motherboard tray there’s tons of space to hide all your unsightly cables. I bought some heavy duty duct tape to keep everything in place but to be honest I needn’t have bothered [not pictured – sorry].
So, all that remains is for the big switch on and loading Windows 7.
The system fires up and the system comes to life. A quick inspection and all the fans are fully functional, the pump is .. well pumping and the Tactical Tracers show a small amount of activity.
Everything looks to be just fine. Windows 7 is loaded and my system is back.

CPU-Z clearly show the correct CPU identity, along with steppings.. The lower frequency is shown while system is idle.
http://www.huddysworld.co.uk/images/admiralslog/Upgrade2012/benchmarks/cpuZ_stock.jpg
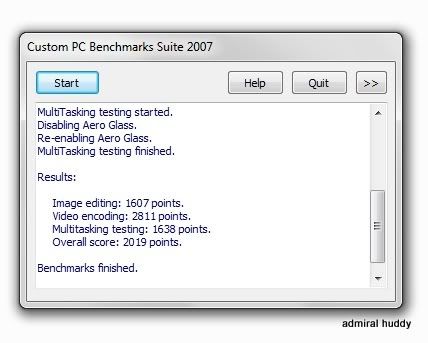
Let's look at some initial benchmarks starting with Custom PC Suite 2007.
Unigine Engine should give the Graphic card a testing
http://www.huddysworld.co.uk/images/admiralslog/Upgrade2012/benchmarks/UnigineV3.JPG
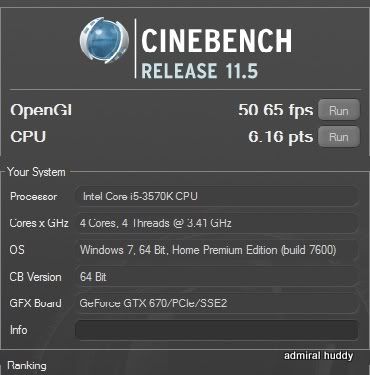
Cinibench is used for OpenGl and CPU testing.
Conclusion
I’m really quite pleased with my latest upgrade. It’s been too long but worth the wait. Going by the CPC Benchmark result, the system shows a performance gain of around 100% since I upgraded my system to the Q6600 back in 2007. Albeit, the comparison I’m making is between an Overclocked Q6600 to stock 3570k that’s quite a slow performance gain in 5 years which is why I’ve not upgraded until now. Given that the system was still able to play the most recent games at reasonably high settings when I made this upgrade, I wonder just how log would I have to wait for a similar gain.
Back to the system, as I’ve already said, the Xigmatek Elysium is huge and a bit un- expectantly so. I measured the height and width but not the depth which when looking at the pictures above, clearly shows that there is plenty of room to spare between the motherboard and the drive bays. Some what of an overkill. Staying on topic of the case, the build quality is quite poor despite what some reviews might say. The side doors resemble that of a budget £35 case. I would expect latch door fittings on a high end case which this clearly isn’t. Using sliding mounts can be a bit hit and miss and I have found it frustrating to so say the least. The front panel isn’t much better. I needed this removed to install the dual bay reservoir from the front. This required squeezing together a number of black plastic pegs which snap out. I’ve had a few of these in the past break quite easily. There are a few positives though. The case is easy to work with given its size. There is plenty of cable routing holes and space to hide your un-slightly cables. There’s not too many sub £140 cases that could host a dual water cooling loop so it’s a lot of case for the money. It’s just that it’s a budget case for its class.
Positives
+ Large case will host most single and dual loop water cooling system.
+ Plenty of fans
+ Spacious and Easy to work with
+ Plenty of motherboard tray holes for cable routing
+ Generous space behind motherboard tray to hide cabling, including ATX cables.
+ Doesn't look too bad but that's down to taste
Negatives
- Looks and feels cheap
- Power button but is a bit feeble - can't see that lasting
- Door fittings resemble that of a budget sub £35 case not something I'd expect from a £130 + case.
- Not sure why you would need a HDD snap port on top.. Could have invested the manufacturing costs on decent doors.
- If not using wheels, the feet leave a residue when moved.
The Intel IB I5 3570k however, was no disappointment. Since the build, I’ve successfully overclocked the system to 4.5GHz and 4.8Ghz with just a few settings in the EFI. Granted it does run a bit warmer than expect, a 1GHz + overclock is never to be sniffed at.
The motherboard also meets all expectations and the EFI is a dream to work with. Plenty of options to play around with too.
The Gigabyte GTX 670 Windforce also seems to be a worthy replacement. At full load, it’s bearable audible over the existing case and radiator fans to the extend I may not actually bother with the expense of watercooling it after all. It runs decent frame rates in both Mass Effect 3 and Battlefield 3 to name a few. I seriously can’t see this being replaced for a few years to come.
In all I’m pleased with my upgrade with the case being the possible exception. I wish I had kept my old Cosmos ”S” but at least I have plenty of room to work with in side. However, going by the history of my upgrades over the last 5 years, I won’t get much to make the most of it.
Commentas Welcome
Thanks for looking
However, the introduction of the IvyBridge and the Z77 chipset platform was just to much of a temptation to pass by this time and it was time to regretfully but to bed one the mightiest chips of modern times.
At the same time, I have decided to take the opportunity to completely overhaul my system, so I have replaced my Radeon ATI 5870 for a newer generation of GPU
Here is my shopping list:
- Intel Core i5-3570K 3.40GHz (Ivybridge) Socket LGA1155 Processor (77W) – Retail
- Gigabyte Z77X-UD3H Intel Z77 (Socket 1155) DDR3 Motherboard
- Crucial Ballistix Tactical Tracer 8GB (2x4GB) DDR3 PC3-12800C8 1600MHz Dual Channel Kit (BLTCP2G3D1608DT2TXRGCEU)
- Gigabyte GeForce GTX 670 Windforce 3X 2048MB GDDR5 PCI-Express Graphics Card
- Xigmatek Elysium Full Tower Windowed Case - Black/Silver
- EK-Supremacy - CPU Waterblock - Copper Plexi
- Masterkleer Hose Pack PVC 15,9/11mm (7/16ID) UV-Reactive Blue 3.3m
- 2 x Mayhems X1 UV Blue Premixed Watercooling Fluid 1L
- 4 xOcUK 7/16" [16/13mm] G1/4 - High Flow Style - Shiny Silver - Compression Fittings
The following items will be lifted from my existing system and used in my new:
- Corsair HX 620W ATX2.2 Modular SLi compliant
- Patriot Inferno 120GB 2.5" SATA-II Solid State Drive
- Samsung Spinpoint T 500GB SATA-II
- IBM/Hitachi Deskstar 250GB SATA-II
- Water cooling : Radiator - Manufacturer : Swiftech MCR320-QP-K Triple 120mm with 3 x Scythe Kaze Jyuni 120mm fans, XSPC Dual 750 clear Bay Reservoir with pump
- Zalman ZM-MFC1 Plus Black multi fan controller
- Sony Optiarc AD-7280S 24x DVD±RW SATA ReWriter
- Creative X-Fi Gamer Fatal1ty Pro
- Microsoft Windows 7 - Home Premium (retail)
So it's out with the old and in with the new. A full afternoon striping down the old system and cleaning the parts for either resale or reuse in the new system. The picture below shows the difference between the outgoing Coolermaster Cosmos S and the new Xigmatek Elysium. A huge difference.
My first impression of the Elysium was some what sceptical. Out of the box, it didn't appear to have the sleek appearance nor build quality of my existing Coolermater Comos "S". My decision for change was purely for ease of use and access to some of the watercooled components. The Comos was very tight for space and cable tidying was a nightmare. So after reading some great reviews for this case I thought it would be ideal to host my new Ivy Bridge system. Although it’s a decent enough case, it’s certainly not without its faults which you can read in my conclusion.
Some pictures of the case just out of the box.
First job with the new case was to remove all doors and panels for easier installation, then fit the existing Corsair PSU (how rock solid has this been). The case comes with two PSU placement options (top or bottom). Will have to be bottom as to not interfere with the triple radiator on the roof. Notice the generous amount of cables and tubing holes through the motherboard tray and rear panel?
Next up is to fit the triple radiator and the fans to the roof of the case. I'm re-using my Swiftech MCR320 radiator with 3 x Scythe Kazee 120mm fans. The radiator was flushed through and cleaned before fitting using de-ionised water. The radiator fins and the fans were cleaned with a soft clean paint brush. Amazingly, this fits with space to spare
I've opted to place the port holes to the front of the case so I can have a gentle flow in to CPU block.
Let's take a look at the motherboard.. The Gigabyte Z77X-UD3 sports an array of new features including PCi3 capability, native USB3 support, SATA 3 and on-board video connection.
The black PCB should look great in the new case.
The Gigabyte Z77X-UD3H hosts a number of back panel ports including HDMI, Display-Port, DVI, audio sockets plus USB2 and native USB3 support. Not sure I'd use any of these. Surprised to still see the legacy PS/2 mouse/keyboard connector.
The socket 1155 retainer is lifted and ready for the Intel I5 3750k
I have chosen to cool the CPU with an EK-Supremacy Copper Plexi CPU waterblock as part of my watercooling loop. The block supports a range of CPU socket compatibility and requires different mounting mechanisms for each. I have used a small amount of MX5 compound for thermal contact. The waterblock is locked by four retainer bolts.
With the CPU fitted and waterblock mounted, time to fit the memory. Having being very fond of my DDR2 Ballistix tracer modules in my previous build, I have chosen the same modules in DDR3 equivalent. The new tactical tracers run at 1,600MHZ with 8-8-8-24 timings requiring a small 1.50V using the XMP set in the EFI. Although slightly more expensive than other DDR3 modules currently available, this was selected purely on reliability and looks. I have also doubled up the capacity to 8GB using 2 x 4GB modules in dual channel mode.
The modules are fitted and compliment the Gigabyte motherboard well. I later changed the LEDs from green to red using the MOD utility.
For tubing I have choosen Masterkleer Hose PVC 15,9/11mm (7/16ID) UV-Reactive Blue to accompany the 7/16ID compression fitting I purchased along with 2 litres of Mayhems X1 UV Blue Premixed Watercooling Fluid although I only used half the second bottle.
I have carried over the XSPC Dual 750 Res/Pump from my old system as I didn’t see the need for a new pump or reservoir and I prefer its neatness. I cleaned this out using a mould and mildew cleaner, and then rinsed with plenty of Deionised water. As with the previous build, I had to bend the middle shelf brackets used for single bay drives inwards order to insert the dual bay unit.
You'll also notice from the picture below that I've not used the 7/16” compression fittings after all but instead reverted back to the 1/2" barbs. The reason for this is that no matter how hard I tried, I couldn't get compression over the outside sleeve of the tubing. I ripped my hands to shreds trying. Apparently, others have experienced the same issue with the fittings and tubing combination. No idea? Anyway, I'm not too fussed to be honest; I ran the old system for years using a 7/16" over 1/2" barbs with no problems. Dipping the ends of the tubing helps with the fitting. Once cooled down, the fitting is lovely and tight.
With the tubes fitted and bay filled almost to the top, I connect the pump only to my workshop PSU. The PSU will be jump started in order to switch it on from the mains, rather from the motherboard/chassis switch. This is done by creating a bridge circuit between the green pin and any black pin on the ATX connector using a spare 12v wire. Leaving the fill port open, I start the pump by switching on the PSU and leave just for a few seconds for just enough time for the system to starting and for a quick leak test. I then fill up the reservoir and repeat the process until there is a constant 5mm gap at the top of the reservoir. This allows for heat expansion. Once happy, the fill port cover is secured and the area is cleaned. The pump is left running for 24 hours for a though leak test. I normally put clean white sheets of paper every where, particularly under the barbs. As the water is blue, this is a good indication for the smallest of leaks. It’s important to run a test without other components connected to a power source otherwise water can cause damage.
I always leave the exciting bit to last and the graphics card is finally unwrapped. As you see, I’ve opted for the Gigabyte GeForce GTX 670 Windforce 3X 2048MB. Good all round reports on this card according to some reviews. It’s apparently a decent overclocker, performance, cooling and noise. I hate noisy graphics cards! You might wonder why I’m not watercoolig cooling the card. The reason is that I have no idea if the card works so jumping in and ripping off the cooler and in doing invalidating any warranty so I tend to run the card on its own for a few months just to test. It might be the card is ok without watercooling and therefore can decide on that later with out the expense.
The card itself looks awesome. It’s always a shame that cards face is always placed downwards towards the bottom of the case. Those lovely windforce fans are hidden shamelessly away from view. I’m, looking forward to see how this 980Mhz monster performs and overclocks.
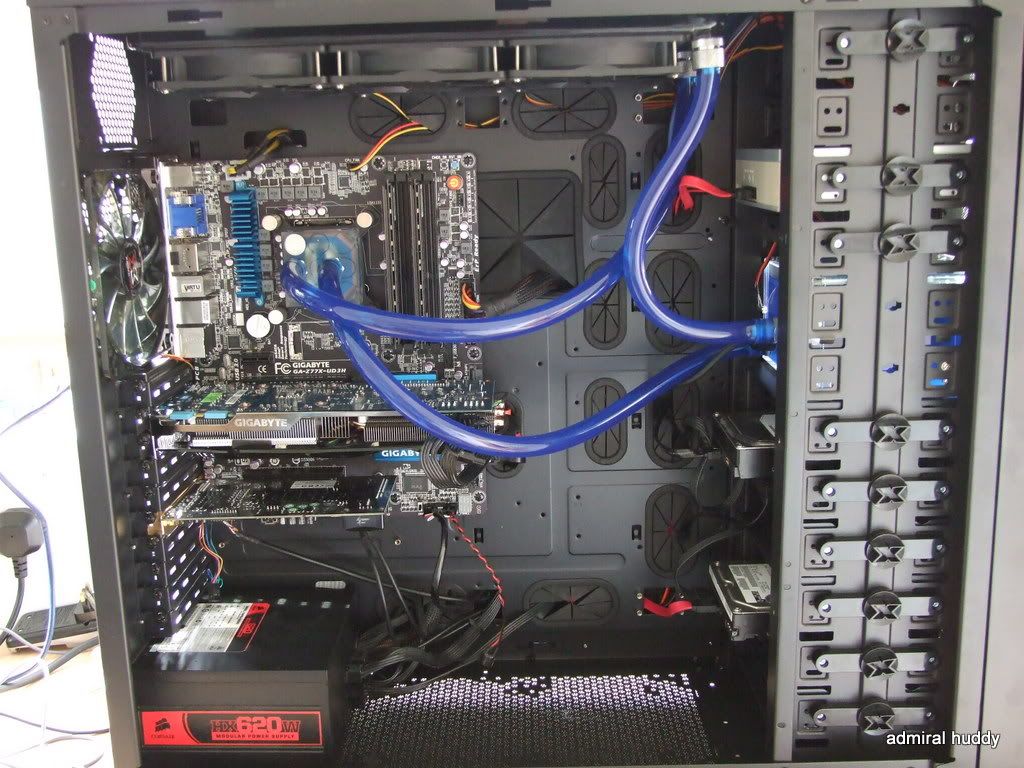
Nearly there then! The water loop is connected, tested and fully working. All power and data leads are connected and cables tidied. I had a small problem here. The 8=pin EPS12v connector couldn't reach the socket on the top side of the motherboard. An 8-pin female to male extender was required.
I keep looking as to how big this case is. It’s huge. The motherboard and graphics card look lost in a black sea of chassis. Even behind the motherboard tray there’s tons of space to hide all your unsightly cables. I bought some heavy duty duct tape to keep everything in place but to be honest I needn’t have bothered [not pictured – sorry].
So, all that remains is for the big switch on and loading Windows 7.
The system fires up and the system comes to life. A quick inspection and all the fans are fully functional, the pump is .. well pumping and the Tactical Tracers show a small amount of activity.
Everything looks to be just fine. Windows 7 is loaded and my system is back.
CPU-Z clearly show the correct CPU identity, along with steppings.. The lower frequency is shown while system is idle.
http://www.huddysworld.co.uk/images/admiralslog/Upgrade2012/benchmarks/cpuZ_stock.jpg
Let's look at some initial benchmarks starting with Custom PC Suite 2007.
Unigine Engine should give the Graphic card a testing
http://www.huddysworld.co.uk/images/admiralslog/Upgrade2012/benchmarks/UnigineV3.JPG
Cinibench is used for OpenGl and CPU testing.
Conclusion
I’m really quite pleased with my latest upgrade. It’s been too long but worth the wait. Going by the CPC Benchmark result, the system shows a performance gain of around 100% since I upgraded my system to the Q6600 back in 2007. Albeit, the comparison I’m making is between an Overclocked Q6600 to stock 3570k that’s quite a slow performance gain in 5 years which is why I’ve not upgraded until now. Given that the system was still able to play the most recent games at reasonably high settings when I made this upgrade, I wonder just how log would I have to wait for a similar gain.
Back to the system, as I’ve already said, the Xigmatek Elysium is huge and a bit un- expectantly so. I measured the height and width but not the depth which when looking at the pictures above, clearly shows that there is plenty of room to spare between the motherboard and the drive bays. Some what of an overkill. Staying on topic of the case, the build quality is quite poor despite what some reviews might say. The side doors resemble that of a budget £35 case. I would expect latch door fittings on a high end case which this clearly isn’t. Using sliding mounts can be a bit hit and miss and I have found it frustrating to so say the least. The front panel isn’t much better. I needed this removed to install the dual bay reservoir from the front. This required squeezing together a number of black plastic pegs which snap out. I’ve had a few of these in the past break quite easily. There are a few positives though. The case is easy to work with given its size. There is plenty of cable routing holes and space to hide your un-slightly cables. There’s not too many sub £140 cases that could host a dual water cooling loop so it’s a lot of case for the money. It’s just that it’s a budget case for its class.
Positives
+ Large case will host most single and dual loop water cooling system.
+ Plenty of fans
+ Spacious and Easy to work with
+ Plenty of motherboard tray holes for cable routing
+ Generous space behind motherboard tray to hide cabling, including ATX cables.
+ Doesn't look too bad but that's down to taste
Negatives
- Looks and feels cheap
- Power button but is a bit feeble - can't see that lasting
- Door fittings resemble that of a budget sub £35 case not something I'd expect from a £130 + case.
- Not sure why you would need a HDD snap port on top.. Could have invested the manufacturing costs on decent doors.
- If not using wheels, the feet leave a residue when moved.
The Intel IB I5 3570k however, was no disappointment. Since the build, I’ve successfully overclocked the system to 4.5GHz and 4.8Ghz with just a few settings in the EFI. Granted it does run a bit warmer than expect, a 1GHz + overclock is never to be sniffed at.
The motherboard also meets all expectations and the EFI is a dream to work with. Plenty of options to play around with too.
The Gigabyte GTX 670 Windforce also seems to be a worthy replacement. At full load, it’s bearable audible over the existing case and radiator fans to the extend I may not actually bother with the expense of watercooling it after all. It runs decent frame rates in both Mass Effect 3 and Battlefield 3 to name a few. I seriously can’t see this being replaced for a few years to come.
In all I’m pleased with my upgrade with the case being the possible exception. I wish I had kept my old Cosmos ”S” but at least I have plenty of room to work with in side. However, going by the history of my upgrades over the last 5 years, I won’t get much to make the most of it.
Commentas Welcome
Thanks for looking
")