

You are using an out of date browser. It may not display this or other websites correctly.
You should upgrade or use an alternative browser.
You should upgrade or use an alternative browser.
Please help spec me a £4k gaming rig
- Thread starter Papablu
- Start date
More options
Thread starter's postsWhat did you decide on component wise then? Or is it still a work in progress?
- Case: Corsair Carbide 540 Cube Case- Black
- CPU: Intel Core i7 4790K, Watercooled and Overclocked to 4.5GHz (I've knocked it back to 4.5 due to wanting more stability)
- Motherboard: Asus Maximus VII Formula Z97X Now water cooled too
- RAM: Avexis Blitz 16GB (4x4GB) 2400MHz C10
- Graphics: 3 x Sapphire Tri-X OC AMD Radeon R9 290X 4096MB Watercooled
- Cooling: Full Custom Watercooling Loop, Mayhems White Fluid
- Primary Drive: Samsung 840 Evo Series 1TB SSD
- Secondary Drive: Seagate Barracuda 2TB SATA-III Hard Drive
- Optical Drive: LG 16x Bluray writer
- Audio: 7.1 Channel HD Audio with SPDIF I/O
- Operating System: Microsoft Windows 8.1 64-Bit
- Power Supply: Super Flower Leadex Platinum 1200W
- Bitfenix Fan Controller
- DEMCiflex Dust Filter Kit
- NZXT Led RGB controller
But yeah it's still a work in progress as I'll eventually add acrylic tubing and the appropriate fittings. Plus I'm still working on lighting and cabling.
Curlyriff, lol, yeah I agree a total ball ache. I've purchased some more white coolant myself but ocuk are sending me more when they send the block out which is on order.Curlyriff said:Honestly that sounds like such a ball ache. Are OcUK sending some more coolant as well then.
It has to be said that 45 degree rotary fittings are not the greatest. I have not used them in a long time for the exact reason that around 50% off the ones I have used leaked.
Honestly the best resource to check out for waterloop ideas and how to get yours cleaned up and set up is google images.
I would still standby and suggest that the quick disconnects would not be worth the time and effort to fit in the loop.
My main reason for going down the quick disconnect route was my son. I can see me having to do a lot of running repairs when he has it.
Aesthetically it shouldn't be too bad as one will go across that bottom tube into the rad. The other I'm not 100% sure yet, I may just leave it at the one and save the others for the next build. I'll see how it fits in first. I've got 2 metres of primochill white tubing on the way as there's a few scratches and marks on my current tubing so it'll be the ideal time to fit those disconnects.
I'm going to see how it goes for the next few months and I'll swap to the hard line setup then even if I haven't had any more issues with leaks. But if I do get any more leaks I'll swap it straight away. If I change too much right now and my system starts to play up then ocuk won't be liable for any problems. I want to know for certain if the system is fully reliable before I start to swap out too much. Everything I'm doing at the moment is being discussed with ocuk and OK'd by them or even down to their parts failing as with the leaks.
Curlyriff said:Again, at work at moment so picture not visible. However the idea to get the drain is to make sure that you connect the drain run to the lowest part of the build so it drains via gravity (and maybe a little wiggle). If your elbow fitting is at the bottom with 6" of tube that will be fine.
Are you by an chance to spin the top radiator around by 180 degree? This could make for much cleaner loop but based on the previous picture it might be a little tight.
Thanks for everything buddy. I'll have a look at that rad. As mentioned I have some spare tubing if I decide to switch it around then I'm all ready with parts. I'm hoping it would allow a straight connection to be able to get rid of that 45 degree fitting.
If you could have a look at that pic when you get the chance and let me know if that elbow and tubing would work from there I'd be very grateful.
The pic you posted is not showing for me either
") I bet it's nice though
I bet it's nice though 
Last edited:
Curlyriff, lol, yeah I agree a total ball ache. I've purchased some more white coolant myself but ocuk are sending me more when they send the block out which is on order.
My main reason for going down the quick disconnect route was my son. I can see me having to do a lot of running repairs when he has it.
Fair enough. And fair play on the block/coolant then, will hopefully stop a few small issues.
In regards to repairs, the time it will take to disconnect the GPU's and then drain them it would be as simple to use the drainage tube we are discussing. It would also make it ideal to clean the loop out. You can keep the fluid you are draining in a clean bucket (keep one just for this in storage somewhere).
Once you get used to cleaning out the PC, you could do it one afternoon a month or similar. Shouldn't take more than 30mins to drain and refill.
Aesthetically it shouldn't be too bad as one will go across that bottom tube into the rad. The other I'm not 100% sure yet, I may just leave it at the one and save the others for the next build. I'll see how it fits in first. I've got 2 metres of primochill white tubing on the way as there's a few scratches and marks on my current tubing so it'll be the ideal time to fit those disconnects.
In regards to actually using them if you do really still want to (no matter how many times I might suggest not
 ) then your right the bottom run would work but remember to pull it apart you need a little slack and with that it would either need supporting or it will droop slightly.
 And you won't fit one in the top of the loop cleanly anywhere as the loop is set at the moment so to me would make the use of the Q/R redundant because you wouldn't be able to take the GPU block out as one.
I'm going to see how it goes for the next few months and I'll swap to the hard line setup then even if I haven't had any more issues with leaks. But if I do get any more leaks I'll swap it straight away. If I change too much right now and my system starts to play up then ocuk won't be liable for any problems. I want to know for certain if the system is fully reliable before I start to swap out too much. Everything I'm doing at the moment is being discussed with ocuk and OK'd by them or even down to their parts failing as with the leaks.
That makes sense. Hope it does all work out though. Looking forward to seeing it all finished.
Thanks for everything buddy. I'll have a look at that rad. As mentioned I have some spare tubing if I decide to switch it around then I'm all ready with parts. I'm hoping it would allow a straight connection to be able to get rid of that 45 degree fitting.
If you could have a look at that pic when you get the chance and let me know if that elbow and tubing would work from there I'd be very grateful.
The pic you posted is not showing for me either I bet it's nice though
That's OK, hopefully more than anything I'm just stating the pros/cons of the options available. Of course, I will be home from 5:30pm so will take a look then for you with any comments in regards to what we are discussing. Seeing both sides might make it easier to see other options for the loop also.
And I will also try and repost that other picture with the Hardline.
Weeks I believe, end of September earliest and it would add around £300 to the build costs which isn't worth it for what the OP wanted. Plus he wanted a system now rather than later to game on.
My understanding is in a years time, maybe sooner this current PC will then go to the OP's son and he will build another super computer which will also mean new GPU's, CPU, RAM & possibly OS options by then to play with.
My understanding is in a years time, maybe sooner this current PC will then go to the OP's son and he will build another super computer which will also mean new GPU's, CPU, RAM & possibly OS options by then to play with.
Weeks I believe, end of September earliest and it would add around £300 to the build costs which isn't worth it for what the OP wanted. Plus he wanted a system now rather than later to game on.
My understanding is in a years time, maybe sooner this current PC will then go to the OP's son and he will build another super computer which will also mean new GPU's, CPU, RAM & possibly OS options by then to play with.
I couldn't have said it better myself.
This particular setup, with a lower overclock on the CPU (Down to 4.5 for absolute stability) has given me a 1,000 point increase on 3DMark11 with just a small overclock on the cards. What I'm getting out of this system is plenty enough for me not to be worried about the upcoming X99/DDR4/Ivy-E. The increase I'd get from that isn't worth the extra money at this time.
Everything I've tried on this rig has run immaculately so I'm happy with the choices. So is Elliot, my son, he's a bit eager to get hold of it though

Currently he's got a X51 R2,with a GTX 760Ti which he's happy with but obviously he knows he's going to be better off with this rig. I do wish I'd have got him a normal PC though, for the upgradability. Hence why he'll have my hand me downs and my daughter who's 11 will get his X51. She wants to play theHunter with me so this reason is probably the biggest push for me to get another pc in due course.
Had chance to get on the computer and see the photo now and yes that would be a great place to put the drainage tube.
That picture however has set my OCD off and I want to come down and sort it out haha.
In regards to the picture, it is because of the way the site was hosting so the link is http://www.modding.fr/?p=15937
Further to that, you could always do two other options with the res. If you got some full pictures of both sides and on here we could talk through how to use the space and what we can do maybe with some custom brackets if your willing to do some modifications?
Here are some examples:
Ah yes the white pc is gorgeous. I've got a couple of pics of that saved for inspiration
The wiring on my rig needs sorting big time but it's not worth doing until I get everything sorted. This issue was that everything was tightly clipped together and to get to a molex or any other wire I had to unclip 'everything'. Just to get the original LED out of the system I had to take every cable tie off to release the one wire. This will definitely be getting sorted out as soon as I'm done with the draining of the loop. I hate untidy wiring and it's driving me nuts just knowing that it's like that at the moment.
Where that green scheme pc has the res is where I currently have my NZXT RGB LED controller. Attached to the back of the case. Seeing that res there makes a lot of sense. I would love to get it into the front of the case at some point but not this particular res, I'd want a taller res in the front.
I had thought about mounting it externally and maybe getting a twin setup but I also like the way the green res comes out the top of that PC, that would work well for me especially with a twin res setup.. I don't mind modding the case at all, I have all the tools for that sort of stuff and I find it a crying shame to have the res hidden away. It's one of the focal points of any watercooled pc IMO.
I really do like the idea of that res popping out the top and the way the pc currently looks I think it'll suit it a lot.
When I get these fittings done I'll get the wiring sorted and we'll go from there Curlyriff. I'd like to try something like that as my res, as you can see, is just stuffed in there, lost at the bottom looking really sad.
Thanks once again for all your help buddy, I really do appreciate your time and effort to do this for me. Being a newb to water cooling and pc's in general for the last 10 years or more it's difficult to get into the loop. Yeah that was bad
Once those wires are sorted I can then get those pics and we'll have a better idea of what we can do.
Yeah the key really is to get your system wired up right. Work out your cable runs as you already know all your components.
The other plus of having the Res popping out the top other than looking cool is that it makes refilling a dream. We can then change the place where drain tube runs which would be off your front rad but the tube would be hidden and you should be able to get a Y-connector in then.
Cable runs for you of course are always going to be a little tight. Mainly due to the extensions used. Custom cable/cable lengths are also a great way to save space. They will cost you around £100 but in my opinion on this build and with the space would be a great investment.
Glad your up for modding, we can certainly get a custom mount for your NZXT, there is a lot of spare space in corners on this case.
That was a bad pun, but at this time in the morning it still made me crack a smile which is rare ha.
Edit: P.S. you can tell you like the res at the top, you referenced it Three times.
Also, some white perspex at the bottom to make the false floor would be great like that one pictured. Just cut it to fit and rest it in for now since we may be revisiting that space later.
If you had the NZXT unit at the front you could also place that below the false floor. Trim off the floor SSD mounts so that it is flat and maximises the space there. Trim the NZXT Hue back to the faceplate with just 10mm of the housing left since it is just a plastic tray basically.
no hotlinking images
http://www.custompcreview.com/wp-co...ustom-pc-review-nzxt-hue-review-3-588x392.jpg
Cut the back of the case out to match the fascia so the unit is accessible from the rear of the case. Drill some pilot holes in the 10mm of housing that we left at the required position and bolt it to the base of the case so it's all flush.
Then place the false floor over the top to keep it clean. With that positioned you should have space to make some brackets to mount both your HDD & SSD under as well. This means you can remove the drive bay off the back and leave allot of room to install your res as you want. You could even go for the taller D5 twin res and fix them just above the PSU.
A bracket would be easy to sort. 2-3mmRubber mat would be usefull as well to cut up to make anti-vibration mats where applicable and to pick up a load of rubber grommets and nylon washers of various sizes.
With custom cables as well you would have a very tidy rig.
Edit: It would cost you around £220 to get all the above done and done right, but hell it would be nice.
That would really give you a white, red, black build and would mean you could get cables with those 3 colours done also.
If you had the NZXT unit at the front you could also place that below the false floor. Trim off the floor SSD mounts so that it is flat and maximises the space there. Trim the NZXT Hue back to the faceplate with just 10mm of the housing left since it is just a plastic tray basically.
no hotlinking images
http://www.custompcreview.com/wp-co...ustom-pc-review-nzxt-hue-review-3-588x392.jpg
Cut the back of the case out to match the fascia so the unit is accessible from the rear of the case. Drill some pilot holes in the 10mm of housing that we left at the required position and bolt it to the base of the case so it's all flush.
Then place the false floor over the top to keep it clean. With that positioned you should have space to make some brackets to mount both your HDD & SSD under as well. This means you can remove the drive bay off the back and leave allot of room to install your res as you want. You could even go for the taller D5 twin res and fix them just above the PSU.
A bracket would be easy to sort. 2-3mmRubber mat would be usefull as well to cut up to make anti-vibration mats where applicable and to pick up a load of rubber grommets and nylon washers of various sizes.
With custom cables as well you would have a very tidy rig.
Edit: It would cost you around £220 to get all the above done and done right, but hell it would be nice.
- £100 on cables
- £100 on the 2nd Pump combo
- £20 for the perspex
That would really give you a white, red, black build and would mean you could get cables with those 3 colours done also.
Last edited:
The other plus of having the Res popping out the top other than looking cool is that it makes refilling a dream. We can then change the place where drain tube runs which would be off your front rad but the tube would be hidden and you should be able to get a Y-connector in then.
I got a 90° rotating fitting and some compression fittings last night for the loop drain off the res. All mismatched as they didn't have the same colour of everything. That's ok though because I can still have that on the res as well as a Y off the front rad for draining. The more the merrier
Cable runs for you of course are always going to be a little tight. Mainly due to the extensions used. Custom cable/cable lengths are also a great way to save space. They will cost you around £100 but in my opinion on this build and with the space would be a great investment.
Yeah those bitfenix cable extensions look good but take up so much room. It would be better to have cables exactly the right length to avoid all that clutter and free up the space for the mods. I spent this afternoon getting the cables grouped and it shows that there's enough room for that res up the top right.
I took out the NZXT controller and I've fitted that inside a cupboard underneath the pc for now.
I cut off a few of the ties to see how things looked and wow, what a mess.
I also took out the SSD tray and started to unplug everything. May sound lame but to me it was a big deal

A couple of hours later I was about half way through separating the cables.

And pretty much grouped here, easy enough to work with the separate sections now but there's quite a few wires I can't do anything with until I remove the res and obviously drain the loop. Those SATA cables are a mare to work with. But at least we can see some daylight in there and once the rad is moved to the top right those cable groups can go into the bottom left.

My res was actually only partly installed and was leaning forward by about 15° so I had to get that seated in properly for now and at least it's now using both bolt points and no longer being shoved forward by the tubing and cables behind it.
Glad your up for modding, we can certainly get a custom mount for your NZXT, there is a lot of spare space in corners on this case.
Edit: P.S. you can tell you like the res at the top, you referenced it Three times.
No need for the mount for the NZXT now so that's out the way. It's actually easier to use now and tomorrow I'll mount the bracket in the cupboard so it's nice and solid.
lol yeah the res thing is something I'd thought about before but to be honest I thought it would be laughed at. Thankfully I've now seen it and it looks great, actually I'll shut up now before I do it again
Also, some white perspex at the bottom to make the false floor would be great like that one pictured. Just cut it to fit and rest it in for now since we may be revisiting that space later. .
A false floor is definitely on the cards but my bottom card with the fittings goes down low, even dipping under the top of the SSD mounts. They will for sure have to be cut off to even get the floor in there.
A second pump is also a must have especially aesthetically for me. I've got some sheet metal strips that I can make brackets out of for the res and pump.
Well I just had a parcel delivered so I'm going to have a look at these fittings now
Once I get my LED's sorted in the case (Single ones on the cards) I'll get some pics. It's looking better though.Oh yes, almost forgot. ocuk have found a triple parallel for me and hopefully it'll fit, it looks like it will.
Does this sound right :
For use with motherboards with PCIe x16 slots 60.9 mm (2.4") apart (1st in 2nd card) and 40.6 mm (1.6") (2nd and 3rd card)!
I can't put the link in because it's a direct competitor to ocuk.
Gosh, I thought my cables were bad lol. Honestly it doesn't sound lame to me and probably won't to most on this forum.
It already looks a hell of a lot better bud.
There will be so much room when you've got to the next stage. I feel really bad for saying "do this" or "try that". Between the money and the time. I looked at the cost for me to put my PC under water cause I cheated with my current build with AIO unit but I just don't have £1k spent.
Had a look and found it. Not a bad price and in stock as well. And yes that is exactly what is needed. But yeah it's this one right:
no hotlinking images
http://www.ekwb.com/shop/media/cata...c-terminal-triple-parallell-z77_front_600.jpg
Have you thought about buying an external disc drive rather than one internal so you have more space and easier cable management? Plus it only needs to be plugged in when needed. This is what I have done for the most recent builds.
Glad you are going to get a false floor in there asap. Will be so much better, it is probably the most annoying point to the case overall.
It already looks a hell of a lot better bud.
There will be so much room when you've got to the next stage. I feel really bad for saying "do this" or "try that". Between the money and the time. I looked at the cost for me to put my PC under water cause I cheated with my current build with AIO unit but I just don't have £1k spent.
For use with motherboards with PCIe x16 slots 60.9 mm (2.4") apart (1st in 2nd card) and 40.6 mm (1.6") (2nd and 3rd card)!
I can't put the link in because it's a direct competitor to ocuk.
Had a look and found it. Not a bad price and in stock as well. And yes that is exactly what is needed. But yeah it's this one right:
no hotlinking images
http://www.ekwb.com/shop/media/cata...c-terminal-triple-parallell-z77_front_600.jpg
Have you thought about buying an external disc drive rather than one internal so you have more space and easier cable management? Plus it only needs to be plugged in when needed. This is what I have done for the most recent builds.
Glad you are going to get a false floor in there asap. Will be so much better, it is probably the most annoying point to the case overall.
Also I am surprised that the fittings are that low. You can't really tell from the photo of the GPU side because of the angle but looking at this with a similar Triple bridge it looks like there is plenty of room for the floor and to fit the disk drives in.

I've actually got a couple of external drives which I could use after a reformat as they were for my Macbook backups as I use that for work a lot. I'd never really thought about using them for this PC but I'm trying to keep the SSD free of anything but gaming on this one. Most of my pics (PC's) and video stuff goes straight to the D drive and if that wasn't there all the time I would end up not plugging in the external and cluttering up the SSD. I'm a lazy git once I've sat down.
I think if I was using the PC in a more traditional way, on a desk then the external would be a great idea and I'd likely go for that. I do wish I could get rid of some of that cable though.
Let me dig out a picture I was sent by ocuk with the HDD in place on my case and why I asked them to fit it in the back.
My initial plan was to put the false floor in straight away and this pic put a stop to that idea.
Here you go. There's not enough room to have the fittings on the bottom card with the HDD in place. Then with the fittings on there's not even enough room to slide in a false floor without cutting out the mounting points.

Sorry for the tiny pic.
I can't understand how that triple bridge is on that pc in the pic you posted with the fittings and that HDD ?
That's the one buddy, and thanks for the confirmation. I've asked them to get that for me. It'll be a sturdier option than the adjustable fittings. I hate the little rubber gaskets around the outlets on them though, they come off so easily as you're trying to place it on the block.
Ok, so what am I going to need to get the res setup as a twin one. Do I need a different pump or should I just get one bigger res and pump setup in place of my current one ?
I think if I was using the PC in a more traditional way, on a desk then the external would be a great idea and I'd likely go for that. I do wish I could get rid of some of that cable though.
Let me dig out a picture I was sent by ocuk with the HDD in place on my case and why I asked them to fit it in the back.
My initial plan was to put the false floor in straight away and this pic put a stop to that idea.
Here you go. There's not enough room to have the fittings on the bottom card with the HDD in place. Then with the fittings on there's not even enough room to slide in a false floor without cutting out the mounting points.
Sorry for the tiny pic.
I can't understand how that triple bridge is on that pc in the pic you posted with the fittings and that HDD ?
Had a look and found it. Not a bad price and in stock as well. And yes that is exactly what is needed. But yeah it's this one right:
http://www.ekwb.com/shop/media/cata...c-terminal-triple-parallell-z77_front_600.jpg
That's the one buddy, and thanks for the confirmation. I've asked them to get that for me. It'll be a sturdier option than the adjustable fittings. I hate the little rubber gaskets around the outlets on them though, they come off so easily as you're trying to place it on the block.
Ok, so what am I going to need to get the res setup as a twin one. Do I need a different pump or should I just get one bigger res and pump setup in place of my current one ?
Yeah I am non the wiser how it works either but can certainly see what you mean about space underneath in that picture.
In regards to the twin res it depends entirely on what you want to do with the set-up. Do you want to do separate loops for the CPU & GPU's? You wanting them to sit side by side for the looks and make a custom window so they are visible with two tubes out the top of the case?
Is it for performance or purely aesthetics?
Something like;
or you can install the following?
YOUR BASKET
1 x EK Water Blocks EK-D5 Vario X-RES 140 (incl. pump) £107.99
Total : £116.69 (includes shipping : £7.25).

If you moved the SSD once you have tided up the cables (I was thinking installing it above the disc drive position) and removed the caddy then you would have plenty of height free for the taller res option.
In regards to the twin res it depends entirely on what you want to do with the set-up. Do you want to do separate loops for the CPU & GPU's? You wanting them to sit side by side for the looks and make a custom window so they are visible with two tubes out the top of the case?
Is it for performance or purely aesthetics?
Something like;
or you can install the following?
YOUR BASKET
1 x EK Water Blocks EK-D5 Vario X-RES 140 (incl. pump) £107.99
Total : £116.69 (includes shipping : £7.25).
If you moved the SSD once you have tided up the cables (I was thinking installing it above the disc drive position) and removed the caddy then you would have plenty of height free for the taller res option.
I reckon the one loop will be OK Curlyriff, I can see the benefit of having two separate ones for sure but that would make it a bit more complex and at this point I think I'd like to just be able to plumb into this loop.
Performance would be good because I'm doubting the current setup is actually good enough for the three cards when they are pushed, but aesthetics is equally important because of where it's situated.
That picture is a good example of what sort of size and setup I'd like, but I think going for the same size as I have now would make more sense financially, at least for this build
So lets base it on going with the same res and pump as I have now. I want to get the top of the res out of the case by a couple of inches so I can keep an eye on levels. No need for a window because the back is not seen at all where it's sitting now.
I can't quite picture the way this works yet so I'm going to have a look on youtube and see if there's anything similar I can see running.
Curlyriff said:In regards to the twin res it depends entirely on what you want to do with the set-up. Do you want to do separate loops for the CPU & GPU's? You wanting them to sit side by side for the looks and make a custom window so they are visible with two tubes out the top of the case?
Is it for performance or purely aesthetics?
Performance would be good because I'm doubting the current setup is actually good enough for the three cards when they are pushed, but aesthetics is equally important because of where it's situated.
That picture is a good example of what sort of size and setup I'd like, but I think going for the same size as I have now would make more sense financially, at least for this build
So lets base it on going with the same res and pump as I have now. I want to get the top of the res out of the case by a couple of inches so I can keep an eye on levels. No need for a window because the back is not seen at all where it's sitting now.
I can't quite picture the way this works yet so I'm going to have a look on youtube and see if there's anything similar I can see running.
I reckon the one loop will be OK Curlyriff, I can see the benefit of having two separate ones for sure but that would make it a bit more complex and at this point I think I'd like to just be able to plumb into this loop.
No problem. Maybe the discussion for dual loop can be had when you move to hardline and/or the next build you do mate. Although dual loops are more about aesthetics than real performance gains. We are talking maximum 2 degree difference between the two loops.
Performance would be good because I'm doubting the current setup is actually good enough for the three cards when they are pushed, but aesthetics is equally important because of where it's situated.
I can't quite picture the way this works yet so I'm going to have a look on youtube and see if there's anything similar I can see running.
Honestly a single D5 for this loop shouldn't be a problem.
But running dual D5 can increase hydraulic pressure by around 20% which when you are plumbed through a restrictive CPU block or Mobo (your motherboard in this case would be the weak link/most restrictive) and may be where you will see some performance improvement.
You can run them in series. Just connect the outlet of one to the inlet of the other with a length of tube. If you can get around 4" of tube to separate them, that would be ideal to keep the flow controlled. Ideally you want the inlet/outlet connection to be as unrestricted as possible, of course a 90 degree is almost guaranteed though because of the tube design of the res.
That picture is a good example of what sort of size and set-up I'd like, but I think going for the same size as I have now would make more sense financially, at least for this build
That is fair enough. Sounds like you'll be aiming for this on the next build.
So lets base it on going with the same res and pump as I have now. I want to get the top of the res out of the case by a couple of inches so I can keep an eye on levels. No need for a window because the back is not seen at all where it's sitting now.
I would suggest not to go over an inch out of the case. It will look like a chimney for the case which aesthetically may not be too pleasing. It should be easy enough to experiment. Showing 10mm of fluid I think would be ideal.
No problem. Maybe the discussion for dual loop can be had when you move to hardline and/or the next build you do mate. Although dual loops are more about aesthetics than real performance gains. We are talking maximum 2 degree difference between the two loops.
Sounds like it's not really worth the extra effort then and like you suggest we can always get it set up in the next build which will have more room for a more extravagant loop.
Honestly a single D5 for this loop shouldn't be a problem.
But running dual D5 can increase hydraulic pressure by around 20% which when you are plumbed through a restrictive CPU block or Mobo (your motherboard in this case would be the weak link/most restrictive) and may be where you will see some performance improvement.
Well if the single res and pump is enough for this system then I'd go along with that to keep the costs down and that will mean I can get on with the move a lot sooner.
I would suggest not to go over an inch out of the case. It will look like a chimney for the case which aesthetically may not be too pleasing. It should be easy enough to experiment. Showing 10mm of fluid I think would be ideal.
Cool, thanks for the input again Curlyriff, I can understand why you say that. Have you got any pics of a setup that you can see a protruding res out the top from a front perspective buddy ?
I usually fill my res to about 10mm from the top. If I let it get below half way I do find that temps suffer which, from what I was reading the other day, shouldn't really happen?
Anyway, as long as I can see about 10mm of the coolant that would be good. I did also consider putting the res on the outside of the case, at the rear sitting on that mesh, because where I sit I can fully see that position. With a UV led inside the res and using UV coolant (which I currently have as they didn't have normal coolant) I would have a very good view of it in any lighting conditions. It's usually dark in the lounge so that would work out well. Like you I'm not (any longer) that keen on UV in the case but a small amount of it to use as a visual aid would be ok for the res.
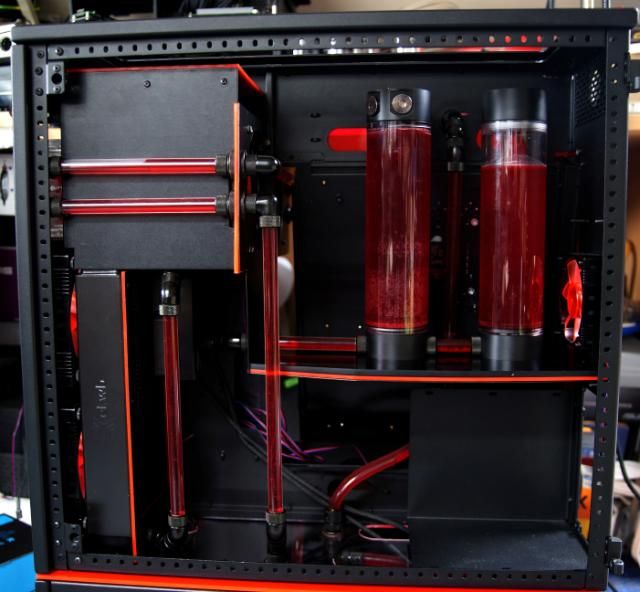
Well here's where I'm at with the front of the PC now. Looking a bit better than it did and it's nice to put my own touches to it.
The floor has been flattened down to accept a false floor. Rather than cutting off the mounts I managed to push them down flat which saved on mess but killed the old fingers.

The adjustable Bitspower fittings were added between the cards and now the cards sit on a straight line. I'll still be getting the triple block but at the moment I'm thinking I'll stay with this setup as I like it being a bit more open. I had to replace a dripping fitting on that front left hand top rad connection. I also took the opportunity to fit a coolant temp sensor to the loop.

Quick disconnects were added at the CPU and bellow the cards going into the left hand rad to make life easier and I think they look good.

I added a 90° to the end of the CPU one and that lined up perfectly with the edge of the top card so this will be a breeze to get the acrylic tubes fitted.
Cards are now obviously isolated and easier to remove with the disconnects allowing them to be taken straight out without draining the loop.

I've not relocated the res and pump yet because I will be getting a water chiller soon and I'll do that at the same time. I find that when playing heavy load games like Metro Redux the coolant can get up to 67°c so I'd like to keep the temp down to around 30°c when gaming.
Once again, thanks for you help and advice Curlyriff, without it I'd have not got this far.
Edit : Forgot to mention all tubes were replaced with Primochill 16/11 as the other ones were all dirty and scratched.
The floor has been flattened down to accept a false floor. Rather than cutting off the mounts I managed to push them down flat which saved on mess but killed the old fingers.
The adjustable Bitspower fittings were added between the cards and now the cards sit on a straight line. I'll still be getting the triple block but at the moment I'm thinking I'll stay with this setup as I like it being a bit more open. I had to replace a dripping fitting on that front left hand top rad connection. I also took the opportunity to fit a coolant temp sensor to the loop.
Quick disconnects were added at the CPU and bellow the cards going into the left hand rad to make life easier and I think they look good.
I added a 90° to the end of the CPU one and that lined up perfectly with the edge of the top card so this will be a breeze to get the acrylic tubes fitted.
Cards are now obviously isolated and easier to remove with the disconnects allowing them to be taken straight out without draining the loop.
I've not relocated the res and pump yet because I will be getting a water chiller soon and I'll do that at the same time. I find that when playing heavy load games like Metro Redux the coolant can get up to 67°c so I'd like to keep the temp down to around 30°c when gaming.
Once again, thanks for you help and advice Curlyriff, without it I'd have not got this far.
Edit : Forgot to mention all tubes were replaced with Primochill 16/11 as the other ones were all dirty and scratched.
Last edited:
Sorry haven't got aroudn to replying to your last post. With all the X99 stuff going on and people with some silly thought's on specs for single GPU configurations I was consentrating on them.
Will take a good look tonight and have some more info to reply with accordingly when I have 30mins and will check the pictures out then.
Glad you are moving forward with it all though.
Will catch up with it later tonight.
Will take a good look tonight and have some more info to reply with accordingly when I have 30mins and will check the pictures out then.
Glad you are moving forward with it all though.
Will catch up with it later tonight.