You are using an out of date browser. It may not display this or other websites correctly.
You should upgrade or use an alternative browser.
You should upgrade or use an alternative browser.
Project Rainbow (ITX)
- Thread starter famas
- Start date
More options
View all postsSo it begins.
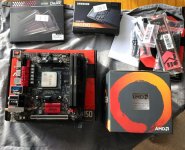
CPU, RAM and M.2 drive all installed smoothly.
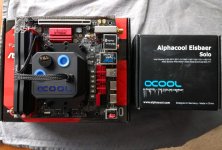
Next was to fit the Eisbaer. It looks massive on an ITX board
I fitted the motherboard and PSU into the case easy enough. The SFF PSU bracket was a total pain in the arse to fit. really poor design by Raijintek there.
Eventually I got it fitted.
Before ordering the GPU I double then triple checked the dimensions on the official website and a few others to make sure the card would fit.
They all stated 266.7mm which although tight should have left around 10 mm clearance between the card and case.
As it is the card is larger than quoted and at first I thought there was no way it was going to fit.
However with a bit of perseverance and the removal of the front USB/audio ports I managed to get it to fit.
I had to remove the front of the case to get the card in as there is zero clearance. This means the motherboard tray in unsupported while fitting the GPU but as long as your careful it's not a major problem.
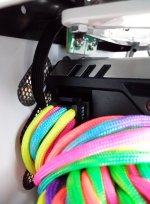
As you can see the card is touching the front of the case. Above is the power button, in front of that is where the USB/audio ports should mount.
The PCB for the USB/audio ports actually does fit into place but because the wires go directly downwards they hit the GPU.
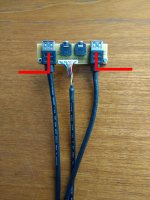
And because the wires are so thick there is no way of bending them round.
For it to work I'd need the USB port wires to come out at right angles like shown.
The audio cable is fine as it has plenty of play in the wires where it connects to the PCB.
If any one has any suggestions on how I can overcome this that would be great, I'm all out of ideas
After that hoohaa I got all the power cables hooked up. Cable management is going to be a nightmare in this case, especially with corsairs strange modular cables.
And lastly the rad went in........just
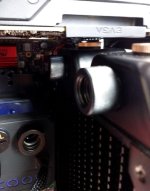
Again zero clearance to get it in. I had to turn in 90 degrees and put the bottom of the rad into the case first, then stand it upright and swivel it into position being very careful not to lift it at all as it would hit the underside of the GPU.
Once in place there is about 3mm of clearance between the top port blanking screw and the GPU.
So that's as far as I've got. Believe it or not just getting to this point had taken pretty much a whole day and I'd had enough by this point.
More to come soon....hopefully
CPU, RAM and M.2 drive all installed smoothly.

Next was to fit the Eisbaer. It looks massive on an ITX board


I fitted the motherboard and PSU into the case easy enough. The SFF PSU bracket was a total pain in the arse to fit. really poor design by Raijintek there.
Eventually I got it fitted.
Before ordering the GPU I double then triple checked the dimensions on the official website and a few others to make sure the card would fit.
They all stated 266.7mm which although tight should have left around 10 mm clearance between the card and case.
As it is the card is larger than quoted and at first I thought there was no way it was going to fit.
However with a bit of perseverance and the removal of the front USB/audio ports I managed to get it to fit.
I had to remove the front of the case to get the card in as there is zero clearance. This means the motherboard tray in unsupported while fitting the GPU but as long as your careful it's not a major problem.

As you can see the card is touching the front of the case. Above is the power button, in front of that is where the USB/audio ports should mount.
The PCB for the USB/audio ports actually does fit into place but because the wires go directly downwards they hit the GPU.

And because the wires are so thick there is no way of bending them round.
For it to work I'd need the USB port wires to come out at right angles like shown.
The audio cable is fine as it has plenty of play in the wires where it connects to the PCB.
If any one has any suggestions on how I can overcome this that would be great, I'm all out of ideas

After that hoohaa I got all the power cables hooked up. Cable management is going to be a nightmare in this case, especially with corsairs strange modular cables.
And lastly the rad went in........just

Again zero clearance to get it in. I had to turn in 90 degrees and put the bottom of the rad into the case first, then stand it upright and swivel it into position being very careful not to lift it at all as it would hit the underside of the GPU.
Once in place there is about 3mm of clearance between the top port blanking screw and the GPU.
So that's as far as I've got. Believe it or not just getting to this point had taken pretty much a whole day and I'd had enough by this point.
More to come soon....hopefully

(1)Front Mounted USB's, Could try taking some of the Black Cable/Soft plastic cover off to make it really flexible like the Audio CABLE, Be Very Careful not to cut the wires inside.
I thought about trying this but the 2 USB ports join into one cable so getting it round the GPU would still be tricky.
Ideally It wants two separate cables. I've tried searching for USB cables that I could mod but I'm not having much luck, can only find external cables.
Not keen on trying to move the ports any where else at this stage, too much work for what its worth.
Cheers for the suggestions Darren.
No way the pictured cable will work with out some serious modding. Just not worth the effort at the moment, maybe in the future.
About 4 years ago when I finished swapping the soft tube to acrylic on my last build I swore to myself I'd never do it again. In fact before I started this build I intended to go back to air...and sometime I wish I did!
Luckily I had a lot of spare tube left over from last time. I'm by no means a pro but I'm fairly handy when it comes to things but these tight curves where testing my patience.
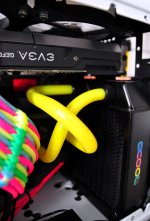
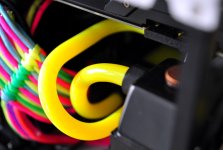
After many many failed attempts and a lot of wasted tube the first one was in. The pictures don't really show how tight the curves are and how little space there is to work in.
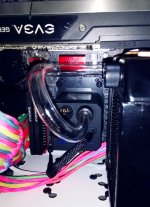
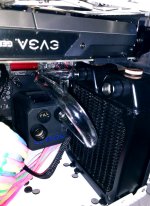
I thought the first tube was tough but the second was worse. I tried all sorts of different tube routing but nothing was going to be easier other than a lot of expensive fittings.
Another problem I was using push fit fittings which means you have to have perfectly straight ends to go into the fitting. With compression fittings you can get away with a very small amount of bend into the fitting.
The main problem with acrylic is once you've set one angle it's extremely hard not to effect it with heat if you have another angle close by.
Again after a lot of failed attempts and down to my last couple of tubes I tried something different, I heated the whole tube and did both bends at once.
Now i'd like to say it was skill but I'm sure it was just pure luck that it came out right and thank god it did as I was seconds away from ripping it out and going to air.
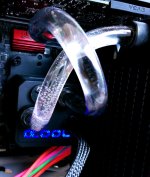
Filled the loop to check for leaks and thankfully it was okay.
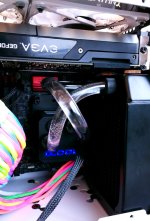
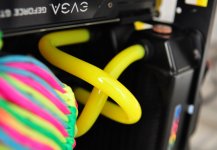
While it's not the best looking routing and not how I'd imagined it would look I'm glad it's done and pretty happy with the results.
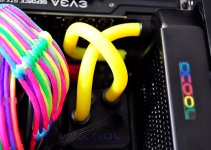
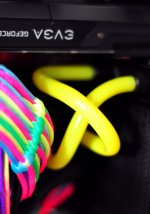
I quite like the way it crosses over like an X, a bit like the Alphacool logo.
Still I'm saying it now for all to hear....I'M NEVER DOING ACRYLIC TUBING AGAIN
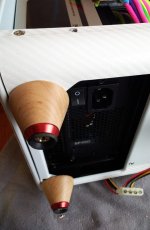
I also added some rubber feet to the feet, which did make a nice difference.
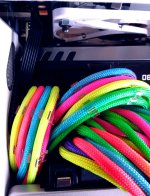
And the colourful mess that is the cabling.
No way the pictured cable will work with out some serious modding. Just not worth the effort at the moment, maybe in the future.
About 4 years ago when I finished swapping the soft tube to acrylic on my last build I swore to myself I'd never do it again. In fact before I started this build I intended to go back to air...and sometime I wish I did!
Luckily I had a lot of spare tube left over from last time. I'm by no means a pro but I'm fairly handy when it comes to things but these tight curves where testing my patience.
After many many failed attempts and a lot of wasted tube the first one was in. The pictures don't really show how tight the curves are and how little space there is to work in.


I thought the first tube was tough but the second was worse. I tried all sorts of different tube routing but nothing was going to be easier other than a lot of expensive fittings.
Another problem I was using push fit fittings which means you have to have perfectly straight ends to go into the fitting. With compression fittings you can get away with a very small amount of bend into the fitting.
The main problem with acrylic is once you've set one angle it's extremely hard not to effect it with heat if you have another angle close by.
Again after a lot of failed attempts and down to my last couple of tubes I tried something different, I heated the whole tube and did both bends at once.
Now i'd like to say it was skill but I'm sure it was just pure luck that it came out right and thank god it did as I was seconds away from ripping it out and going to air.

Filled the loop to check for leaks and thankfully it was okay.

While it's not the best looking routing and not how I'd imagined it would look I'm glad it's done and pretty happy with the results.
I quite like the way it crosses over like an X, a bit like the Alphacool logo.
Still I'm saying it now for all to hear....I'M NEVER DOING ACRYLIC TUBING AGAIN

I also added some rubber feet to the feet, which did make a nice difference.

And the colourful mess that is the cabling.

Last edited:
Can easily be 10 quid per fitting, it's a lot of extra cost I can't justify  though would have made things a lot easier!
I've now also added a fill/drain port to the back of the rad. This is why I spent so long cutting the back of the case to give me access to the rear ports. Not the most elegant solution but it works well.
One thing i like about the push fit fittings is I can rotate the tube 360 degrees which helps when draining the system.
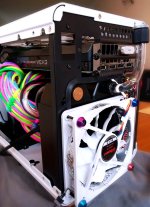
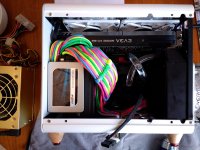
And how shes looking at the moment. Cable management is very difficult. I tried all sorts to route the 24/28 pin out of the way but its just too large.
Also because it splits 2 wires into 1 on a few of the pins it's a bit messy where it connects to the PSU.
 though would have made things a lot easier!
I've now also added a fill/drain port to the back of the rad. This is why I spent so long cutting the back of the case to give me access to the rear ports. Not the most elegant solution but it works well.
One thing i like about the push fit fittings is I can rotate the tube 360 degrees which helps when draining the system.

And how shes looking at the moment. Cable management is very difficult. I tried all sorts to route the 24/28 pin out of the way but its just too large.
Also because it splits 2 wires into 1 on a few of the pins it's a bit messy where it connects to the PSU.

Cheers Darren. Happy new year 
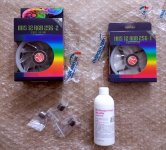
Big thanks to OCUK for the quick delivery of this lot. Wasn't expecting it to come next day with the free forum shipping considering I ordered it at 5PM the day before
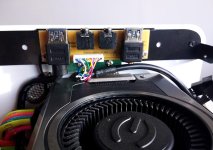
I also had another look at the USB cables and Thought I'd have a go at cutting the outer sleeving away to allow it to bend round the GPU.
I managed to cut the sleeving away with out cutting into the internal wiring but as soon as I tried to bend the cable around the GPU it snapped one of the internal wires. I though it might happen but it was worth a try. So I just cut it off.
At some point I may solder on a USB 2 port instead as less wires to route around the GPU.
Luckily the other USB cable I was able to bend around the GPU.
Next I fitted another fill/drain port at the rear and added the pastle coolant.
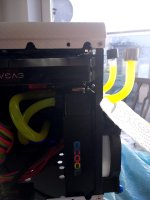
And it was all looking great until......
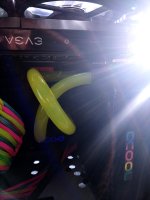
I noticed a small spot of coolant on one of the tubes.
I wiped it away as I thought it was just a small drip that had leaked onto the tube from the bottle but as i wiped it away again the drip came back.
I left the pump cycling for a few minutes and no more drips occurred, some thing weird is going on!
So I grabbed some isopropyl alcohol and rubbed it over the suspect area and not only did the drip come back but it was now a very visible hair line crack in the tube!
fluid was now rapidly dripping from it.
So I've powered down and drained the loop. Really glad I added the second port now and draining was fairly painless.
This is what happened when I removed the tube.
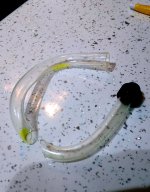
I'm guessing that when I swapped the rear fan that attaches to the rad for the new RGB fan it put some extra stress onto the tube.
Another thing is acrylic tube is very rigid and brittle and it has little to no "flex" Unlike PETG tubing that will "flex" a lot more once bent.
The alignment of the tube must have been a bit off putting stress onto the tube when I fitted it.
So now I'm left with only 2 spare tubes to get this bend redone and going on past experience it's not looking good.

Big thanks to OCUK for the quick delivery of this lot. Wasn't expecting it to come next day with the free forum shipping considering I ordered it at 5PM the day before


I also had another look at the USB cables and Thought I'd have a go at cutting the outer sleeving away to allow it to bend round the GPU.
I managed to cut the sleeving away with out cutting into the internal wiring but as soon as I tried to bend the cable around the GPU it snapped one of the internal wires. I though it might happen but it was worth a try. So I just cut it off.
At some point I may solder on a USB 2 port instead as less wires to route around the GPU.
Luckily the other USB cable I was able to bend around the GPU.

Next I fitted another fill/drain port at the rear and added the pastle coolant.

And it was all looking great until......

I noticed a small spot of coolant on one of the tubes.
I wiped it away as I thought it was just a small drip that had leaked onto the tube from the bottle but as i wiped it away again the drip came back.
I left the pump cycling for a few minutes and no more drips occurred, some thing weird is going on!
So I grabbed some isopropyl alcohol and rubbed it over the suspect area and not only did the drip come back but it was now a very visible hair line crack in the tube!
fluid was now rapidly dripping from it.
So I've powered down and drained the loop. Really glad I added the second port now and draining was fairly painless.
This is what happened when I removed the tube.

I'm guessing that when I swapped the rear fan that attaches to the rad for the new RGB fan it put some extra stress onto the tube.
Another thing is acrylic tube is very rigid and brittle and it has little to no "flex" Unlike PETG tubing that will "flex" a lot more once bent.
The alignment of the tube must have been a bit off putting stress onto the tube when I fitted it.
So now I'm left with only 2 spare tubes to get this bend redone and going on past experience it's not looking good.

Last edited:
Cheers for the help and suggestions guys.
I did consider going over to soft tubing but all my fittings are tied up in my current rig. Don't really want to mess around pull this one part if I can help it.
I could order some more fittings but If I do I might as well get some 90 bends for the acrylic. I do much prefer the look of acrylic over soft tube.
I'll have a go at bending a new bit first and go from there. I've kept all my reject pieces of tube as they can be cut and utilised if I do get hold of some 90 bends.
Believe me I've tried all sorts of different ways to route the tube and nothing else I tried worked. The trouble is the top right port on the CPU block is so close to the rad there is no way of getting a bend in, that's why I've had to come out and over the other tube.
I've also far surpassed my budget for this build it's getting out of hand

Cheers for the help. I think if I cant bend another tube this might be the way to go.
I've just had a look inside the case and the front rad port should work like you've shown.
Unfortunately the rear port on the rad is further back behind the port on the Eisbaer so wont work quite like you've shown.
This pictures shows it better.
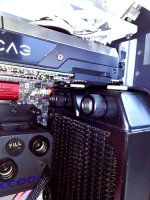
I could still do it like you've shown but I'd have to use soft tubing I think, Either that or daisy chain a few fittings together.
I'm Still hoping I'll be able to bend a new bit of tube just not had the time to do it yet.
I've just had a look inside the case and the front rad port should work like you've shown.
Unfortunately the rear port on the rad is further back behind the port on the Eisbaer so wont work quite like you've shown.
This pictures shows it better.

I could still do it like you've shown but I'd have to use soft tubing I think, Either that or daisy chain a few fittings together.
I'm Still hoping I'll be able to bend a new bit of tube just not had the time to do it yet.
That's either a job for soft tube or a 90 degree out of the Eisbaer, tube right angle over the top of the unit and into (possibly) a 45 degree fitting. Or 2 90 degree bends.
yeah that's what I thought, think it's going to be 2 or 3 fittings for that run alone.
So I had some spare time to have a go at finishing off the build.
First up was trying to bend a new piece of tubing. Thankfully I kept hold of the broken bit and used it as a guide to bend the new one.
I really took my time and thankfully it came out spot on first try! Having the broken one as a guide really helped and the new tube was even better than the first one.
I'm glad it worked out okay as I didn't want to use any fittings if I could help it. Though I am thinking of replacing the two fill/drain ports at the back with 90 elbows as I think it will look cleaner.
The RGB fans are all fitted and the cables as tidy as I can be bothered to do them at the moment. It's been so long I really just want to get this build finished.
I'm not overly happy with the 24pin cable. I might buy a new one at some point and redo it but it will do for the moment.
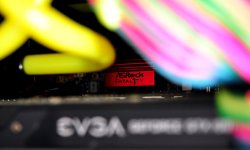
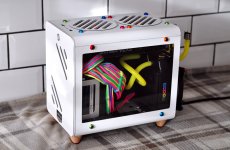
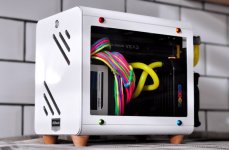
So here it is Finished for the moment up and running
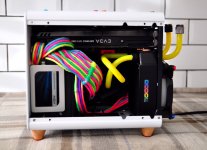
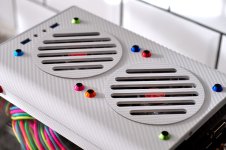
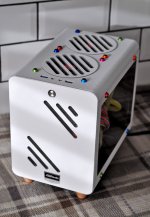
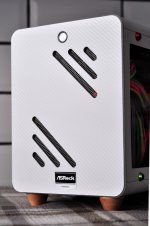
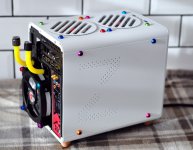
Also did a quick Video to show off the RGB.
First up was trying to bend a new piece of tubing. Thankfully I kept hold of the broken bit and used it as a guide to bend the new one.
I really took my time and thankfully it came out spot on first try! Having the broken one as a guide really helped and the new tube was even better than the first one.
I'm glad it worked out okay as I didn't want to use any fittings if I could help it. Though I am thinking of replacing the two fill/drain ports at the back with 90 elbows as I think it will look cleaner.
The RGB fans are all fitted and the cables as tidy as I can be bothered to do them at the moment. It's been so long I really just want to get this build finished.
I'm not overly happy with the 24pin cable. I might buy a new one at some point and redo it but it will do for the moment.
So here it is Finished for the moment up and running


Also did a quick Video to show off the RGB.
Last edited:
It's weird for the first few weeks it was silent.
I did notice a small bubble of air in the reservoir which I tried all sorts to get out but couldn't. After a few days the bubble disappeared so I figured it worked its way out but unfortunately now i'm getting some rattle.
Some days there's no noise at all. I can game for hours on end and its absolutely fine and other days it rattles.
I'm guessing that small air bubble gets stuck around the impeller and makes the rattling noise.
Hoping its not a faulty pump but only time will tell I guess. I will have another go at getting any air out of the system at some point.


